Idefics2-8B多模态大模型微调指南

我们生活在大模型 (LLM) 时代,几乎每周你都会听到一种新的语言模型问世。从谷歌的 Gemini 和 Gemma 模型到 Meta 最新的 Llama 3 和微软的微型 Phi-3 模型,这些行业巨头之间正在进行激烈的在线竞争,以争夺头把交椅。

在这一连串的活动中,最引人注目的是这些科技巨头愿意向开发者社区开放其中一些语言模型。

开放模型有什么好处?

向开发者社区开放模型带来了几个好处,包括开发人员可以针对特定用例微调这些模型来解决有趣的问题。

如果你现在是一个大模型 (LLM)粉丝,我相信你已经尝试微调至少一个开放模型来探索它们的能力。在讨论所有这些流行的模型时,很少能找到同时开放和多模式的模型。

NSDT工具推荐: Three.js AI纹理开发包 - YOLO合成数据生成器 - GLTF/GLB在线编辑 - 3D模型格式在线转换 - 可编程3D场景编辑器 - REVIT导出3D模型插件 - 3D模型语义搜索引擎 - Three.js虚拟轴心开发包 - 3D模型在线减面 - STL模型在线切割 

我最近探索到的其中一个隐藏宝藏是 Hugging Face 🤗 构建的 Idefics2-8B 视觉语言模型。它是开放的,支持多模态,接受图像和文本输入序列。Idefics2 模型可以回答有关图像的问题、描述视觉内容、从多幅图像创建故事等等。

我一直在寻找详细介绍在自定义数据集上微调视觉语言模型的步骤的文章和教程。虽然大多数文章都涵盖了微调过程(在已有的数据集上),但它们往往忽略了数据准备的关键步骤。

本博客将为你带来这一点:微调 Idefics2 模型的综合指南,你不仅可以学习如何微调视觉语言模型,还可以从头开始准备自己的自定义数据集。你可以在此 GitHub 存储库中找到完整的 Colab 笔记本和原始数据集。

但在开始之前,让我们快速了解视觉语言模型的高级架构,以及它们与标准 LLM 有何不同。

视觉语言模型是从图像和文本中学习的多模态模型,从图像和文本输入生成文本输出。它们在零样本能力、泛化以及图像识别、问答和文档理解等各种任务方面表现出色。
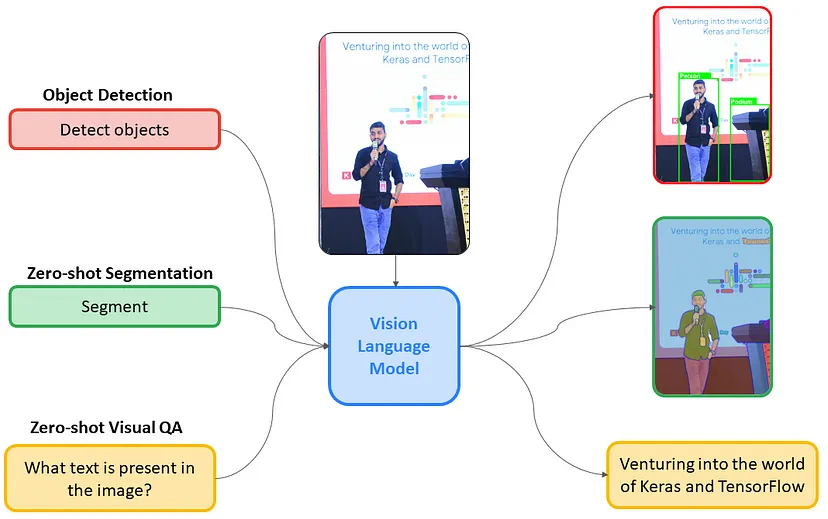
视觉语言模型

这些模型还可以捕获空间属性并输出特定主题的边界框或分割蒙版。在此处详细了解 VLM 及其架构。

现在你已经对 VLM 有了基本的了解,是时候展示一下了。让我们深入了解代码。

1、数据准备

与 LLM 不同,VLM 的数据集格式略有不同,因为除了标准文本数据外还引入了图像和视频。

今天,我们将在文档图像上微调 Idefics2 模型,以进行视觉问答。我们的训练数据来自 DocVQA 数据集的子采样版本,并进行了轻微修改以从头开始重新创建整个数据集。

克隆以下存储库:

!git clone https://github.com/NSTiwari/Fine-tune-IDEFICS-Vision-Language-Model

在存储库中,你将找到一个数据集文件夹,其中包含一个图像子文件夹。此子文件夹包含训练和测试图像集。确切地说,有 1000 张图像用于训练,200 张图像用于测试。

以下是数据的主要内容:

DocVQA 图像数据集样本示例

这些图像是各种文档(如新闻文章、电子邮件、发票、报告、广告等)的黑白扫描件。

除了图像之外,存储库中还有一个 qa_text.csv 文件,其中包含有关所有图像的详细信息。由于我们正在处理问答任务,因此 CSV 文件包含每个图像的问题或查询及其对应的答案。

DocVQA CSV数据集样本示例

现在我们已经将图像及其相关内容分别存储起来,让我们将它们合并以创建一个用于训练模型的格式化数据集。

安装以下库:

!pip install -q git+https://github.com/huggingface/transformers.gi 
!pip install -q accelerate datasets peft bitsandbytes
from datasets import Dataset, DatasetDict, Image
import pandas as pd
import os

# Define train and test size.
TRAIN_SAMPLES = 1000
TEST_SAMPLES = 200
TEST_SIZE = 0.166 #

# Define the directory containing the images.
train_images_directory = '/content/Fine-tune-IDEFICS-Vision-Language-Model/dataset/images/train/'
test_images_directory = '/content/Fine-tune-IDEFICS-Vision-Language-Model/dataset/images/test/'

# Read the CSV Q&A text.
qa_text = pd.read_csv('/content/Fine-tune-IDEFICS-Vision-Language-Model/dataset/qa_text.csv')

# Create a list of image paths.
train_image_paths = [os.path.join(train_images_directory, f'train_{i}.jpg') for i in range(TRAIN_SAMPLES)]
test_image_paths = [os.path.join(test_images_directory, f'test_{i}.jpg') for i in range(TEST_SAMPLES)]
image_paths = train_image_paths + test_image_paths

# Create a list of other columns such as id, query, and answer.
ids = ids = qa_text['id'].tolist()
queries = qa_text['query'].tolist()
answers = qa_text['answers'].tolist()

# Create the dataset dictionary.
dataset_dict = {
    'id': ids,
    'image': image_paths,
    'query': queries,
    'answers': answers
}

# Create the dataset.
dataset = Dataset.from_dict(dataset_dict)

# Cast the 'image' column to Image type.
dataset = dataset.cast_column("image", Image())

# Split the dataset into train and test.
split_dataset = dataset.train_test_split(test_size=TEST_SIZE, shuffle=False)

# Push the dataset on Hugging Face Hub.
split_dataset.push_to_hub("NSTiwari/DocumentIDEFICS_QA")

上述脚本将图像与文本查询和答案结合起来,创建了一个统一的数据集,随后将其上传到 Hugging Face 🤗。你可以通过此链接访问数据集。

Hugging Face 的 DocumentIDEFICS_QA 数据集

恭喜您创建了自定义数据集。这确实很简单,不是吗?如果你希望为其他用例创建数据集,只需按照与之前相同的步骤操作即可。

2、加载数据集

现在我们已经准备好数据集,让我们继续加载它。

from datasets import load_dataset

train_dataset = load_dataset("NSTiwari/DocumentIDEFICS_QA", split="train")
eval_dataset = load_dataset("NSTiwari/DocumentIDEFICS_QA", split="test")

检查训练数据:

print(train_dataset[0])
train_dataset[0]['image']

这是训练数据集中记录的显示方式。图像作为 JpegImageFile 嵌入到数据集中:

{
  'id': 'train_0',
  'image': <PIL.JpegImagePlugin.JpegImageFile image mode=L size=1695x2025>,
  'query': 'what is the date mentioned in this letter?',
  'answers': "['1/8/93']"
}

train_0.jpg

3、配置 LoRA 适配器

训练或微调语言模型本身就是一项艰巨的任务,除非你拥有高计算能力的 GPU,否则几乎不可能完成。

随着参数高效微调 (PEFT) 的引入,你无需再担心训练整个语言模型。

借助 LoRA 和 QLoRA 等技术,你可以通过显著减少可训练参数的数量来有效地微调这些大型模型。这不仅可以加速微调过程,还可以节省内存使用量。

import torch
from peft import LoraConfig
from transformers import AutoProcessor, BitsAndBytesConfig, Idefics2ForConditionalGeneration

DEVICE = "cuda:0"
USE_LORA = False
USE_QLORA = True

processor = AutoProcessor.from_pretrained(
    "HuggingFaceM4/idefics2-8b",
    do_image_splitting=False
)
if USE_QLORA or USE_LORA:
    lora_config = LoraConfig(
        r=8,
        lora_alpha=8,
        lora_dropout=0.1,
        target_modules='.*(text_model|modality_projection|perceiver_resampler).*(down_proj|gate_proj|up_proj|k_proj|q_proj|v_proj|o_proj).*$',
        use_dora=False if USE_QLORA else True,
        init_lora_weights="gaussian"
    )
    if USE_QLORA:
        bnb_config = BitsAndBytesConfig(
            load_in_4bit=True,
            bnb_4bit_quant_type="nf4",
            bnb_4bit_compute_dtype=torch.float16
        )
    model = Idefics2ForConditionalGeneration.from_pretrained(
        "HuggingFaceM4/idefics2-8b",
        torch_dtype=torch.float16,
        quantization_config=bnb_config if USE_QLORA else None,
    )
    model.add_adapter(lora_config)
    model.enable_adapters()
else:
    model = Idefics2ForConditionalGeneration.from_pretrained(
        "HuggingFaceM4/idefics2-8b",
        torch_dtype=torch.float16,
        _attn_implementation="flash_attention_2", # Need GPUs like A100 or H100.
    ).to(DEVICE)

上述代码块为 Idefics2–8b 模型配置了 LoRA 适配器。

QLoRA 是 Quantized LoRA 的缩写,是 LoRA 的增强版本。顾名思义,QLoRA 量化了权重参数的精度,将 32 位参数压缩为 4 位格式。

LLM 内存需求的大幅减少使得微调变得容易,在硬件资源有限的情况下尤其有用。

4、创建数据整理器

数据整理器是使用数据集元素列表作为输入来形成批处理的对象。这些元素与 train_dataset 或 eval_dataset 的元素类型相同。

import random

class MyDataCollator:
    def __init__(self, processor):
        self.processor = processor
        self.image_token_id = processor.tokenizer.additional_special_tokens_ids[
            processor.tokenizer.additional_special_tokens.index("<image>")
        ]

    def __call__(self, examples):
        texts = []
        images = []
        for example in examples:
            image = example["image"]
            question = example["query"]['en']
            answer = random.choice(example["answers"])
            messages = [
                {
                    "role": "user",
                    "content": [
                        {"type": "text", "text": "Answer briefly."},
                        {"type": "image"},
                        {"type": "text", "text": question}
                    ]
                },
                {
                    "role": "assistant",
                    "content": [
                        {"type": "text", "text": answer}
                    ]
                }
            ]
            text = processor.apply_chat_template(messages, add_generation_prompt=False)
            texts.append(text.strip())
            images.append([image])

        batch = processor(text=texts, images=images, return_tensors="pt", padding=True)

        labels = batch["input_ids"].clone()
        labels[labels == processor.tokenizer.pad_token_id] = self.image_token_id
        batch["labels"] = labels

        return batch

data_collator = MyDataCollator(processor)

5、设置训练参数

配置超参数来训练模型:

from transformers import TrainingArguments, Trainer

training_args = TrainingArguments(
    output_dir = "IDEFICS_DocVQA",
    learning_rate = 2e-4,
    fp16 = True,
    per_device_train_batch_size = 2,
    per_device_eval_batch_size = 2,
    gradient_accumulation_steps = 8,
    dataloader_pin_memory = False,
    save_total_limit = 3,
    evaluation_strategy ="steps",
    save_strategy = "steps",
    eval_steps = 10,
    save_steps = 25,
    max_steps = 25,
    logging_steps = 5,
    remove_unused_columns = False,
    push_to_hub=False,
    label_names = ["labels"],
    load_best_model_at_end = False,
    report_to = "none",
    optim = "paged_adamw_8bit",
)
trainer = Trainer(
    model = model,
    args = training_args,
    data_collator = data_collator,
    train_dataset = train_dataset,
    eval_dataset = eval_dataset
)

6、开始训练

现在可以启动训练了:

trainer.train()

我使用 Google Colab 上的 T4 GPU 花了大约一个小时对模型进行了 25 步微调。使用的训练步骤和示例越多,结果就越好。考虑到 T4 的局限性,这是我训练模型的最佳方法。

训练结果

7、评估模型

现在,是时候在测试示例上评估模型了。

test_example = eval_dataset[0]
test_example["image"]

test_0.jpg

model.eval()

image = test_example["image"]
query = test_example["query"]


messages = [
    {
        "role": "user",
        "content": [
            {"type": "text", "text": "Answer briefly."},
            {"type": "image"},
            {"type": "text", "text": query}
        ]
    }
]


text = processor.apply_chat_template(messages, add_generation_prompt=True)
inputs = processor(text=[text.strip()], images=[image], return_tensors="pt", padding=True)
generated_ids = model.generate(**inputs, max_new_tokens=64)
generated_texts = processor.batch_decode(generated_ids[:, inputs["input_ids"].size(1):], skip_special_tokens=True)
print(generated_texts)Question: What the location address of NSDA?
Answer: [‘1128 SIXTEENTH ST., N. W., WASHINGTON, D. C. 20036’, ‘1128 sixteenth st., N. W., washington, D. C. 20036’]

我要求微调后的模型看图回答如下问题:

What the location address of NSDA?

模型的回答如下:

[‘1128 SIXTEENTH ST., N. W., WASHINGTON, D. C. 20036’, ‘1128 sixteenth st., N. W., washington, D. C. 20036’]

这太棒了——该模型已经为测试图像中提出的问题提供了准确的答案。

8、将微调模型推送到 Hugging Face

如果你希望将来无需重新训练即可访问该模型,最好将其推送到 HF 上。

# Login to your HF account.
from huggingface_hub import notebook_login
notebook_login()

from huggingface_hub import whoami
from pathlib import Path

# Output directory.
output_dir = "IDEFICS_DocVQA"
repo_name = "IDEFICS2-DocVQA-fine-tuned"
username = whoami(token=Path("/root/.cache/huggingface/"))["name"]
repo_id = f"{username}/{repo_name}"
from huggingface_hub import upload_folder, create_repo

repo_id = create_repo(repo_id, exist_ok=True).repo_id

upload_folder(
    repo_id=repo_id,
    folder_path=output_dir,
    commit_message="Pushed the IDEFICS2 fine-tuned model.",
    ignore_patterns=["step_*", "epoch_*"],
)

就这些了。恭喜你成功在自定义数据集上微调了 Idefics2–8B 模型。我希望你学到了从头开始创建图像文本数据集和微调视觉语言模型的宝贵见解。


原文链接:Idefics2-8B微调简明教程 - BimAnt

  • 27
    点赞
  • 30
    收藏
    觉得还不错? 一键收藏
  • 0
    评论
评论
添加红包

请填写红包祝福语或标题

红包个数最小为10个

红包金额最低5元

当前余额3.43前往充值 >
需支付:10.00
成就一亿技术人!
领取后你会自动成为博主和红包主的粉丝 规则
hope_wisdom
发出的红包
实付
使用余额支付
点击重新获取
扫码支付
钱包余额 0

抵扣说明:

1.余额是钱包充值的虚拟货币,按照1:1的比例进行支付金额的抵扣。
2.余额无法直接购买下载,可以购买VIP、付费专栏及课程。

余额充值