


手动钢筋计数是一项耗时的任务,而且容易出错和不一致。但是,你可以使用计算机视觉自动进行钢筋计数。你可以使用经过微调的计算机视觉模型来计算单个钢筋,这对于构建库存管理和质量验证系统非常有用
在这篇博文中,我们将学习如何使用计算机视觉自动进行钢筋计数。我们将构建的钢筋计数系统使用摄像头捕捉钢筋排列的图像,并应用使用 Roboflow 构建和托管的计算机视觉模型来分析和解释视觉数据。
Roboflow Universe 上已经有一个可用于钢筋计数的公共模型,因此我们不必训练模型。相反,我们可以使用现有的模型。

NSDT工具推荐: Three.js AI纹理开发包 - YOLO合成数据生成器 - GLTF/GLB在线编辑 - 3D模型格式在线转换 - 可编程3D场景编辑器 - REVIT导出3D模型插件 - 3D模型语义搜索引擎 - Three.js虚拟轴心开发包 - 3D模型在线减面 - STL模型在线切割
1、钢筋计数 API
在我们的最终应用程序中,用户将实时获取钢筋图像,这些图像存储在服务器上。之后,我们可以调用钢筋计数模式来检测和计算每幅图像中的钢筋总数。下图显示了我们的应用程序的结构。
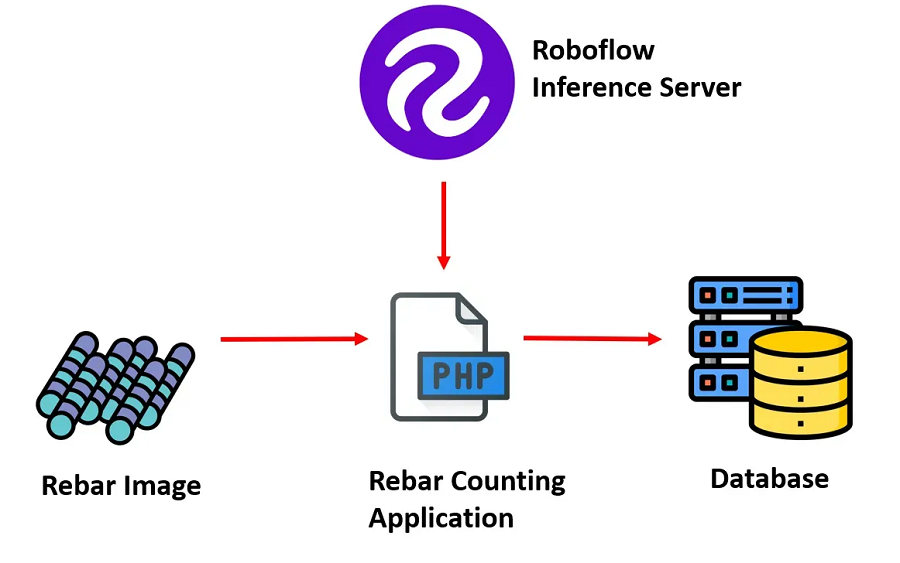
对于这个项目,我们将使用 Roboflow Universe 提供的钢筋计数 API 和 Roboflow 托管 API,用于基于 PHP 部署钢筋计数应用程序。
Roboflow Universe 的钢筋计数项目是在钢筋数据集上进行训练的。该项目的训练模型可通过托管推理 API 和其他部署方法获得预测。
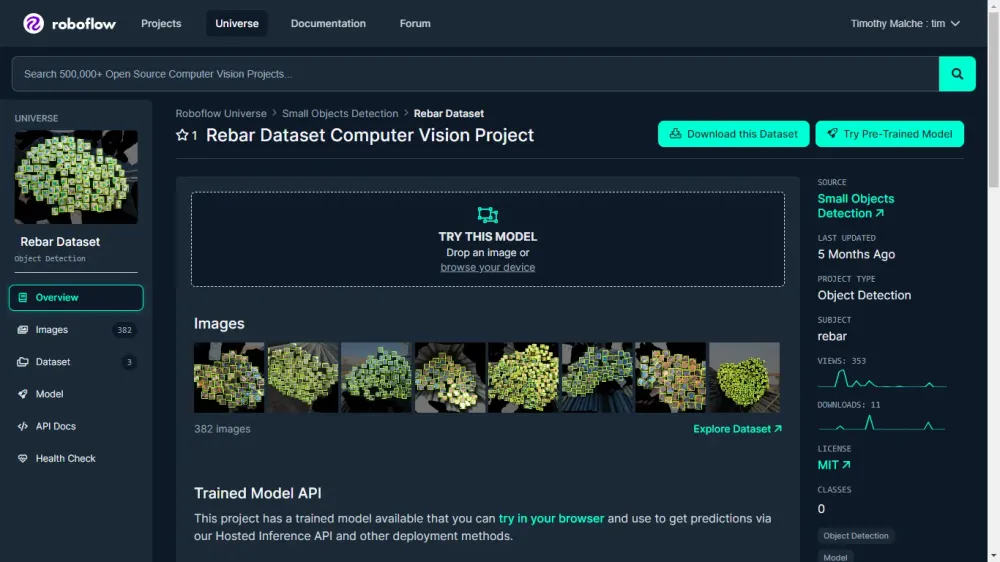
训练后的模型能够使用图像中的边界框准确检测钢筋,并可进一步利用这些钢筋来构建我们的应用程序。
2、构建应用程序
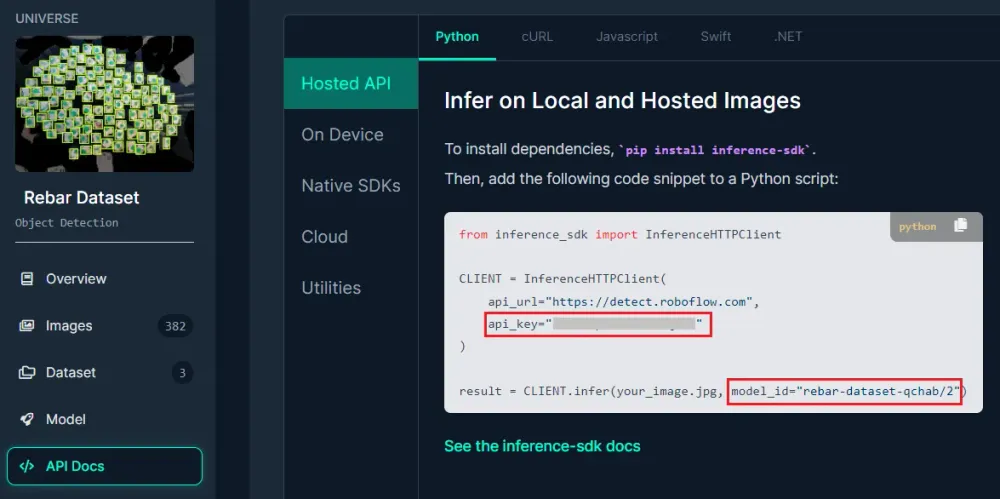
要构建应用程序,我们将在 PHP 应用程序中使用 Roboflow 托管 API。首先,我们需要获取所需的信息,例如模型 ID 和 API 密钥,这可以通过访问项目页面上的 API 文档链接来完成。
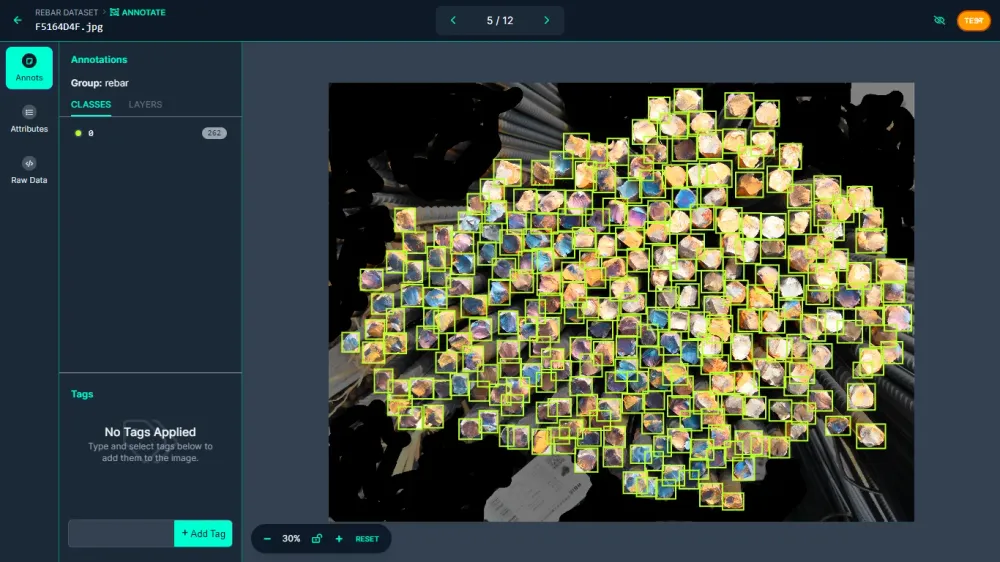
以下是测试模型的简单 PHP 代码。我们将使用下图来测试应用程序。
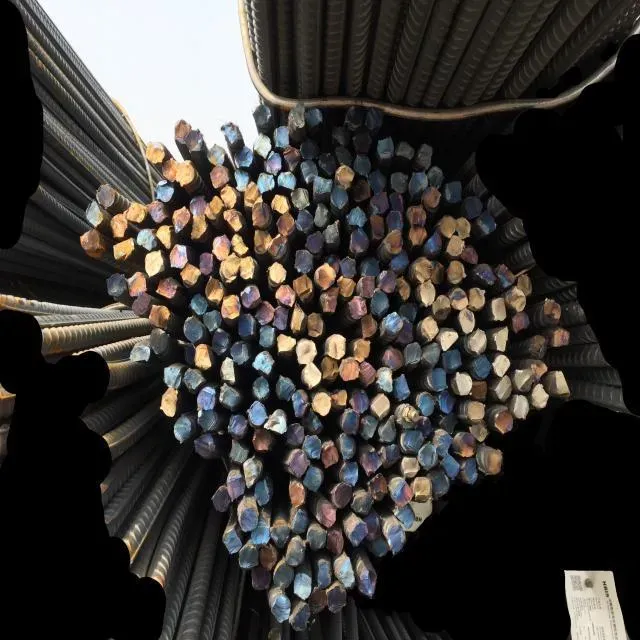
以下是我们可以用来测试模型的代码:
<?php

// Base 64 Encode Image
$data = base64_encode(file_get_contents("rebar.jpg"));

$api_key = "API_Key"; // Set API Key
$model_endpoint = "rebar-dataset-qchab/2"; // Set model endpoint (Found in Dataset URL)

// URL for Http Request
$url = "https://detect.roboflow.com/" . $model_endpoint
. "?api_key=" . $api_key
. "&name=rebar.jpg";

// Setup + Send Http request
$options = array(
  'http' => array (
    'header' => "Content-type: application/x-www-form-urlencoded\r\n",
    'method'  => 'POST',
    'content' => $data
  ));

$context  = stream_context_create($options);
$result = file_get_contents($url, false, $context);
echo $result;
?>
运行上述代码将生成以下输出:
{"time":0.05434697300006519,"image":{"width":640,"height":640},"predictions":[{"x":137.5,"y":284.0,"width":21.0,"height":28.0,"confidence":0.8618741035461426,"class":"0","class_id":0,"detection_id":"c146c502-0a99-41c8-b9c1-b62df14dc875"},{"x":248.0,"y":517.0,"width":22.0,"height":30.0,"confidence":0.8511471748352051,"class":"0","class_id":0,"detection_id":"838f948f-93a2-4551-a85e-db9942ad6b80"},{"x":182.5,"y":428.0,"width":21.0,"height":30.0,"confidence":0.8510258197784424,"class":"0","class_id":0,"detection_id":"c4dc9cf0-aec2-4f80-b9c7-ae4cb8fcb93d"},{"x":221.5,"y":498.5,"width":21.0,"height":29.0,"confidence":0.8491973876953125,"class":"0","class_id":0,"detection_id":"eb2fff69-dbf7-496b-b33d-8753bea8a4ae"},

...
结果以 JSON 格式返回,此信息将在我们的 PHP 代码中用于在检测到的钢筋实例上绘制边界框并计算钢筋总数。
3、构建用户界面
我们现在将构建以下界面,该界面将允许用户浏览和上传捕获的图像,然后运行预测以检测和计算图像中的钢筋。
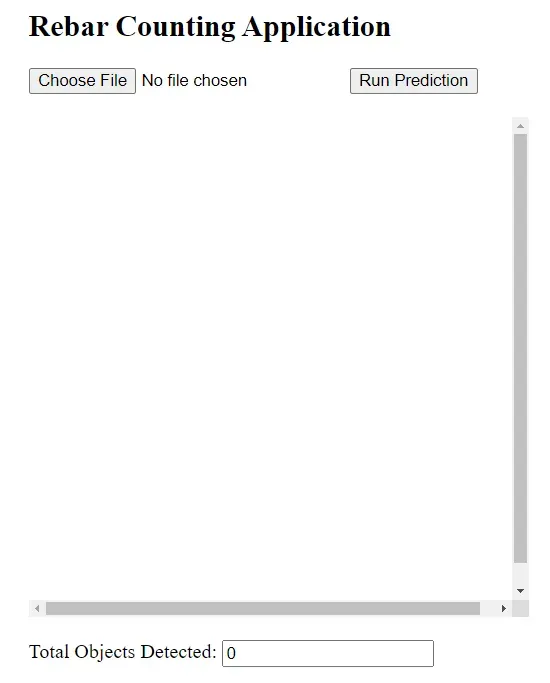
选择图像并单击“运行预测”按钮后,将显示结果输出。如下图所示,应用程序在每个检测到的对象上绘制一个边界框,并显示检测到的总对象数:

现在让我们了解构建应用程序的代码。代码分为以下几个部分:
- 表单提交检查
- 图像处理
- HTML 输出
- 显示结果
表单提交检查:首先,我们指定一个条件语句来检查表单是否已通过 POST 方法提交以及是否已上传图像文件:
if ($_SERVER["REQUEST_METHOD"] == "POST" && isset($_FILES["image"])) {

 // Image processing code

} else {

  // Default response if no image is uploaded
}
此条件确保仅当表单提交了图像文件时才会执行后续代码。
图像处理:在 if 块中,代码处理上传的图像。以下是处理图像的代码。
$image_data = file_get_contents($_FILES["image"]["tmp_name"]);
    $base64_image = base64_encode($image_data);

    $api_key = "API_KEY"; // Set API Key
    $model_endpoint = "rebar-dataset-qchab/2"; // Set model endpoint (Found in Dataset URL)

    // URL for Http Request
    $url = "https://detect.roboflow.com/" . $model_endpoint . "?api_key=" . $api_key;

    // Setup + Send Http request
    $options = array(
        'http' => array(
            'header' => "Content-type: application/x-www-form-urlencoded\r\n",
            'method' => 'POST',
            'content' => $base64_image
        )
    );

    $context = stream_context_create($options);
    $result = file_get_contents($url, false, $context);

    // Decode JSON response
    $response = json_decode($result, true);
首先,我们的代码读取上传的图像文件的内容并将其转换为 base64 编码的字符串。随后,代码设置访问机器学习模型端点的基本参数,包括 API 密钥和来自 Roboflow 的模型端点 URL。
我们的代码构建一个包含必要标头和内容的 HTTP 请求,封装 base64 编码的图像数据。然后使用 POST 方法将此请求分派到指定的模型端点。在收到来自模型端点的响应(通常包含有关图像中检测到的对象的信息)后,JSON 响应将解码为关联数组,以便在应用程序中进一步处理。
HTML 输出:HTML 标记用于显示用于上传图像的表单并在 HTML 画布中显示处理后的图像。
    <h2>Rebar Counting Application</h2>
    <form action="" method="post" enctype="multipart/form-data">
        <input type="file" name="image" accept="image/*">
        <button type="submit">Run Prediction</button>
        <br/><br/>
    </form>

    <div id="canvas-container">
        <canvas id="canvas"></canvas>
    </div>
    <br/>
    <div>
        <label for="object-count">Total Objects Detected:</label>
        <input type="text" id="object-count" readonly value="<?= count($response["predictions"]) ?>">
    </div>
此 HTML 标记包含一个表单,其中有一个用于上传图像的输入字段和一个提交按钮。它还包括一个画布元素,其中将显示带有边界框的处理后的图像。用户界面中的文本框显示检测到的对象的数量。此外,用于加载图像和绘制边界框的 JavaScript 代码包含在 HTML 中:
 <script>
        var canvas = document.getElementById("canvas");
        var ctx = canvas.getContext("2d");

        // Load image if available
        <?php if ($_SERVER["REQUEST_METHOD"] == "POST" && isset($_FILES["image"])): ?>
            var img = new Image();
            img.onload = function() {
                canvas.width = img.width;
                canvas.height = img.height;
                ctx.drawImage(img, 0, 0);

                // Draw bounding boxes
                var predictions = <?= json_encode($response["predictions"]) ?>;
                var color = "rgb(103, 251, 25)"; // Red color for bounding boxes
                predictions.forEach(function(prediction) {
                    var x1 = prediction.x - prediction.width / 2;
                    var y1 = prediction.y - prediction.height / 2;
                    var x2 = prediction.x + prediction.width / 2;
                    var y2 = prediction.y + prediction.height / 2;

                    // Draw bounding box
                    ctx.beginPath();
                    ctx.rect(x1, y1, x2 - x1, y2 - y1);
                    ctx.strokeStyle = color;
                    ctx.stroke();
                });

                // Update object count
                document.getElementById("object-count").value = predictions.length;
            };
            img.src = "data:image/jpeg;base64,<?= $base64_image ?>";
        <?php endif; ?>
    </script>
仅当表单随图片一起提交时,才会执行此 JavaScript 代码。它会将图片加载到画布上,并根据从模型端点收到的响应在检测到的对象周围绘制边界框。您可以参考本指南了解如何从推理 API JSON 输出中绘制边界框。
以下是此博客文章的完整代码。将此代码保存在 .php 文件中并在 Web 服务器环境中执行。
<?php

if ($_SERVER["REQUEST_METHOD"] == "POST" && isset($_FILES["image"])) {
    // Base 64 Encode Image
    $image_data = file_get_contents($_FILES["image"]["tmp_name"]);
    $base64_image = base64_encode($image_data);

    $api_key = "API_KEY"; // Set API Key
    $model_endpoint = "rebar-dataset-qchab/2"; // Set model endpoint (Found in Dataset URL)

    // URL for Http Request
    $url = "https://detect.roboflow.com/" . $model_endpoint . "?api_key=" . $api_key;

    // Setup + Send Http request
    $options = array(
        'http' => array(
            'header' => "Content-type: application/x-www-form-urlencoded\r\n",
            'method' => 'POST',
            'content' => $base64_image
        )
    );

    $context = stream_context_create($options);
    $result = file_get_contents($url, false, $context);

    // Decode JSON response
    $response = json_decode($result, true);
} else {
    $response = array("predictions" => []);
}

// Create canvas size
$canvas_width = 400; // Specify canvas width
$canvas_height = 400; // Specify canvas height

// Start HTML output
?>
<!DOCTYPE html>
<html>
<head>
    <title>Image with Bounding Boxes</title>
    <style>
        #canvas-container {
            width: <?= $canvas_width ?>px;
            height: <?= $canvas_height ?>px;
            overflow: auto;
        }
        #canvas {
            width: <?= $canvas_width ?>px;
            height: <?= $canvas_height ?>px;
        }
    </style>
</head>
<body style="padding-left: 50px;">
    <h2>Rebar Counting Application</h2>
    <form action="" method="post" enctype="multipart/form-data">
        <input type="file" name="image" accept="image/*">
        <button type="submit">Run Prediction</button>
        <br/><br/>
    </form>

    <div id="canvas-container">
        <canvas id="canvas"></canvas>
    </div>
    <br/>
    <div>
        <label for="object-count">Total Objects Detected:</label>
        <input type="text" id="object-count" readonly value="<?= count($response["predictions"]) ?>">
    </div>
    <script>
        var canvas = document.getElementById("canvas");
        var ctx = canvas.getContext("2d");

        // Load image if available
        <?php if ($_SERVER["REQUEST_METHOD"] == "POST" && isset($_FILES["image"])): ?>
            var img = new Image();
            img.onload = function() {
                canvas.width = img.width;
                canvas.height = img.height;
                ctx.drawImage(img, 0, 0);

                // Draw bounding boxes
                var predictions = <?= json_encode($response["predictions"]) ?>;
                var color = "rgb(103, 251, 25)"; // Red color for bounding boxes
                predictions.forEach(function(prediction) {
                    var x1 = prediction.x - prediction.width / 2;
                    var y1 = prediction.y - prediction.height / 2;
                    var x2 = prediction.x + prediction.width / 2;
                    var y2 = prediction.y + prediction.height / 2;

                    // Draw bounding box
                    ctx.beginPath();
                    ctx.rect(x1, y1, x2 - x1, y2 - y1);
                    ctx.strokeStyle = color;
                    ctx.stroke();
                });

                // Update object count
                document.getElementById("object-count").value = predictions.length;
            };
            img.src = "data:image/jpeg;base64,<?= $base64_image ?>";
        <?php endif; ?>
    </script>
</body>
</html>
4、结束语
这篇博文展示了如何使用 Roboflow 世界中的钢筋计数 API 构建钢筋检测和计数应用程序,该应用程序结合使用了 Roboflow 托管 API 和 PHP 代码。
该应用程序有效地识别和检测钢筋实例,并显示总计数。为了扩展其功能,可以通过集成数据库来增强应用程序,以永久存储钢筋批次的批号及其各自的计数。然后可以以各种方式利用这些存储的数据来增强应用程序的实用性和分析能力。
原文链接:钢筋计数AI应用 - BimAnt


 2512
2512

 被折叠的 条评论
为什么被折叠?
被折叠的 条评论
为什么被折叠?
 到【灌水乐园】发言


