


ue4 保管库
Nowadays, when building applications, we tend to store various application secrets like passwords, API keys, access keys, SSL certificates, and other confidential secrets in order to be able to communicate to various components of the applications.
如今,在构建应用程序时,我们倾向于存储各种应用程序秘密,例如密码,API密钥,访问密钥,SSL证书和其他机密秘密,以便能够与应用程序的各个组件进行通信。
Storing these types of data securely is a challenge, as we want our application to be able to access it any time while preventing others from getting a hold of it. We want our system to be as secured as possible, so we don’t want to store our secret keys and certificates in the system or configurations in a file or something similar like we used to.
安全地存储这些类型的数据是一个挑战,因为我们希望我们的应用程序能够随时访问它,同时又防止其他人获取它。 我们希望我们的系统尽可能地安全,因此我们不想将我们的秘密密钥和证书存储在系统中或将配置存储在文件或类似的文件中。
In my daily work, I get to work with payment and blockchain services. I have a bunch of .envfiles in my local environment, as well as on the prod environment holding various confidential API Keys and secret keys which could lead to chaos if ends up in the wrong hands.
在日常工作中,我开始使用支付和区块链服务。 在我的本地环境以及产品环境中,我有一堆.envfiles ,它们持有各种机密的API密钥和秘密密钥,如果使用不当,可能会导致混乱。
What we need now is true storage secured on a server that can be used to store and access application secrets anytime, anywhere. What we need is a vault.
我们现在需要的是在服务器上保护的真正存储,可用于随时随地存储和访问应用程序秘密。 我们需要的是金库。
A vault is a secure way to store your application secrets. A vault can be used to store any secret in a secure manner. The secrets may be SSL certificates and keys for your organization’s domain or credentials to connect to a corporate database server, for example.
保管库是一种存储应用程序机密的安全方法。 保管库可用于以安全方式存储任何机密。 例如,这些机密可以是组织域的SSL证书和密钥,或用于连接到公司数据库服务器的凭据。
Vaults could be any application hosted on a server aimed at securing your application secrets and could be self-hosted, or they could be served as a service. An example of a vault-as-a-service is AKEYLESS Vault.
保管库可以是托管在服务器上旨在保护您的应用程序机密的任何应用程序,也可以是自托管的,也可以作为服务使用。 AKEYLESS Vault是“服务即保险库”的一个示例。
In this review article, we’ll explore how to secure your application secrets with AKEYLESS Vault.
在这篇评论文章中,我们将探索如何使用AKEYLESS Vault保护您的应用程序秘密。
什么是AKEYLESS保险柜,以及如何设置它:查看 (What’s an AKEYLESS Vault, and How to Set it Up: Review)
AKEYLESS is a secrets management SaaS that offers a hassle-free vault to support the handling of application secrets, streamline DevOps workflows, and connect instantly to any cloud platform. It can be applied in various use cases and phases of software development.
AKEYLESS是机密管理SaaS,它提供了一个无忧的库,以支持处理应用程序机密,简化DevOps工作流程并立即连接到任何云平台。 它可以应用于软件开发的各种用例和阶段。
AKEYLESS vault can be used for:
AKEYLESS保险库可用于:
- Storing secret keys — could be dynamic or static 存储密钥-可以是动态的也可以是静态的
- Storing encryption keys — can be used to encrypt dynamic secrets 存储加密密钥-可用于加密动态机密
- Store SSH Cert Issuer 商店SSH证书颁发者
- PKI Cert Issuer PKI证书颁发者
The cool thing is you can create access roles and assign auth methods to define how you can access your secrets.
很棒的事情是您可以创建访问角色并分配auth方法来定义如何访问您的机密。
You can interface with the AKEYLESS vault through either a command-line application (CLI), Language SDK (Python, Go), Restful API, and Web UI. The simplest is, of course, the Web UI where you can easily store and retrieve secrets.
您可以通过命令行应用程序(CLI),语言SDK(Python,Go),Restful API和Web UI与AKEYLESS保管库对接。 当然,最简单的是Web UI,您可以在其中轻松存储和检索机密。
You’ll need an account to be able to work with the vault, so head over to the registration page and create an account. You will need the Access Key and AccessId keys given on registration to be able to log in to the web dashboard and connect with the CLI, so ensure that you keep that safe.
您需要一个帐户才能使用该库,因此请转到注册页面并创建一个帐户。 您将需要注册时提供的Access Key和AccessId键,才能登录到Web仪表板并与CLI连接,因此请确保保持安全。
Once you have the keys needed, you can decide how you want to interface with the vault. In this review article, I will be showing how to set up both CLI and Python SDK setup.
拥有所需的密钥后,您可以决定如何与Vault交互。 在这篇评论文章中,我将展示如何设置CLI和Python SDK设置。
设置CLI (Setting up CLI)
AKEYLESS CLI has support for major operating systems, which include Linux, Mac, and Windows.
AKEYLESS CLI支持主要操作系统,包括Linux,Mac和Windows。
If you are on Linux or Mac, you will need to run this command below:
如果您使用的是Linux或Mac,则需要在下面运行以下命令:
# Linux$ curl https://akeyless-cli.s3.us-east-2.amazonaws.com/cli/latest/production/cli-linux-amd64 -o akeyless# Mac$ curl https://akeyless-cli.s3.us-east-2.amazonaws.com/cli/latest/production/cli-darwin-amd64 -o akeylessThen, run:
然后,运行:
$ chmod +x akeyless
$ ./akeyless
On Windows, head over to this download link to install the executable file and follow the installation instructions.
在Windows上,请转至此下载链接以安装可执行文件并按照安装说明进行操作。
Once that’s done successfully, you can run the below commands in your terminal:
成功完成后,您可以在终端中运行以下命令:
C:/ akeyless configureThis should prompt for AccessId and AccessKey. Ensure you enter the right data:
这应该提示输入AccessId和AccessKey。 确保输入正确的数据:
$ akeyless configure
Access ID:  p-access_id
Access Key: p-access_key
Profile default successfully configured
And there we go! We have successfully set up our CLI. Next, let's look at Python setup.
然后我们去了! 我们已经成功设置了CLI。 接下来,让我们看一下Python的设置。
AKEYLESS Python安装 (AKEYLESS Python Setup)
Ensure you have Python installed and I would suggest you set up a virtual environment for this project. If you are using Python3, you should run python -m venv <env_name> to create a virtualenv.
确保已安装Python,建议您为该项目设置虚拟环境。 如果使用的是Python3,则应运行python -m venv <env_name>创建virtualenv。
AKEYLESS has an official Python SDK vault that can be installed:
AKEYLESS具有可安装的官方Python SDK库:
pip install akeyless-proxy-apiOnce that is installed, in order to be able to connect to our vault, let's take a look at the following:
安装完成后,为了能够连接到我们的保管库,让我们看一下以下内容:
import akeyless_proxy_api # import our installled module# Setup our configuration
api_conf = akeyless_proxy_api.Configuration()
api_conf.host = "rest.akeyless-security.com"# create an instance of the Proxy API class
api_client = akeyless_proxy_api.ApiClient(api_conf)
api_instance =  akeyless_proxy_api.DefaultApi(api_client)# Authenticating - We'll be using our API Key
access_id = 'access_id' # Access Id
access_type = 'api_key' # Access Type (api_key/okta_saml) (optional)
access_key = 'access_key' # Access key (relevant only for access-type=api_key) (optional)# Authenticate to the service and returns an access token
auth_response = api_instance.auth(access_id, access_type=access_type, access_key=access_key)token = auth_response.token # this token will be used to interface with our vault.
We have now successfully set up both our CLI and Python SDK to be able to use our AKEYLESS vault.
现在,我们已经成功设置了CLI和Python SDK,以便能够使用AKEYLESS保管库。
如何在AKEYLESS Vault上存储和访问机密 (How to Store and Access Secrets on AKEYLESS Vault)
Like I mentioned earlier, there are various methods you can use to store and access secrets on AKEYLESS vaults and we have been able to set up both the CLI and Python SDK.
就像我之前提到的,可以使用多种方法来存储和访问AKEYLESS保管库中的机密,并且我们已经能够设置CLI和Python SDK。
One thing I didn’t mention is how you can also manage your secrets using the web dashboard. So we can now manage our application secrets through the web dashboard, CLI, and Python SDK.
我没有提到的一件事是如何使用Web仪表板管理秘密。 因此,我们现在可以通过Web仪表板,CLI和Python SDK管理应用程序的机密。
Cool, right?
酷吧?
Let’s see how to just do that.
让我们看看如何做到这一点。
使用网络仪表板 (Using the web dashboard)
To use the web UI dashboard, you’d need to login to the dashboard. So head over to the login page here and enter your access ID and access key correctly. Once it's successful, it should take you to a dashboard below:
要使用Web UI仪表板,您需要登录到仪表板。 因此,请转到此处的登录页面,并正确输入访问ID和访问密钥。 成功完成后,应该带您到以下仪表盘:
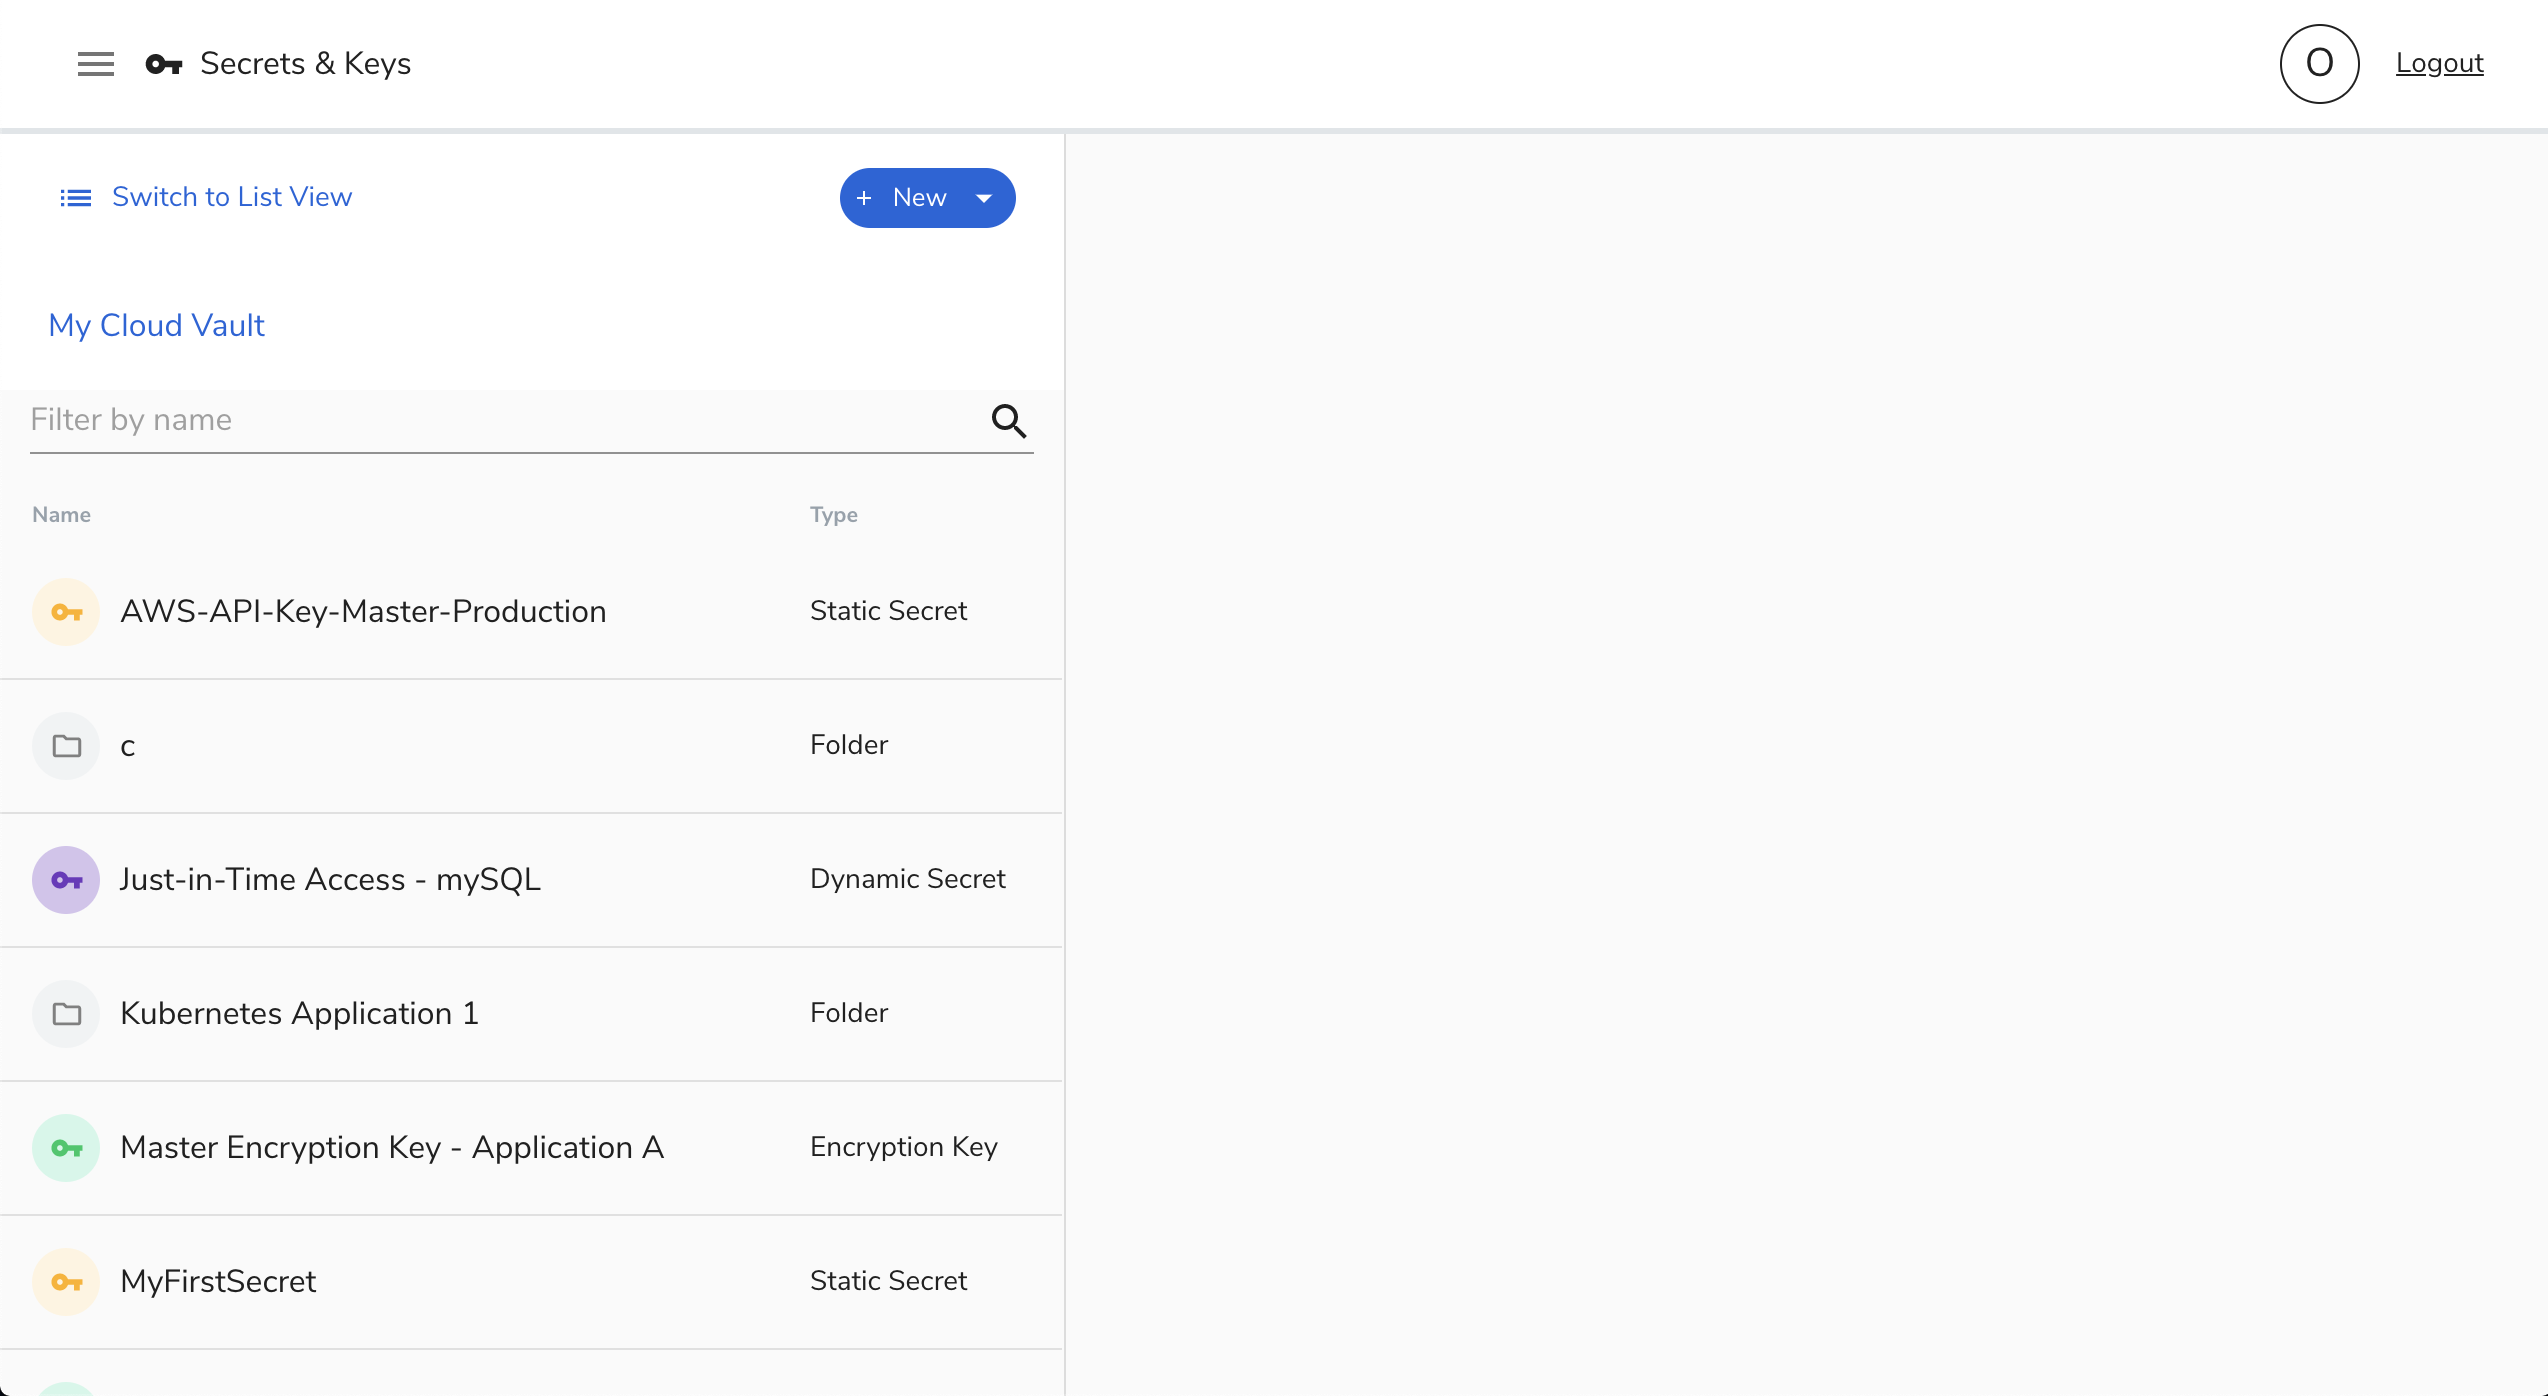
Right from this view, you can see a list of secrets — both their name and types. To create new secrets or keys, simply click on the + New button at the top.
从此视图中,您可以看到一个秘密列表-秘密的名称和类型。 要创建新的机密或密钥,只需单击顶部的+新建按钮。
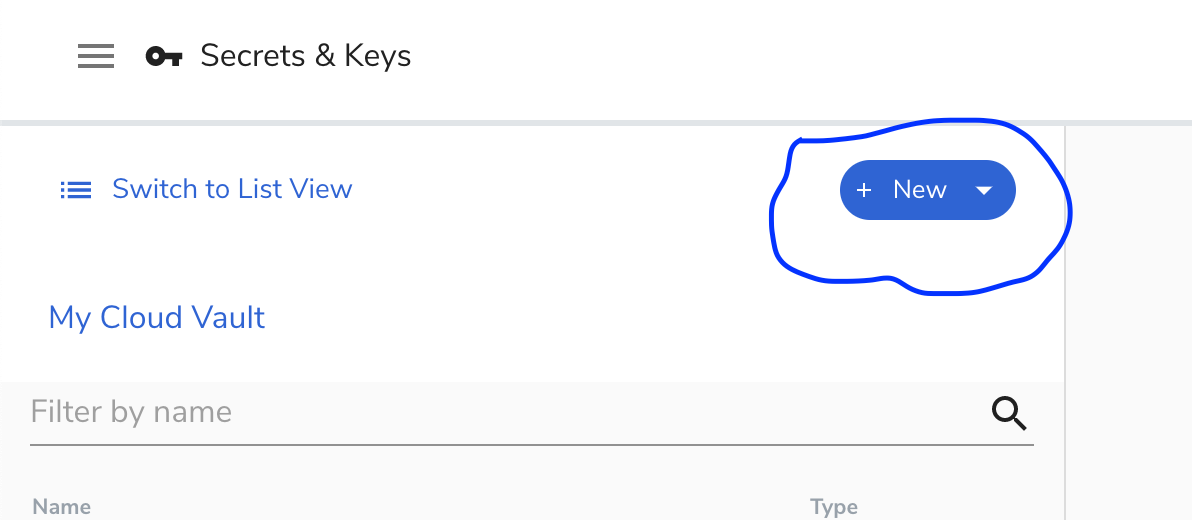
This should show a pop up with a list of types of secrets/keys available. You can click on the one you want to create.
这应该显示一个弹出窗口,其中列出了可用的秘密/密钥类型。 您可以单击要创建的那个。
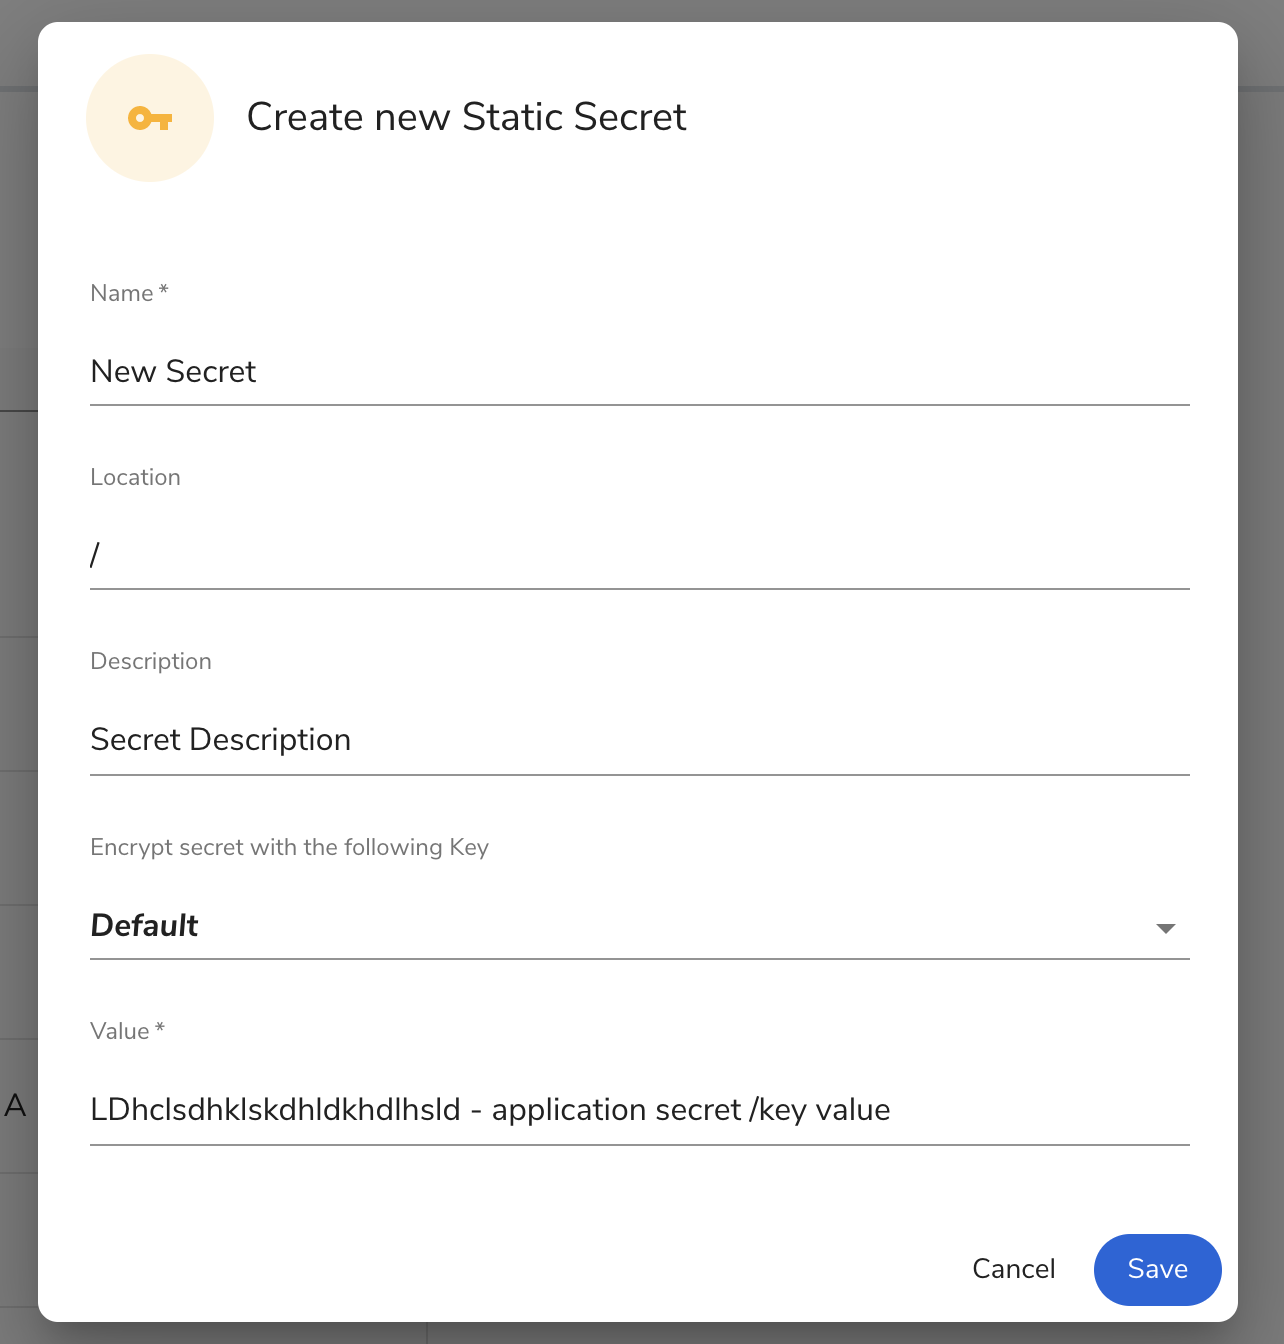
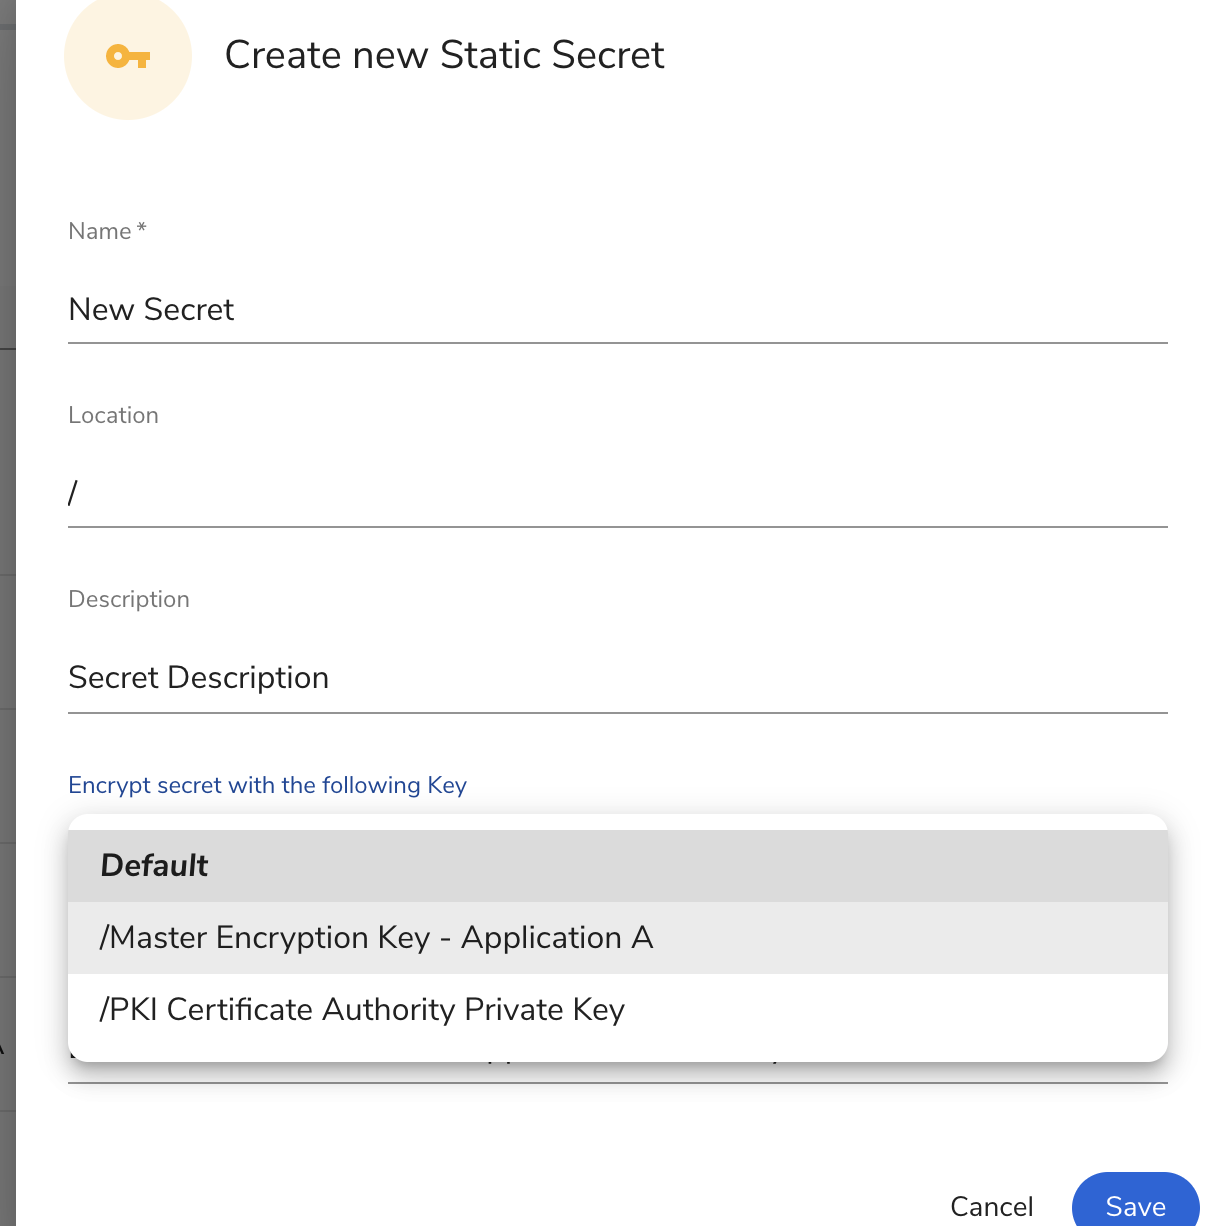
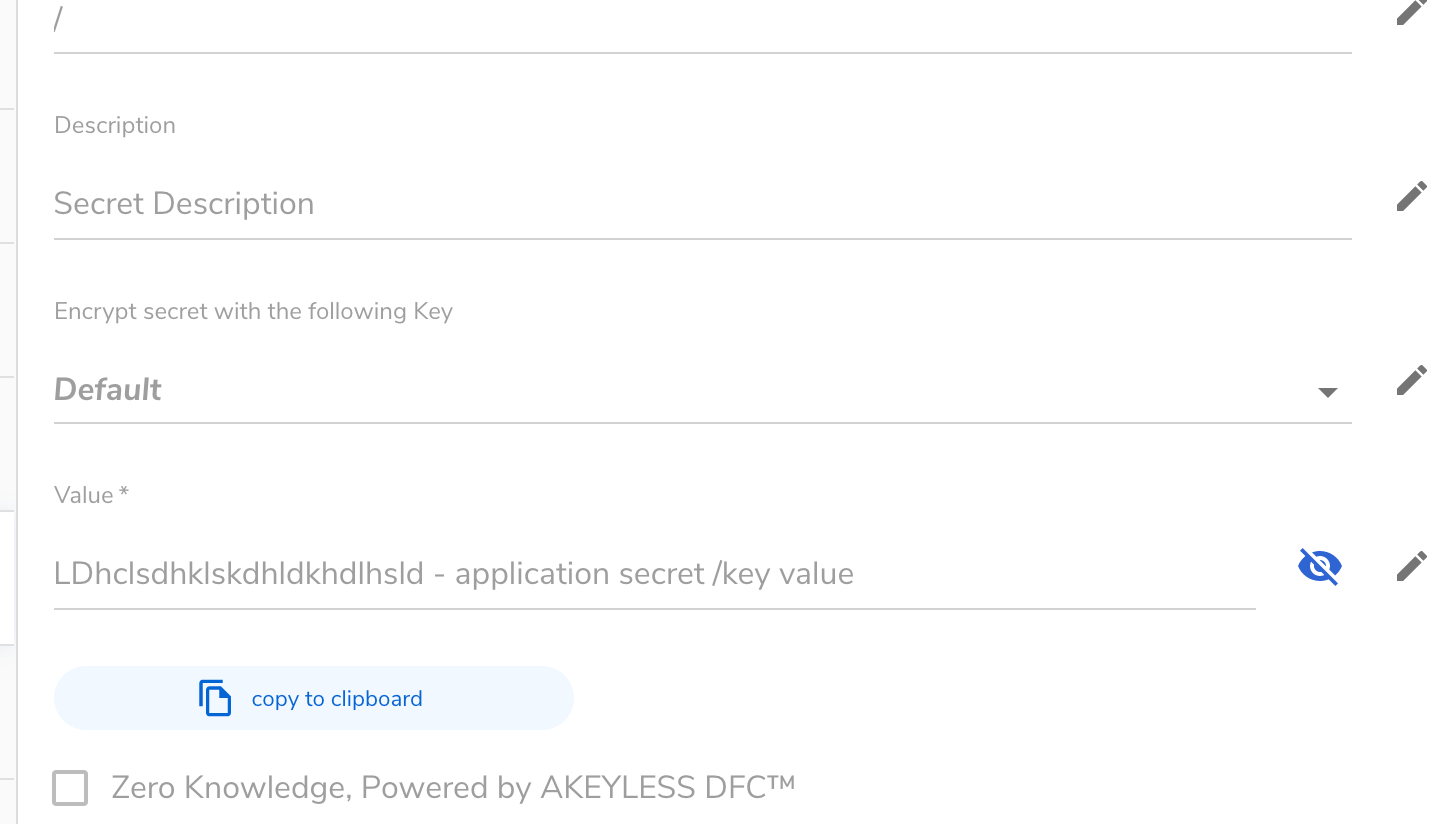
To create a new static secret, click on Static Secret, enter the name, description, the secret value, and the encryption key in case you would like to encrypt it with a custom key.
要创建新的静态机密,请单击“ 静态机密”,然后输入名称,描述,机密值和加密密钥,以防您想使用自定义密钥对其进行加密。
Then click on Save to create your new secrets.
然后单击“ 保存”以创建您的新机密。
After successfully creating your application secrets, to access your secrets through the web dashboard, you will need to head to the dashboard and click on the name of the secret/key to open the secret details.
成功创建应用程序机密后,要通过Web仪表板访问您的机密,您将需要前往仪表板并单击机密/密钥的名称以打开机密详细信息。
By default, your secret value is encrypted with the default encryption or the one provided by you. You can click on the Decrypt and copy to clipboard to decrypt the value and have it copied in your system clipboard.
默认情况下,将使用默认加密或您提供的一种加密方式来加密您的秘密值。 您可以单击解密并复制到剪贴板以解密该值并将其复制到系统剪贴板中。
That’s all for the web dashboard vault.
这就是Web仪表板库的全部内容。
使用库的CLI (Using the vault’s CLI)
Now let’s look at how to interface with the AKEYLESS vault using the CLI (command-line interface) application we installed earlier.
现在,让我们看一下如何使用我们先前安装的CLI(命令行界面)应用程序与AKEYLESS保管库对接。
It’s quite easy to use this, as the commands are easy to remember. To verify if our CLI is working, you can try running:
使用此命令非常容易,因为命令很容易记住。 要验证我们的CLI是否正常运行,可以尝试运行:
$ akeyless -h
akeyless <command> -h, --help
If you get the same message as above, then you are good to go or you can try reinstalling it again.
如果您收到与上述相同的消息,则可以继续进行操作,也可以尝试重新安装。
The first thing we want to do here is to create a secret key using the CLI create-secret command.
我们在这里要做的第一件事是使用CLI create-secret命令创建一个密钥。
To create a secret key, you will need to follow the below create-secret command syntax:
要创建密钥,您将需要遵循以下create-secret命令语法:
$ akeyless create-secret --name <SecretName> --value "<SecretValue>"Where:
哪里:
<SecretName>is the name of your secret.<SecretName>是您的秘密的名称。<SecretValue>is the secret key/value.<SecretValue>是密钥/值。
With this, we can create a new secret key:
这样,我们可以创建一个新的密钥:
$ akeyless create-secret --name AppSecret --value "wiutiJHQ&(Q*&)R*Q7r^Q#"Then, to get our secret, you will need to use the get-secret-value command structure, as below:
然后,要获取我们的秘密,您将需要使用get-secret-value命令结构,如下所示:
$ akeyless get-secret-value --name <SecretName>With that, we can run this command to get our secret value:
这样,我们可以运行以下命令来获取我们的秘密值:
$ akeyless get-secret-value --name AppSecretAnother cool thing is you can update your secret using the command below:
另一个很酷的事情是,您可以使用以下命令来更新您的秘密:
$ Other available commands are: create-dynamic-secret, get-dynamic-secret, create-ssh-cert-issuer, get-ssh-cert-issuer and so on. You can read more here.
其他可用命令包括: create-dynamic-secret , get-dynamic-secret , create-ssh-cert-issuer , get-ssh-cert-issuer等。 您可以在这里阅读更多内容。
使用Python SDK (Using the Python SDK)
So far, we have looked at how to interface with our vaults using the web dashboard and CLI. Now, we’ll be looking at how to do just that with the Python SDK.
到目前为止,我们已经研究了如何使用Web仪表板和CLI与保管库对接。 现在,我们将研究如何使用Python SDK做到这一点。
Ensure you have followed the Python SDK setup instructions mentioned earlier in order to continue.
确保您已遵循前面提到的Python SDK设置说明以继续。
We’ll be continuing from where we stopped in our Python SDK setup. Make sure you have this connection code below running:
我们将从在Python SDK设置中停止的地方继续。 确保您正在运行以下连接代码:
Like I explained earlier, for every request we will be sending through the Python module, we need to pass along the token as it serves as authentication to be able to access our vaults.
就像我之前解释的那样,对于将要通过Python模块发送的每个请求,我们都需要传递令牌,因为令牌用作身份验证,以便能够访问我们的保管库。
To create a new secret, we’ll be using the create_secret function. Let’s look at the code below:
要创建一个新的秘密,我们将使用create_secret函数。 让我们看下面的代码:
secret_name = '<secret_name>' # Secret name
secret_value = '<secret_value>' # secret value
secret_metadata = '<secret_metadata>' # Description about the secret (optional)
create_response =  api_instance.create_secret(secret_name, secret_value, token, metadata=secret_metadata)
Looking at the code above on line 4, we passed our token to the create_secret function to authenticate our requests. Running this will create a secret with the name provided assigned to the value given.
查看上面第4行的代码,我们将令牌传递给create_secret函数以验证我们的请求。 运行此命令将创建一个秘密,并将提供的名称分配给给定的值。
To access our secret, all we need to do is to pass the token and secret name to the get_secret_value function:
要访问我们的秘密,我们需要做的就是将令牌和秘密名称传递给get_secret_value函数:
secret_val_res = api_instance.get_secret_value(secret_name, token)print(secret_val_res) # secret valueThis should print out our application secrets key.
这应该打印出我们的应用程序密钥。

To update our secret key, we can simply write below:
要更新我们的密钥,我们可以简单地写如下:
new_secret_value = "this is a new secret"api_instance.update_secret_val(secret_name, new_secret_value, token)secret_val_res = api_instance.get_secret_value(secret_name, token)Below are other functions you can call to create different types of secret/keys:
您可以调用以下其他函数来创建不同类型的秘密/密钥:
dynamic_secret = api_instance.create_dynamic_secret(name, token, metadata=metadata, key=key) # creates a dynamic secret - can provide `key` for encryptionssh_cert = api_instance.create_ssh_cert_issuer() # create new ssh cert issuerpki_cert = api_instance.create_pki_cert_issuer() # create new ssh cert issuerYou can read more about the available functions here.
您可以在此处阅读有关可用功能的更多信息。
在您的应用程序中集成AKEYLESS Vault (Integrating AKEYLESS Vault in Your Application)
So far, we have explored how to set up our AKEYLESS vault and how to interface with it either through the Web Dashboard, CLI, or Python SDK.
到目前为止,我们已经探索了如何设置AKEYLESS保管库,以及如何通过Web Dashboard,CLI或Python SDK与它进行接口。
The next thing we’ll be looking at is integrating the vault in our application using the Python SDK. We are going to see how to integrate the AKEYLESS vault in a real-world application.
我们接下来要看的是使用Python SDK将Vault集成到我们的应用程序中。 我们将看到如何将AKEYLESS保管库集成到实际应用程序中。
For this tutorial, we are going to build a simple command-line application to create and manage orders. We’ll be using a Rest API called store-ordering-api hosted on Heroku to manage orders; PyInquirer, a command-line interface; and Click, a command-line framework to build command-line applications for taking orders.
对于本教程,我们将构建一个简单的命令行应用程序来创建和管理订单。 我们将使用Heroku上托管的Rest API(称为store-ordering-api来管理订单。 PyInquirer,一个命令行界面; 单击,这是一个命令行框架,用于构建用于接受订单的命令行应用程序。
To get started, you will need to set up your environment (virtual environment) and installed the required modules. You can run the command below in your terminal to get started:
首先,您需要设置环境(虚拟环境)并安装所需的模块。 您可以在终端中运行以下命令以开始使用:
$ python3 -m venv food-ordering-env && source food-ordering-env/bin/activate
$ pip install PyInquirer click requests akeyless-proxy-api
$ mkdir food-ordering && cd food-ordering
$ touch main.py auth.py api.py cli.py
The above should set up everything you need to get started with the application. Open the folder in your preferred code editor or IDE. If you are using VSCode like me, you can easily run code . in the project directory to open the current directory in vs code.
上面应该设置了开始使用该应用程序所需的一切。 在首选的代码编辑器或IDE中打开文件夹。 如果像我一样使用VSCode,则可以轻松运行code。 在项目目录中以vs代码打开当前目录。
Before we proceed, let’s have a basic understanding of the structure of the application.
在继续之前,让我们对应用程序的结构有一个基本的了解。
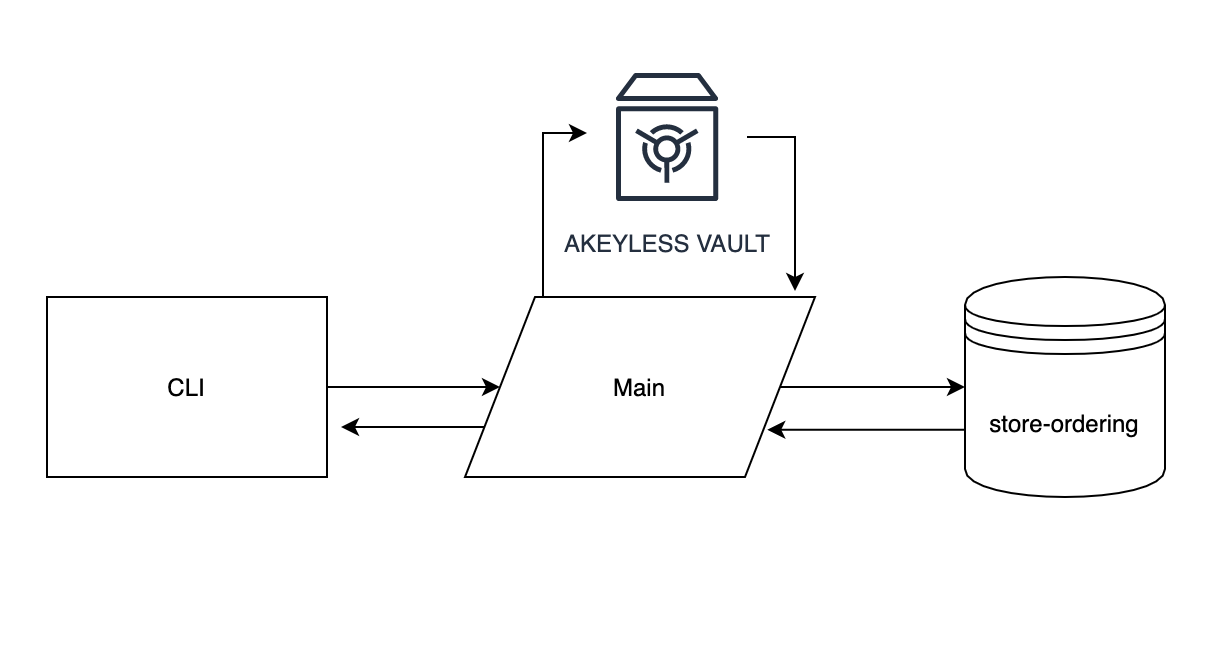
The CLI will serve as the interface to take the user’s orders; the main will be responsible for processing the user's request, getting the API Keys from the vault, sending the key along to the store ordering API, and getting back a response.
CLI将用作接受用户订单的界面。 主服务器将负责处理用户的请求,从库中获取API密钥,将密钥发送到商店订购API并获取响应。
To use the store-ordering-api, you will need to request an API key that will be used for authentication and also to be able to access your saved orders. You can read more on the docs here. Ensure you keep your token safe and secured when you get it from the API.
要使用store-ordering-api ,您需要请求一个API密钥,该密钥将用于身份验证并且还能够访问您保存的订单。 您可以在此处阅读有关文档的更多信息 。 从API获取令牌时,请确保令牌安全。
From the docs, you can see a list of endpoints for request token, creating orders, getting the list of orders, getting a particular order, and so on.
从文档中,您可以看到请求令牌,创建订单,获取订单列表,获取特定订单等的端点列表。
With this endpoints, we have been able to set up basic API integration below:
有了这个端点,我们已经能够在下面设置基本的API集成:
In the above code, we:
在上面的代码中,我们:
Added two functions:
get_jsonandpost_jsonto simply send, get, and post a request添加了两个功能:
get_json和post_json以简单地发送,获取和发布请求Added
store-ordering-apiendpoint functions:添加了
store-ordering-api端点函数:request_api_key: To request for an API keyrequest_api_key:请求API密钥create_orders: To create orders. You will need to pass in the order data and API key in the Authorization Header in Basic <token_key> format.create_orders:创建订单。 您需要以基本<token_key>格式以授权标头传递订单数据和API密钥。get_orders: To get a list of orders. You will need to pass in the api_key/token.get_orders:获取订单列表。 您将需要传递api_key / token。get_order: To get a particular order.get_order:获取特定的订单。
The second thing we’ll be looking at here is the auth.py, which is responsible for getting the API key we’ll be using from our vaults.
我们将在这里查看的第二件事是auth.py ,它负责从保管库获取我们将要使用的API密钥。
In the above code, we:
在上面的代码中,我们:
- Initialized our vault setup and authentication. 初始化我们的保管库设置和身份验证。
Added two functions:
get_tokento get the vault token authentication, thenget_apito get or create the API key/token (in case the API is not there) we got from the food-ordering-api app.添加了两个功能:
get_token获取保险库令牌认证,然后get_api获取或创建我们从food-ordering-api应用获取的API密钥/令牌(如果API不存在)。
The next thing is to create a simple implementation of both the API and auth in the main.py:
下一步是在main.py中创建API和auth的简单实现:
# main.pyfrom api import get_order, get_orders, create_orders
from auth import get_apiapi_key = get_api()new_order_body =  {
"name":"Sandine (Milo)",
"customer_email":"oyetoketoby80@gmail.com",
"customer_name":"Oyetoke Toby",
"quantity":5,
"customer_address": "Aboru, Lagos"
}new_order = create_orders(new_order_body, api_key)
order = get_order(new_order.get("data")["_id"], api_key)
print(new_order, order)
In the above code,
在上面的代码中,
- We imported our API and auth functions 我们导入了API和auth函数
- Request for the store-ordering-api key 要求提供store-ordering-api密钥
- Added order data 添加了订单数据
- Sent the order data along with the api_key 发送订单数据和api_key
- Get the order with the _id from the new order response 从新订单响应中获取带有_id的订单
This can be run like below:
可以如下运行:
$ python main.py
$ python main.py

The next thing is to set up our cli.py and as well as update our main.py with the click command-line interface.
下一步是设置我们的cli.py,并使用click命令行界面更新main.py。
Here’s the basic structure of our command line and its commands:
这是命令行及其命令的基本结构:
We have created three commands:
我们创建了三个命令:
order: Command to create an order.order:创建订单的命令。get: Command to get a particular order.get:获取特定命令的命令。orders: Command to list out orders.orders:列出命令的命令。
Now, earlier on I mentioned the PyInquirer module, which will be used to collect order details.
现在,在前面我提到了PyInquirer模块,该模块将用于收集订单详细信息。
Here’s our PyInquirer setup to take user orders:
这是我们接受用户订单的PyInquirer设置:
We added two validation methods for validating empty records and also validating valid emails.
我们添加了两种验证方法,用于验证空记录以及验证有效电子邮件。
You can easily run this, like below:
您可以轻松地运行它,如下所示:
$ python cli.py
The next thing to do here is to simply connect this to our main.py. We can update the file:
接下来要做的就是将它简单地连接到我们的main.py。 我们可以更新文件:
We have updated our:
我们已经更新了:
Order command to use
create_ordersfunction from our api.py.Order命令以使用来自api.py的
create_orders函数。Get command to use the
get_ordercommand to get a particular order with its ID.Get命令以使用
get_order命令获取具有其ID的特定订单。Orders command to use the
get_orderscommand to get a list of available orders.Orders命令使用
get_orders命令获取可用订单的列表。
To test this, let's test our first command — order:
为了测试这一点,让我们测试第一个命令-命令:
$ python main.py order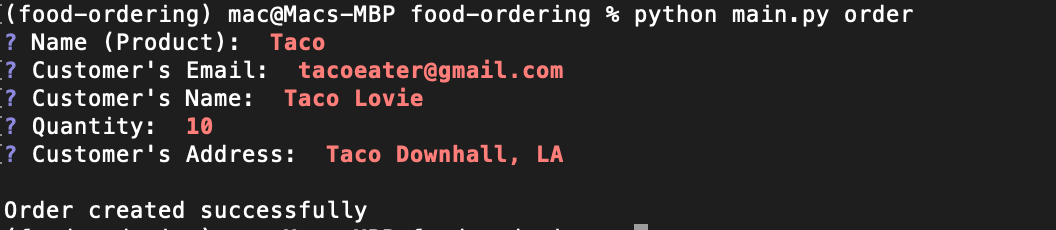
To get a list of orders, all you need is :
要获取订单清单,您需要做的是:
$ python main.py orders
To get our Taco order, we can simply extract our id which is in the square bracket ([]) and pass it to the get command:
要获取Taco订单,我们只需提取方括号([])中的id并将其传递给get命令:
python main.py get 5f08519fd4449c0004f7fefcTada! Our command-line application is ready for the world.
多田 我们的命令行应用程序已准备就绪,可以向世界展示。
结论 (Conclusion)
So far, we have explored the importance of secrets vault-like AKEYLESS, how to use and interface with AKEYLESS vaults, and how to implement it in a real-world application. I think this worth it as your application secret is secured from anyone planning to use it wrongly.
到目前为止,我们已经探索了像AKEYLESS之类的秘密金库的重要性,如何在AKEYLESS金库中使用和接口以及如何在实际应用中实现它。 我认为这是值得的,因为您的应用程序秘密可以防止任何计划错误使用它的人。
In the application we created, we didn't have access to the Rest API key, as it's passed directly to AKEYLESS vault upon request for it, and we have been using it to make requests effortlessly without caring about the safety of the API key or the stress of having junky .env files or environment variables.
在我们创建的应用程序中,我们无权访问Rest API密钥,因为它会根据请求直接传递给AKEYLESS保管库,并且我们一直在使用它轻松地发出请求,而无需担心API密钥或具有垃圾.env文件或环境变量的压力。
ue4 保管库


 1042
1042


 被折叠的 条评论
为什么被折叠?
被折叠的 条评论
为什么被折叠?
 到【灌水乐园】发言


