


微软graph开发视频
This article is a step-by-step instruction on how to configure a bot to work with Microsoft Teams and authenticate it to make Microsoft Graph requests.
本文是有关如何配置漫游器以使其与Microsoft Teams一起使用并进行身份验证以发出Microsoft Graph请求的分步说明。
Before we start, check that you have completed the steps required to configure your bot to work with Microsoft Teams. Here is a link:
在开始之前,请检查您是否已完成配置机器人与Microsoft Teams所需的步骤。 这里是一个链接:
In the following sections we are going to work with:
在以下各节中,我们将使用:
- Microsoft Azure 微软Azure
- Web App Bot Web App Bot
- .NET Core solution .NET Core解决方案
- Microsoft Teams 微软团队
Azure活动目录 (Azure Active Directory)
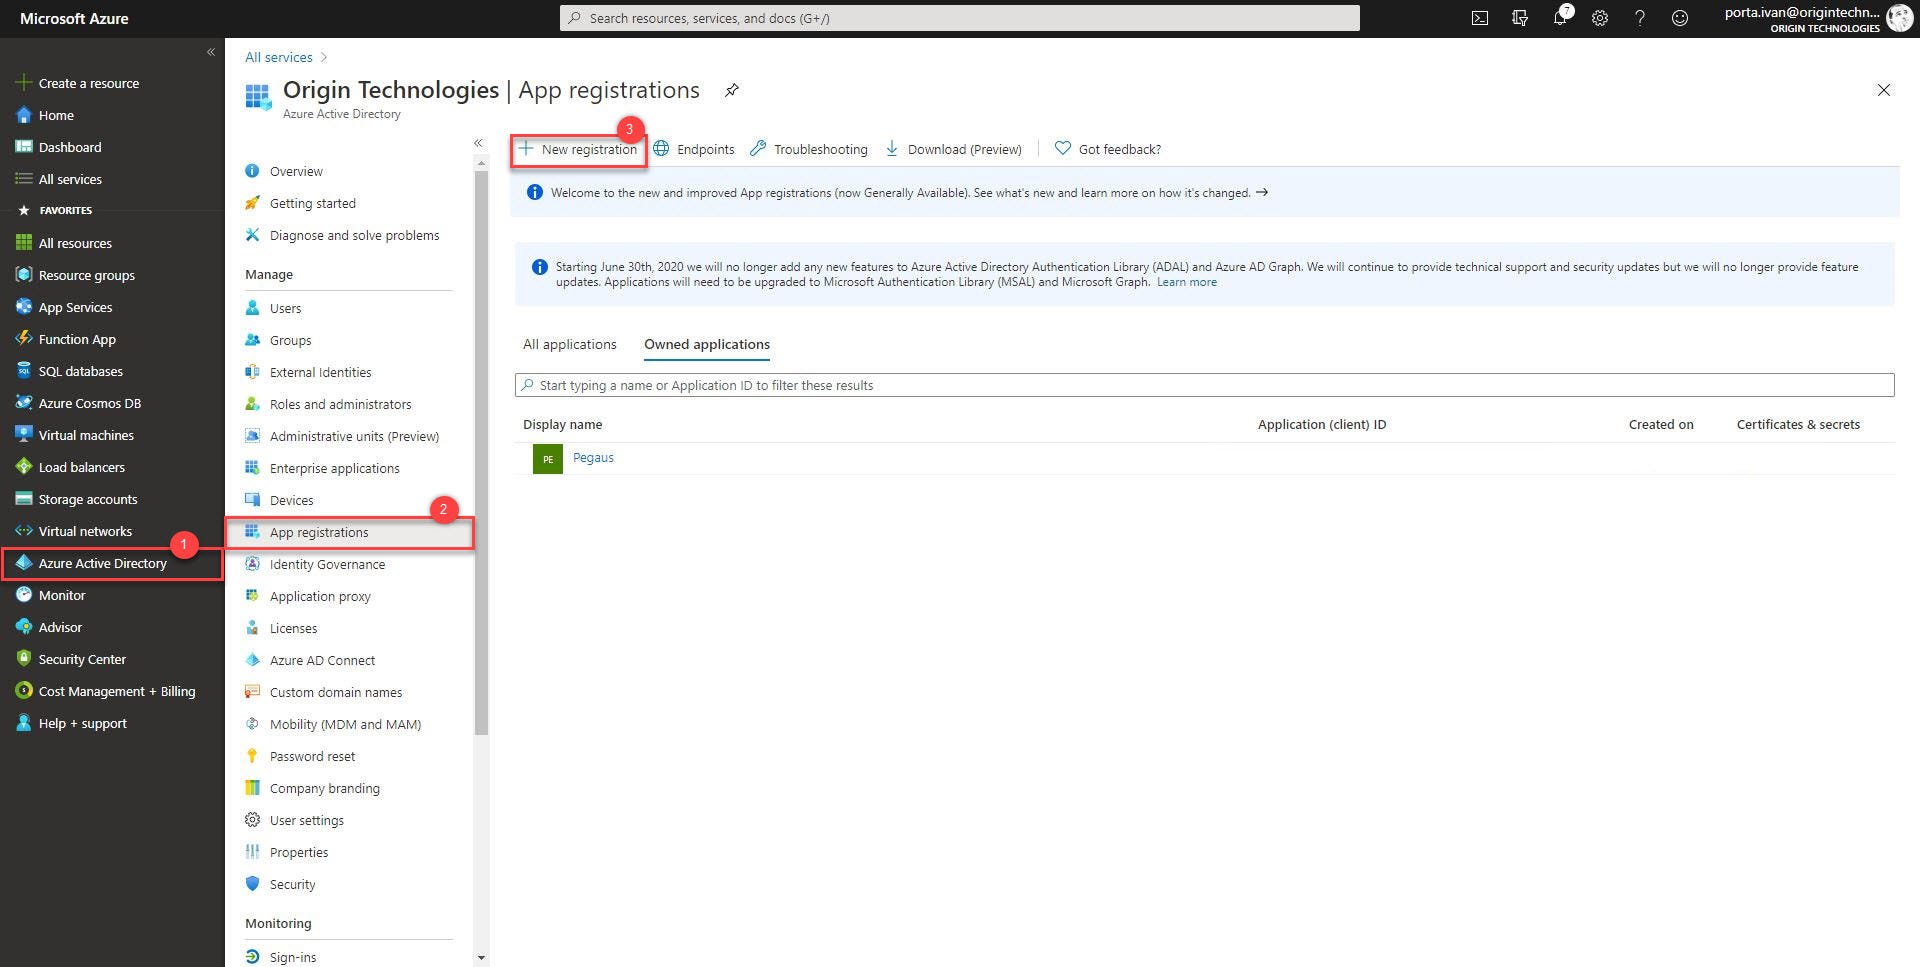
Navigate to the Azure portal, and after logging in with your user, open the Azure Active Directory panel. Click App registration in the left panel then click New registration in the upper left.
导航到Azure门户,然后用您的用户登录后,打开“ Azure Active Directory”面板。 点击左侧面板中的应用注册 ,然后点击左上方的新注册 。
In the app registration page add the following configurations:
在应用程序注册页面中,添加以下配置:
Name: Enter the name of the bot application you are registering.
名称 :输入您正在注册的机器人应用程序的名称。
Supported account types: Select Accounts in any organizational directory and personal Microsoft accounts.
支持的帐户类型: 在任何组织目录和个人Microsoft帐户中选择帐户 。
Redirect URI: Select Web and set the URL to https://token.botframework.com/.auth/web/redirect
重定向URI :选择Web并将URL设置为https://token.botframework.com/.auth/web/redirect
To complete the registration, click Register. Once the registration is completed, Azure will display an overview page for the app registration.
要完成注册,请点击注册 。 注册完成后,Azure将显示应用程序注册的概述页。

Copy the Application (client) ID and save it to a file (we will need it later). In the left panel, select Certificate & secrets, then click New client secret.
复制应用程序(客户端)ID并将其保存到文件中(稍后我们将需要它)。 在左侧面板中,选择证书和机密 ,然后点击新建客户端机密 。

In the creation page add the following configurations:
在创建页面中,添加以下配置:
Description: Text used to identify this secret from others.
描述 :用于从其他人识别此秘密的文本。
Expires: Client secret expiration.
到期 :客户机密到期。
Click Add, copy your new client secret and save it to a file. To conclude, in the navigation pane, select API permissions and then click Add a permission. For the purpose of this demo, select Microsoft APIs, then Microsoft Graph and add the following permissions:
单击添加 ,复制新的客户机密并将其保存到文件中。 最后,在导航窗格中,选择API权限 ,然后单击添加权限 。 就本演示而言,选择Microsoft APIs ,然后选择Microsoft Graph并添加以下权限:
- openid Openid
- profile 个人资料
- Mail.Read 邮件阅读
- User.Read 用户读
- User.ReadBasic.All User.ReadBasic.All
Click Add permissions.
点击添加权限 。
Web App Bot (Web App Bot)
Navigate to your web app bot’s resource page on the Azure portal and click the option Settings from the navigation panel. Under the section OAuth Connection Settings, click Add Setting and insert the following configurations:
在Azure门户上导航到Web应用程序bot的资源页面,然后从导航面板中单击选项“设置” 。 在OAuth连接设置部分下,点击添加设置并插入以下配置:
Name: Enter a name for your connection.
名称 :输入连接的名称。
Service Provider: Select Azure Active Directory.
服务提供商 :选择“ Azure Active Directory” 。
Client id: Enter the Application (client) ID that you saved during the registration of your application.
客户ID :输入您在注册应用程序时保存的应用程序(客户)ID 。
Client secret: Enter the secret that you previously created to grant the bot access to the Azure Active Directory app.
客户端密钥 :输入您先前创建的用于授予漫游器对Azure Active Directory应用程序访问权限的密钥。
Grant Type: Enter authorization code.
授予类型 :输入授权码。
Login URL: Enter https://login.microsoftonline.com.
登录URL :输入https://login.microsoftonline.com。
Tenant ID: Enter the Directory (tenant) ID that your recorded earlier for your Azure AD app.
租户ID :输入您先前为Azure AD应用记录的目录(租户)ID 。
Resource URL: Enter https://graph.microsoft.com/.
资源URL :输入https://graph.microsoft.com/。
Scopes: Leave it blank.
范围 :将其留空。

Click Save to complete the configuration.
单击保存以完成配置。
.NET Core Web应用程序 (.NET Core Web Application)
Starting from the code that we wrote in the previous tutorial, change the PegasusBot as following:
从我们在上一教程中编写的代码开始,更改PegasusBot ,如下所示:
using System.Threading;
using System.Threading.Tasks;
using Microsoft.Bot.Builder;
using Microsoft.Bot.Builder.Dialogs;
using Microsoft.Bot.Builder.Teams;
using Microsoft.Bot.Schema;
using Microsoft.Extensions.Logging;namespace Pegasus.Bots
{
    public class PegasusBot<T> : TeamsActivityHandler where T : Dialog
    {
        protected readonly BotState ConversationState;
        protected readonly Dialog Dialog;
        protected readonly ILogger Logger;
        protected readonly BotState UserState;public PegasusBot(ConversationState conversationState, UserState userState, T dialog, ILogger<PegasusBot<T>> logger)
        {
            ConversationState = conversationState;
            UserState = userState;
            Dialog = dialog;
            Logger = logger;
        }
        public override async Task OnTurnAsync(ITurnContext turnContext, CancellationToken cancellationToken = default(CancellationToken))
        {
            await base.OnTurnAsync(turnContext, cancellationToken);
            await ConversationState.SaveChangesAsync(turnContext, false, cancellationToken);
            await UserState.SaveChangesAsync(turnContext, false, cancellationToken);
        }
        protected override async Task OnMessageActivityAsync(ITurnContext<IMessageActivity> turnContext, CancellationToken cancellationToken)
        {
            await Dialog.RunAsync(turnContext, ConversationState.CreateProperty<DialogState>(nameof(DialogState)), cancellationToken);
        }
    }
}
Then add a new bot called AuthBot. This Bot handles the reception of a token/response and because we are using an OAuthPrompt and forward the Activity to the current Dialog.
然后添加一个名为AuthBot的新机器人。 该漫游器处理令牌/响应的接收,并且因为我们正在使用OAuthPrompt并将“活动”转发到当前对话框。
using System.Collections.Generic;
using System.Threading;
using System.Threading.Tasks;
using Microsoft.Bot.Builder;
using Microsoft.Bot.Builder.Dialogs;
using Microsoft.Bot.Schema;
using Microsoft.Extensions.Logging;namespace Pegasus.Bots
{
    public class AuthBot<T> : PegasusBot<T> where T : Dialog
    {
        public AuthBot(ConversationState conversationState, UserState userState, T dialog, ILogger<PegasusBot<T>> logger)
            : base(conversationState, userState, dialog, logger)
        {
        }
        protected override async Task OnTokenResponseEventAsync(ITurnContext<IEventActivity> turnContext, CancellationToken cancellationToken)
        {
            await Dialog.RunAsync(turnContext, ConversationState.CreateProperty<DialogState>(nameof(DialogState)), cancellationToken);
        }
        protected override async Task OnTeamsSigninVerifyStateAsync(ITurnContext<IInvokeActivity> turnContext, CancellationToken cancellationToken)
        {
            await Dialog.RunAsync(turnContext, ConversationState.CreateProperty<DialogState>(nameof(DialogState)), cancellationToken);
        }
    }
}
Create a new folder called Dialogs and add the following class:
创建一个名为Dialogs的新文件夹,并添加以下类:
using System;
using System.Threading;
using System.Threading.Tasks;
using Microsoft.Bot.Builder;
using Microsoft.Bot.Builder.Dialogs;
using Microsoft.Bot.Schema;
using Microsoft.Extensions.Configuration;
using Microsoft.Extensions.Logging;
using Microsoft.Graph;namespace Pegasus.Dialogs
{
    public class MainDialog : ComponentDialog
    {
        protected readonly ILogger _logger;
        protected string ConnectionName { get; private set; }
        public MainDialog(IConfiguration configuration, ILogger<MainDialog> logger)
            : base(nameof(MainDialog))
        {
            _logger = logger;
            AddDialog(new OAuthPrompt(
                nameof(OAuthPrompt),
                new OAuthPromptSettings
                {
                    ConnectionName = configuration["ConnectionName"],
                    Text = "Please login",
                    Title = "Login",
                    Timeout = 120000,
                }));
            AddDialog(new TextPrompt(nameof(TextPrompt)));
            AddDialog(new WaterfallDialog(nameof(WaterfallDialog), new WaterfallStep[]
            {
                PromptStepAsync,
                LoginStepAsync,
                CommandStepAsync,
                ProcessStepAsync
            }));
            InitialDialogId = nameof(WaterfallDialog);
        }
        protected override async Task<DialogTurnResult> OnBeginDialogAsync(DialogContext innerDc, object options, CancellationToken cancellationToken)
        {
            var result = await InterruptAsync(innerDc, cancellationToken);
            if (result != null)
            {
                return result;
            }
            return await base.OnBeginDialogAsync(innerDc, options, cancellationToken);
        }
        protected override async Task<DialogTurnResult> OnContinueDialogAsync(DialogContext innerDc, CancellationToken cancellationToken)
        {
            var result = await InterruptAsync(innerDc, cancellationToken);
            if (result != null)
            {
                return result;
            }
            return await base.OnContinueDialogAsync(innerDc, cancellationToken);
        }
        private async Task<DialogTurnResult> InterruptAsync(DialogContext innerDc, CancellationToken cancellationToken)
        {
            if (innerDc.Context.Activity.Type == ActivityTypes.Message)
            {
                var text = innerDc.Context.Activity.Text.ToLowerInvariant();
                if (text == "logout")
                {
                    var botAdapter = (BotFrameworkAdapter)innerDc.Context.Adapter;
                    await botAdapter.SignOutUserAsync(innerDc.Context, ConnectionName, null, cancellationToken);
                    await innerDc.Context.SendActivityAsync(MessageFactory.Text("You have been signed out."), cancellationToken);
                    return await innerDc.CancelAllDialogsAsync();
                }
            }
            return null;
        }
        private async Task<DialogTurnResult> PromptStepAsync(WaterfallStepContext stepContext, CancellationToken cancellationToken)
        {
            return await stepContext.BeginDialogAsync(nameof(OAuthPrompt), null, cancellationToken);
        }
        private async Task<DialogTurnResult> LoginStepAsync(WaterfallStepContext stepContext, CancellationToken cancellationToken)
        {
            var tokenResponse = (TokenResponse)stepContext.Result;
            if (tokenResponse != null)
            {
                await stepContext.Context.SendActivityAsync(MessageFactory.Text("You are now logged in."), cancellationToken);
                return await stepContext.PromptAsync(nameof(TextPrompt), new PromptOptions { Prompt = MessageFactory.Text("Would you like to do? (type 'me', or 'email')") }, cancellationToken);
            }
            await stepContext.Context.SendActivityAsync(MessageFactory.Text("Login was not successful please try again."), cancellationToken);
            return await stepContext.EndDialogAsync();
        }
        private async Task<DialogTurnResult> CommandStepAsync(WaterfallStepContext stepContext, CancellationToken cancellationToken)
        {
            stepContext.Values["command"] = stepContext.Result;
            return await stepContext.BeginDialogAsync(nameof(OAuthPrompt), null, cancellationToken);
        }
        private async Task<DialogTurnResult> ProcessStepAsync(WaterfallStepContext stepContext, CancellationToken cancellationToken)
        {
            if (stepContext.Result != null)
            {
                var tokenResponse = stepContext.Result as TokenResponse;
                if (tokenResponse?.Token != null)
                {
                    var command = ((string)stepContext.Values["command"] ?? string.Empty).ToLowerInvariant();
                    if (command == "me")
                    {
                        await ListMeAsync(stepContext.Context, tokenResponse);
                    }
                    else if (command.StartsWith("email"))
                    {
                        await ListEmailAddressAsync(stepContext.Context, tokenResponse);
                    }
                    else
                    {
                        await stepContext.Context.SendActivityAsync(MessageFactory.Text($"Your token is: {tokenResponse.Token}"), cancellationToken);
                    }
                }
            }
            else
            {
                await stepContext.Context.SendActivityAsync(MessageFactory.Text("We couldn't log you in. Please try again later."), cancellationToken);
            }            return await stepContext.EndDialogAsync(cancellationToken: cancellationToken);
        }
        private static async Task<User> GetUserAsync(ITurnContext turnContext, TokenResponse tokenResponse)
        {
            if (turnContext == null)
            {
                throw new ArgumentNullException(nameof(turnContext));
            }
            if (tokenResponse == null)
            {
                throw new ArgumentNullException(nameof(tokenResponse));
            }
            var client = new GraphClient(tokenResponse.Token);
            return await client.GetMeAsync();
        }
        public static async Task ListMeAsync(ITurnContext turnContext, TokenResponse tokenResponse)
        {
            var user = await GetUserAsync(turnContext, tokenResponse);
            await turnContext.SendActivityAsync($"You are {user.DisplayName}.");
        }
        public static async Task ListEmailAddressAsync(ITurnContext turnContext, TokenResponse tokenResponse)
        {
            var user = await GetUserAsync(turnContext, tokenResponse);
            await turnContext.SendActivityAsync($"Your email: {user.Mail}.");
        }
    }
}
Now, create a client to manage the calls to Microsoft Graph.
现在,创建一个客户端来管理对Microsoft Graph的调用。
using System;
using System.Net.Http.Headers;
using System.Threading.Tasks;
using Microsoft.Graph;namespace Pegasus
{
    public class GraphClient
    {
        private readonly string _token;
        public GraphClient(string token)
        {
            if (string.IsNullOrWhiteSpace(token))
            {
                throw new ArgumentNullException(nameof(token));
            }
            _token = token;
        }
        public async Task<User> GetMeAsync()
        {
            var graphClient = GetAuthenticatedClient();
            var me = await graphClient.Me.Request().GetAsync();
            return me;
        }
        private GraphServiceClient GetAuthenticatedClient()
        {
            var graphClient = new GraphServiceClient(
                new DelegateAuthenticationProvider(
                    requestMessage =>
                    {
                        requestMessage.Headers.Authorization = new AuthenticationHeaderValue("bearer", _token);
                        requestMessage.Headers.Add("Prefer", "outlook.timezone=\"" + TimeZoneInfo.Local.Id + "\"");
                        return Task.CompletedTask;
                    }));
            return graphClient;
        }
    }
}
Now let’s update the startup file by adding:
现在,通过添加以下内容来更新启动文件:
As the state should be stored somewhere, we need to add a storage layer to the bot. In this case, we’ll be using in-memory storage by
storageservices.AddSingleton<IStorage, MemoryStorage>();由于状态应该存储在某个地方,因此我们需要向机器人添加一个存储层。 在这种情况下,我们将通过
storageservices.AddSingleton<IStorage, MemoryStorage>();使用内存存储storageservices.AddSingleton<IStorage, MemoryStorage>();The user state which will be used in this bot’s Dialog implementation
services.AddSingleton<UserState>();该机器人的Dialog实现
services.AddSingleton<UserState>();中将使用的用户状态services.AddSingleton<UserState>();The conversation state which will be used by the Dialog system itself
services.AddSingleton<ConversationState>();对话状态将由Dialog系统本身使用。service.AddSingleton
services.AddSingleton<ConversationState>();A transient lifetime services, which represent out bot, and that is created each time they’re requested from the service container by
services.AddTransient<IBot, AuthBot<MainDialog>>();瞬态生存期服务,代表bot,并在每次服务从服务容器请求它们时创建
services.AddTransient<IBot, AuthBot<MainDialog>>();
using Microsoft.AspNetCore.Builder;
using Microsoft.AspNetCore.Hosting;
using Microsoft.Bot.Builder;
using Microsoft.Bot.Builder.Integration.AspNet.Core;
using Microsoft.Extensions.Configuration;
using Microsoft.Extensions.DependencyInjection;
using Microsoft.Extensions.Hosting;
using Pegasus.Bots;
using Pegasus.Dialogs;namespace Pegasus
{
    public class Startup
    {
        public IConfiguration Configuration { get; }
        public Startup(IConfiguration configuration)
        {
            Configuration = configuration;
        }
        public void ConfigureServices(IServiceCollection services)
        {
            services.AddControllers().AddNewtonsoftJson();
            services.AddSingleton<IBotFrameworkHttpAdapter, AdapterWithErrorHandler>();
            services.AddSingleton<IStorage, MemoryStorage>();
            services.AddSingleton<UserState>();
            services.AddSingleton<ConversationState>();
            services.AddSingleton<MainDialog>();
            services.AddTransient<IBot, AuthBot<MainDialog>>();
        }
        public void Configure(IApplicationBuilder app, IWebHostEnvironment env)
        {
            if (env.IsDevelopment())
            {
                app.UseDeveloperExceptionPage();
            }
            app.UseDefaultFiles()
                .UseStaticFiles()
                .UseWebSockets()
                .UseRouting()
                .UseAuthorization()
                .UseEndpoints(endpoints =>
                {
                    endpoints.MapControllers();
                });
        }
    }
}
Add a new property to appsettings.json called ConnectionName. Its values should be the name of the OAuth connection name we’ve added to the bot.
向appsettings.json添加一个名为ConnectionName的新属性。 它的值应该是我们添加到漫游器中的OAuth连接名称的名称。
{
  "MicrosoftAppId": "MICROSOFT-APP-ID",
  "MicrosoftAppPassword": "MICROSOFT-APP-PASSWORD",
  "ConnectionName": "OAUTH-CONNECTION-NAME"
}
微软团队 (Microsoft Teams)
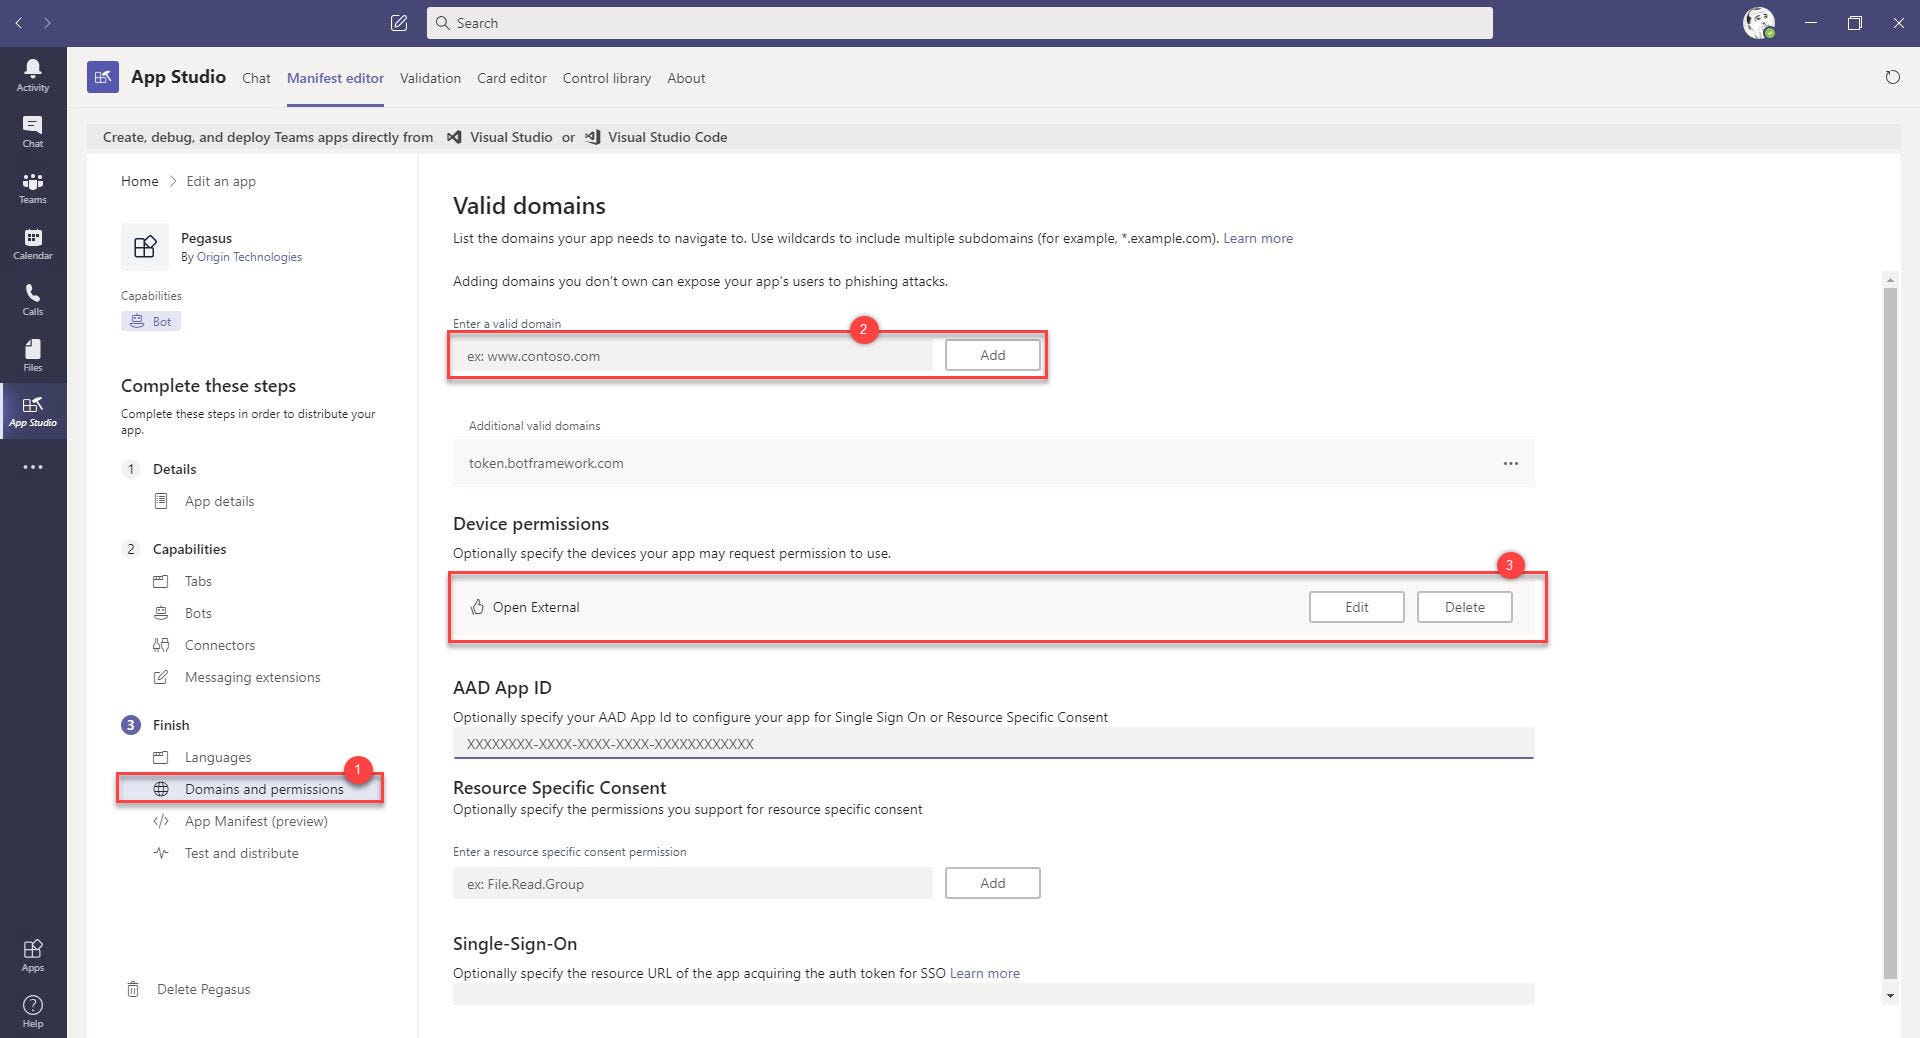
Open Microsoft Teams and click on App Studio. Under Manifest Editor select your bot and then click Edit.
打开Microsoft Teams并单击App Studio 。 在清单编辑器下,选择您的机器人,然后点击编辑 。

Select Domains and permission from the left panel and add token.botframework.com as a custom domain. To finish the configuration grant permission to open an external link to the app and reinstall it by clicking on Test and distribute and the Install.
从左侧面板中选择“域和权限” ,然后将token.botframework.com添加为自定义域。 要完成配置,请授予权限以打开指向应用程序的外部链接,然后单击“ 测试并分发”和“ 安装”以重新安装它。
Congratulations you are all set. Now your bot is connected to Microsoft Graph.
恭喜,您一切就绪。 现在,您的机器人已连接到Microsoft Graph。

翻译自: https://medium.com/swlh/connect-your-teams-bot-to-microsoft-graph-19c4344ad526
微软graph开发视频


 667
667

 被折叠的 条评论
为什么被折叠?
被折叠的 条评论
为什么被折叠?
 到【灌水乐园】发言


