


早些时候,MetaAI 通过开源 DINOv2 在计算机视觉领域取得了一个重要的里程碑,该模型是在 1.42 亿张图像的庞大数据集上训练的。此版本使 DINOv2 与 OpenAI CLIP 直接竞争,初步评估表明它甚至可能在某些任务上超越它。然而,浏览现有文档可能难以利用 DINOv2 的功能。在本文中,我们将探讨图像相似性任务需要采取的步骤,并对其性能进行全面评估。
图像相似性的意义
在之前的故事中,我们深入探讨了图像相似性的多种应用,并展示了 OpenAI Clip 如何促进这一过程。简单回顾一下,以下实例可以证明其相关性:
组合视觉内容:图像相似性对于组合视觉上连贯的相册或幻灯片非常有用。通过将相似的图像组合在一起,可以实现无缝的叙事或主题进展。
内容审核:它是防止上传未经授权或不当内容的强大工具。此应用程序在用户生成内容盛行的平台上尤为重要,可确保安全且合规的环境。
高效的内容检索:在涉及大量图像文件库的场景中,查找特定的视觉效果可能是一项艰巨的任务。图像相似性通过快速检索视觉上类似的图像简化了此过程,从而节省了时间和资源。
现在,让我们探索 DINOv2 如何增强和改进这些应用程序。
探索 DINOv2
DINOv2 是一款多功能模型,具有广泛的应用范围,是执行各种任务的强大工具。其一些主要应用包括:
深度估计:从相机的视点确定场景中物体距离的过程。
语义分割:将图像中的每个像素精确分类为不同的类别,从而详细了解对象边界及其语义。
图像相似性:量化两个或多个图像之间的视觉相似性,并通过辨别其视觉内容的相似性进行检索。
DINOv2 有多种规模,每种规模都针对特定要求量身定制:
小:具有 2100 万个参数,大小为 85MB,从图像中提取的特征的维数为 384。
基础:具有 8600 万个参数,大小为 331MB,从图像中提取的特征的维数为 768。
大:有3亿个参数,占用1.2GB的存储空间,从图像中提取的特征的维数为1024。
Giant:现有模型中最广泛的模型,具有 11 亿个参数,需要 4.3GB 的存储空间,从图像中提取的特征维数为 1536。
多样化的模型确保 DINOv2 能够适应多种应用,从资源密集型任务到需要高精度的任务。
入门
为了搜索相似的图像,我们将遵循以下几个步骤:
特征提取:首先提取数据集中所有图像的特征。这些特征作为每幅图像视觉特征的数值表示。
使用 FAISS 进行索引:接下来,将这些嵌入存储到 FAISS 索引中。FAISS 提供了一个强大的工具来执行快速相似性搜索,并且它添加了一个简化该过程的抽象层。(有关 FAISS 的更多详细信息,您可以阅读此故事)。
输入图像特征提取:提取输入图像的特征,用作相似性搜索的查询。
相似性搜索:利用 FAISS 索引对输入图像的特征进行相似性搜索。检索最相似的前 3 张图像。
首先,必须安装几个软件包。建议使用虚拟环境:
#Creating the virtual env
virtualenv venv-dinov2
source venv-dinov2
#Installaing the packages
pip install transformers faiss-gpu torch Pillow
使用小模型进行特征提取和存储:
import torch
from transformers import AutoImageProcessor, AutoModel
from PIL import Image
import faiss
import numpy as np
import os


#load the model and processor
device = torch.device('cuda' if torch.cuda.is_available() else "cpu")
processor = AutoImageProcessor.from_pretrained('facebook/dinov2-small')
model = AutoModel.from_pretrained('facebook/dinov2-small').to(device)


#Populate the images variable with all the images in the dataset folder
images = []
for root, dirs, files in os.walk('./dataset'):
    for file in files:
        if file.endswith('jpg'):
            images.append(root  + '/'+ file)


#Define a function that normalizes embeddings and add them to the index
def add_vector_to_index(embedding, index):
    #convert embedding to numpy
    vector = embedding.detach().cpu().numpy()
    #Convert to float32 numpy
    vector = np.float32(vector)
    #Normalize vector: important to avoid wrong results when searching
    faiss.normalize_L2(vector)
    #Add to index
    index.add(vector)


#Create Faiss index using FlatL2 type with 384 dimensions as this
#is the number of dimensions of the features
index = faiss.IndexFlatL2(384)


import time
t0 = time.time()
for image_path in images:
    img = Image.open(image_path).convert('RGB')
    with torch.no_grad():
        inputs = processor(images=img, return_tensors="pt").to(device)
        outputs = model(**inputs)
    features = outputs.last_hidden_state
    add_vector_to_index( features.mean(dim=1), index)


print('Extraction done in :', time.time()-t0)


#Store the index locally
faiss.write_index(index,"vector.index")
使用小型模型,特征提取过程在大约 12 秒内分析了 1000 张图像。这表明处理速度约为每秒 83 张图像。为了进一步提高性能,您可以考虑将图像以批次形式提供给处理器,以便同时处理多张图像。这可以显著减少提取特征所需的计算时间,尽管这需要更多的 GPU 消耗。
我们现在可以使用 FAISS 来搜索相似的图像:
import faiss
import numpy as np
import torch
from transformers import AutoImageProcessor, AutoModel
from PIL import Image


#input image
image = Image.open('banana.jpg')


#Load the model and processor
device = torch.device('cuda' if torch.cuda.is_available() else "cpu")
processor = AutoImageProcessor.from_pretrained('facebook/dinov2-small')
model = AutoModel.from_pretrained('facebook/dinov2-small').to(device)


#Extract the features
with torch.no_grad():
    inputs = processor(images=image, return_tensors="pt").to(device)
    outputs = model(**inputs)


#Normalize the features before search
embeddings = outputs.last_hidden_state
embeddings = embeddings.mean(dim=1)
vector = embeddings.detach().cpu().numpy()
vector = np.float32(vector)
faiss.normalize_L2(vector)


#Read the index file and perform search of top-3 images
index = faiss.read_index("vector.index")
d,i = index.search(vector,3)
print('distances:', d, 'indexes:', i)
注意:图像搜索是使用带有 GPU 的 FAISS 执行的,搜索时间非常快,仅为 0.2 毫秒。
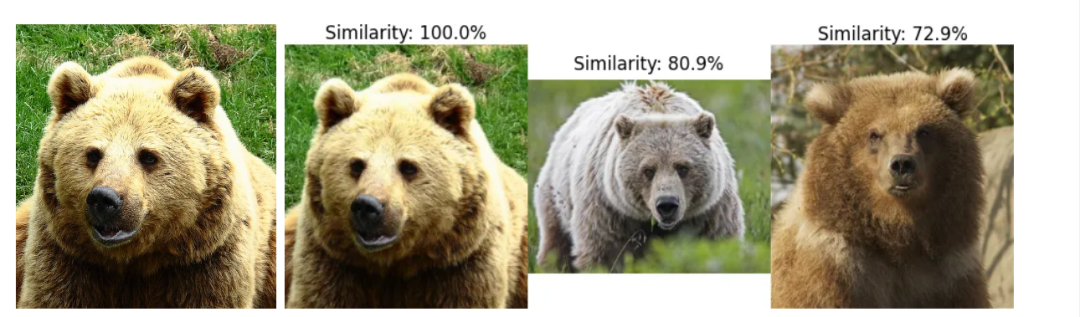
首次观察与 Coco 数据集的图像相似性
对于我们的初步评估,我们将利用Coco 数据集中的验证集,其中包含 5000 张图像。我们将使用多张输入图像进行图像相似性搜索,得出以下结果:
输入图像和前 3 个相似图像

输入图像和前 3 个相似图像

输入图像和前 3 个相似图像
这些初步结果已经非常有希望了,让我们更深入地研究图像相似性。
针对更大的数据集进行基准测试
利用数据集
为了对我们的模型进行基准测试,我们选择了 DISC21 数据集,该数据集由 MetaAI Research 专门为图像相似性搜索而创建。由于其大小高达 350GB,我们将使用 Kaggle 上提供的 50,000 张图像的子集。您可以在此处找到数据集。
采用的指标
在指标方面,我们将计算:
准确率:正确预测的图像占图像总数的比例。
Top-3 准确率:在前三张相似图像中找到正确图像的次数与图像总数的比例。
计算时间:处理整个数据集所需的时间。
基准测试脚本
首先,我们将检查“真实情况” CSV 文件,以确定在这 50,000 张图片中,哪些图片在数据集中有相似的对应图片。对该文档的初步审查显示,有 529 张图片属于此类。
接下来,我们将开发一个脚本来为这 529 张已识别的图像查找相似图像。随后,我们将计算准确率和 top-3 准确率。提取数据集中所有图像的特征、将它们存储在 FAISS 索引中并存储文件名后,我们可以使用以下脚本(以适应您的文件名):
import faiss
import numpy as np
import torch
from transformers import AutoImageProcessor, AutoModel
from PIL import Image
import json
import time


#Assume we have stored the filenames in this JSON file
f = open('list_images_disc21.json')
images = json.load(f)
f.close()


#Assume you have stored the ground truth for the 529 images
#json is formatted as follows: { image1_filename: ground_truth_filename, ...}
f = open('ground_truth.json')
ground_truth = json.load(f)
f.close()


device = torch.device('cuda' if torch.cuda.is_available() else "cpu")
processor = AutoImageProcessor.from_pretrained('facebook/dinov2-base')
model = AutoModel.from_pretrained('facebook/dinov2-base').to(device)


index = faiss.read_index("disc21_base.index")


positive=0
top3_positive=0
total=0
t0=time.time()


for filename in truth:
    image = Image.open(filename)
    with torch.no_grad():
        inputs = processor(images=image, return_tensors="pt").to(device)
        outputs = model(**inputs)
    #Convert and normalize before searching
    embeddings = outputs.last_hidden_state
    embeddings = embeddings.mean(dim=1)
    vector = embeddings.detach().cpu().numpy()
    vector = np.float32(vector)
    faiss.normalize_L2(vector)
    #Search top-3 images
    d,i = index.search(vector,3)
    if ground_truth[filename]==images[i[0][0]]:
        positive+=1
    for res in i[0]:
        if ground_truth[key]==images[res]:
            top3_positive+=1
    total+=1


print('Accuracy:', positive/total)
print('Top3-Accuracy', top3_positive/total)
print('Time:', time.time()-t0)
请注意,此脚本必须适应您使用的文件夹/文件名。如果您需要帮助来重现它,请随时联系我。
基准测试结果
准确率和 Top3 准确率
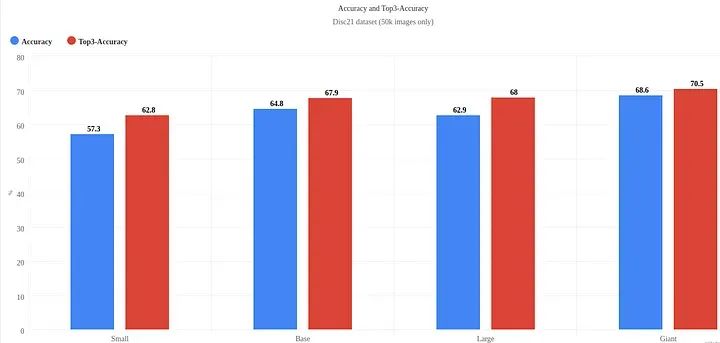
准确率和 Top3 准确率
计算时间
+-------+---------------------+-------------------------------+
| 模型 | 特征提取:| 基准时间(529 张图像 |
| | Nb 张图像/秒 | 针对 50000 张图像 |
+-------+---------------------+-------------------------------+
| 小 | 47.80 | 22 秒 |
| 基本 | 39.87 | 24 秒 |
| 大 | 21.83 | 35 秒 |
| 巨型 | 6.76 | 93 秒 |
+-------+---------------------+-------------------------------+
其他统计数据
+-------+--------------------+----------------+
| 模型 | 索引大小(MB)| GPU 使用情况(MB)|
+-------+--------------------+----------------+
| 小 | 74 | 1322 |
| 基本 | 147 | 1594 |
| 大 | 196 | 2398 |
| 巨型 | 293 | 5722 |
+-------+--------------------+----------------+
检查结果
以下示例展示了不同模型获得的结果:
所有模型均能正确识别图像
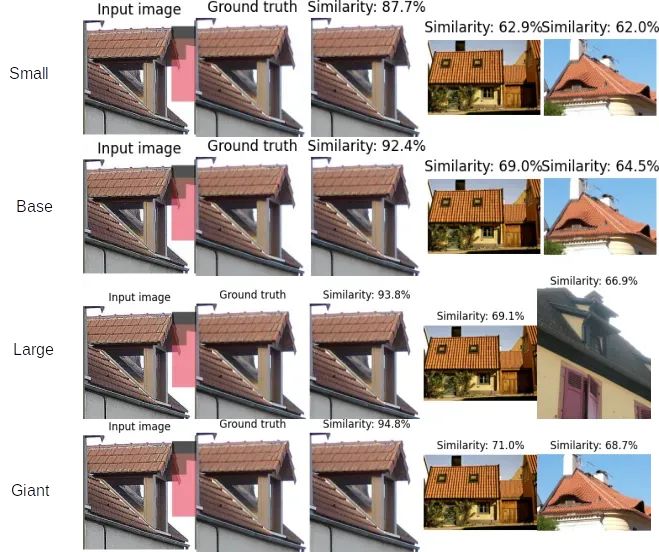
所有模型都找到正确的图像
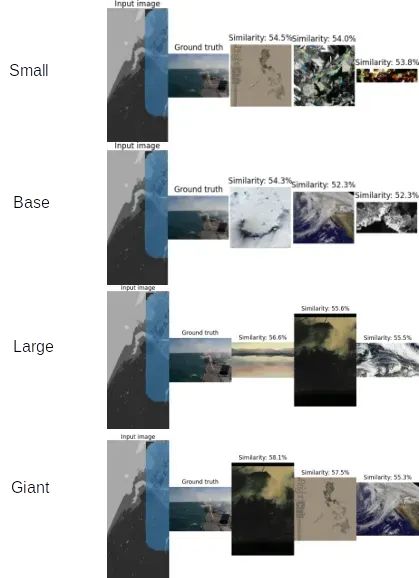
各模型表现参差不齐
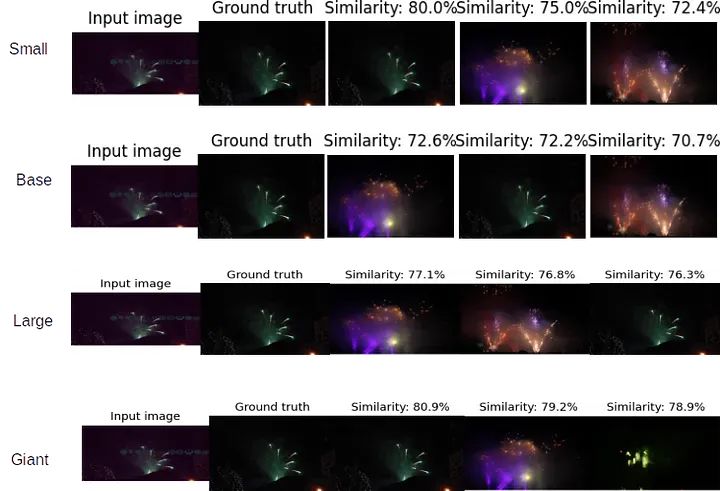
各模型表现参差不齐
所有模型都无法找到正确的图像
所有模型都无法找到正确的图像
对最后一张图片的评论:与真实图像相比,输入图像经历了几次操作,包括旋转、灰度转换和蒙版。难怪所有模型都没有找到预期的图像。
分析
DINOv2 在图像相似性任务上表现非常出色,即使在 DISC21 等具有挑战性的数据集上也是如此。模型越大,性能越好,尽管这在计算时间和 GPU 消耗方面会带来很大的权衡。此外,通过利用 FAISS 功能,执行搜索的速度非常快。
限制
虽然这个基准测试提供了有价值的见解,但我们必须承认它的局限性。由于其规模巨大,我们无法评估 DINOv2 在整个 DISC21 数据集上的表现。
结论
在本次评估中,我们深入研究了 DINOv2 在图像相似性任务上的表现,采用了 DISC21 等具有挑战性的数据集。虽然数据集的大小存在一些限制,但我们的基准测试提供了宝贵的见解,让我们了解 DINOv2 的功能以及不同模型的不同性能水平。
显然,尽管计算需求增加,但更大的模型可以产生更好的结果。利用 FAISS 进一步证明了可以进行搜索的惊人速度。DINOv2 无疑有资格成为图像相似性任务的强大模型。
· END ·
HAPPY LIFE

本文仅供学习交流使用,如有侵权请联系作者删除


 1738
1738

 被折叠的 条评论
为什么被折叠?
被折叠的 条评论
为什么被折叠?
 到【灌水乐园】发言


