


本文较长,建议点赞收藏,以免遗失。更多AI大模型应用开发学习内容,尽在聚客AI学院。
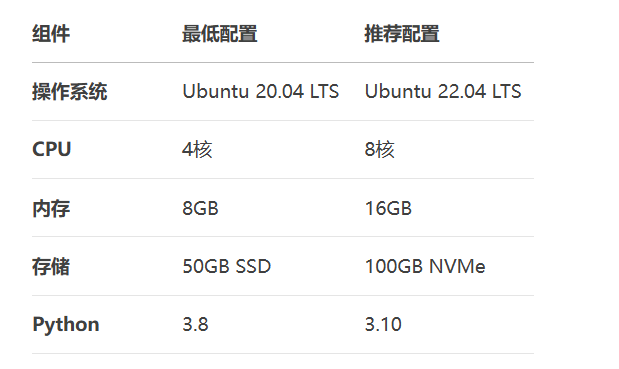
一. 系统要求与环境准备
1.1 基础环境要求
1.2 依赖安装
# 安装系统级依赖
sudo apt update && sudo apt install -y git docker.io docker-compose nginx python3-pip nodejs npm
# 安装Python虚拟环境
pip install virtualenv
python3 -m virtualenv dify-env
source dify-env/bin/activate
二. 部署Dify后端服务
2.1 代码拉取与配置
git clone https://github.com/langgenius/dify.git
cd dify/backend
# 安装Python依赖
pip install -r requirements.txt
2.2 环境变量配置
创建 .env 文件:
# 数据库配置
DATABASE_URL=postgresql://dify:yourpassword@localhost:5432/dify
REDIS_URL=redis://localhost:6379/0
# 应用配置
SECRET_KEY=your-secret-key-1234
DEBUG=False  # 生产环境设为False
# 邮件服务(可选)
EMAIL_HOST=smtp.example.com
EMAIL_PORT=587
EMAIL_USER=user@example.com
EMAIL_PASSWORD=your-email-password
2.3 启动后端服务
开发模式:
python manage.py runserver 0.0.0.0:5000生产模式(使用Gunicorn + Nginx):
gunicorn --workers 4 --bind 0.0.0.0:5000 wsgi:app
# Nginx配置示例(/etc/nginx/sites-available/dify)
server {
    listen 80;
    server_name dify.yourdomain.com;
    location / {
        proxy_pass http://localhost:5000;
        proxy_set_header Host $host;
        proxy_set_header X-Real-IP $remote_addr;
    }
}
三. 配置前端界面
3.1 前端代码配置
cd ../frontend
npm install
# 修改环境配置
cp .env.example .env
修改 .env 文件:
VITE_API_BASE_URL=http://localhost:5000
VITE_ENABLE_SENTRY=false  # 生产环境建议开启
3.2 构建与部署
开发模式:
npm run dev生产构建:
npm run build
# 部署到Nginx
sudo cp -r dist/* /var/www/dify/
Nginx配置:
server {
    listen 80;
    server_name dify-frontend.yourdomain.com;
    root /var/www/dify;
    index index.html;
    location / {
        try_files $uri $uri/ /index.html;
    }
}
四. 服务启动与验证
4.1 全栈启动命令
# 后端
cd backend && gunicorn --workers 4 --bind 0.0.0.0:5000 wsgi:app
# 前端
cd frontend && npm run start
# 监控日志
tail -f backend/logs/app.log frontend/logs/server.log
4.2 健康检查
# 检查后端API
curl http://localhost:5000/api/health
# 预期输出:{"status": "ok"}
# 检查前端页面
curl -I http://localhost:3000
# 预期状态码:200 OK故障排查:
-
端口冲突:
lsof -i :5000查找占用进程 -
依赖错误:
pip freeze > requirements.txt重新生成依赖清单
五. 数据库初始化与管理
5.1 数据库迁移
python manage.py db init
python manage.py db migrate
python manage.py db upgrade
5.2 初始化数据
# 创建管理员
python manage.py create_admin --email admin@dify.com --password yourpassword
# 加载示例数据集
python manage.py load_data examples/demo_data.json自定义初始化脚本:
# custom_init.py
from models import *
from extensions import db
def init_roles():
roles = ['admin', 'developer', 'viewer']
for name in roles:
if not Role.query.filter_by(name=name).first():
db.session.add(Role(name=name))
db.session.commit()
if __name__ == '__main__':
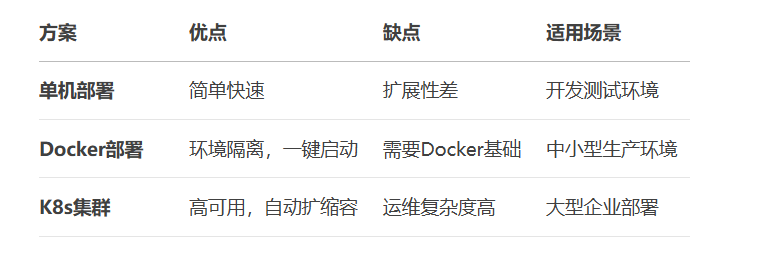
init_roles()六. 总结
6.1 部署方案对比
6.2 Docker化部署示例
# Dockerfile
FROM python:3.10-slim
WORKDIR /app
COPY backend/requirements.txt .
RUN pip install -r requirements.txt
COPY . .
CMD ["gunicorn", "--workers", "4", "--bind", "0.0.0.0:5000", "wsgi:app"]
docker build -t dify-backend .
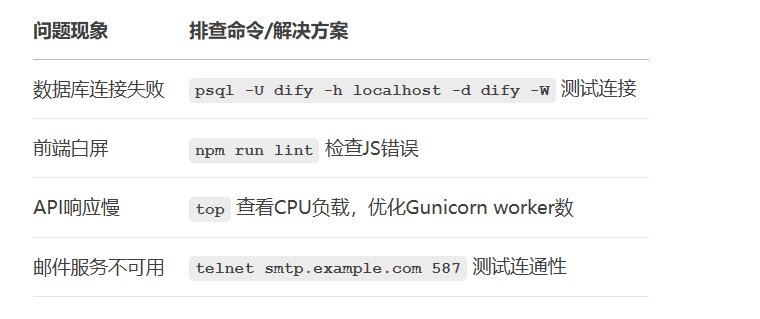
docker run -d -p 5000:5000 --env-file .env dify-backend附:常见问题解决方案
注:本文代码基于Dify v0.3.5版本,部署前请确认:
PostgreSQL和Redis服务已正常运行
防火墙开放5000(后端)和3000(前端)端口
域名解析已正确配置(生产环境需HTTPS)
# 一键验证命令
curl -sSL https://raw.githubusercontent.com/langgenius/dify/main/check_env.sh | bash更多AI大模型应用开发学习内容,尽在聚客AI学院。


 1248
1248

 被折叠的 条评论
为什么被折叠?
被折叠的 条评论
为什么被折叠?
 到【灌水乐园】发言


