


环境是树莓派3B+,当然这里安装tensorflow并不是一定要在树莓派环境,只需要是ARM架构就行,也就是目前市场上绝大部分的嵌入式系统都是用这套精简指令集。
在电脑端的检测,有兴趣的可以查阅SSD(Single Shot MultiBox Detector)系列:计算机视觉之SSD改进版本(平滑L1范数损失与焦点损失)《4》
操作系统属于Linux,所以我们来熟悉下自己的硬件环境,主要就是查看自己的芯片架构是属于哪种。
1、Linux查看芯片架构
前面提到了需要在ARM架构里面安装,如何通过指令来查看当前是什么芯片架构。
因为都是在Linux系统中,所以输入的命令都是一样的,下面三条命令中的任意一个都可以查看到所属架构:
arch
uname -a
file /bin/bash
X86图(我这是安装的WSL):
 这里是X86_64,就是X86的64位扩展,最开始是AMD设计的,所以也叫做“AMD64”,后来被Intel采用,它的就叫做“Intel64”
ARM图:
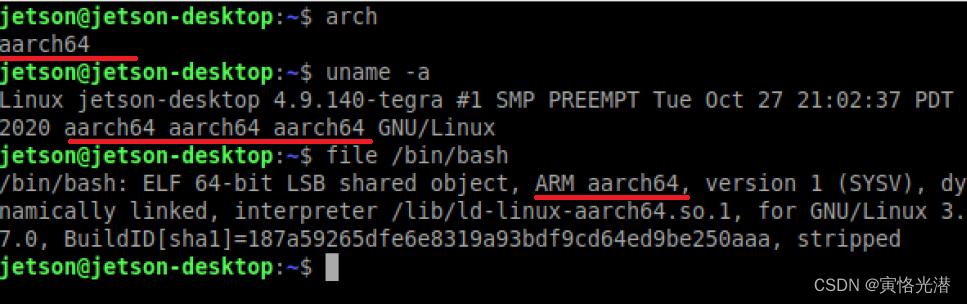 这里的aarch64是ARMv8-A架构中引入的64位指令集 ,属于ARM架构。
还有一种Linux系统的收银机,由于占用资源少,使用的是低配的芯片即可,一般是“奔腾”,返回的是i686
2、安装环境
安装tensorflow,当然这个版本根据自己情况选择,目前最新版本是tensorflow-2.4.0-cp35-none-linux_armv6l.whl
# https://github.com/lhelontra/tensorflow-on-arm/releases
pip install tensorflow-1.8.0-cp27-none-linux_armv7l.whl
2.1、SSD移动端模型
#http://download.tensorflow.org/models/object_detection/ssdlite_mobilenet_v2_coco_2018_05_09.tar.gz
tar -xzvf ssdlite_mobilenet_v2_coco_2018_05_09.tar.gz .
2.2、安装OpenCV视觉库
pip install opencv-python
2.3、运行Demo,命令行运行
python opencv_camera.py
# 或者如果是在Jupyter中加载.py文件,会将其内容拷贝过来,点击运行
%load opencv_camera.py
3、物体识别
接下来我们就来实际操作下,让摄像头检测对象并标注对象类别,这里使用的是CSI摄像头,如果你的是USB接口,代码也有注释。
3.1、导入相关库
导入相关的库,其中的object_detection等源码在最后给出了地址,有兴趣测试的,可以clone下来玩玩。
import numpy as np
import cv2
import os,time
import tensorflow as tf
from object_detection.utils import label_map_util
from object_detection.utils import visualization_utils as vis_utils
import ipywidgets.widgets as widgets
from image_fun import bgr8_to_jpeg
3.2、摄像头初始化
摄像头初始化,这里也给出了USB接口的摄像头,我这里就借用无人车上面的摄像头,为CSI接口。如果你的摄像头是USB的情况,
可以通过 ls /dev/video* 命令查看设备索引,camera = USBCamera(capture_device=1)
#from jetcam.usb_camera import USBCamera
from jetcam.csi_camera import CSICamera
from jetcam.utils import bgr8_to_jpeg

#camera = USBCamera(width=320, height=240, capture_fps=30)
camera = CSICamera(width=320, height=240, capture_fps=30)
#将相机设置为running = True,为新帧附加回调
camera.running = True
3.3、安装JetCam
当然在这里如果没有安装JetCam,可以先进行安装。JetCam是NVIDIA Jetson的一个易于使用的Python相机接口,安装jetcam:
git clone https://github.com/NVIDIA-AI-IOT/jetcam
cd jetcam
sudo python3 setup.py install
3.4、Image显示组件
摄像头初始化好了之后,我们就在Jupyter中新建一个图片组件,用来更新摄像头拍摄过来的数据
image_widget = widgets.Image(format='jpg', width=320, height=240)
display(image_widget)
image_widget.value = bgr8_to_jpeg(camera.value)
运行之后,这里会出现画面,不过是静止的第一帧,想要持续的更新,就会用到后面的两种更新方法。
3.5、初始化模型
将轻量级的SSD模型与标签加载进来
MODEL_NAME = 'ssdlite_mobilenet_v2_coco_2018_05_09'
PATH_TO_CKPT = MODEL_NAME + '/frozen_inference_graph.pb'
PATH_TO_LABELS = os.path.join('data', 'mscoco_label_map.pbtxt')

NUM_CLASSES = 90
IMAGE_SIZE = (12, 8)
fileAlreadyExists = os.path.isfile(PATH_TO_CKPT)

if not fileAlreadyExists:
    print('Model does not exsist !')
    exit
3.6、加载Graph
这里是加载上面的计算图,是一种冻结的序列化图,意思就是说不能训练,就是说拿来做预测的,是一个预训练模型。
另外也加载标签图,将这些标签进行分类,做成一个id与name对应的字典类型。后面将详细介绍Graph的用法!
print('Loading...')
detection_graph = tf.Graph()
with detection_graph.as_default(): #语句下定义属于计算图detection_graph的张量和操作
    od_graph_def = tf.compat.v1.GraphDef()
    with tf.io.gfile.GFile(PATH_TO_CKPT, 'rb') as fid:
        serialized_graph = fid.read()
        od_graph_def.ParseFromString(serialized_graph)
        tf.import_graph_def(od_graph_def, name='')
label_map = label_map_util.load_labelmap(PATH_TO_LABELS)
categories = label_map_util.convert_label_map_to_categories(label_map, max_num_classes=NUM_CLASSES, use_display_name=True)
category_index = label_map_util.create_category_index(categories)
print('Finish Load Graph..')

print(len(category_index),category_index)
print(category_index[1]['name'])#person这里的category_index是一个80个分类的字典,类似于 {1: {'id': 1, 'name': 'person'}, 2: {'id': 2, 'name': 'bicycle'},...} 如下图:

3.7、摄像头检测
调用摄像头实时检测的方法有两种,一种是一直循环的读取摄像头的值,也就是在死循环里面处理;另外一种就是通过回调函数,当摄像头的值有变化的时候就会自动更新值到图片组件里面。
3.7.1、死循环
    # Main
    t_start = time.time()
    fps = 0

    with detection_graph.as_default():
        with tf.compat.v1.Session(graph=detection_graph) as sess:
            while True:
                frame = camera.value
               # ret, frame = cap.read()
    #            frame = cv2.flip(frame, -1) # Flip camera vertically
    #             frame = cv2.resize(frame,(320,240))
                ##############
                image_np_expanded = np.expand_dims(frame, axis=0)
                image_tensor = detection_graph.get_tensor_by_name('image_tensor:0')
                detection_boxes = detection_graph.get_tensor_by_name('detection_boxes:0')
                detection_scores = detection_graph.get_tensor_by_name('detection_scores:0')
                detection_classes = detection_graph.get_tensor_by_name('detection_classes:0')
                num_detections = detection_graph.get_tensor_by_name('num_detections:0')
    #             print('Running detection..')
                (boxes, scores, classes, num) = sess.run(
                    [detection_boxes, detection_scores, detection_classes, num_detections],
                    feed_dict={image_tensor: image_np_expanded})
    #             print('Done.  Visualizing..')
                vis_utils.visualize_boxes_and_labels_on_image_array(
                        frame,
                        np.squeeze(boxes),
                        np.squeeze(classes).astype(np.int32),
                        np.squeeze(scores),
                        category_index,
                        use_normalized_coordinates=True,
                        line_thickness=8)

                for i in range(0, 10):
                    if scores[0][i] >= 0.5:
                        print(category_index[int(classes[0][i])]['name'])
                ##############
                fps = fps + 1
                mfps = fps / (time.time() - t_start)
                cv2.putText(frame, "FPS " + str(int(mfps)), (10,10), cv2.FONT_HERSHEY_SIMPLEX, 0.5, (0,0,255), 2)
                image_widget.value = bgr8_to_jpeg(frame)
3.7.2、回调函数
创建一个更新函数,当摄像头启动时就调用它,这样就可以做到摄像头的值变化时,更新函数就会做出处理。一般推荐使用这种方法!
detection_graph.as_default()
sess = tf.compat.v1.Session(graph=detection_graph)
t_start = time.time()
fps = 0

def update_image(change):
    global fps
    global sess
    frame = change['new']
    image_np_expanded = np.expand_dims(frame, axis=0)
    image_tensor = detection_graph.get_tensor_by_name('image_tensor:0')
    detection_boxes = detection_graph.get_tensor_by_name('detection_boxes:0')
    detection_scores = detection_graph.get_tensor_by_name('detection_scores:0')
    detection_classes = detection_graph.get_tensor_by_name('detection_classes:0')
    num_detections = detection_graph.get_tensor_by_name('num_detections:0')

    (boxes, scores, classes, num) = sess.run(
        [detection_boxes, detection_scores, detection_classes, num_detections],
        feed_dict={image_tensor: image_np_expanded})

    # 锚框与标签
    vis_utils.visualize_boxes_and_labels_on_image_array(
        frame,
        np.squeeze(boxes),
        np.squeeze(classes).astype(np.int32),
        np.squeeze(scores),
        category_index,
        use_normalized_coordinates=True,
        line_thickness=8)
    '''
    for i in range(0, 10):
        if scores[0][i] >= 0.5:
            print(category_index[int(classes[0][i])]['name'])
    '''

    fps = fps + 1
    mfps = fps / (time.time() - t_start)
    cv2.putText(frame, "FPS " + str(int(mfps)), (10,10), cv2.FONT_HERSHEY_SIMPLEX, 0.5, (0,0,255), 2)
    image_widget.value = bgr8_to_jpeg(frame)

#摄像头更新函数
camera.observe(update_image, names='value')

#停止更新,单纯的unobserve不能停止摄像头的继续运行,我加了一个stop停止
#camera.unobserve(update_image, names='value')
#camera.stop()
效果图如下:
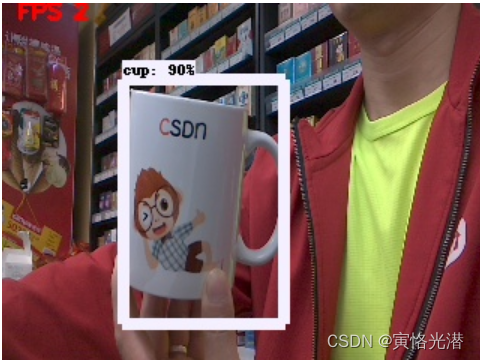
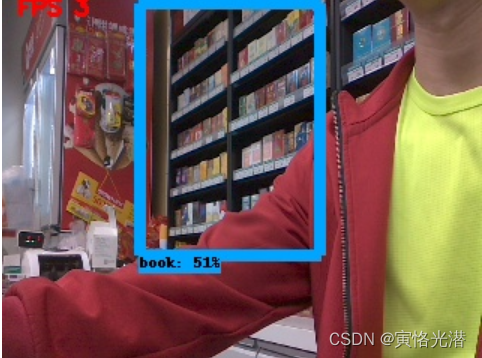
当然也存在识别有误的情况,比如下面这张图,将后面的烟,识别成了书,这个也正常,跟数据集有关,毕竟看起来像书的陈列形状。
4、tf.Graph()
这里对上述代码中出现的tf.Graph函数做一个相关介绍,它是Tensorflow中的计算图,对里面张量有专门的计算模块,还可以新建多张计算图,通常表示为G(V,E),其中G表示一个图,V是图G中顶点的集合,E是图G中边的集合。这样的构建就可以并行化处理,对于提升性能很有帮助。
Graph实质是一种集合数组(Tensor张量)与Operation操作的数据结构,可以运行在非Python环境中,只需要对这个数据结构进行解释即可。所以说通过构建Graph,我们可以方便地表示和优化计算过程,从而实现深度学习模型的训练和推断。
一旦Graph被构建完成,我们就可以使用TensorFlow的Session对象来执行这个Graph。在执行过程中,Session会按照Graph中定义的节点和边的关系,将数据从一个节点传递到另一个节点,并执行每个节点的操作,最终得到我们需要的计算结果。
我们来看一个例子:
g1 = tf.Graph()
g2 = tf.Graph()

with g1.as_default():
    a = tf.constant([1,2])
    b = tf.constant([3,4])
    c = tf.constant([5,6])
    result1 = a + b + c

with g2.as_default():
    d = tf.constant([11,22,33])
    e = tf.constant([33,44,55])
result2 = d * e定义好两个计算图之后,我们就可以分别在其下面计算,然后通过Session的run来执行计算的结果
with tf.compat.v1.Session(graph=g1) as sess:
    print(a)#Tensor("Const_12:0", shape=(2,), dtype=int32)
    print(result1)#Tensor("add_8:0", shape=(2,), dtype=int32)
    print(sess.run(result1))#[ 9 12]
可以看到在g1计算图下面,我们可以查看计算节点与计算节点,这里是做相加的操作,接着看下g2做相乘的操作:
with tf.compat.v1.Session(graph=g2) as sess:
    print(d)#Tensor("Const_12:0", shape=(3,), dtype=int32)
    print(result2)#Tensor("mul:0", shape=(3,), dtype=int32)
    print(sess.run(result2))#[ 363  968 1815]
我们也可以对这些张量的计算图属于哪一个做一个验证:
print(a.graph is g1)#True
print(a.graph is g2)#False
print(d.graph is g1)#False
print(d.graph is g2)#True
4.1、run()中fetches参数
当然这个run函数里面的fetches参数值除了上面求和求积操作,还可以是单元素,列表,元组
import tensorflow as tf

sess = tf.compat.v1.Session()
a = tf.constant([10, 20])
b = tf.constant([1.0, 2.0])

v = sess.run(a)
print(type(v),v)#<class 'numpy.ndarray'> [10 20]

v = sess.run([a, b])
print(v)#[array([10, 20], dtype=int32), array([1., 2.], dtype=float32)]
当然也可以是字典,里面的a,b值将转成numpy数组
import collections
MyData = collections.namedtuple('MyData', ['a', 'b'])
v = sess.run({'k1': MyData(a, b), 'k2': [b, a]})
print(v)
#{'k1': MyData(a=array([10, 20], dtype=int32), b=array([1., 2.], dtype=float32)), 'k2': [array([1., 2.], dtype=float32), array([10, 20], dtype=int32)]}
4.2、run()中feed_dict参数
这个feed_dict参数的输入值需要是字典类型:
v = sess.run([a, b],feed_dict={b:[33,44]})
print(v)
#[array([10, 20], dtype=int32), array([33., 44.], dtype=float32)]


 2万+
2万+


 被折叠的 条评论
为什么被折叠?
被折叠的 条评论
为什么被折叠?
 到【灌水乐园】发言


