


硬件平台 树莓派4B
gst-inspect 在开发时用于查询库各个插件element的详细信息
gst-launch 用于在终端快速构建一条pipeline用于播放多媒体
摄像头图像测试 采集图像并显示
gst-launch-1.0 v4l2src ! xvimagesink
根据摄像头 ,有的可能不能显示图像
- gst-launch 构建通道
- v4l2src 采集视频 的插件
- xvimagesink 显示采集图像的sink插件
ximagesink和xvimagesink 两者都是用来x桌面用来显示视频图像的sink插件,但支持的格式不同。
ximagesink支持rgb格式,不支持yuv格式;xvimagesink支持yuv等多种格式
gst-launch-0.10 videotestsrc pattern=ball ! ffmpegcolorspace ! autovideosink
显示测试测试视频 一个滚动的雪球
注意版本
gst-launch v4l2src device=/dev/video0 ! ffmpegcolorspace ! ximagesink
显示video0采集的图像,并显示出来
ffmpegcolorspace 用于颜色转换的插件 转换多种颜色格式的过滤器,摄像头设备视频数据通常使用YUV颜色格式,而显示器通常使用RGB颜色格式
我们也可以通过设置一些参数来设定显示效果如尺寸,帧率等
##gstreamer 1.0 测试 捕获 显示
##gstreamer 1.0  测试 捕获 显示
gst-launch-1.0 v4l2src device=/dev/video0  !  video/x-raw,width=1280,height=720,framerate=20/1  !  autovideosink
视频采集 ! 设定尺寸320*240 帧率 30 fps ! 颜色转换 ! 屏幕显示
gst-launch v4l2src device=/dev/video0 ! 'video/x-raw-yuv,width=320,height=240,framerate=30/1' ! ffmpegcolorspace ! ximagesink同时显示两路
gst-launch v4l2src device=/dev/video0 ! ‘video/x-raw-yuv,width=320,height=240,framerate=30/1’ ! ffmpegcolorspace ! ximagesink
v4l2src device=/dev/video1 ‘video/x-raw-yuv,width=320,height=240,framerate=30/1’ ! ffmpegcolorspace ! ximagesink
网络传输测试
1 . 先不用摄像头,先通过系统测试图像进行测试
发送端发送 测试雪球的视频
gst-launch-1.0 videotestsrc pattern=ball ! x264enc ! rtph264pay ! udpsink host=127.0.0.1 port=5600
encode a test video source to H264 – RTP发送
可以用mNetAssist网络调试助手 查看地址设为127.0.0.1 port:5600 可以监听到数据
-
//接收端 另开一个端口 接收视频 -
gst-launch-1.0 udpsrc port=5600 caps='application/x-rtp, media=(string)video, clock-rate=(int)90000, encoding-name=(string)H264' ! rtph264depay ! avdec_h264 ! autovideosink fps-update-interval=1000 sync=false -
//监听端口5600-- 解码 --播放视频
2 .(利用本地127.0.0.1 地址在一台电脑上测试) 测试通过UDP网络发送 RTP视频流
发送端
gst-launch-0.10 v4l2src ! video/x-raw-yuv,width=352,height=288 ! x264enc ! rtph264pay ! udpsink host=127.0.0.1 port=5600
获取视频–H.264编码–传输
接收端
-
//本地地址127.0.0.1 5600端口监听 接收视频 -
gst-launch-1.0 udpsrc port=5600 caps='application/x-rtp, media=(string)video, clock-rate=(int)90000, encoding-name=(string)H264' ! rtph264depay ! avdec_h264 ! autovideosink fps-update-interval=1000 sync=false
3 .(Internet网络测试 ) 测试通过UDP网络发送 RTP视频流
发送端 TK1 挂载C920 摄像头 连接路由 IP 192.168.0.10*
接收端 PC 连接校园网 IP 172.20.59.13*
-
//发送端 -
gst-launch-0.10 v4l2src device=/dev/video0 ! video/x-raw-yuv,width=352,height=288 ! x264enc ! rtph264pay ! udpsink host=172.20.59.13* port=5000 -
//注意几个关键的点 video/x-raw-yuv x264enc rtph264pay
-
//接收端 -
gst-launch-1.0 udpsrc port=5000 caps='application/x-rtp, media=(string)video, clock-rate=(int)90000, encoding-name=(string)H264' ! rtph264depay ! avdec_h264 ! autovideosink fps-update-interval=1000 sync=false
4 .(Qground 地面站视频传输测试)
* 测试通过TK1采集C920 视频,利用gstreamer 通过UDP网络发送给 另一网络端的Qground Control 地面站 *
大前提
- TK1端 安装gstreamer工具
- PC端 先安装gstreamer工具软件,然后再自己编译Qground control
打开Qground control station 查看 General –> Video Source 有UDP Video source / RTSP Video source / TCP-MPEG2 Vdieo String 这样才算编译成功
发送端不变
gst-launch-1.0 videotestsrc pattern=ball ! x264enc ! rtph264pay ! host=172.20.59.13* port=5000
【测试视频 Qground 所在PC IP 端口为QGC监听端口】
gst-launch-0.10 v4l2src device=/dev/video0 ! video/x-raw-yuv,width=352,height=288 ! x264enc ! rtph264pay ! udpsink host=172.20.59.13* port=5000打开QGround Control 软件 设置General Video Source 为UDP Video source 端口为5000
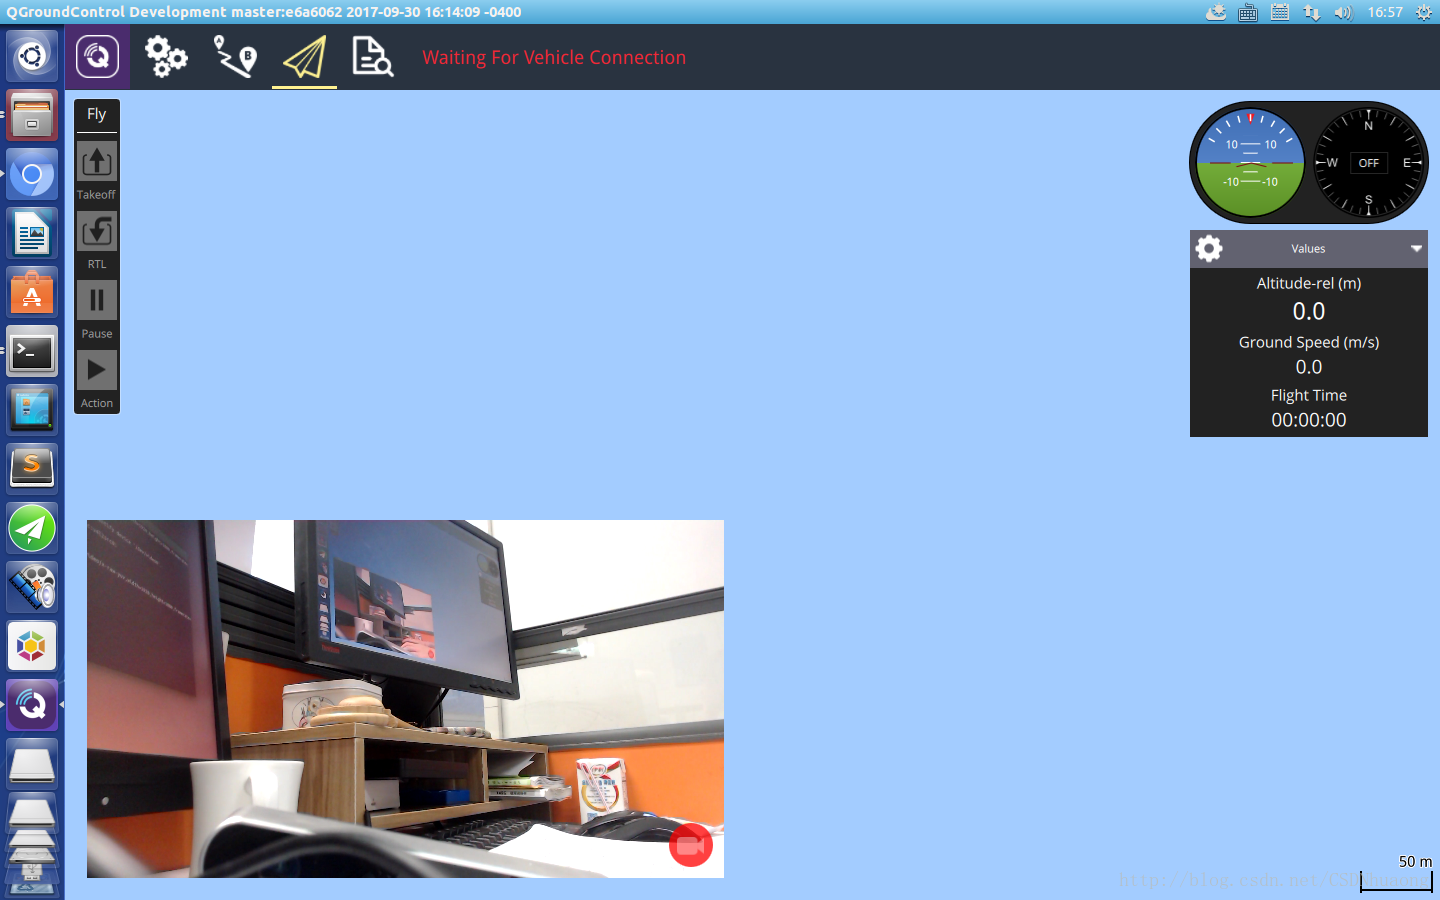
效果图
具体利用gstreamer设计自已的图传 并整合到Qground Control地面站,请看这篇博文。
5.使用NVIDIA硬件加速
发送端我们采用的是NVIDIA Jetson TK1,对于多媒体本身有硬件加速引擎openMAX,
NVIDIA accelerated encode
gst-launch-0.10 -e videotestsrc ! ‘video/x-raw-yuv, width=(int)640, height=(int)480, format=(fourcc)YUY2’ ! nvvidconv ! ‘video/x-nvrm-yuv, format=(fourcc)I420’ ! nv_omx_h264enc ! rtph264pay pt=96 ! udpsink host=172.20.**.25 port=5000
【测试视频 Qground 所在PC IP 端口为QGC监听端口】gst-launch-0.10 -e v4l2src device=”/dev/video0” ! ‘video/x-raw-yuv, width=(int)640, height=(int)480, format=(fourcc)YUY2’ ! nvvidconv ! ‘video/x-nvrm-yuv, format=(fourcc)I420’ ! nv_omx_h264enc ! rtph264pay pt=96 ! udpsink host=172.20.**.25 port=5000
【C920采集的视频】简单的视频传输链路Sample usage chain:
(发) Camera -> gstreamer --[RTP stream (UDP)]--> wifibroadcast_tx
(传) --//--[ RADIO ]--//-->
(收) wifibroadcast_rx --[RTP stream (UDP)]--> gstreamer --> Display使用NVIDIA TX1进行gstreamer测试
//***注意 TX1 自带一个CSI接口的camera, 如果只有一个摄像头 默认他会挂载在 /dev/video0
//如果在使用中接入(开机后) UVC-CAMERA,那么uav-camera会被挂载到/dev/video1
//如果在开机前就接入了UVC-CAMERA,那么uav-camera会被挂载到/dev/video0,
//这个pipeline把test video 压缩、存储为文件
gst-launch-1.0 videotestsrc ! 'video/x-raw, format=(string)I420,
width=(int)640, height=(int)480' ! omxh264enc ! 'video/x-h264, streamformat=(string)byte-stream' ! h264parse ! qtmux ! filesink location=test.mp4 -e
//omxh264enc 是nvidia开发的用于加速的element
//H.264 Encode (NVIDIA accelerated encode)
//gst-launch-0.10 没有omxh264enc未加速
v4l2src ! 'video/x-raw, format=(string)I420,width=(int)640, height=(int)480' ! omxh264enc ! 'video/x-h264, stream-format=(string)byte-stream' ! rtph264pay ! udpsink host=192.168.0.101 port=5000
//采集UAV camera数据 压缩保存为文件
gst-launch-1.0 v4l2src ! 'video/x-raw, format=(string)I420,
width=(int)640, height=(int)480' ! omxh264enc ! 'video/x-h264, streamformat=(string)byte-stream' ! h264parse ! qtmux ! filesink location=test.mp4 -e
//采集的uvc_camera数据通过rtp发送
gst-launch-1.0 v4l2src ! 'video/x-raw, format=(string)I420,\
width=(int)640, height=(int)480' ! omxh264enc ! 'video/x-h264, stream-format=(string)byte-stream' ! rtph264pay ! udpsink host=192.168.0.101 port=5000
NVIDIA tx1支持的硬件加速gst-launch测试命令
发射端
For encode logitech c920 camera:
gst-launch-1.0 uvch264src device=/dev/video0 initial-bitrate=6000000 average-bitrate=6000000 iframe-period=1000 name=src auto-start=true \
src.vidsrc ! queue ! video/x-h264,width=1920,height=1080,framerate=30/1 ! h264parse ! rtph264pay ! udpsink host=localhost port=5600
//wifi broadcast 方式gst-launch-1.0 v4l2src device=/dev/video0 ! video/x-h264,width=1920,height=1080,framerate=24/1 ! h264parse ! rtph264pay ! udpsink host=xxx.xxx.xxx.xxx port=5000
//测试
gst-launch-1.0 u412src device=/dev/video0 initial-bitrate=6000000 average-bitrate=6000000 iframe-period=1000 name=src auto-sta rt=true \ src.vidsrc ! queue ! Video/ h264,width=1920,height=1080,framerate=30/1 ! h264parse ! rtph264pay ! udpsink host=local host port=5600
gst-launch-1.0 u412src device=/dev/video0 initial-bitrate=6000000 average-bitrate=6000000 iframe-period=1000 name=src auto-sta rt=true \ src.vidsrc ! queue ! video/x-h264,width=1920,height=1080,framerate=30/1 ! h264parse ! rtph264pay ! udpsink host=local
host port=5600接收端
To decode:
gst-launch-1.0 udpsrc port=5600 caps='application/x-rtp, media=(string)video, clock-rate=(int)90000, encoding-name=(string)H264' \
! rtph264depay ! avdec_h264 ! clockoverlay valignment=bottom ! autovideosink fps-update-interval=1000 sync=false
//接收广播


 3706
3706

 被折叠的 条评论
为什么被折叠?
被折叠的 条评论
为什么被折叠?
 到【灌水乐园】发言


