


前言
因为想了解一下MMSegmentation框架,因此在官网里面找了官方教程简单跑了一下。因为遇到了一点bug,因此简单记录一下。
顺便说一嘴,这是实验室GPU服务器跑的第一个代码。o( ̄▽ ̄)ブ
如果还没安装mmsegmentaion的小伙伴可以参考这篇Blog:mmsegmentaion安装记录
使用MMSeg训练的权重运行推断
导入MMSeg所需库
from mmseg.apis import inference_segmentor, init_segmentor, show_result_pyplot
from mmseg.core.evaluation import get_palette
进入到c:\Penge\mmsegmentation\mmsegmentation目录下
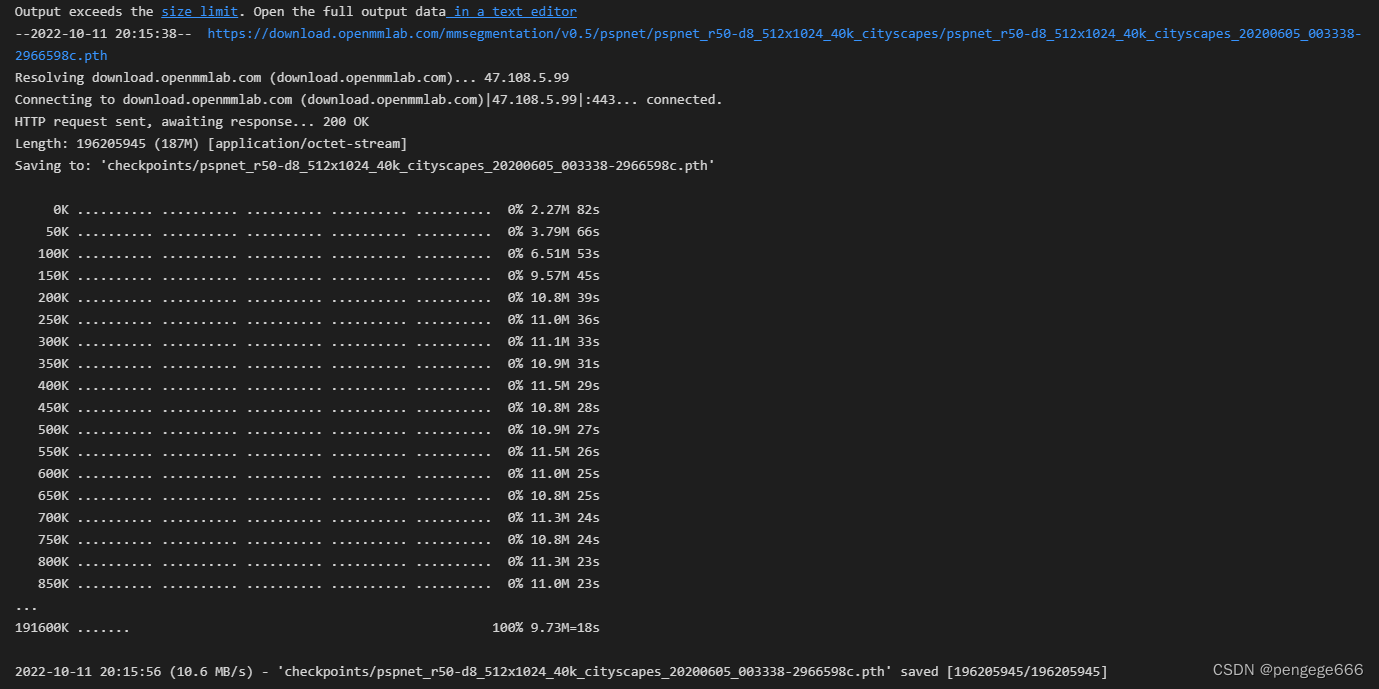
下载训练好的模型权重
!mkdir checkpoints
!wget https://download.openmmlab.com/mmsegmentation/v0.5/pspnet/pspnet_r50-d8_512x1024_40k_cityscapes/pspnet_r50-d8_512x1024_40k_cityscapes_20200605_003338-2966598c.pth -P checkpoints
指明配置文件和权重文件所在目录
config_file = 'configs/pspnet/pspnet_r50-d8_512x1024_40k_cityscapes.py'
checkpoint_file = 'checkpoints/pspnet_r50-d8_512x1024_40k_cityscapes_20200605_003338-2966598c.pth'
根据配置文件和权重建立模型
# build the model from a config file and a checkpoint file
model = init_segmentor(config_file, checkpoint_file, device='cuda:0')

放入图像进行测试并查看效果。
# test a single image
img = 'demo/demo.png'
result = inference_segmentor(model, img)
# show the results
show_result_pyplot(model, img, result, get_palette('cityscapes'))

在新数据集上训练语义分割模型
步骤
要对自定义数据集进行培训,需要执行以下步骤。
-
1.添加新的数据集类。
-
2.创建相应的配置文件。
-
3.进行培训和评估。
1.准备数据集
这个数据集下载比较慢,可以搭个梯子,但是还是很慢QEQ
# download and unzip
!wget http://dags.stanford.edu/data/iccv09Data.tar.gz -O stanford_background.tar.gz
!tar xf stanford_background.tar.gz
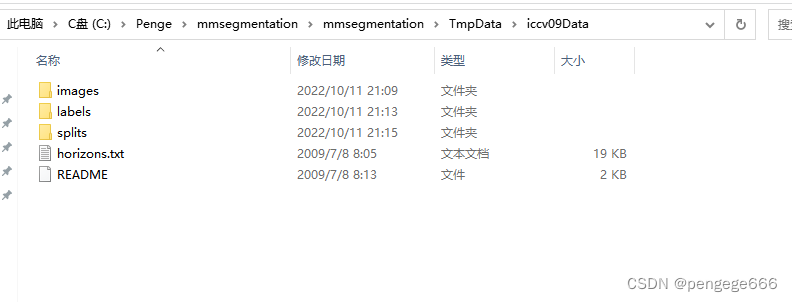
解压后的数据集目录
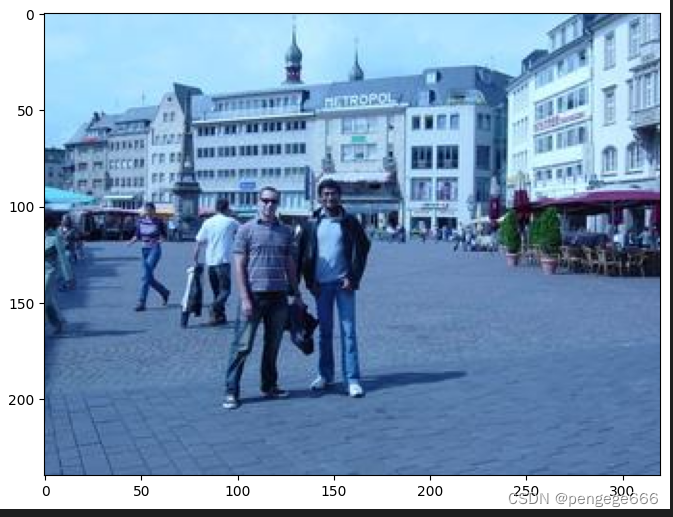
查看数据集
# Let's take a look at the dataset
# Let's take a look at the dataset
import mmcv
import matplotlib.pyplot as plt

import cv2
img = mmcv.imread('TmpData/iccv09Data/images/0000047.jpg')
plt.figure(figsize=(8, 6))
plt.imshow(mmcv.bgr2rgb(img))
plt.show()
转换格式【我们需要将注释转换为作为图像的语义图格式】
import os.path as osp
import numpy as np
from PIL import Image
# convert dataset annotation to semantic segmentation map
data_root = 'TmpData/iccv09Data'
img_dir = 'images'
ann_dir = 'labels'
# define class and plaette for better visualization
classes = ('sky', 'tree', 'road', 'grass', 'water', 'bldg', 'mntn', 'fg obj')
palette = [[128, 128, 128], [129, 127, 38], [120, 69, 125], [53, 125, 34],
           [0, 11, 123], [118, 20, 12], [122, 81, 25], [241, 134, 51]]
for file in mmcv.scandir(osp.join(data_root, ann_dir), suffix='.regions.txt'):
  seg_map = np.loadtxt(osp.join(data_root, ann_dir, file)).astype(np.uint8)
  seg_img = Image.fromarray(seg_map).convert('P')
  seg_img.putpalette(np.array(palette, dtype=np.uint8))
  seg_img.save(osp.join(data_root, ann_dir, file.replace('.regions.txt',
                                                         '.png')))
查看语义分割图
# Let's take a look at the segmentation map we got
import matplotlib.patches as mpatches
img = Image.open('TmpData/iccv09Data/labels/6000124.png')
plt.figure(figsize=(8, 6))
im = plt.imshow(np.array(img.convert('RGB')))

# create a patch (proxy artist) for every color
patches = [mpatches.Patch(color=np.array(palette[i])/255.,
                          label=classes[i]) for i in range(8)]
# put those patched as legend-handles into the legend
plt.legend(handles=patches, bbox_to_anchor=(1.05, 1), loc=2, borderaxespad=0.,
           fontsize='large')

plt.show()

划分数据集
# split train/val set randomly
split_dir = 'splits'
mmcv.mkdir_or_exist(osp.join(data_root, split_dir))
filename_list = [osp.splitext(filename)[0] for filename in mmcv.scandir(
    osp.join(data_root, ann_dir), suffix='.png')]
with open(osp.join(data_root, split_dir, 'train.txt'), 'w') as f:
  # select first 4/5 as train set
  train_length = int(len(filename_list)*4/5)
  f.writelines(line + '\n' for line in filename_list[:train_length])
with open(osp.join(data_root, split_dir, 'val.txt'), 'w') as f:
  # select last 1/5 as train set
  f.writelines(line + '\n' for line in filename_list[train_length:])
※下载数据后,我们需要在新的数据集类StanfordBackgroundDataset中实现load_annotations函数。
from mmseg.datasets.builder import DATASETS
from mmseg.datasets.custom import CustomDataset

@DATASETS.register_module()
class StanfordBackgroundDataset(CustomDataset):
  CLASSES = classes
  PALETTE = palette
  def __init__(self, split, **kwargs):
    super().__init__(img_suffix='.jpg', seg_map_suffix='.png',
                     split=split, **kwargs)
    assert osp.exists(self.img_dir) and self.split is not None
2.创建配置文件
在下一步中,我们需要修改培训的配置。为了加速这个过程,我们根据训练的权重对模型进行微调。
1.导入配置文件
from mmcv import Config
cfg = Config.fromfile('configs/pspnet/pspnet_r50-d8_512x1024_40k_cityscapes.py')
2.由于给定的配置用于在城市景观数据集上训练PSPNet,因此我们需要为新数据集相应地修改它。
from mmseg.apis import set_random_seed
from mmseg.utils import get_device

# Since we use only one GPU, BN is used instead of SyncBN
cfg.norm_cfg = dict(type='BN', requires_grad=True)
cfg.model.backbone.norm_cfg = cfg.norm_cfg
cfg.model.decode_head.norm_cfg = cfg.norm_cfg
cfg.model.auxiliary_head.norm_cfg = cfg.norm_cfg
# modify num classes of the model in decode/auxiliary head
cfg.model.decode_head.num_classes = 8
cfg.model.auxiliary_head.num_classes = 8

# Modify dataset type and path
cfg.dataset_type = 'StanfordBackgroundDataset'
cfg.data_root = data_root

cfg.data.samples_per_gpu = 8
cfg.data.workers_per_gpu=8

cfg.img_norm_cfg = dict(
    mean=[123.675, 116.28, 103.53], std=[58.395, 57.12, 57.375], to_rgb=True)
cfg.crop_size = (256, 256)
cfg.train_pipeline = [
    dict(type='LoadImageFromFile'),
    dict(type='LoadAnnotations'),
    dict(type='Resize', img_scale=(320, 240), ratio_range=(0.5, 2.0)),
    dict(type='RandomCrop', crop_size=cfg.crop_size, cat_max_ratio=0.75),
    dict(type='RandomFlip', flip_ratio=0.5),
    dict(type='PhotoMetricDistortion'),
    dict(type='Normalize', **cfg.img_norm_cfg),
    dict(type='Pad', size=cfg.crop_size, pad_val=0, seg_pad_val=255),
    dict(type='DefaultFormatBundle'),
    dict(type='Collect', keys=['img', 'gt_semantic_seg']),
]

cfg.test_pipeline = [
    dict(type='LoadImageFromFile'),
    dict(
        type='MultiScaleFlipAug',
        img_scale=(320, 240),
        # img_ratios=[0.5, 0.75, 1.0, 1.25, 1.5, 1.75],
        flip=False,
        transforms=[
            dict(type='Resize', keep_ratio=True),
            dict(type='RandomFlip'),
            dict(type='Normalize', **cfg.img_norm_cfg),
            dict(type='ImageToTensor', keys=['img']),
            dict(type='Collect', keys=['img']),
        ])
]


cfg.data.train.type = cfg.dataset_type
cfg.data.train.data_root = cfg.data_root
cfg.data.train.img_dir = img_dir
cfg.data.train.ann_dir = ann_dir
cfg.data.train.pipeline = cfg.train_pipeline
cfg.data.train.split = 'splits/train.txt'

cfg.data.val.type = cfg.dataset_type
cfg.data.val.data_root = cfg.data_root
cfg.data.val.img_dir = img_dir
cfg.data.val.ann_dir = ann_dir
cfg.data.val.pipeline = cfg.test_pipeline
cfg.data.val.split = 'splits/val.txt'

cfg.data.test.type = cfg.dataset_type
cfg.data.test.data_root = cfg.data_root
cfg.data.test.img_dir = img_dir
cfg.data.test.ann_dir = ann_dir
cfg.data.test.pipeline = cfg.test_pipeline
cfg.data.test.split = 'splits/val.txt'

# We can still use the pre-trained Mask RCNN model though we do not need to
# use the mask branch
cfg.load_from = 'checkpoints/pspnet_r50-d8_512x1024_40k_cityscapes_20200605_003338-2966598c.pth'

# Set up working dir to save files and logs.
cfg.work_dir = './work_dirs/tutorial'

cfg.runner.max_iters = 200
cfg.log_config.interval = 10
cfg.evaluation.interval = 200
cfg.checkpoint_config.interval = 200

# Set seed to facitate reproducing the result
cfg.seed = 0
set_random_seed(0, deterministic=False)
cfg.gpu_ids = range(1)
cfg.device = get_device()

# Let's have a look at the final config used for training
print(f'Config:\n{cfg.pretty_text}')
特别注意
如果我们直接使用官方给定的配置文件进行训练的话,就会报错。
下面截取遇到的一个错位进行展示
Bug: RuntimeError: DataLoader worker (pid(s) 24444) exited unexpectedly
解决方案:
设置cfg.data.workers_per_gpu=0
打开目录: mmseg–>datasets–>builder.py
将Line 99 改成persistent_workers=False
参考:https://github.com/open-mmlab/mmsegmentation/issues/1482 TolgaBkm的办法
训练代码
from mmseg.datasets import build_dataset
from mmseg.models import build_segmentor
from mmseg.apis import train_segmentor


# Build the dataset
datasets = [build_dataset(cfg.data.train)]

# Build the detector
model = build_segmentor(cfg.model)
# Add an attribute for visualization convenience
model.CLASSES = datasets[0].CLASSES

# Create work_dir
mmcv.mkdir_or_exist(osp.abspath(cfg.work_dir))
train_segmentor(model, datasets, cfg, distributed=False, validate=True,
                meta=dict())
使用训练模型推断
img = mmcv.imread('/TmpData/iccv09Data/images/6000124.jpg')

model.cfg = cfg
result = inference_segmentor(model, img)
plt.figure(figsize=(8, 6))
show_result_pyplot(model, img, result, palette)
完整代码
这份代码已经调通,可以直接使用。
import mmcv
import os.path as osp
from PIL import Image
import matplotlib.pyplot as plt
import matplotlib.patches as mpatches
import numpy as np
from mmseg.datasets.builder import DATASETS
from mmseg.datasets.custom import CustomDataset
from mmcv import Config
from mmseg.apis import set_random_seed
from mmseg.datasets import build_dataset
from mmseg.utils import get_device

from mmseg.models import build_segmentor
from mmseg.apis import train_segmentor
import os
os.environ['KMP_DUPLICATE_LIB_OK'] = 'True'


data_root = 'TmpData/iccv09Data'
img_dir = 'images'
ann_dir = 'labels'
classes = ('sky', 'tree', 'road', 'grass', 'water', 'bldg', 'mntn', 'fg obj')
palette = [[128, 128, 128], [129, 127, 38], [120, 69, 125], [53, 125, 34],
           [0, 11, 123], [118, 20, 12], [122, 81, 25], [241, 134, 51]]

@DATASETS.register_module()
class StanfordBackgroundDataset(CustomDataset):
  CLASSES = classes
  PALETTE = palette
  def __init__(self, split, **kwargs):
    super().__init__(img_suffix='.jpg', seg_map_suffix='.png',
                     split=split, **kwargs)
    assert osp.exists(self.img_dir) and self.split is not None

# split train/val set randomly
split_dir = 'splits'
mmcv.mkdir_or_exist(osp.join(data_root, split_dir))
filename_list = [osp.splitext(filename)[0] for filename in mmcv.scandir(
    osp.join(data_root, ann_dir), suffix='.png')]
with open(osp.join(data_root, split_dir, 'train.txt'), 'w') as f:
  # select first 4/5 as train set
  train_length = int(len(filename_list)*4/5)
  f.writelines(line + '\n' for line in filename_list[:train_length])
with open(osp.join(data_root, split_dir, 'val.txt'), 'w') as f:
  # select last 1/5 as train set
  f.writelines(line + '\n' for line in filename_list[train_length:])

############################################################################################ 这里训练pspnet网络,通过在脚本里修改配置文件,里面还有很多参数,想改别的打开看看细节吧
cfg = Config.fromfile('configs/pspnet/pspnet_r50-d8_512x1024_40k_cityscapes.py')

# Since we use only one GPU, BN is used instead of SyncBN
cfg.norm_cfg = dict(type='BN', requires_grad=True)
cfg.model.backbone.norm_cfg = cfg.norm_cfg
cfg.model.decode_head.norm_cfg = cfg.norm_cfg
cfg.model.auxiliary_head.norm_cfg = cfg.norm_cfg
# modify num classes of the model in decode/auxiliary head
cfg.model.decode_head.num_classes = 8
cfg.model.auxiliary_head.num_classes = 8

# Modify dataset type and path
cfg.dataset_type = 'StanfordBackgroundDataset'
cfg.data_root = data_root

cfg.data.samples_per_gpu = 8
cfg.data.workers_per_gpu = 0

cfg.img_norm_cfg = dict(
    mean=[123.675, 116.28, 103.53], std=[58.395, 57.12, 57.375], to_rgb=True)
cfg.crop_size = (256, 256)
cfg.train_pipeline = [
    dict(type='LoadImageFromFile'),
    dict(type='LoadAnnotations'),
    dict(type='Resize', img_scale=(320, 240), ratio_range=(0.5, 2.0)),
    dict(type='RandomCrop', crop_size=cfg.crop_size, cat_max_ratio=0.75),
    dict(type='RandomFlip', flip_ratio=0.5),
    dict(type='PhotoMetricDistortion'),
    dict(type='Normalize', **cfg.img_norm_cfg),
    dict(type='Pad', size=cfg.crop_size, pad_val=0, seg_pad_val=255),
    dict(type='DefaultFormatBundle'),
    dict(type='Collect', keys=['img', 'gt_semantic_seg']),
]

cfg.test_pipeline = [
    dict(type='LoadImageFromFile'),
    dict(
        type='MultiScaleFlipAug',
        img_scale=(320, 240),
        # img_ratios=[0.5, 0.75, 1.0, 1.25, 1.5, 1.75],
        flip=False,
        transforms=[
            dict(type='Resize', keep_ratio=True),
            dict(type='RandomFlip'),
            dict(type='Normalize', **cfg.img_norm_cfg),
            dict(type='ImageToTensor', keys=['img']),
            dict(type='Collect', keys=['img']),
        ])
]


cfg.data.train.type = cfg.dataset_type
cfg.data.train.data_root = cfg.data_root
cfg.data.train.img_dir = img_dir
cfg.data.train.ann_dir = ann_dir
cfg.data.train.pipeline = cfg.train_pipeline
cfg.data.train.split = 'splits/train.txt'

cfg.data.val.type = cfg.dataset_type
cfg.data.val.data_root = cfg.data_root
cfg.data.val.img_dir = img_dir
cfg.data.val.ann_dir = ann_dir
cfg.data.val.pipeline = cfg.test_pipeline
cfg.data.val.split = 'splits/val.txt'

cfg.data.test.type = cfg.dataset_type
cfg.data.test.data_root = cfg.data_root
cfg.data.test.img_dir = img_dir
cfg.data.test.ann_dir = ann_dir
cfg.data.test.pipeline = cfg.test_pipeline
cfg.data.test.split = 'splits/val.txt'

# We can still use the pre-trained Mask RCNN model though we do not need to
# use the mask branch
#预模型位置,链接里有下载地址,自己去下载一下
cfg.load_from = 'checkpoints/pspnet_r50-d8_512x1024_40k_cityscapes_20200605_003338-2966598c.pth'

# Set up working dir to save files and logs.
#训练生成的文件位置
cfg.work_dir = './work_dirs/tutorial'

cfg.runner.max_iters = 100000
cfg.log_config.interval = 20
cfg.evaluation.interval = 500
cfg.checkpoint_config.interval = 200

# Set seed to facitate reproducing the result
cfg.seed = 0
set_random_seed(0, deterministic=False)
cfg.gpu_ids = range(1)

cfg.device = get_device()
# Let's have a look at the final config used for training
print(f'Config:\n{cfg.pretty_text}')

# Build the dataset
datasets = [build_dataset(cfg.data.train)]

# Build the detector
model = build_segmentor(cfg.model)
# Add an attribute for visualization convenience
model.CLASSES = datasets[0].CLASSES

# Create work_dir
mmcv.mkdir_or_exist(osp.abspath(cfg.work_dir))
train_segmentor(model, datasets, cfg, distributed=False, validate=True,
                meta=dict())
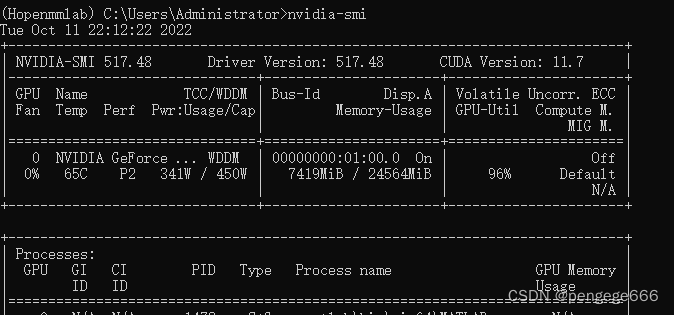
运行截图相对比较长,很多都是重复的,因此截取一部分展示。
2022-10-11 21:59:07,523 - mmseg - INFO - Loaded 572 images
Output exceeds the size limit. Open the full output data in a text editor
Config:
norm_cfg = dict(type='BN', requires_grad=True)
model = dict(
    type='EncoderDecoder',
    pretrained='open-mmlab://resnet50_v1c',
    backbone=dict(
        type='ResNetV1c',
        depth=50,
        num_stages=4,
        out_indices=(0, 1, 2, 3),
        dilations=(1, 1, 2, 4),
        strides=(1, 2, 1, 1),
        norm_cfg=dict(type='BN', requires_grad=True),
        norm_eval=False,
        style='pytorch',
        contract_dilation=True),
    decode_head=dict(
        type='PSPHead',
        in_channels=2048,
        in_index=3,
        channels=512,
        pool_scales=(1, 2, 3, 6),
        dropout_ratio=0.1,
        num_classes=8,
        norm_cfg=dict(type='BN', requires_grad=True),
...
seed = 0
gpu_ids = range(0, 1)
device = 'cuda'

Output exceeds the size limit. Open the full output data in a text editor
c:\Penge\mmsegmentation\mmsegmentation\mmseg\models\backbones\resnet.py:431: UserWarning: DeprecationWarning: pretrained is a deprecated, please use "init_cfg" instead
  warnings.warn('DeprecationWarning: pretrained is a deprecated, '
c:\Penge\mmsegmentation\mmsegmentation\mmseg\models\losses\cross_entropy_loss.py:235: UserWarning: Default ``avg_non_ignore`` is False, if you would like to ignore the certain label and average loss over non-ignore labels, which is the same with PyTorch official cross_entropy, set ``avg_non_ignore=True``.
  warnings.warn(
2022-10-11 21:59:08,037 - mmseg - INFO - Loaded 143 images
2022-10-11 21:59:08,039 - mmseg - INFO - load checkpoint from local path: checkpoints/pspnet_r50-d8_512x1024_40k_cityscapes_20200605_003338-2966598c.pth
2022-10-11 21:59:08,206 - mmseg - WARNING - The model and loaded state dict do not match exactly

size mismatch for decode_head.conv_seg.weight: copying a param with shape torch.Size([19, 512, 1, 1]) from checkpoint, the shape in current model is torch.Size([8, 512, 1, 1]).
size mismatch for decode_head.conv_seg.bias: copying a param with shape torch.Size([19]) from checkpoint, the shape in current model is torch.Size([8]).
size mismatch for auxiliary_head.conv_seg.weight: copying a param with shape torch.Size([19, 256, 1, 1]) from checkpoint, the shape in current model is torch.Size([8, 256, 1, 1]).
size mismatch for auxiliary_head.conv_seg.bias: copying a param with shape torch.Size([19]) from checkpoint, the shape in current model is torch.Size([8]).
2022-10-11 21:59:08,218 - mmseg - INFO - Start running, host: Administrator@PC-20220523VGPE, work_dir: c:\Penge\mmsegmentation\mmsegmentation\work_dirs\tutorial
2022-10-11 21:59:08,219 - mmseg - INFO - Hooks will be executed in the following order:
before_run:
(VERY_HIGH   ) PolyLrUpdaterHook
(NORMAL      ) CheckpointHook
(LOW         ) EvalHook
(VERY_LOW    ) TextLoggerHook
 --------------------
before_train_epoch:
(VERY_HIGH   ) PolyLrUpdaterHook
(LOW         ) IterTimerHook
(LOW         ) EvalHook
(VERY_LOW    ) TextLoggerHook
...
2022-10-11 22:00:30,267 - mmseg - INFO - Iter [440/100000]	lr: 9.961e-03, eta: 5:09:09, time: 0.248, data_time: 0.136, memory: 3518, decode.loss_ce: 0.4405, decode.acc_seg: 82.7337, aux.loss_ce: 0.2001, aux.acc_seg: 80.8836, loss: 0.6406
2022-10-11 22:00:33,000 - mmseg - INFO - Iter [460/100000]	lr: 9.959e-03, eta: 5:05:30, time: 0.136, data_time: 0.036, memory: 3518, decode.loss_ce: 0.4698, decode.acc_seg: 81.8568, aux.loss_ce: 0.2172, aux.acc_seg: 79.3739, loss: 0.6870
2022-10-11 22:00:35,754 - mmseg - INFO - Iter [480/100000]	lr: 9.957e-03, eta: 5:02:13, time: 0.138, data_time: 0.036, memory: 3518, decode.loss_ce: 0.4020, decode.acc_seg: 83.6756, aux.loss_ce: 0.1896, aux.acc_seg: 81.5914, loss: 0.5915
2022-10-11 22:00:40,601 - mmseg - INFO - Iter [500/100000]	lr: 9.956e-03, eta: 5:06:09, time: 0.242, data_time: 0.138, memory: 3518, decode.loss_ce: 0.4140, decode.acc_seg: 83.5783, aux.loss_ce: 0.1869, aux.acc_seg: 82.3322, loss: 0.6009
[>>>>>>>>>>>>>>>>>>>>>>>>>>>>>>] 143/143, 52.2 task/s, elapsed: 3s, ETA:     0sOutput exceeds the size limit. Open the full output data in a text editor
2022-10-11 22:00:43,346 - mmseg - INFO - per class results:
2022-10-11 22:00:43,347 - mmseg - INFO -
+--------+-------+-------+
| Class  |  IoU  |  Acc  |
+--------+-------+-------+
|  sky   | 86.77 | 93.66 |
|  tree  | 64.32 | 75.81 |
|  road  | 74.01 | 77.17 |
| grass  | 67.12 | 92.58 |
| water  | 44.45 | 91.74 |
|  bldg  | 71.41 | 81.84 |
|  mntn  | 24.12 | 35.47 |
| fg obj | 62.62 | 77.61 |
+--------+-------+-------+
2022-10-11 22:00:43,348 - mmseg - INFO - Summary:
2022-10-11 22:00:43,348 - mmseg - INFO -
+------+-------+-------+
| aAcc |  mIoU |  mAcc |
+------+-------+-------+
| 81.5 | 61.85 | 78.24 |
+------+-------+-------+
2022-10-11 22:00:43,349 - mmseg - INFO - Iter(val) [143]	aAcc: 0.8150, mIoU: 0.6185, mAcc: 0.7824, IoU.sky: 0.8677, IoU.tree: 0.6432, IoU.road: 0.7401, IoU.grass: 0.6712, IoU.water: 0.4445, IoU.bldg: 0.7141, IoU.mntn: 0.2412, IoU.fg obj: 0.6262, Acc.sky: 0.9366, Acc.tree: 0.7581, Acc.road: 0.7717, Acc.grass: 0.9258, Acc.water: 0.9174, Acc.bldg: 0.8184, Acc.mntn: 0.3547, Acc.fg obj: 0.7761
2022-10-11 22:00:46,117 - mmseg - INFO - Iter [520/100000]	lr: 9.954e-03, eta: 5:11:55, time: 0.276, data_time: 0.173, memory: 3518, decode.loss_ce: 0.4247, decode.acc_seg: 82.6503, aux.loss_ce: 0.1899, aux.acc_seg: 81.2412, loss: 0.6146
2022-10-11 22:00:48,880 - mmseg - INFO - Iter [540/100000]	lr: 9.952e-03, eta: 5:08:46, time: 0.138, data_time: 0.036, memory: 3518, decode.loss_ce: 0.4325, decode.acc_seg: 82.8490, aux.loss_ce: 0.2045, aux.acc_seg: 80.5547, loss: 0.6370
2022-10-11 22:00:51,698 - mmseg - INFO - Iter [560/100000]	lr: 9.950e-03, eta: 5:06:01, time: 0.141, data_time: 0.039, memory: 3518, decode.loss_ce: 0.4228, decode.acc_seg: 82.4444, aux.loss_ce: 0.1922, aux.acc_seg: 81.1937, loss: 0.6151
...
2022-10-11 22:02:01,898 - mmseg - INFO - Iter [960/100000]	lr: 9.915e-03, eta: 4:58:30, time: 0.137, data_time: 0.037, memory: 3518, decode.loss_ce: 0.3282, decode.acc_seg: 87.0135, aux.loss_ce: 0.1558, aux.acc_seg: 85.0921, loss: 0.4840
2022-10-11 22:02:04,655 - mmseg - INFO - Iter [980/100000]	lr: 9.913e-03, eta: 4:56:59, time: 0.138, data_time: 0.038, memory: 3518, decode.loss_ce: 0.2973, decode.acc_seg: 87.8748, aux.loss_ce: 0.1421, aux.acc_seg: 86.0150, loss: 0.4394
2022-10-11 22:02:09,521 - mmseg - INFO - Saving checkpoint at 1000 iterations
2022-10-11 22:02:11,509 - mmseg - INFO - Iter [1000/100000]	lr: 9.911e-03, eta: 5:02:24, time: 0.346, data_time: 0.137, memory: 3518, decode.loss_ce: 0.3266, decode.acc_seg: 86.5497, aux.loss_ce: 0.1624, aux.acc_seg: 83.8872, loss: 0.4890
[>>>>>>>>>>>>>>>>>>>>>>>>>>>>>>] 143/143, 51.0 task/s, elapsed: 3s, ETA:     0s
MMSegmentation框架的优化还是很不错的,GPU使用情况很高。
最后,由于模型跑的时间相对较久,因此等以后有时间再跑。待填坑…
参考资料
MMSegmentatio资料:
二、MMsegmentation 配置教程+训练教程+模型测试( 服务器)
【Python】mmSegmentation语义分割框架教程(自定义数据集、训练设定、数据增强)


 948
948

 被折叠的 条评论
为什么被折叠?
被折叠的 条评论
为什么被折叠?
 到【灌水乐园】发言


