


 本文详细介绍了如何使用OpenCV进行Blob检测,包括Blob的概念、SimpleBlobDetector的基本使用方法及通过颜色、大小和形状等参数过滤Blob的具体操作。
本教程解释了使用OpenCV进行简单的blob检测。
1.Blob是什么?
Blob是图像中共享某些共同属性(例如灰度值)的一组连接的像素。在上图中,暗连通区域是Blob,Blob检测的目的就是识别和标记这些区域。
2.SimpleBlobDetector例子
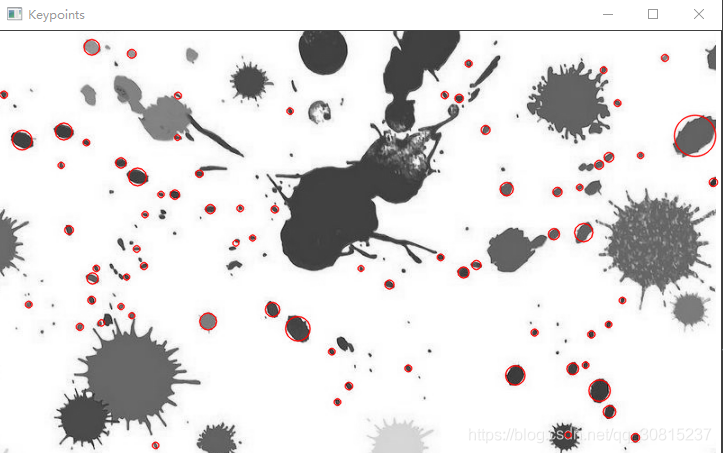
OpenCV提供了一种方便的方法来检测Blob,并根据不同的属性对其进行过滤。让我们从最简单的例子开始。
(1)Python
# 导入库
import cv2
import numpy as np;

# 读取图像
im = cv2.imread("blob.png", cv2.IMREAD_GRAYSCALE)

# 用默认参数设置检测器
ver = (cv2.__version__).split('.')
if int(ver[0]) < 3:
    detector = cv2.SimpleBlobDetector()
else:
    detector = cv2.SimpleBlobDetector_create()

# 检测blobs
keypoints = detector.detect(im)

# 用红色圆圈画出检测到的blobs
# cv2.DRAW_MATCHES_FLAGS_DRAW_RICH_KEYPOINTS 确保圆的大小对应于blob的大小
im_with_keypoints = cv2.drawKeypoints(im, keypoints, np.array([]), (0,0,255), cv2.DRAW_MATCHES_FLAGS_DRAW_RICH_KEYPOINTS)

# 结果显示
cv2.imshow("Keypoints", im_with_keypoints)
cv2.waitKey(0)
(2)C++
// 导入依赖
#include <opencv2/opencv.hpp>
#include <iostream>
// 命名空间
using namespace std;
using namespace cv;
// 读取图像
Mat im = imread( "blob.png", IMREAD_GRAYSCALE );

#if CV_MAJOR_VERSION < 3   // 如果你使用的是opencv2

  // 使用默认参数设置检测器
  SimpleBlobDetector detector();

  // 您可以这样使用检测器
  detector.detect( im, keypoints);

#else

  // 使用参数设置检测器
  Ptr<SimpleBlobDetector> detector = SimpleBlobDetector::create();

  // SimpleBlobDetector::create 创建一个智能指针
  // 所以你需要使用arrow(->)而不是dot(.)
  detector->detect( im, keypoints);

#endif

// 用红色圆圈画出检测到的blobs
// DrawMatchesFlags::DRAW_RICH_KEYPOINTS 确保圆的大小对应于blob的大小
Mat im_with_keypoints;
drawKeypoints( im, keypoints, im_with_keypoints, Scalar(0,0,255), DrawMatchesFlags::DRAW_RICH_KEYPOINTS );

// 结果显示
imshow("keypoints", im_with_keypoints );
waitKey(0);

3.Blob检测是如何工作的
SimpleBlobDetector,顾名思义,基于下面描述的一个相当简单的算法。该算法由参数控制(如下粗体所示),并具有以下步骤。下面了解如何设置参数。
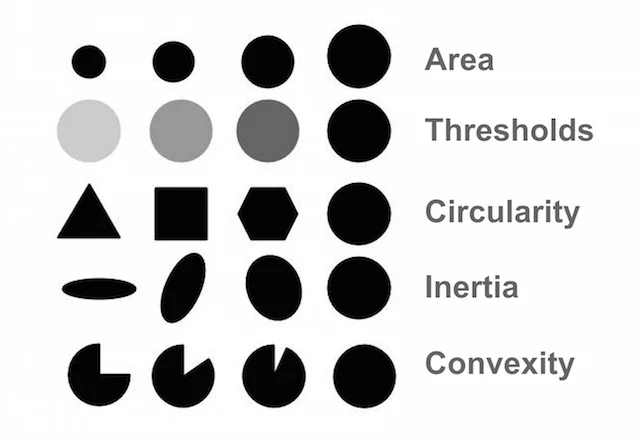
Thresholding:通过对源图像进行阈值化,将源图像转换为若干二值图像,阈值从minThreshold开始。这些阈值通过thresholdStep递增,直到maxThreshold。所以第一个阈值是minThreshold,第二个是minThreshold + thresholdStep,第三个是minThreshold + 2 x thresholdStep,以此类推。Grouping:在每个二值图像中,连接的白色像素被组合在一起。我们称这些为二值blobs。Merging:计算二值图像中二值blobs的中心,并合并距离小于minDistBetweenBlobs的blobs。Center & Radius Calculation:计算并返回新合并的blobs的中心和半径。
4.通过Color, Size 和 Shape过滤Blobs
可以设置SimpleBlobDetector的参数来过滤我们想要的blob类型。
- 1.按
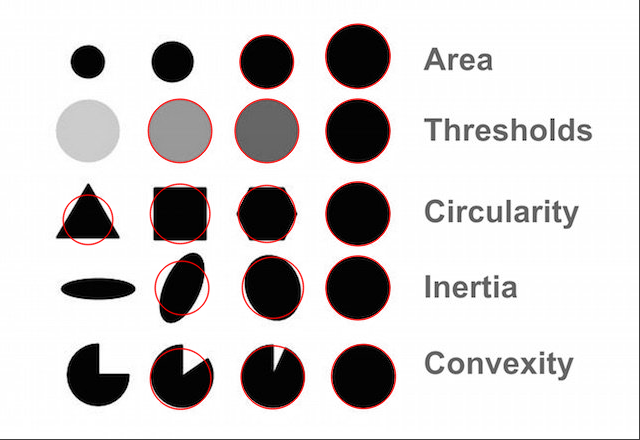
Color:首先,您需要设置filterByColor = 1。设置blobColor = 0来选择较暗的Blobs,设置blobColor = 255来选择较亮的Blobs。按大小:可以根据大小过滤Blobs,方法是设置参数filterByArea = 1,以及适当的minArea和maxArea值。例如,设置minArea = 100将过滤掉所有像素个数小于100的Blobs。按Shape:现在Shape有三个不同的参数。 - 2.
Circularity(圆度):这只是测量了这个blob与圆的距离。正六边形的圆度比正方形高。要根据圆度进行过滤,设置filterByCircularity = 1。然后设置适当的minCircularity和maxCircularity值。圆度定义为 4 π A r e a p e r i m e t e r 2 \frac{4\pi Area}{{perimeter}^2} perimeter24πArea:这意味着圆的圆度为1,正方形的圆度为0.785,以此类推。 - 3.
Convexity(凹凸性):一图胜千言。凸性定义为(Blob的面积/它的凸包的面积)。现在,凸包的形状是最紧的凸形状,完全包围了形状。设置filterByConvexity = 1,然后设置0≤minConvexity≤1和maxConvexity(≤1)。 - 4.
Inertia Ratio(惯性比):不要让这吓到你。数学家经常用令人困惑的词来描述一些非常简单的东西。你所需要知道的是,它衡量的是一个形状的伸长程度。例如,对于圆,这个值是1,对于椭圆,它在0和1之间,对于直线,它是0。根据惯性比进行滤波,设置filterByInertia = 1,并适当设置0≤mininertiratio≤1和maxinertiratio≤1。
5.如何设置SimpleBlobDetector参数?
设置SimpleBlobDetector的参数很容易。下面是一个例子:
(1)Python
# 导入库
import cv2
import numpy as np;
# 读取图像
im = cv2.imread("blob.png", cv2.IMREAD_GRAYSCALE)
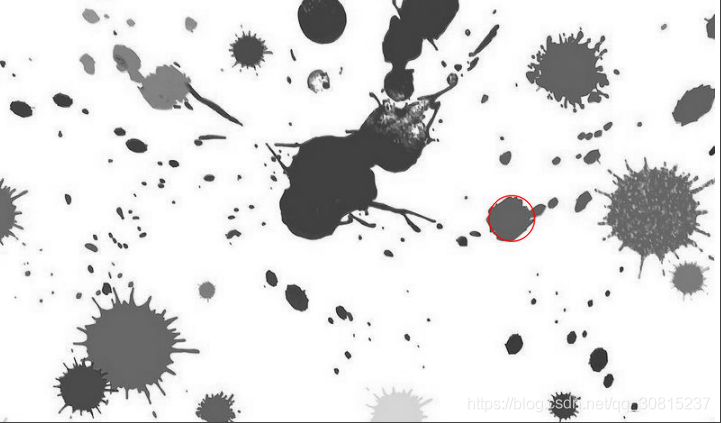
# 设置SimpleBlobDetector参数
params = cv2.SimpleBlobDetector_Params()
# 改变阈值
params.minThreshold = 10;
params.maxThreshold = 200;
# 根据面积过滤
params.filterByArea = True
params.minArea = 1500
# 根据Circularity过滤
params.filterByCircularity = True
params.minCircularity = 0.1
# 根据Convexity过滤
params.filterByConvexity = True
params.minConvexity = 0.87
# 根据Inertia过滤
params.filterByInertia = True
params.minInertiaRatio = 0.01
# 创建一个带有参数的检测器
ver = (cv2.__version__).split('.')
if int(ver[0]) < 3 :
detector = cv2.SimpleBlobDetector(params)
else :
detector = cv2.SimpleBlobDetector_create(params)
# 检测blobs
keypoints = detector.detect(im)
# 用红色圆圈画出检测到的blobs
# cv2.DRAW_MATCHES_FLAGS_DRAW_RICH_KEYPOINTS 确保圆的大小对应于blob的大小
im_with_keypoints = cv2.drawKeypoints(im, keypoints, np.array([]), (0,0,255), cv2.DRAW_MATCHES_FLAGS_DRAW_RICH_KEYPOINTS)
# 结果显示
cv2.imshow("Keypoints", im_with_keypoints)
cv2.waitKey(0)
(2)C++
// 导入依赖
#include <opencv2/opencv.hpp>
#include <iostream>
// 命名空间
using namespace std;
using namespace cv;
// 读取图像
Mat im = imread( "blob.png", IMREAD_GRAYSCALE );

// 设置SimpleBlobDetector参数
SimpleBlobDetector::Params params;

// 改变阈值
params.minThreshold = 10;
params.maxThreshold = 200;

// 根据面积过滤
params.filterByArea = true;
params.minArea = 1500;

// 根据Circularity过滤
params.filterByCircularity = true;
params.minCircularity = 0.1;

// 根据Convexity过滤
params.filterByConvexity = true;
params.minConvexity = 0.87;

// 根据Inertia过滤
params.filterByInertia = true;
params.minInertiaRatio = 0.01;

#if CV_MAJOR_VERSION < 3   // 如果你使用的是opencv2

  // 使用参数设置检测器
  SimpleBlobDetector detector(params);

  // 您可以这样使用检测器
  detector.detect( im, keypoints);

#else

  // 使用参数设置检测器
  Ptr<SimpleBlobDetector> detector = SimpleBlobDetector::create(params);

  // SimpleBlobDetector::create 创建一个智能指针
  // 所以你需要使用arrow(->)而不是dot(.)
  detector->detect( im, keypoints);

#endif

// 用红色圆圈画出检测到的blobs
// DrawMatchesFlags::DRAW_RICH_KEYPOINTS 确保圆的大小对应于blob的大小
Mat im_with_keypoints;
drawKeypoints( im, keypoints, im_with_keypoints, Scalar(0,0,255), DrawMatchesFlags::DRAW_RICH_KEYPOINTS );

// 结果显示
imshow("keypoints", im_with_keypoints );
waitKey(0);

参考目录
https://blog.csdn.net/dz4543/article/details/79897763
https://learnopencv.com/blob-detection-using-opencv-python-c/


 852
852

 被折叠的 条评论
为什么被折叠?
被折叠的 条评论
为什么被折叠?
 到【灌水乐园】发言


