


目录
旋转目标检测mmrotate
干什么:
旋转目标检测框任务
优势:
复现顶会的论文- 自定义旋转目标检测模型
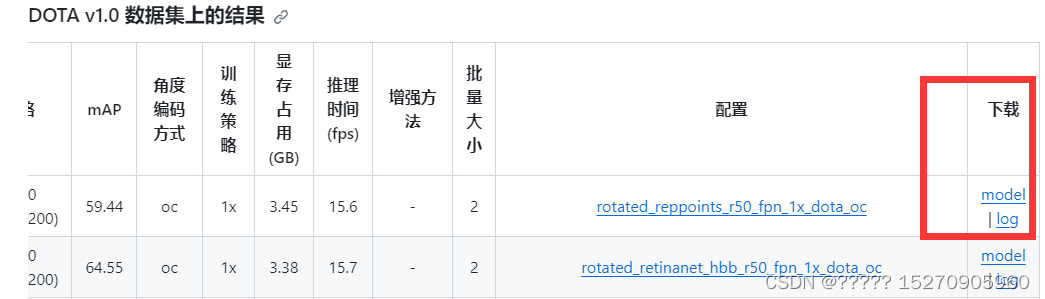
- 基础模型进行对比
实现mmrotate的五个步骤
-
环境的安装
首先创建虚拟环境,
conda create --n  mmrotate python=3.8 -y
conda activate mmrotate
然后需要安装pytorch,这里需要根据自己服务器的显卡,如果是30系列的话,最好使用cuda11,
我这里使用的torch v1.11.0
# CUDA 11.3
conda install pytorch==1.11.0 torchvision==0.12.0 torchaudio==0.11.0 cudatoolkit=11.3 -c pytorch
可以conda安装pytorch,也可以使用pip,
紧接着就是安装对应的包
第0步: 使用 MIM 安装 MMCV 和 MMDetection

pip install -U openmim
mim install mmcv-full
mim install mmdet\<3.0.0

第1步: 安装 MMRotate.

git clone https://github.com/open-mmlab/mmrotate.git
cd mmrotate
pip install -v -e .
需要注意的点是,可以使用pip,也可以使用mim,建议使用mim安装,
pip install -v -e . 这个.一定不能漏掉,否则会报错。
使用pip show mmrotate,查看对应的库的版本
环境验证
验证是否正确安装了 MMRotate和环境依赖
第1步: 我们需要下载配置文件和检查点文件。
mim download mmrotate --config oriented_rcnn_r50_fpn_1x_dota_le90 --dest .下载完成之后,当前文件夹下会找到oriented_rcnn_r50_fpn_1x_dota_le90.py 和 oriented_rcnn_r50_fpn_1x_dota_le90-6d2b2ce0.pth 这两个文件。.py为配置文件,.pth为权重文件
第2步: 验证推理演示
运行以下命令
python demo/image_demo.py demo/demo.jpg oriented_rcnn_r50_fpn_1x_dota_le90.py oriented_rcnn_r50_fpn_1x_dota_le90-6d2b2ce0.pth --out-file result.jpg
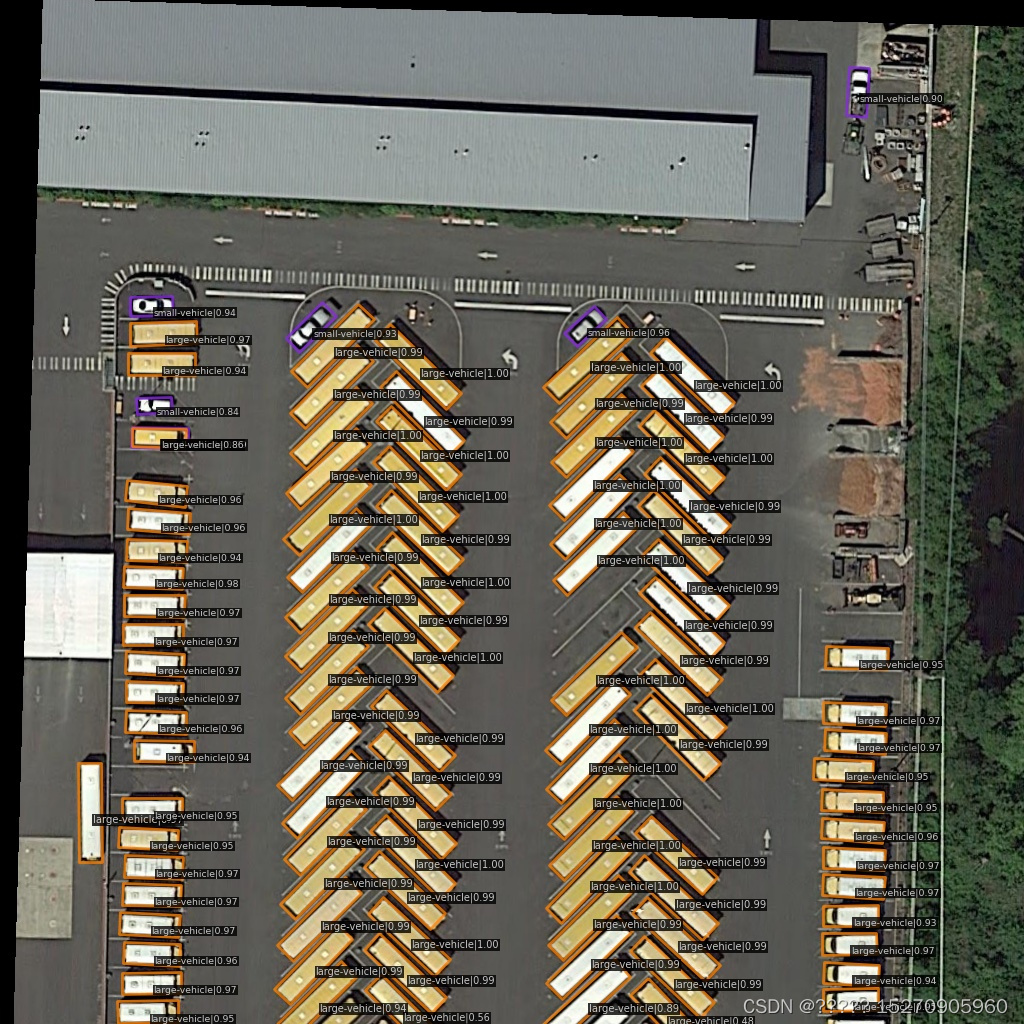
当前目录下看到一张名为 result.jpg 的新图片,其中旋转边界框绘制在汽车、公共汽车等目标上
-
数据集的处理
MMRoteate 支持的数据集
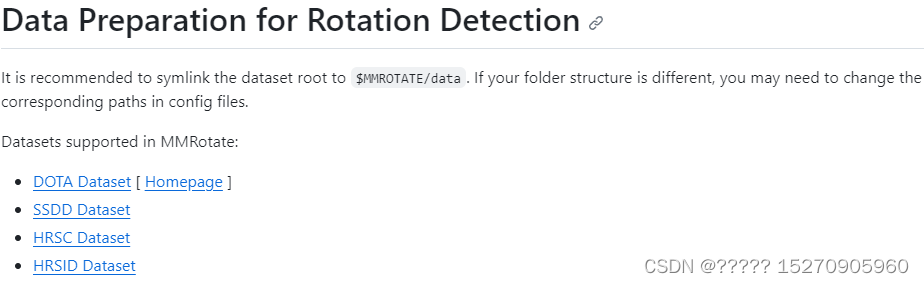
每个格式都有对应的代码图像修改
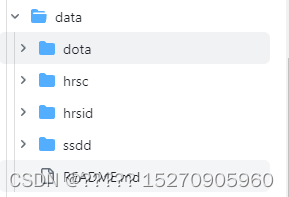
这是我们最开始的图像文件夹放置格式
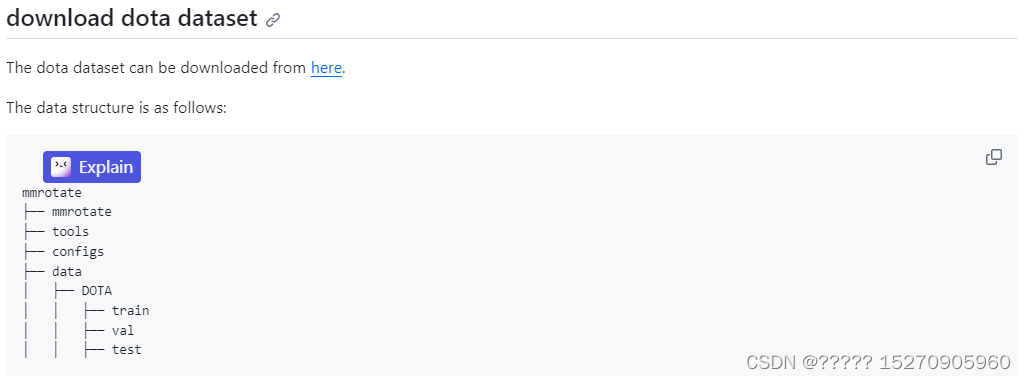
这里我使用DOTA V1.0和自己构造的数据集进行训练,首先先介绍DOTA V1.0数据集
DOTA V1.0数据集

下载地址:DOTA(推荐使用google driver下载)

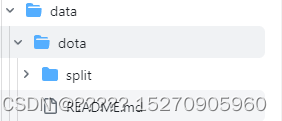
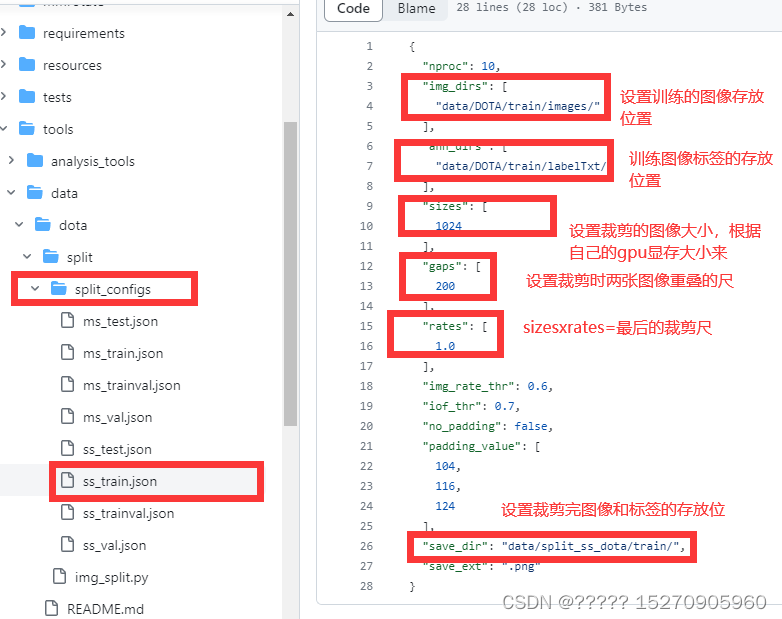
当将文件夹按照上面情况摆放后,对数据集进行裁剪 ,因为dota格式需要满足图片为.png格式且尺寸是 n×n 的(方形)通过./tools/data/dota/split/img_split.py (裁剪脚本),split文件夹里面存放着配置文件split_configs和img_split.py的执行文件。
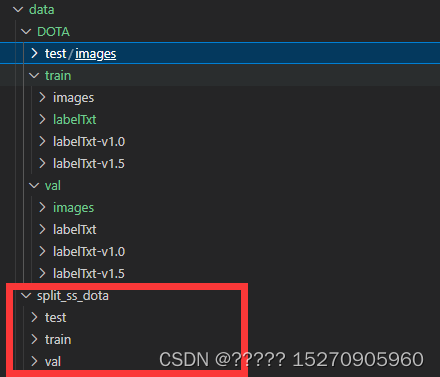
其他的val和test也是一样类似处理,处理好后,结果是下面的情况。(其中ss_表示单一尺度裁剪,ms_表示多尺度裁剪)
以上是对公共数据集进行裁剪和整理。下面对我自己的数据集进行裁剪处理,
第一,给图像进行标注,
roLabelImg 打标签
roLabelImg工具专门用于旋转框的标注,操作时:可以使用一些快捷键实现快速标注
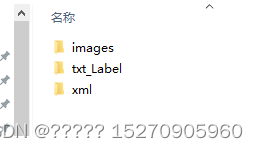
最后生成的文件目录为:
![]()
第二 给自己的数据集进行格式转化,和数据集划分,
xml格式转dota格式(txt)
import os
import xml.etree.ElementTree as ET
import math
import cv2 as cv

def voc_to_dota(xml_dir, xml_name, img_dir, savedImg_dir):
    txt_name = xml_name[:-4] + '.txt'   # txt文件名字:去掉xml 加上.txt
    txt_path = xml_dir + '/txt_label'  # txt文件目录:在xml目录下创建的txtl_label文件夹
    if not os.path.exists(txt_path):
        os.makedirs(txt_path)
    txt_file = os.path.join(txt_path, txt_name) # txt完整的含名文件路径

    img_name = xml_name[:-4] + '.jpg'          # 图像名字
    img_path = os.path.join(img_dir, img_name) # 图像完整路径
    img = cv.imread(img_path)                  # 读取图像

    xml_file = os.path.join(xml_dir, xml_name)
    tree = ET.parse(os.path.join(xml_file))    # 解析xml文件 然后转换为DOTA格式文件
    root = tree.getroot()
    with open(txt_file, "w+", encoding='UTF-8') as out_file:
        # out_file.write('imagesource:null' + '\n' + 'gsd:null' + '\n')
        for obj in root.findall('object'):
            name = obj.find('name').text
            difficult = obj.find('difficult').text
            # print(name, difficult)
            robndbox = obj.find('robndbox')
            cx = float(robndbox.find('cx').text)
            cy = float(robndbox.find('cy').text)
            w = float(robndbox.find('w').text)
            h = float(robndbox.find('h').text)
            angle = float(robndbox.find('angle').text)
            # print(cx, cy, w, h, angle)
            p0x, p0y = rotatePoint(cx, cy, cx - w / 2, cy - h / 2, -angle)
            p1x, p1y = rotatePoint(cx, cy, cx + w / 2, cy - h / 2, -angle)
            p2x, p2y = rotatePoint(cx, cy, cx + w / 2, cy + h / 2, -angle)
            p3x, p3y = rotatePoint(cx, cy, cx - w / 2, cy + h / 2, -angle)

            # 找最左上角的点
            dict = {p0y:p0x, p1y:p1x, p2y:p2x, p3y:p3x }
            list = find_topLeftPopint(dict)
            #print((list))
            if list[0] == p0x:
                list_xy = [p0x, p0y, p1x, p1y, p2x, p2y, p3x, p3y]
            elif list[0] == p1x:
                list_xy = [p1x, p1y, p2x, p2y, p3x, p3y, p0x, p0y]
            elif list[0] == p2x:
                list_xy = [p2x, p2y, p3x, p3y, p0x, p0y, p1x, p1y]
            else:
                list_xy = [p3x, p3y, p0x, p0y, p1x, p1y, p2x, p2y]

            # 在原图上画矩形 看是否转换正确
            cv.line(img, (int(list_xy[0]), int(list_xy[1])), (int(list_xy[2]), int(list_xy[3])), color=(255, 0, 0), thickness= 3)
            cv.line(img, (int(list_xy[2]), int(list_xy[3])), (int(list_xy[4]), int(list_xy[5])), color=(0, 255, 0), thickness= 3)
            cv.line(img, (int(list_xy[4]), int(list_xy[5])), (int(list_xy[6]), int(list_xy[7])), color=(0, 0, 255), thickness= 2)
            cv.line(img, (int(list_xy[6]), int(list_xy[7])), (int(list_xy[0]), int(list_xy[1])), color=(255, 255, 0), thickness= 2)

            data = str(list_xy[0]) + " " + str(list_xy[1]) + " " + str(list_xy[2]) + " " + str(list_xy[3]) + " " + \
                   str(list_xy[4]) + " " + str(list_xy[5]) + " " + str(list_xy[6]) + " " + str(list_xy[7]) + " "
            data = data + name + " " + difficult + "\n"
            out_file.write(data)
        if not os.path.exists(savedImg_dir):
            os.makedirs(savedImg_dir)
        out_img = os.path.join(savedImg_dir, xml_name[:-4]+'.jpg')
        cv.imwrite(out_img, img)


def find_topLeftPopint(dict):
    dict_keys = sorted(dict.keys())  # y值
    temp = [dict[dict_keys[0]], dict[dict_keys[1]]]
    minx = min(temp)
    if minx == temp[0]:
        miny = dict_keys[0]
    else:
        miny = dict_keys[1]
    return [minx, miny]


# 转换成四点坐标
def rotatePoint(xc, yc, xp, yp, theta):
    xoff = xp - xc
    yoff = yp - yc
    cosTheta = math.cos(theta)
    sinTheta = math.sin(theta)
    pResx = cosTheta * xoff + sinTheta * yoff
    pResy = - sinTheta * xoff + cosTheta * yoff
    # pRes = (xc + pResx, yc + pResy)
    # 保留一位小数点
    return float(format(xc + pResx, '.1f')), float(format(yc + pResy, '.1f'))
    # return xc + pResx, yc + pResy

import argparse
def parse_args():
    parser = argparse.ArgumentParser(description='数据格式转换')
    parser.add_argument('--xml-dir', default='./buildings/train/label', help='original xml file dictionary')
    parser.add_argument('--img-dir', default='./buildings/train', help='original image dictionary')
    parser.add_argument('--outputImg-dir', default='./buildings/train/out', help='saved image dictionary after dealing ')

    args = parser.parse_args()
    return args

if __name__ == '__main__':
    args = parse_args()
    xml_path = args.xml_dir
    xmlFile_list = os.listdir(xml_path)
    print(xmlFile_list)
    for i in range(0, len(xmlFile_list)):
        if ('.xml' in xmlFile_list[i]) or ('.XML' in xmlFile_list[i]):
            voc_to_dota(xml_path, xmlFile_list[i], args.img_dir, args.outputImg_dir)
            print('----------------------------------------{}{}----------------------------------------'
                  .format(xmlFile_list[i], ' has Done!'))
        else:
            print(xmlFile_list[i] + ' is not xml file')
运行之后得到的文件目录结果如下,txt_label是dota格式下的标签
第三步,将数据集按照训练集,验证集和最后的测试集
可以参考 将标注好的数据集进行划分
可以将数据集打乱,然后随机划分数据集,输入img和lables,outputimg的地址就可以生成了,
划分好后,参照上面DOTA V1.0对数据集进行裁剪。
-
配置文件的设置
配置文件这里就需要包含两个方面的配置文件,一个就是对数据的配置文件的修改,另外一个就是对模型配置文件的修改。
数据集配置文件
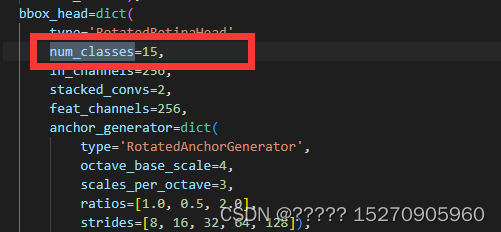
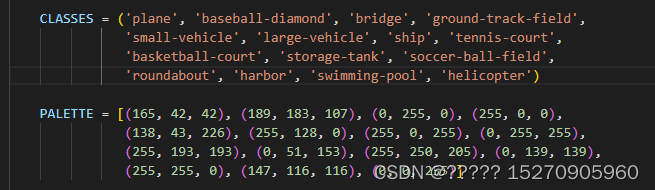
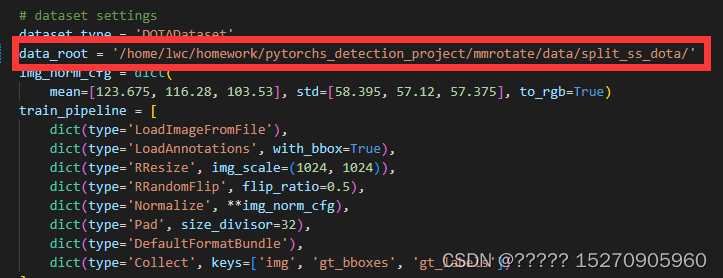
数据集配置文件主要修改 num_classes类别数,类别名称,数据集的位置,samples_per_gpu ,workers_per_gpu,epochs,打印设置等参数
num_classes类别数在 ./configs/r3det/r3det_tiny_r50_fpn_1x_dota_oc.py文件中
类别名称 ./mmrotate/datasets/dota.py
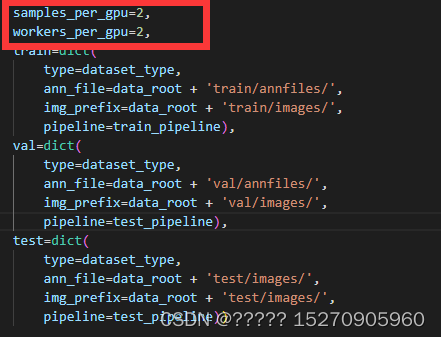
数据集的位置和samples_per_gpu ,workers_per_gpu, 在./configs/_base_/datasets/dotav1.py 文件
samples_per_gpu ,workers_per_gpu这里需要注意的是,# 设置的batch_size是通过samples_per_gpu,如果你只有一张显卡,那batch_size=samples_per_gpu,如果如果你有两张显卡,那么n x samples_per_gpu= batch_size,即
# 总的batch_size就是单个GPU的batch_size*GPU数量设置的num_worker是通过修改workers_per_gpu,workers_per_gpu=每个GPU的workers
GPU workers 在 PyTorch 中指的是在 GPU 上运行的工作进程。
-
worker 的数量对性能有很大影响。增加 worker 数可以加速训练,但过多也会导致资源竞争。需要根据 GPU 内存大小适当设置。
-
数据加载也可以通过 worker 进行并行加速。设置 num_workers 参数来启动数据加载线程。
./configs/_base_/schedules/schedule_1x.py 中,设置epochs,
# evaluation
evaluation = dict(interval=5, metric='mAP')  # 训练多少轮评估一次
# optimizer
optimizer = dict(type='SGD', lr=0.0025, momentum=0.9, weight_decay=0.0001)
optimizer_config = dict(grad_clip=dict(max_norm=35, norm_type=2))
# learning policy
lr_config = dict(
    policy='step',
    warmup='linear',
    warmup_iters=500,
    warmup_ratio=1.0 / 3,
    step=[8, 11])
runner = dict(type='EpochBasedRunner', max_epochs=100)  # 训练的总次数
checkpoint_config = dict(interval=10)  # 训练多少次后保存模型
./configs/_base_/default_runtime.py 修改log配置和使用tensorboaed
以上是数据集配置文件的修改模型文件的修改
模型文件的修改需要分为两个部分,一个是自己自定义的模型和使用现有的模型
这里先介绍使用现有的模型进行训练
1、下载模型的预训练权重,这里主要看你自己需要用什么算法,我用的是r3dat,
2、修改配置文件
在该./configs/r3det/r3det_tiny_r50_fpn_1x_dota_oc.py文件下设置预训练权重的地址,修改为你下载的预训练权重地址。(我这里使用的是绝对路径)
 init_cfg=dict(type='Pretrained', checkpoint='/home/lwc/homework/pytorchs_detection_project/mmrotate/checkpoint/r3det_tiny_r50_fpn_1x_dota_oc-c98a616c.pth')),
neck=dict(-
模型的训练
模型的训练,这里需要看自己是单gpu训练,还是多gpu训练
单gpu训练
python tools/train.py ${CONFIG_FILE} [optional arguments]python tools/train.py configs/r3det/r3det_tiny_r50_fpn_1x_dota_oc.py --work-dir ./run/r3dat/dota多gpu训练
./tools/dist_train.sh ${CONFIG_FILE} ${GPU_NUM} [optional arguments]例子:
./tools/dist_train.sh configs/r3det/r3det_tiny_r50_fpn_1x_dota_oc.py 4看到在运行,不报错,就可以呢!
-
模型的测试
预测的话,修改 test.py 中的路径参数即可。
主要有三个参数: - -config: 使用的模型文件 ; - -checkpoint:训练得到的模型权重文件; --show-dir: 预测结果存放的路径。
![]()
![]()
可以在里面加default=’xxxxx‘,也可以在命令行里面加,但是请注意的是,应该怎么添加,否则会报错
参考文献
旋转框目标检测mmrotate v0.3.1 训练DOTA数据集(二)
基于mmdetection 旋转目标检测(OBB detection)+DOTA数据集&自定义数据集+配docker


 432
432

 被折叠的 条评论
为什么被折叠?
被折叠的 条评论
为什么被折叠?
 到【灌水乐园】发言


