


方法一:是用之前学习opencv时的一个课程——信用卡数字识别的思路来做的。课程的B站链接:https://www.bilibili.com/video/BV1oJ411D71z?p=9
方法二:ocr识别
样板字符与人民币图像准备
首先需要准备下样本字符,作为匹配的标准。我这里是直接在ppt中大概肉眼匹配了一组和人民币字符接近的字符,一共设置了A-Z,0-9,36个字符:

人民币图像采集,或者网上有人民币的数据集。
方法一:opencv
主要流程

1.myutils.py
该脚本为此次所用到的一些功能函数
import cv2
import os

def sort_contours(cnts, method="left-to-right"):
    reverse = False
    i = 0
    if method == "right-to-left" or method == "bottom-to-top":
        reverse = True
    if method == "top-to-bottom" or method == "bottom-to-top":
        i = 1
    boundingBoxes = [cv2.boundingRect(c) for c in cnts] #用一个最小的矩形,把找到的形状包起来x,y,h,w
    (cnts, boundingBoxes) = zip(*sorted(zip(cnts, boundingBoxes),
                                        key=lambda b: b[1][i], reverse=reverse))
    return cnts, boundingBoxes

def resize(image, width=None, height=None, inter=cv2.INTER_AREA):
    dim = )None
    (h, w) = image.shape[:2]
    if width is None and height is None:
        return image
    if width is None:
        r = height / float(h)
        dim = (int(w * r), height)
    else:
        r = width / float(w)
        dim = (width, int(h * r))
    resized = cv2.resize(image, dim, interpolation=inter)
    return resized

def cv_show(name,img):
    cv2.imshow(name, img)
    cv2.waitKey(0)
    cv2.destroyAllWindows()

def img_save(file_name,img):
    path='./result/'
    if not os.path.exists(path):
        os.mkdir(path)
    file=path+file_name
    cv2.imwrite(file,img)
2.rmb.py
from imutils import contours
import numpy as np
import os
import argparse
import cv2
import myutils
from myutils import cv_show,img_save
# 设置参数
ap = argparse.ArgumentParser()
ap.add_argument("-i", "--image", required=True,
help="path to input image")
ap.add_argument("-t", "--template", required=True,
help="path to template OCR-A image")
args = vars(ap.parse_args())
# 读取一个模板图像
img = cv2.imread(args["template"])
cv_show('img', img)
img_save('1.png', img)
# 灰度图
ref = cv2.cvtColor(img, cv2.COLOR_BGR2GRAY)
cv_show('ref', ref)
img_save('2.png', ref)
# 二值图像
ref = cv2.threshold(ref, 10, 255, cv2.THRESH_BINARY_INV)[1]
cv_show('ref', ref)
img_save('3.png', ref)
# 计算轮廓
refCnts, hierarchy = cv2.findContours(ref.copy(), cv2.RETR_EXTERNAL,cv2.CHAIN_APPROX_SIMPLE)
cv2.drawContours(img,refCnts,-1,(0,0,255),3)
cv_show('img',img)
img_save('4.png',img)
print(np.array(refCnts).shape)
refCnts = myutils.sort_contours(refCnts, method="left-to-right")[0] #排序,从左到右,从上到下
digits = {}
list=['A','B','C','D','E','F','G','H','I','J','K','L','M','N','O','P','Q','R','S','T',\
'U','V','W','X','Y','Z','0','1','2','3','4','5','6','7','8','9']
# 遍历每一个轮廓
for (i, c) in enumerate(refCnts):
# print(i)
# 计算外接矩形并且resize成合适大小
(x, y, w, h) = cv2.boundingRect(c)
roi = ref[y:y + h, x:x + w]
roi = cv2.resize(roi, (57, 88))
# 每一个数字对应每一个模板
digits[list[i]] = roi
# for key,value in digits.items():
# print(key)
# 初始化卷积核
rectKernel = cv2.getStructuringElement(cv2.MORPH_RECT, (12, 3))
sqKernel = cv2.getStructuringElement(cv2.MORPH_RECT, (7, 7))
#读取输入图像,预处理
image = cv2.imread(args["image"])
cv_show('image',image)
img_save('5.png',image)
print(image.shape)
# image = myutils.resize(image, width=300)
gray = cv2.cvtColor(image, cv2.COLOR_BGR2GRAY)
cv_show('gray',gray)
img_save('6.png',gray)
#礼帽操作,突出更明亮的区域
tophat = cv2.morphologyEx(gray, cv2.MORPH_TOPHAT, rectKernel)
cv_show('tophat',tophat)
img_save('7.png',tophat)
gradX = cv2.Sobel(tophat, ddepth=cv2.CV_32F, dx=1, dy=0, #ksize=-1相当于用3*3的
ksize=-1)
gradX = np.absolute(gradX)
(minVal, maxVal) = (np.min(gradX), np.max(gradX))
gradX = (255 * ((gradX - minVal) / (maxVal - minVal)))
gradX = gradX.astype("uint8")
print (np.array(gradX).shape)
cv_show('gradX',gradX)
img_save('8.png',gradX)
#通过闭操作(先膨胀,再腐蚀)将数字连在一起
gradX = cv2.morphologyEx(gradX, cv2.MORPH_CLOSE, rectKernel)
cv_show('gradX',gradX)
img_save('9.png',gradX)
#THRESH_OTSU会自动寻找合适的阈值,适合双峰,需把阈值参数设置为0
thresh = cv2.threshold(gradX, 0, 255,
cv2.THRESH_BINARY | cv2.THRESH_OTSU)[1]
cv_show('thresh',thresh)
img_save('10.png',thresh)
#再来一个闭操作
thresh = cv2.morphologyEx(thresh, cv2.MORPH_CLOSE, sqKernel) #再来一个闭操作
cv_show('thresh',thresh)
img_save('11.png',thresh)
# 计算轮廓
threshCnts, hierarchy = cv2.findContours(thresh.copy(), cv2.RETR_EXTERNAL,
cv2.CHAIN_APPROX_SIMPLE)
cnts = threshCnts
cur_img = image.copy()
cv2.drawContours(cur_img,cnts,-1,(0,0,255),3)
cv_show('img',cur_img)
img_save('12.png',cur_img)
locs = [] # 用于存储目标轮廓区域的(xywh)
# 遍历轮廓
for (i, c) in enumerate(cnts):
# 计算矩形
(x, y, w, h) = cv2.boundingRect(c)
# 通过长宽比进行筛选需要识别的数字区域
ar = w / float(h)
# 选择合适的区域,根据实际任务来,这里的基本都是四个数字一组
if ar > 4 and ar < 8:
if (w > 130 and w <160 ) and (h > 20 and h < 30):
#符合的留下来
locs.append((x, y, w, h))
print(locs)
# 将符合的轮廓从左到右排序
# locs = sorted(locs, key=lambda x:x[0]) #这里只有一个符合的,不用排序
output = []
# 遍历轮廓中的数字
for (i, (gX, gY, gW, gH)) in enumerate(locs):
# initialize the list of group digits
print("x,y,w,h",gX,gY,gW,gH)
groupOutput = []
# 根据坐标提取每一个组
group = gray[gY - 5:gY + gH + 5, gX - 5:gX + gW + 5]
cv_show('group',group)
img_save('13_'+str(gX)+'.png', group)
# 预处理
group = cv2.threshold(group, 0, 255,
cv2.THRESH_BINARY | cv2.THRESH_OTSU)[1]
cv_show('group',group)
img_save('14_'+str(gX)+'.png', group)
#做个反色
group=cv2.bitwise_not(group)
# 计算每一组的轮廓
digitCnts,hierarchy = cv2.findContours(group.copy(), cv2.RETR_EXTERNAL,
cv2.CHAIN_APPROX_SIMPLE)
digitCnts = contours.sort_contours(digitCnts,
method="left-to-right")[0]
# 计算每一组中的每一个数值
a=1
for c in digitCnts:
# 找到当前数值的轮廓,resize成合适的的大小
(x, y, w, h) = cv2.boundingRect(c)
print(x,y,w,h)
roi = group[y:y + h, x:x + w]
roi = cv2.resize(roi, (57, 88))
cv_show('roi',roi)
img_save('15_' +str(a) + '.png', roi)
a+=1
# 计算匹配得分
scores = []
# 在模板中计算每一个得分
for (digit, digitROI) in digits.items():
# 模板匹配
result = cv2.matchTemplate(roi, digitROI,
cv2.TM_CCOEFF)
(_, score, _, _) = cv2.minMaxLoc(result)
scores.append(score)
# 得到最合适的数字
groupOutput.append(str(np.argmax(scores)))
print(groupOutput)
#将对应位置的结果索引出来
result=[]
for i in groupOutput:
result_sor=list[int(i)]
result.append(result_sor)
print('result',result)
# 画出来
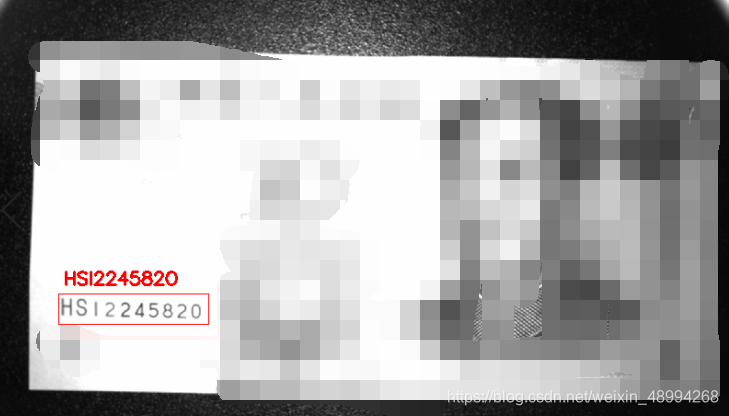
cv2.rectangle(image, (gX - 5, gY - 5),
(gX + gW + 5, gY + gH + 5), (0, 0, 255), 1)
cv2.putText(image, "".join(result), (gX, gY - 15),
cv2.FONT_HERSHEY_SIMPLEX, 0.65, (0, 0, 255), 2)
# 得到结果
output.extend(groupOutput)
cv2.imshow("Image", image)
img_save("16.png", image)
cv2.waitKey(0)结果显示
方法二:easyocr库使用
easyocr官方github.具体的说明文档见github.
使用效果:

支持的识别语言:

代码
import easyocr
import cv2
import numpy as np
from PIL import Image, ImageDraw, ImageFont
import os
fontC = ImageFont.truetype("platech.ttf", 23, 0)
def cv2ImgAddText(img, text, left, top, textColor=(255, 0, 0), textSize=30):
if (isinstance(img, np.ndarray)): # 判断是否OpenCV图片类型
img = Image.fromarray(cv2.cvtColor(img, cv2.COLOR_BGR2RGB))
# 创建一个可以在给定图像上绘图的对象
draw = ImageDraw.Draw(img)
# 字体的格式
fontStyle = ImageFont.truetype(
"font/simsun.ttc", textSize, encoding="utf-8")
# 绘制文本
draw.text((left, top), text, textColor, font=fontC)
# 转换回OpenCV格式
return cv2.cvtColor(np.asarray(img), cv2.COLOR_RGB2BGR)
def image_detect():
img=cv2.imread('./outdoorAA-1.jpg')
reader = easyocr.Reader(['ch_sim','en'])
result = reader.readtext(img)
for a,b,c in result:
print(a,b,c)
pts=np.array(a,np.int32)
pts=pts.reshape((-1,1,2))
left=a[0][0]
top=a[0][1]
if len(b)>0:
cv2.polylines(img,[pts],True,(0,0,255),thickness=2)
img=cv2ImgAddText(img,str(b)+'-'+str(round(c,3)),left,top-30)
cv2.imshow('img',img)
cv2.imwrite('./1.jpg',img)
cv2.waitKey(0)
def dir_detect():
test_dir = "./public_test_data" # 图片读入路径
# fw = open("./test-results/results.txt", 'w+') # 以覆盖写方式打开文件,如果不存在,则新建一个
fw= "./test-results/results.txt"
os.makedirs(os.path.dirname(fw), exist_ok=True)
fw = open("./test-results/No14007mresults.txt", 'w+')
for f in os.listdir(test_dir):
try:
if f.endswith(".jpg") or f.endswith("JPG") or f.endswith("png"):
# print("---------"+f+"----------------");
cpp = test_dir + "/" + f # 生成完整路径
img=cv2.imread(cpp)
reader = easyocr.Reader(['ch_sim', 'en'])
result = reader.readtext(img)
for a,b, c in result:
# print(a, b, c)
pts = np.array(a, np.int32)
pts = pts.reshape((-1, 1, 2))
left = a[0][0]
top = a[0][1]
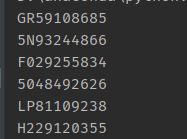
if (len(b) == 10 )and (' 'not in b): # 这个是将检测到的结果筛选
print(b)
cv2.polylines(img, [pts], True, (0, 0, 255), thickness=2)
img = cv2ImgAddText(img, str(b) + '-' + str(round(c, 3)), left, top - 30)
info=str(f)+'\t'+str(b)+'\t'+str(round(c,3))
fw.write(info)
cv2.imwrite("./test-results/" + f, img)
except Exception as e:
print(e) # 输出异常信息,调试用,发布时应注释掉
continue
fw.close()
cv2.destroyAllWindows()
# 两种检测方式,一个是检测单张,一个是检测整个文件夹。
# dir_detect()
image_detect()效果


 885
885


 被折叠的 条评论
为什么被折叠?
被折叠的 条评论
为什么被折叠?
 到【灌水乐园】发言


