


一、经典蓝牙
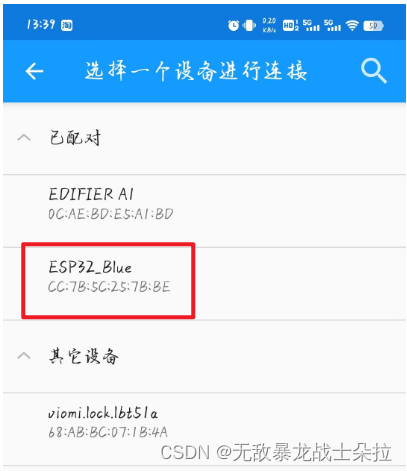
ESP32 上的内置经典蓝牙相比低功耗蓝牙较为简单,可以和 Android 智能手机之间交换数据。例程手机蓝牙控制 led 开关:
#include "BluetoothSerial.h"   //引入蓝牙函数库

// 检查蓝牙是否正确启用
#if !defined(CONFIG_BT_ENABLED) || !defined(CONFIG_BLUEDROID_ENABLED)
#error Bluetooth is not enabled! Please run `make menuconfig` to and enable it
#endif

const int ledPin = 2;

String message = "";

BluetoothSerial SerialBT;   // 蓝牙结构名称

void setup()
{
    Serial.begin(115200);

    pinMode(ledPin, OUTPUT);
    digitalWrite(ledPin , LOW);

    SerialBT.begin("ESP32_Blue");    // 蓝牙名称
    Serial.println("The device started, now you can pair it with bluetooth!");
}

void loop()
{
    if (SerialBT.available())   //判断蓝牙串口是否收到数据
    {
        char c = SerialBT.read();   //将收到的数据读取出来,下面分别处理
        // String res = SerialBT.readString();   //将收到的数据读取出来,下面分别处理
        if (c != '\n')
        {
            message += String(c);
        }
        else
        {
            message = "";
        }
        Serial.write(c);
    }

    if (message == "led_on")
    {
        digitalWrite(ledPin, HIGH);
    }
    else if (message == "led_off")
    {
        digitalWrite(ledPin, LOW);
    }

    delay(10);
}
烧录到 ESP32 开发板后,可以在手机端用蓝牙串口工具连接到 ESP32 蓝牙,然后相互通信。

发送 “led_on”,IO2 高电平,LED 点亮;
发送 “led_off”,IO2 低电平,LED 熄灭。
二、BLE 低功耗蓝牙
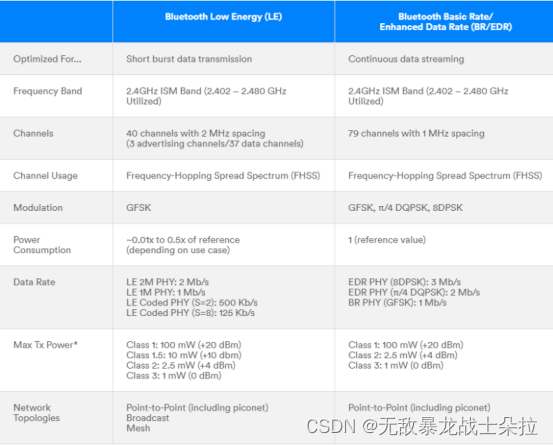
低功耗蓝牙,简称 BLE,是蓝牙的省电版本。BLE 的主要应用是短距离传输少量数据(低带宽)。与经典蓝牙不同,BLE 始终保持睡眠模式,除非启动连接,这使得它消耗的功率非常低。
下面是 BLE 与经典蓝牙对比:
GATT 协议:
GATT 代表通用属性,它定义了向连接的 BLE 设备公开的分层数据结构。这意味着 GATT 定义了两个 BLE 设备发送和接收标准消息的方式。了解此层次结构非常重要,因为它将更容易理解如何使用 BLE 和编写应用程序。

BLE特性:
特征始终由服务拥有,它是实际数据包含在层次结构(值)中的位置。特征始终具有两个属性:特征声明(提供有关数据的元数据)和特征值。
此外,特征值后面可以跟描述符,这些描述符进一步扩展了特征声明中包含的元数据。
这些属性描述了如何与特征值进行交互。基本上,它包含可用于以下特征的操作和过程:
- 广播
- 读
- 写入时没有响应
- 写
- 通知
- 表明
- 经过身份验证的签名写入
- 扩展属性
UUID:
每个服务、特征和描述符都有一个 UUID(通用唯一标识符)。UUID 是唯一的 128 位(16 字节)数字。
SIG(蓝牙特别兴趣小组)中指定的所有类型、服务和配置文件都有缩短的 UUID。
但是,如果您的应用程序需要自己的 UUID,则可以使用此 UUID 生成器网站生成它。
服务器和客户端:
使用低功耗蓝牙,有两种类型的设备:服务器和客户端。ESP32 既可以作为客户端,也可以作为服务器。
BLE支持点对点通信、广播模式和网状网络:
- 点对点通信:服务器蓝牙需要主动广播信号,以便其他设备找到它,其中包含客户端可以读取的数据。客户端蓝牙需要扫描附近的设备,当找到它要查找的服务器时,建立连接并侦听传入的数据;
- 广播模式:服务器将数据传输到连接的多个客户端;
- 网状网络:所有设备都已连接,这是多对多的连接。
ESP32 BLE 服务器:
- 创建 BLE 服务器;
- 创建 BLE 服务;
- 在服务上创建 BLE 特征;
- 在特征上创建 BLE 描述符;
- 启动服务;
- 开始广播,以便其他设备找到它。
#include <Arduino.h>
#include <BLEDevice.h>
#include <BLEUtils.h>
#include <BLEServer.h>

// Service 和 Character 定义一个 UUID
// UUID 用于标识蓝牙服务以及特征访问属性
#define SERVICE_UUID        "4fafc201-1fb5-459e-8fcc-c5c9c331914b"
#define CHARACTERISTIC_UUID "beb5483e-36e1-4688-b7f5-ea07361b26a8"

void setup()
{
    Serial.begin(115200);
    Serial.println("Starting BLE work!");

    BLEDevice::init("Long name now");     // 创建名字为“Long name now”的 BLE 设备
    BLEServer *pServer = BLEDevice::createServer();     // 将 BLE 设备设置为服务器
    BLEService *pService = pServer->createService(SERVICE_UUID);    // 前面定义的 UUID 为 BLE 服务器创建服务
    BLECharacteristic *pCharacteristic = pService->createCharacteristic(    // 设置服务特征
                                            CHARACTERISTIC_UUID,
                                            BLECharacteristic::PROPERTY_READ |
                                            BLECharacteristic::PROPERTY_WRITE
                                        );

    pCharacteristic->setValue("I am BEL");  // 发送
    pService->start();      // 启动服务
    // BLEAdvertising *pAdvertising = pServer->getAdvertising();  // 检索可用于发布服务器存在的发布对象
    BLEAdvertising *pAdvertising = BLEDevice::getAdvertising();
    pAdvertising->addServiceUUID(SERVICE_UUID);
    pAdvertising->setScanResponse(true);    // 响应
    pAdvertising->setMinPreferred(0x06);    // functions that help with iPhone connections issue
    pAdvertising->setMinPreferred(0x12);
    BLEDevice::startAdvertising();
    Serial.println("Characteristic defined! Now you can read it in your phone!");
}


void loop()
{
    delay(2000);
}
ESP32 BLE 客户端:
#include <Arduino.h>
#include <BLEDevice.h>
#include <BLEUtils.h>
#include <BLEScan.h>
#include <BLEAdvertisedDevice.h>
int scanTime = 5;
BLEScan* pBLEScan;
// 回调处理程序
class MyAdvertisedDeviceCallbacks: public BLEAdvertisedDeviceCallbacks
{
void onResult(BLEAdvertisedDevice advertisedDevice) {
Serial.printf("Advertised Device: %s \n", advertisedDevice.toString().c_str());
}
};
void setup()
{
Serial.begin(115200);
Serial.println("Scanning...");
BLEDevice::init(""); // 初始化 BLE 设备
pBLEScan = BLEDevice::getScan(); // 创建新扫描
pBLEScan->setAdvertisedDeviceCallbacks(new MyAdvertisedDeviceCallbacks()); // 回调函数
pBLEScan->setActiveScan(true); // 主动扫描,功率大扫描快
pBLEScan->setInterval(100); // 扫描间隔时间
pBLEScan->setWindow(99);
}
void loop()
{
BLEScanResults foundDevices = pBLEScan->start(scanTime, false); // 扫描
Serial.print("Devices found: ");
Serial.println(foundDevices.getCount());
Serial.println("Scan done!");
pBLEScan->clearResults(); // 从 blescan 缓冲区中删除结果以释放内存
delay(2000);
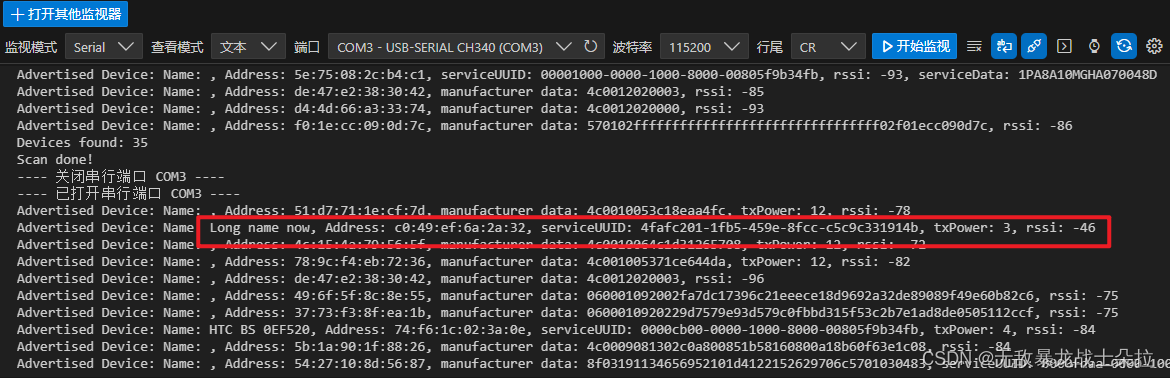
}两个 ESP32 分别烧录上面程序就可以在客户端发现服务器端。
扫描一下找到了好多......但也有我需要的服务器端。


 1033
1033


 被折叠的 条评论
为什么被折叠?
被折叠的 条评论
为什么被折叠?
 到【灌水乐园】发言


