


前言
本系列文章将会记录一个基于YOLOv8和Medipipe的手势识别系统的搭建过程,系列预计分成四个部分,依序完整描述数据预处理、租用服务器基于YOLOv8训练、引入Mediapipe降低实时计算量、搭建前端页面等过程。本文将对开源的HaGRID静态手势数据集执行精简处理和数据增强。
目录
一、HaGRID数据集
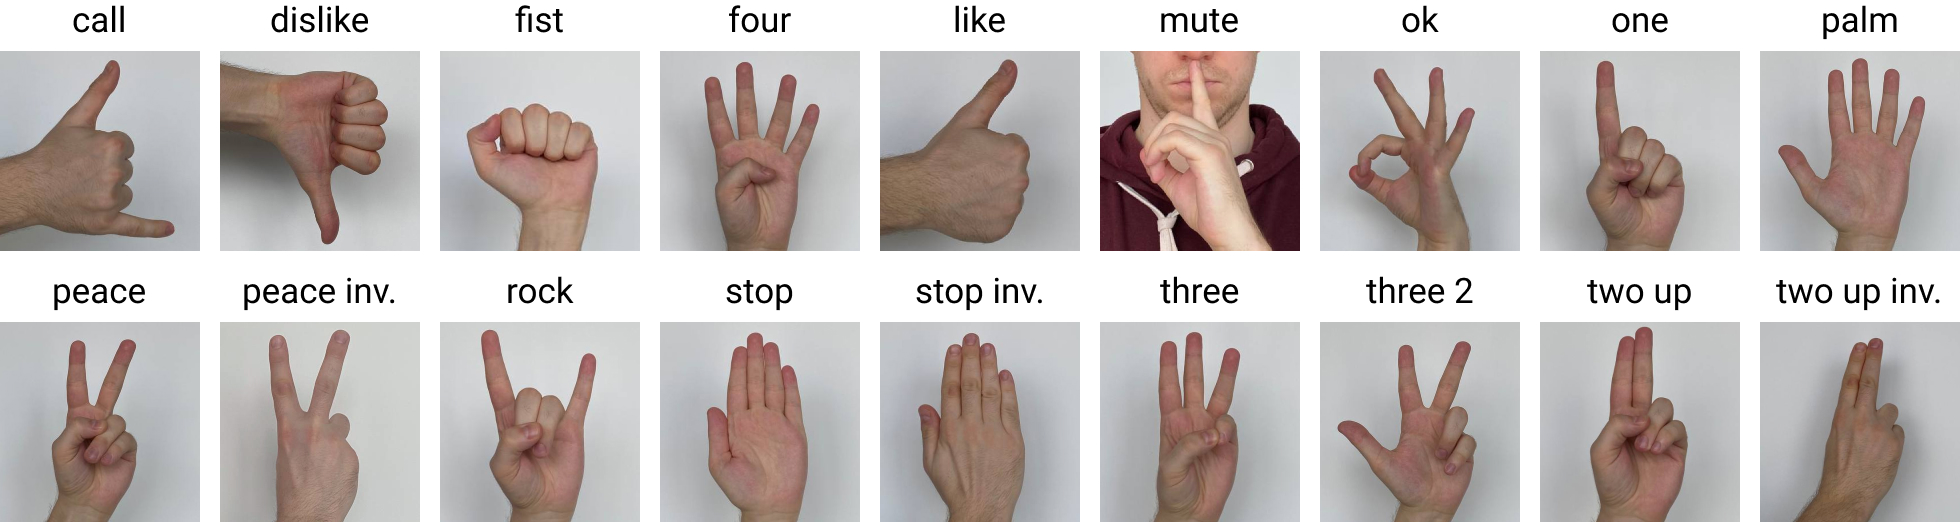
Ha-GRID数据集是一个专为手势识别系统设计的大规模图像数据集,由Alexander Kapitanov等人在2022年提出,该数据集包含 553,994 张分辨率为 1920×1080 的 RGB 图像,涵盖 18 类静态手势。该数据集具备广泛的多样性,涵盖不同种族、光照条件、背景环境以及手势姿态。官方数据集下载链接:hukenovs/hagrid at Hagrid_v1
Tranval
| Gesture | Size | Gesture | Size |
|---|---|---|---|
| call | 39.1 GB | peace | 38.6 GB |
| dislike | 38.7 GB | peace_inverted | 38.6 GB |
| fist | 38.0 GB | rock | 38.9 GB |
| four | 40.5 GB | stop | 38.3 GB |
| like | 38.3 GB | stop_inverted | 40.2 GB |
| mute | 39.5 GB | three | 39.4 GB |
| ok | 39.0 GB | three2 | 38.5 GB |
| one | 39.9 GB | two_up | 41.2 GB |
| palm | 39.3 GB | two_up_inverted | 39.2 GB |
train_val annotations: ann_train_val
Test
| Test | Archives | Size |
|---|---|---|
| images | test | 60.4 GB |
| annotations | ann_test | 27.3 MB |
Subsample
Subsample has 100 items per gesture.
| Subsample | Archives | Size |
|---|---|---|
| images | subsample | 2.5 GB |
| annotations | ann_subsample | 1.2 MB |
二、精简处理
由于原始数据集规模过大(716GB)且标注格式为.json,为了适配YOLOv8训练,本文采用降低分辨率YOLO标注格式的HaGRID数据集,大小约18GB,下载链接:https://pan.baidu.com/s/1Go2YapoeXdy7hbZPX1-G0g 提取码:31yf
该数据集虽降低了原数据集的分辨率,但数量不变。为了进一步降低训练成本,本文对该数据集每类仅抽取750张图片,构成13500张图片的精简HaGRID数据集。并按照8:1:1的比例分成了训练集、验证集与测试集,此外,原数据集对无手势情况也做了标注,这组数据集在训练时需要额外进行处理,为了进一步简化,在处理时剔除了这个情况的标注文件与数据集。精简后的数据集大小仅1.04GB。
下载链接:https://pan.baidu.com/s/1pKMeYZ3mXVduKWcX2Kr3XQ 提取码:yla1
三、数据增强
采用albumentations库执行数据增强,Albumentations库是由Alexander Buslaev等人于2018年提出的一个在计算机视觉领域中被广泛使用的图像增强工具,旨在通过输入变换来增加标记训练集的大小和多样性,同时保持输出标签的一致性。具体安装和使用方法参考:最快最好用的数据增强库「albumentations」 一文看懂用法-CSDN博客
官方链接如下:
对精简HaGRID数据集的训练集执行离线数据增强,实施分阶段扰动策略。几何形变增强包含随机旋转与平移操作:随机旋转以图像中心为轴,以0.5的概率在[-15°, +15°]范围内随机采样旋转角度,旋转后边缘区域填充零值;随机平移则以0.3的概率沿X/Y轴方向移动±10%像素距离。
色彩空间扰动通过多维度调整提升模型对光照变化的适应性,具体包括亮度对比度调整(概率0.5)、HSV色域扰动(概率0.5)和CLAHE增强(概率0.3)。其中亮度对比度的偏移量控制在[-0.2, +0.2]区间,对比度缩放因子为[0.8, 1.2];HSV扰动则对色相施加±10°偏移,饱和度与明度调整幅度为±20%;CLAHE以8×8网格划分图像进行局部直方图均衡化,强化低光照区域的细节特征。
噪声与压缩模拟模块通过高斯噪声注入(概率0.3)和JPEG压缩伪影(概率0.3)模拟现实场景干扰。高斯噪声方差范围设定为[10, 50],JPEG压缩质量因子选取[80, 100]以生成不同失真程度的图像。结构化遮挡增强部分采用随机矩形遮挡策略,以0.3概率生成1-3个尺寸介于10×10至30×30像素的遮挡区域,填充零值以迫使模型关注局部特征。
整个增强流程采用串联执行模式,单张样本最多经历两次强扰动操作,最终训练集规模扩展至21,600张。数据增强代码如下:
import albumentations as A
from albumentations.pytorch import ToTensorV2


def get_augmentation():
    return A.Compose([
        # 几何变换(保持手部完整)
        A.Rotate(limit=15, p=0.5),  # 随机旋转±15度
        A.ShiftScaleRotate(shift_limit=0.1, scale_limit=0, rotate_limit=0, p=0.3),  # 水平平移±10%
        A.ShiftScaleRotate(shift_limit=0.1, scale_limit=0, rotate_limit=0, p=0.3),  # 垂直平移±10%

        # 颜色空间变换
        A.RandomBrightnessContrast(brightness_limit=0.2, contrast_limit=0.2, p=0.5),
        A.HueSaturationValue(hue_shift_limit=10, sat_shift_limit=20, val_shift_limit=10, p=0.5),
        A.CLAHE(p=0.3),

        # 噪声和压缩模拟
        A.GaussNoise(var_limit=(10.0, 50.0), p=0.3),
        A.ImageCompression(quality_lower=80, quality_upper=100, p=0.3),

        # 空间保持类增强
        A.CoarseDropout(max_holes=3, max_height=30, max_width=30,
                        min_holes=1, min_height=10, min_width=10,
                        fill_value=0, p=0.3),  # 在非手部区域添加遮挡

        ToTensorV2()
    ], bbox_params=A.BboxParams(format='yolo', label_fields=['class_labels']))
将该代码命名为augmentations.py,按照注释说明修改以下脚本中的路径即可按照标注文件自动遍历数据集执行该数据增强。
import os
import cv2
import numpy as np
import torch
from augmentations import get_augmentation

# --------------------------
# 配置路径(根据实际情况修改)
# 原始训练数据目录:假设图像与标注文件分别存放在以下文件夹中
orig_images_dir = r"A:\hagrid_yolo\hagrid_dataset_512\yolo\images\train"
orig_labels_dir = r"A:\hagrid_yolo\hagrid_dataset_512\yolo\labels\train"

# 增强后数据存放目录
aug_images_dir = r"A:\hagrid_yolo\hagrid_dataset_512\augyolo\images\train"
aug_labels_dir = r"A:\hagrid_yolo\hagrid_dataset_512\augyolo\labels\train"
os.makedirs(aug_images_dir, exist_ok=True)
os.makedirs(aug_labels_dir, exist_ok=True)

# 获取自定义数据增强管道
augmentation_pipeline = get_augmentation()


def read_yolo_labels(label_path):
    """
    读取 YOLO 格式标注文件,每行格式:
    <class_id> <x_center> <y_center> <width> <height>
    返回 numpy 数组,形状 (N,5)
    """
    labels = []
    with open(label_path, "r") as f:
        for line in f:
            parts = line.strip().split()
            if len(parts) == 5:
                labels.append([float(x) for x in parts])
    return np.array(labels) if labels else np.empty((0, 5), dtype=float)


def write_yolo_labels(label_path, labels):
    """
    将 labels(numpy 数组,每行 [class, x_center, y_center, width, height])写入文件
    """
    with open(label_path, "w") as f:
        for label in labels:
            f.write(" ".join(f"{x:.6f}" for x in label) + "\n")


# 遍历所有原始训练图像
for img_file in os.listdir(orig_images_dir):
    if img_file.lower().endswith(('.jpg', '.jpeg', '.png')):
        img_path = os.path.join(orig_images_dir, img_file)
        # 标注文件名称和图像文件名称(假设相同的文件名前缀)
        label_file = os.path.splitext(img_file)[0] + ".txt"
        label_path = os.path.join(orig_labels_dir, label_file)

        # 加载图像(转换为 RGB)
        image = cv2.imread(img_path)
        if image is None:
            continue
        image = cv2.cvtColor(image, cv2.COLOR_BGR2RGB)
        h, w, _ = image.shape

        # 读取标注(如果存在)
        if os.path.exists(label_path):
            labels = read_yolo_labels(label_path)  # shape: (N, 5)
            if labels.size:
                # 将类别和边界框分离(注意:边界框格式:YOLO格式,均为归一化值)
                class_labels = labels[:, 0].tolist()
                bboxes = labels[:, 1:].tolist()
            else:
                class_labels = []
                bboxes = []
        else:
            class_labels = []
            bboxes = []

        # 应用数据增强
        # 这里的增强管道会返回增强后的图像和边界框(均为归一化值)
        augmented = augmentation_pipeline(image=image, bboxes=bboxes, class_labels=class_labels)
        aug_image = augmented["image"]
        aug_bboxes = augmented.get("bboxes", [])
        aug_class_labels = augmented.get("class_labels", [])

        # 如果 aug_image 是 torch.Tensor,则转换为 numpy 数组并调整维度 (C, H, W) -> (H, W, C)
        if isinstance(aug_image, torch.Tensor):
            aug_image = aug_image.cpu().numpy()
            if aug_image.shape[0] == 3:
                aug_image = aug_image.transpose(1, 2, 0)

        # 如果图像数据在 [0, 1] 范围内,则转换为 [0, 255]
        if aug_image.max() <= 1.0:
            aug_image = (aug_image * 255).astype(np.uint8)
        else:
            aug_image = aug_image.astype(np.uint8)

        # 将图像转换回 BGR 格式以便 OpenCV 保存
        aug_image_bgr = cv2.cvtColor(aug_image, cv2.COLOR_RGB2BGR)

        # 保存增强后的图像(使用前缀 "aug_")
        aug_img_path = os.path.join(aug_images_dir, "aug_" + img_file)
        cv2.imwrite(aug_img_path, aug_image_bgr)

        # 保存增强后的标注(如果存在)
        if len(aug_bboxes) > 0:
            # 合成增强后的标注,每行格式:[class, x_center, y_center, width, height]
            aug_labels = []
            for cls, bbox in zip(aug_class_labels, aug_bboxes):
                aug_labels.append([cls] + list(bbox))
            aug_labels = np.array(aug_labels)
            aug_label_path = os.path.join(aug_labels_dir, "aug_" + label_file)
            write_yolo_labels(aug_label_path, aug_labels)

print("训练集数据增强预处理完成!")
执行以下脚本可以查看数据增强效果样例:
#查看数据增强效果的脚本
import cv2
import matplotlib.pyplot as plt
import numpy as np
from augmentations import get_augmentation  # 导入增强函数


# 函数:读取 YOLO 格式标签文件并归一化坐标
def read_yolo_labels(label_path, image_width, image_height):
    bboxes = []
    class_labels = []

    # 读取标签文件
    with open(label_path, "r") as file:
        for line in file.readlines():
            parts = line.strip().split()
            class_id = int(parts[0])  # 类别ID
            x_center = float(parts[1]) * image_width  # 归一化坐标转为图像像素
            y_center = float(parts[2]) * image_height
            width = float(parts[3]) * image_width
            height = float(parts[4]) * image_height

            # 归一化坐标
            x_center /= image_width
            y_center /= image_height
            width /= image_width
            height /= image_height

            bboxes.append([x_center, y_center, width, height])
            class_labels.append(class_id)

    return np.array(bboxes), np.array(class_labels)


# 图像路径和标签路径
image_path = r"A:\test\1\20250401173212.jpg"
label_path = r"A:\test\2\20250401173212.txt"

# 加载图像
image = cv2.imread(image_path)
image = cv2.cvtColor(image, cv2.COLOR_BGR2RGB)  # 转换为 RGB

# 获取图像的宽度和高度
image_height, image_width, _ = image.shape

# 读取标签(边界框和类标签)
bboxes, class_labels = read_yolo_labels(label_path, image_width, image_height)

# 将边界框和类标签传递给增强函数
augmented = get_augmentation()(image=image, bboxes=bboxes, class_labels=class_labels)
augmented_image = augmented['image']
augmented_bboxes = augmented['bboxes']
augmented_class_labels = augmented['class_labels']

# 如果图像的维度是 (channels, height, width),需要转换为 (height, width, channels)
if augmented_image.shape[0] == 3:  # 判断是否是 (3, height, width)
    augmented_image = np.transpose(augmented_image, (1, 2, 0))  # 转换为 (height, width, 3)

# 显示原始图像和增强后的图像
plt.figure(figsize=(10, 5))

# 原始图像
plt.subplot(1, 2, 1)
plt.title("Original Image")
plt.imshow(image)
for bbox in bboxes:
    x_center, y_center, width, height = bbox
    x1, y1 = int(x_center * image_width - width * image_width / 2), int(
        y_center * image_height - height * image_height / 2)
    x2, y2 = int(x_center * image_width + width * image_width / 2), int(
        y_center * image_height + height * image_height / 2)
    plt.gca().add_patch(plt.Rectangle((x1, y1), x2 - x1, y2 - y1, fill=False, color='red', linewidth=2))

# 增强后的图像
plt.subplot(1, 2, 2)
plt.title("Augmented Image")
plt.imshow(augmented_image)
for bbox in augmented_bboxes:
    x_center, y_center, width, height = bbox
    x1, y1 = int(x_center * image_width - width * image_width / 2), int(
        y_center * image_height - height * image_height / 2)
    x2, y2 = int(x_center * image_width + width * image_width / 2), int(
        y_center * image_height + height * image_height / 2)
    plt.gca().add_patch(plt.Rectangle((x1, y1), x2 - x1, y2 - y1, fill=False, color='blue', linewidth=2))

plt.show()
样例效果如下:
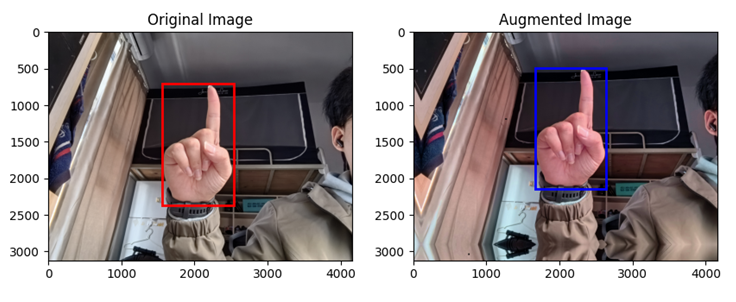
离线数据增强后的精简HaGRID数据集包含21600张训练集、1350张验证集、1350张测试集,大小约1.65GB。
下载链接:https://pan.baidu.com/s/1HHwWnOSkJZaRszTJQkgjGw 提取码:0aoj
总结
本系列文章旨在记录基于YOLOv8和Medipipe的手势识别系统的搭建过程,分为数据预处理、服务器训练、引入Mediapipe优化计算量及前端页面搭建四个部分。本文将重点介绍对开源HaGRID静态手势数据集的精简处理与数据增强。HaGRID数据集包含553,994张RGB图像,涵盖18类手势,具备多样化的背景、光照和手势姿态,原始数据集716GB。为适配YOLOv8训练并降低训练成本,本文抽取每类750张图片,构成13,500张的1.08GB精简数据集。随后,使用albumentations库对训练集进行数据增强,通过几何形变、色彩空间扰动、噪声模拟等策略,将训练集扩展至21,600张。最终,增强后的数据集包含21,600张训练集、1,350张验证集和1,350张测试集,总大小为1.65GB。


 9058
9058

 被折叠的 条评论
为什么被折叠?
被折叠的 条评论
为什么被折叠?
 到【灌水乐园】发言


