


一、软件介绍
1.Unity 2022.3.55(unity官网下载)
2.Pycharm 2020.1(python3.7)
二、效果展示
三、环境配置
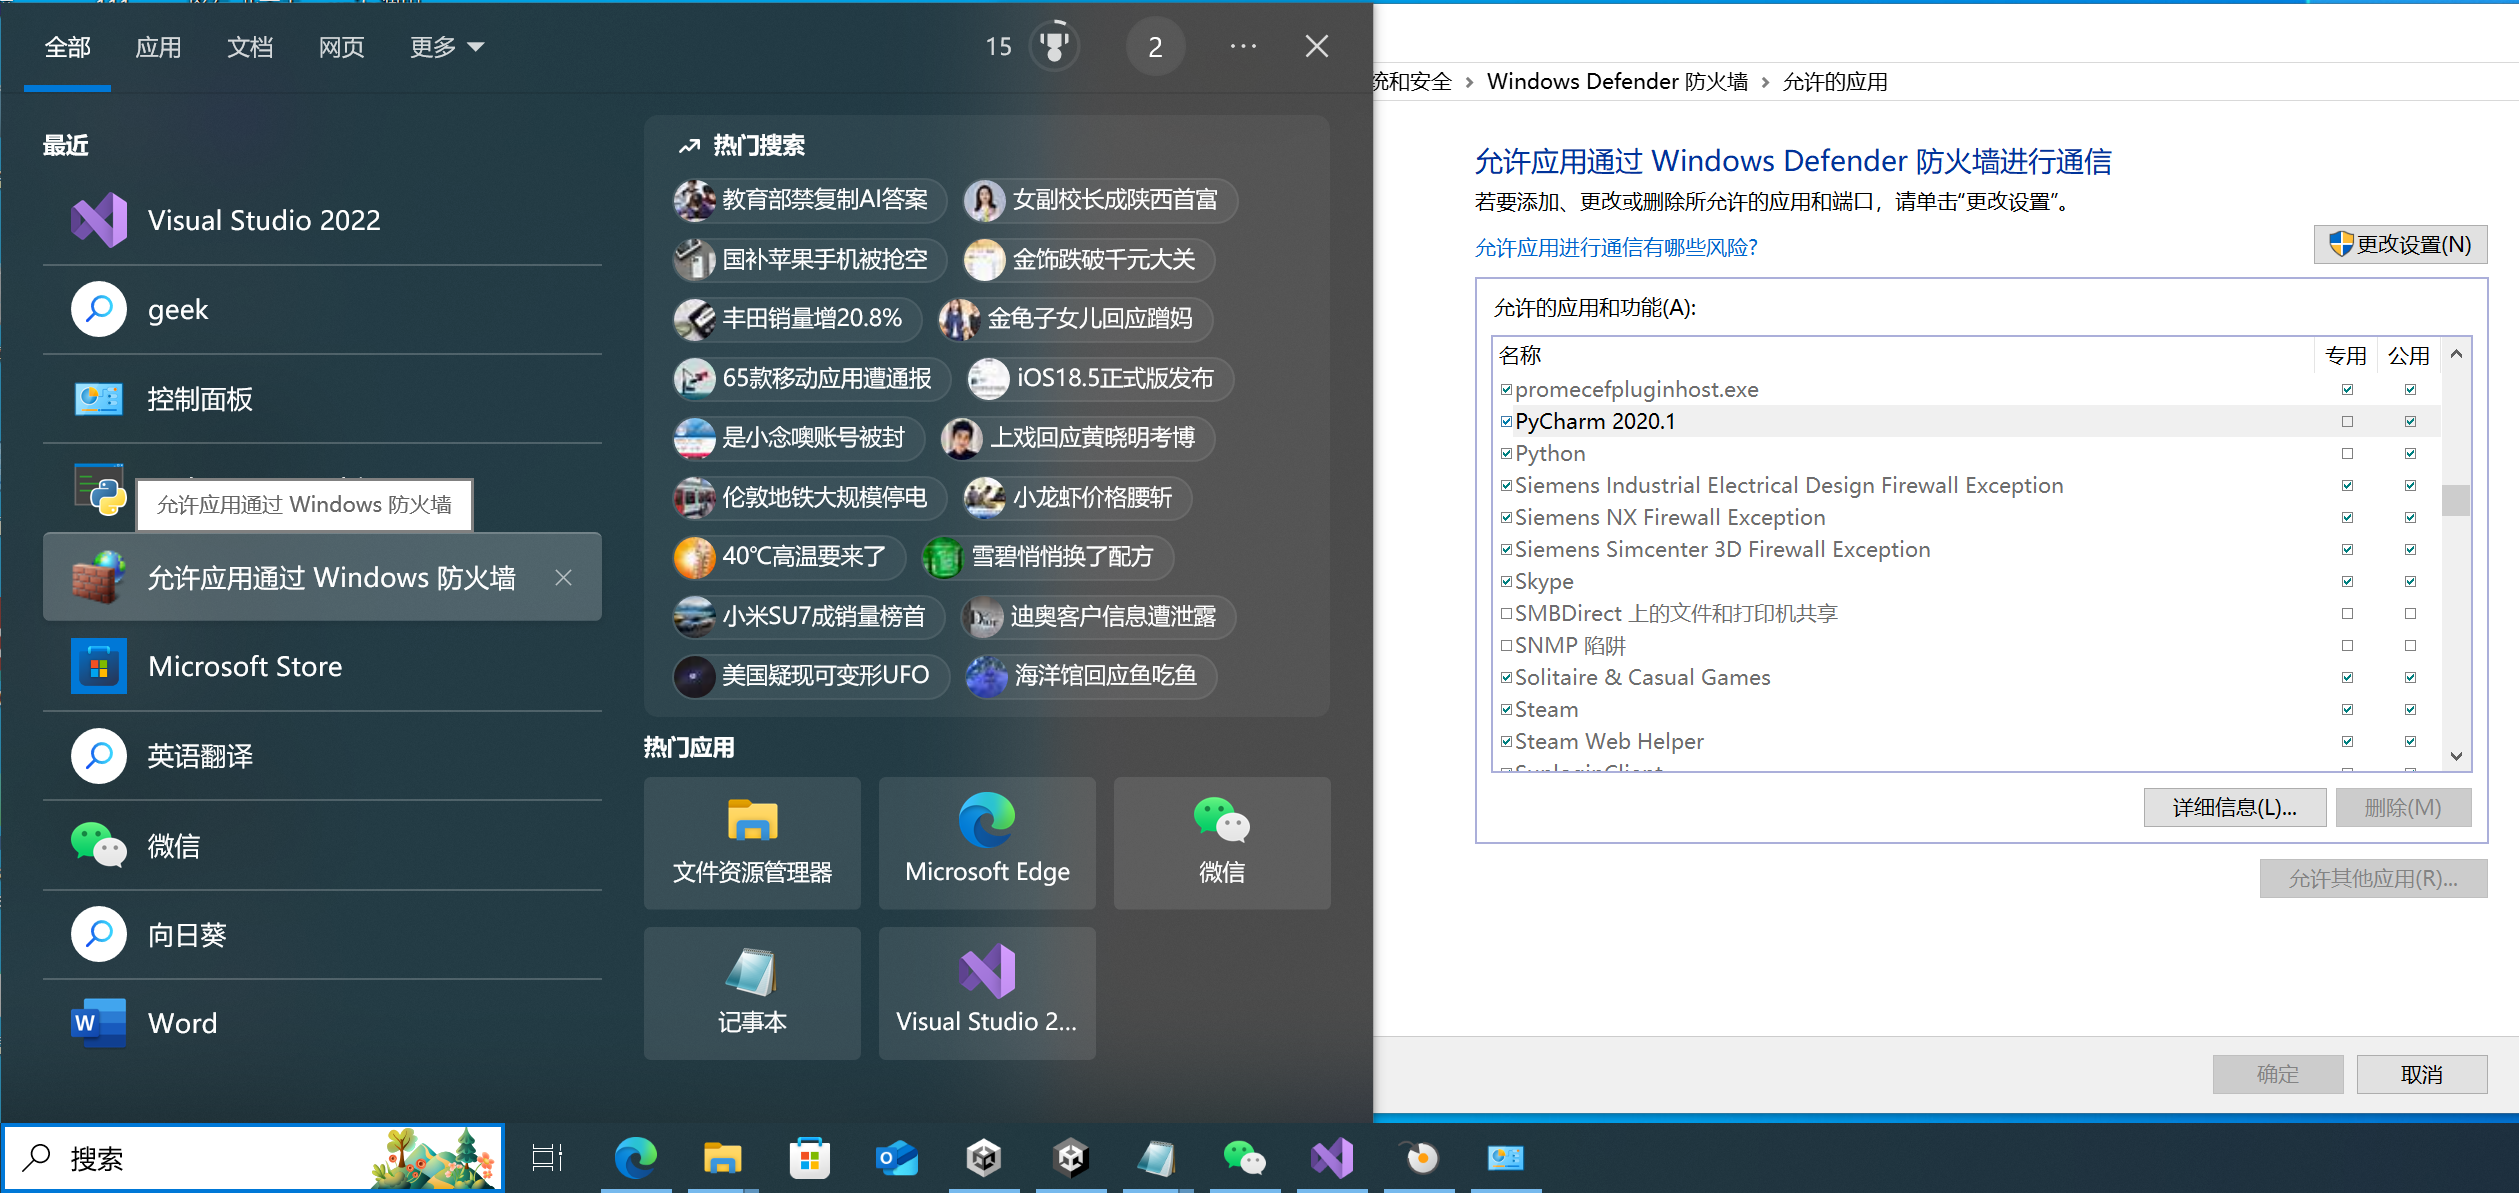
unity 传参并调用python,之前unity一直收不到python的任何消息,找了好久问题,终于知道了。
允许应用通过Windows防火墙这里要把Python和unity公用都打勾 √ !!!
四、实现过程
案例1:unity输入两个参数a,b,调用python计算和(a+b)后,在unityUI端输出结果
1.python代码
import sys

def main():
    if len(sys.argv) != 3:
        return "ERROR: 需要2个整数参数"

    try:
        a = int(sys.argv[1])
        b = int(sys.argv[2])
        return a + b
    except ValueError:
        return "ERROR: 参数必须为整数"

if __name__ == "__main__":
    result = main()
    print(result)
直接运行会报错,这是正常现象,因为缺参数。

所以我们可以用命令行验证,先进入该脚本所在路径:cd E:\PythonProject
再输入:python E:\PythonProject\venv\2.py 12 5
2.C#代码
需要修改的参数:pythonPath 和scriptPath(每个电脑python和路径和脚本路径不一样)
"C:\Users\ThinkPad\AppData\Local\Microsoft\WindowsApps\python.exe";
"E:\PythonProject\venv\2.py";
using System;
using System.Diagnostics;
using UnityEngine;
using UnityEngine.UI;
using System.Text;
//能正确运行出计算结果!!!!
public class PythonCall : MonoBehaviour
{
    public InputField param1Input;
    public InputField param2Input;
    public Text outputText;
    public Button runButton;

    void Start()
    {
        runButton.onClick.AddListener(RunPythonScript);
    }

    void RunPythonScript()
    {
        string param1 = param1Input.text;
        string param2 = param2Input.text;

        if (string.IsNullOrEmpty(param1) || string.IsNullOrEmpty(param2))
        {
            outputText.text = "请输入所有参数";
            return;
        }

        // Python 解释器路径
        string pythonPath = @"C:\Users\ThinkPad\AppData\Local\Microsoft\WindowsApps\python.exe";
        // Python 脚本路径
        string scriptPath = @"E:\PythonProject\venv\2.py";

        // 创建 ProcessStartInfo 对象
        ProcessStartInfo startInfo = new ProcessStartInfo
        {
            FileName = pythonPath,
            Arguments = $"{scriptPath} {param1} {param2}",
            UseShellExecute = false,
            RedirectStandardOutput = true,
            RedirectStandardError = true,
            CreateNoWindow = true,
            StandardOutputEncoding = System.Text.Encoding.UTF8,  // 设置标准输出编码
            StandardErrorEncoding = System.Text.Encoding.UTF8    // 设置标准错误输出编码
        };

        // 创建并启动进程
        using (Process process = new Process { StartInfo = startInfo })
        {
            process.Start();

            // 读取标准输出
            string output = process.StandardOutput.ReadToEnd();
            // 读取标准错误输出
            string error = process.StandardError.ReadToEnd();

            process.WaitForExit();

            if (!string.IsNullOrEmpty(error))
            {
                outputText.text = "Python 脚本执行出错: " + error;
            }
            else
            {
                outputText.text = "Python 脚本输出: " + output;
                UnityEngine.Debug.Log($"Python 脚本输出:{output}");
            }
        }
    }
}
案例2:振动数据分类,unity输入4个参数,调用python(CNN)后,在unityUI端输出3个结果
说明:这里一共两个脚本
1.unity调用python。需要修改的地方:python解释器和脚本(pythonPath,scriptPath)的路径
2.python脚本。增加(4个输入,3个输出)
输入:# 从命令行获取参数(batchSize,learningRate,epochs,momentum),
输出格式包括:训练集准确率,测试集准确率,迭代过程(每次迭代的准确率和损失率)output_string = f"{param1},{param2},{param3}"
1.python代码
# -*- coding: utf-8 -*-
import matplotlib
matplotlib.use('Agg')  # 使用Agg后端,不显示图形界面
import matplotlib.pyplot as plt
plt.rcParams['font.sans-serif'] = ['SimSun']  # 指定中文字体为宋体
plt.rcParams['axes.unicode_minus'] = False  # 解决负号显示问题
import os
import io
import json
import sys  # 新增导入sys模块
os.environ['TF_ENABLE_ONEDNN_OPTS'] = '0'

# 从命令行获取参数
batchSize = int(sys.argv[1])
learningRate = float(sys.argv[2])
epochs = int(sys.argv[3])
momentum = float(sys.argv[4])

# 导入数据
import pandas as pd
import numpy as np
import tensorflow as tf
os.environ['TF_CPP_MIN_LOG_LEVEL'] = '2'  # 2 = 只显示错误,不显示警告和信息


# 划分训练集和测试集
np.random.seed(0)  # 固定随机种子
# 获取脚本所在目录
script_dir = os.path.dirname(os.path.abspath(__file__))
# 构建文件的绝对路径
file_path = os.path.join(script_dir, 'Scope0600.xlsx')
# 使用绝对路径读取文件
data = pd.read_excel(file_path).values  # 获取数据

# data = pd.read_excel('Scope0600.xlsx').values  # 读取数据
indices = np.random.permutation(430)  # 生成随机索引

# 前360训练,剩余70测试(Python从0开始索引)
P_train = data[indices[:360], :25].T  # 前25列特征转置为(25, 360)
T_train = data[indices[:360], 25].T  # 第26列标签转置为(360,)
M = P_train.shape[1]  # 训练样本数360

P_test = data[indices[360:], :25].T  # 测试集特征
T_test = data[indices[360:], 25].T  # 测试集标签
N = P_test.shape[1]  # 测试集样本数70

# 数据归一化
from sklearn.preprocessing import MinMaxScaler

scaler = MinMaxScaler(feature_range=(0, 1))
# 训练集归一化并保存参数
P_train = scaler.fit_transform(P_train.T).T  # 转置适配sklearn (25,360)->(360,25)归一化后再转回
P_test = scaler.transform(P_test.T).T  # 测试集应用相同归一化

# 转换标签为分类(假设标签为1-9整数类别)
from tensorflow.keras.utils import to_categorical

t_train = to_categorical(T_train - 1, num_classes=9)  # 转为one-hot,假设标签是1-9转0-8
t_test = to_categorical(T_test - 1, num_classes=9)

# 数据平铺(调整形状适配卷积输入)
# 转换为(样本数, 高度, 宽度, 通道数)的TensorFlow格式
p_train = P_train.T.reshape(-1, 25, 1, 1).astype('float32')  # (360,25,1,1)
p_test = P_test.T.reshape(-1, 25, 1, 1).astype('float32')  # (70,25,1,1)

# 构造网络结构
from tensorflow.keras.models import Sequential
from tensorflow.keras.layers import (Conv2D, BatchNormalization, MaxPooling2D,
                                     ReLU, Dense, Flatten, InputLayer)

model = Sequential([
    InputLayer(input_shape=(25, 1, 1)),  # 输入层
    BatchNormalization(),  # 批归一化

    Conv2D(64, (5, 1), padding='same'),  # 卷积核5x1(因高度为25,宽度1)
    BatchNormalization(),
    ReLU(),

    Conv2D(128, (5, 1), padding='same'),
    BatchNormalization(),
    ReLU(),
    MaxPooling2D((1, 1), strides=1),  # 池化层(实际无降采样)

    Conv2D(256, (5, 1), padding='same'),
    BatchNormalization(),
    ReLU(),
    MaxPooling2D((1, 1), strides=1),

    Flatten(),  # 展平后接全连接
    Dense(9, activation='softmax')  # 输出9类概率
])

# 参数设置
from tensorflow.keras.optimizers import Adam
from tensorflow.keras.callbacks import LearningRateScheduler


def lr_schedule(epoch):
    if epoch >= 80:
        return learningRate * 0.1
    return learningRate


model.compile(optimizer=Adam(learning_rate=learningRate),
              loss='categorical_crossentropy',
              metrics=['accuracy'])

# 用于存储每次迭代的结果
epoch_results = []

# 训练模型
history = model.fit(p_train, t_train,
                    epochs=epochs,
                    batch_size=batchSize,
                    validation_split=0,
                    shuffle=True,
                    verbose=0,
                    callbacks=[LearningRateScheduler(lr_schedule)])

# 输出每次迭代的准确率和损失率,并记录到epoch_results
for epoch in range(epochs):
    loss = history.history['loss'][epoch]
    accuracy = history.history['accuracy'][epoch]
    epoch_result = {
        "epoch": epoch + 1,
        "loss": loss,
        "accuracy": accuracy
    }
    epoch_results.append(epoch_result)
    print(f'Epoch {epoch + 1}/{epochs}, Loss: {loss:.4f}, Accuracy: {accuracy:.4f}')

# 预测模型
t_sim1 = model.predict(p_train)  # 训练集预测概率
t_sim2 = model.predict(p_test)  # 测试集预测概率

T_sim1 = np.argmax(t_sim1, axis=1) + 1  # 转回1-9类别
T_sim2 = np.argmax(t_sim2, axis=1) + 1
T_train = T_train  # 原标签已为1-9
T_test = T_test

# 确保标准输出和错误使用UTF-8编码
sys.stdout = io.TextIOWrapper(sys.stdout.buffer, encoding='utf-8')
sys.stderr = io.TextIOWrapper(sys.stderr.buffer, encoding='utf-8')
# 性能评价
error1 = np.sum(T_sim1 == T_train) / M * 100
error2 = np.sum(T_sim2 == T_test) / N * 100
param1 =  f"{error1:.2f}"
param2 =  f"{error2:.2f}"  # 更正为测试集准确率
param3 =  f"Epoch {epoch + 1}/{epochs}, Loss: {loss:.4f}, Accuracy: {accuracy:.4f}"
# 修改输出格式
output_string = f"{param1},{param2},{param3}"
print(output_string)
print("接收到的参数:", sys.argv)
和案例一类似,直接运行会报错,这是正常现象,因为缺参数。
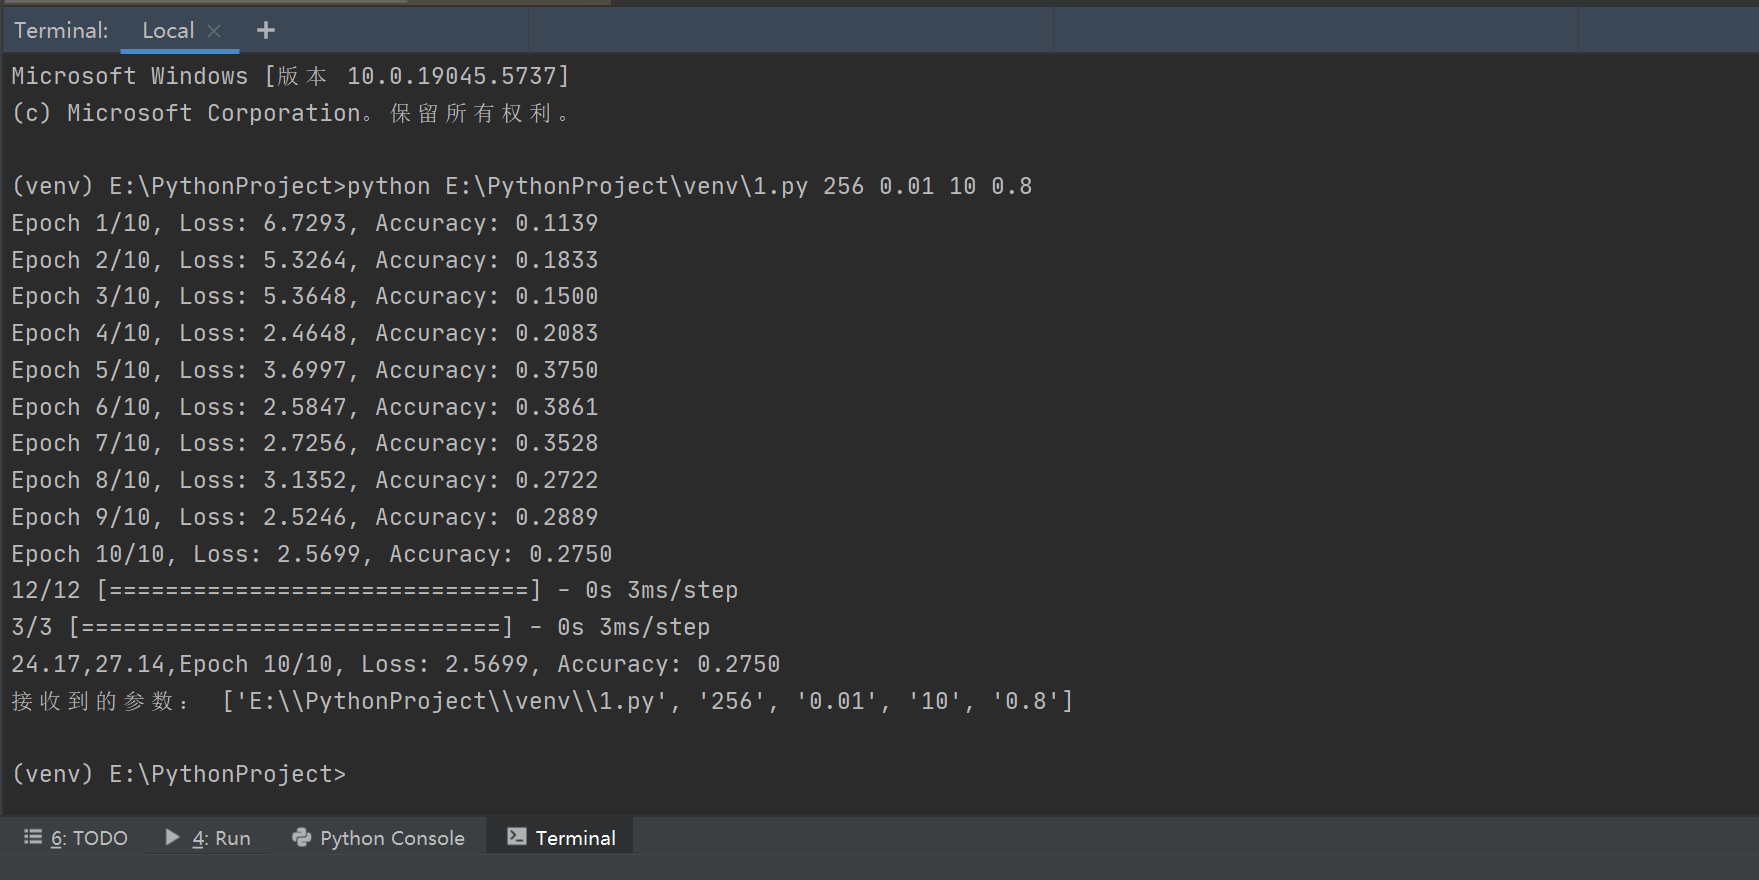
用命令行验证python代码没问题,迭代次数可以随便设置,10次大概等待1分钟左右,运行结果如图所示。
python E:\PythonProject\venv\1.py 256 0.01 10 0.8
2.C#代码
using System;
using System.Diagnostics;
using UnityEngine;
using UnityEngine.UI;
using System.Text;

public class PythonResult : MonoBehaviour
{
    public InputField batchSizeInput;
    public InputField learningRateInput;
    public InputField epochsInput;
    public InputField momentumInput;
    public Text resultText;
    public Button runButton;

    void Start()
    {
        runButton.onClick.AddListener(RunPythonScript);
    }

    void RunPythonScript()
    {
        string batchSize = batchSizeInput.text;
        string learningRate = learningRateInput.text;
        string epochs = epochsInput.text;
        string momentum = momentumInput.text;

        if (string.IsNullOrEmpty(learningRate) || string.IsNullOrEmpty(batchSize) ||
            string.IsNullOrEmpty(epochs) || string.IsNullOrEmpty(momentum))
        {
            resultText.text = "请输入所有参数";
            return;
        }

        string pythonPath = @"E:\PythonProject\venv\Scripts\python.exe";     //改到对应python解释器和脚本路径
        string scriptPath = @"E:\PythonProject\venv\1.py";

        var start = new ProcessStartInfo
        {
            FileName = pythonPath,
            //这里四个参数的顺序和python保持一致,分别是批量大小(int),学习率(float),迭代次数(int),动量大小(float),类型输入错误会报错,输入值为256,0.01,10,0.8
            Arguments = $"{scriptPath}  {batchSize} {learningRate} {epochs} {momentum}",
            UseShellExecute = false,
            RedirectStandardOutput = true,
            RedirectStandardError = true,
            CreateNoWindow = true,
            StandardOutputEncoding = Encoding.UTF8,  // 设置输出编码为 UTF-8
            StandardErrorEncoding = Encoding.UTF8    // 设置错误输出编码为 UTF-8
        };

        using (var process = new Process { StartInfo = start })
        {
            process.Start();

            // 异步读取标准输出和错误输出
            string output = process.StandardOutput.ReadToEnd();
            string error = process.StandardError.ReadToEnd();

            process.WaitForExit();

            // 只在真正有错误时才显示错误信息
            if (!string.IsNullOrEmpty(error))
            {
                UnityEngine.Debug.LogError("Python 脚本错误: " + error);
                resultText.text = "执行出错: " + error;
            }
            else
            {
                UnityEngine.Debug.Log("Python 脚本输出: " + output);
                resultText.text = output;
            }
            // 在处理输出时过滤掉 TensorFlow 的性能提示
            if (!string.IsNullOrEmpty(output))
            {
                // 过滤掉 TensorFlow 的性能提示信息
                string filteredOutput = output;
                filteredOutput = System.Text.RegularExpressions.Regex.Replace(
                    filteredOutput,
                    @"^.*tensorflow/core/platform/cpu_feature_guard.cc.*$[\r\n]*",
                    "",
                    System.Text.RegularExpressions.RegexOptions.Multiline
                );

                UnityEngine.Debug.Log("Python 脚本输出: " + filteredOutput);
                resultText.text = filteredOutput;
            }
        }

    }
}
五、参考链接
1.Unity直接调用Python脚本_unity调用python脚本-CSDN博客
2.Unity 基础 之 Unity 简单调用 Python (传递多个参数并接收返回值)_unity 基础 之 unity 简单调用 python (传递多个参数并接收返回值)-CSDN博客


 1万+
1万+

 被折叠的 条评论
为什么被折叠?
被折叠的 条评论
为什么被折叠?
 到【灌水乐园】发言


