


(2)实现代码
主要代码:
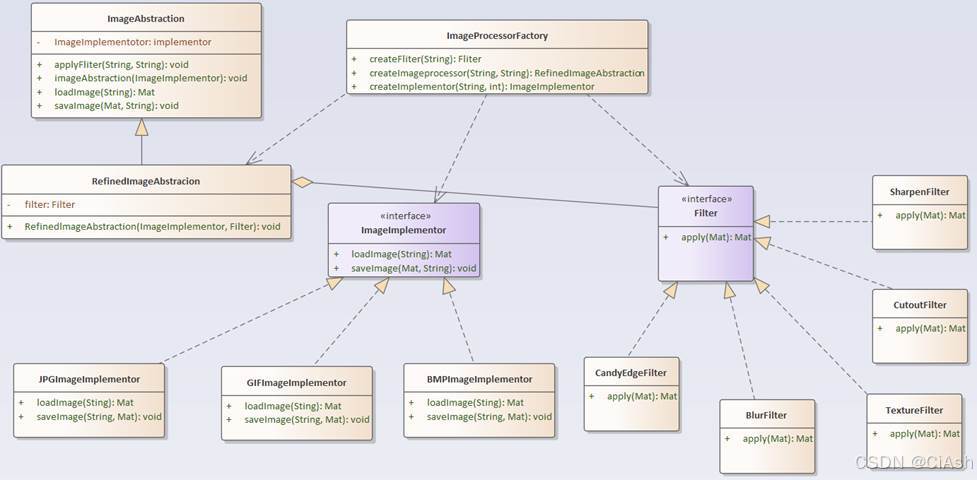
# ----------------- 桥接模式: 接口与抽象类 -----------------
class ImageImplementor(ABC):
"""图像格式实现者接口"""
@abstractmethod
def load_image(self, path):
pass
@abstractmethod
def save_image(self, image, path):
pass
class Filter(ABC):
"""滤镜接口"""
@abstractmethod
def apply(self, input_image):
pass
class ImageAbstraction(ABC):
"""图像处理抽象基类"""
def __init__(self, implementor):
self.implementor = implementor
def load_image(self, path):
return self.implementor.load_image(path)
def save_image(self, image, path):
self.implementor.save_image(image, path)
@abstractmethod
def apply_filter(self, src_path, dest_path):
pass
# ----------------- 具体实现类 (部分)-----------------
class JPGImageImplementor(ImageImplementor):
"""JPG图像实现者"""
def load_image(self, path):
print(f"Loading JPG image: {path}")
return cv2.imread(path)
def save_image(self, image, path):
print(f"Saving JPG image: {path}")
cv2.imwrite(path, image)
class BlurFilter(Filter):
"""模糊滤镜"""
def apply(self, input_image):
print("Applying Blur filter")
return cv2.GaussianBlur(input_image, (15, 15), 0)
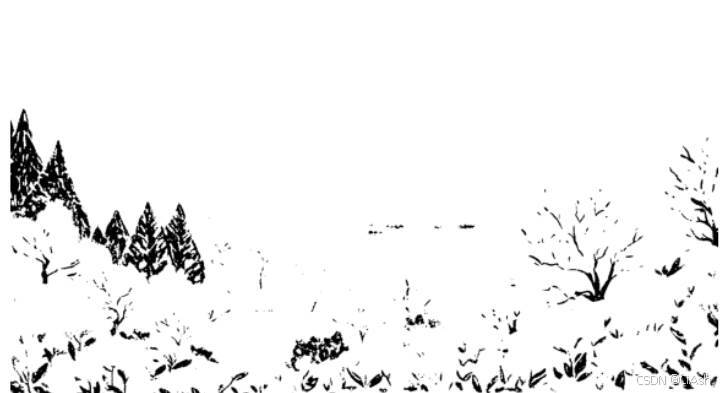
class CutoutFilter(Filter):
"""木刻滤镜"""
def apply(self, input_image):
print("Applying Cutout filter")
if len(input_image.shape) > 2 and input_image.shape[2] > 1:
gray_image = cv2.cvtColor(input_image, cv2.COLOR_BGR2GRAY)
else:
gray_image = input_image.copy()
_, threshold_image = cv2.threshold(gray_image, 127, 255, cv2.THRESH_BINARY)
if len(input_image.shape) > 2 and input_image.shape[2] > 1:
return cv2.cvtColor(threshold_image, cv2.COLOR_GRAY2BGR)
else:
return threshold_image
class TextureFilter(Filter):
"""纹理滤镜"""
def apply(self, input_image):
print("Applying Texture filter")
noise = np.random.normal(0, 50, input_image.shape).astype(np.uint8)
return cv2.add(input_image, noise)
(3)测试代码及结果截图
# ----------------- 测试本地JPG图像 -----------------
# 确保 ImageProcessorFactory 有正确的方法
def fix_processor_factory():
"""添加缺失的方法到工厂类"""
# 如果不存在 create_jpg_processor 方法,添加它
if not hasattr(ImageProcessorFactory, 'create_jpg_processor'):
def create_jpg_processor(filter_name):
"""创建JPG图像处理器"""
filter_obj = ImageProcessorFactory.create_filter(filter_name)
return RefinedImageAbstraction(JPGImageImplementor(), filter_obj)
# 将方法添加到类
setattr(ImageProcessorFactory, 'create_jpg_processor', staticmethod(create_jpg_processor))
# 获取安全的文件名(解决乱码问题)
def get_safe_filename(path):
"""从路径中提取安全的文件名(不含扩展名)"""
# 获取基本文件名(不含路径)
base_name = os.path.basename(path)
# 分离文件名和扩展名
name, ext = os.path.splitext(base_name)
# 将非ASCII字符替换为下划线
safe_name = ''.join(c if c.isascii() and c.isprintable() else '_' for c in name)
# 如果文件名为空,使用默认名称
if not safe_name:
safe_name = "image"
return safe_name
# 测试单个本地JPG图像的所有滤镜效果
def test_local_jpg():
# 首先修复工厂类
fix_processor_factory()
# 指定要处理的JPG文件路径
jpg_path = "input.jpg" # 修改为你的JPG图像文件路径
print(f"开始测试本地图像: {jpg_path}")
# 修改 test_jpg_filters 函数中的输出路径生成逻辑
def test_jpg_filters_fixed(image_path):
"""测试JPG图像的滤镜效果(解决文件名乱码问题)"""
print(f"测试JPG图像: {image_path}")
# 加载原始图像
original_image = cv2.imread(image_path)
if original_image is None:
print(f"无法加载图像: {image_path}")
return
# 显示原始图像
display_image(original_image, "原始图像")
# 创建临时目录用于保存结果
output_dir = tempfile.gettempdir()
print(f"输出目录: {output_dir}")
# 定义要测试的滤镜
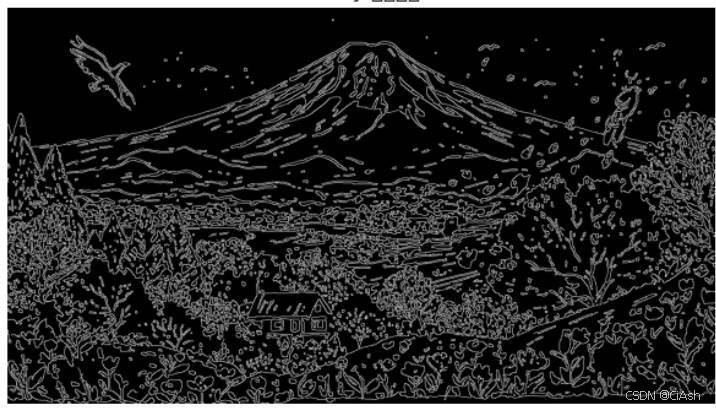
filter_names = ["blur", "sharpen", "cutout", "texture", "canny"]
# 从路径获取安全的文件名
safe_name = get_safe_filename(image_path)
# 测试每种滤镜
for filter_name in filter_names:
print(f"\n应用 {filter_name} 滤镜...")
# 构建安全的输出路径
output_path = os.path.join(output_dir, f"{safe_name}_{filter_name}.jpg")
# 创建处理器
processor = ImageProcessorFactory.create_jpg_processor(filter_name)
# 应用滤镜
filtered_image = processor.apply_filter(image_path, output_path)
# 显示结果
if filtered_image is not None:
display_images_side_by_side(
original_image,
filtered_image,
"原始图像",
f"{filter_name.capitalize()} 滤镜效果"
)
print("\n所有滤镜测试完成")
# 使用修改后的函数
test_jpg_filters_fixed(jpg_path)
# 运行测试 - 取消注释你想使用的测试方法
test_local_jpg()
部分结果:
测试JPG图像: input.jpg

Blur

Cutout
Canny


 2108
2108

 被折叠的 条评论
为什么被折叠?
被折叠的 条评论
为什么被折叠?
 到【灌水乐园】发言


