


 本文介绍了ArcFace算法,它通过在特征x和权重W的角度θ上增加惩罚项m,实现类内紧凑和类间分离。通过标准化、角度调整、交叉熵损失计算,强化了深度学习模型的决策边界。


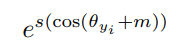
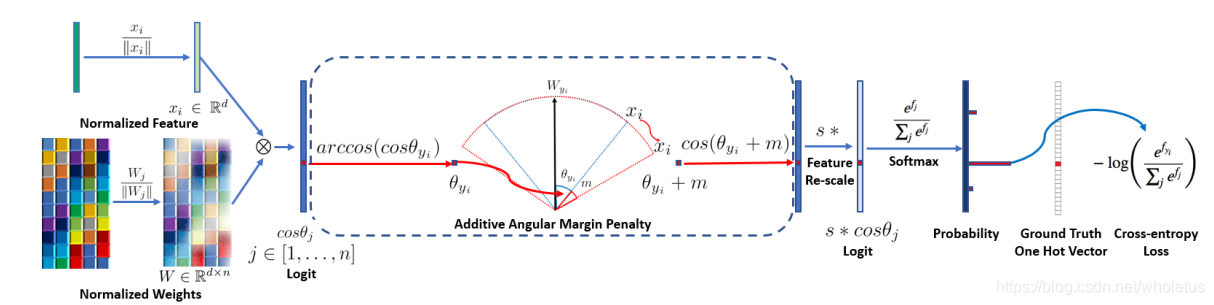
通过将特征x和权重W标准化,得到 cos(θ) 。通过计算 arccos(θ),得到特征x和权重w之间的角度θ。然后在角度θ (groundtrouth)上加上一个额外的角度m得到 θ+m (m为加的惩罚项),接着计算cos函数得到 cos(θ+m),再将所有的log乘以特征尺度s,进行re-scale 得到 s*cos(θ+m),然后将log送到softmax函数中。再用Ground Truth和One Hot Vector一起算出交叉熵损失。
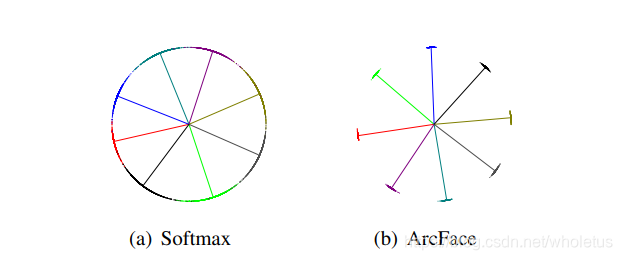
- 在特征x和权重W之间的θ角上,加上角度间隔m。以加法的方式惩罚深度特征与其相应权重之间的角度,增强了类内紧度和类间差异。
- 惩罚θ角度,在训练时加上m,使θ降低
解释m(Margin)是如何使类内聚合类间分离的:比如训练时降到某一固定损失值时,有Margin和无Margin的e指数项是相等的,则有Margin的θ_yi就需要相对的减少了。所以有 Margin的训练就会把 i 类别的输入特征和权重间的夹角θ_yi缩小 - L2归一化来修正单个权重||W_j||=1,还通过L2归一化来固定嵌入特征||x_i|,并将其重新缩放(re-scale )成s。特征和权重的归一化步骤使预测仅取决于特征和权重之间的角度。因此,所学的嵌入特征分布在半径为s的超球体上。
- 决策边界:ArcFace:Additive Angular Margin,加法角度间隔
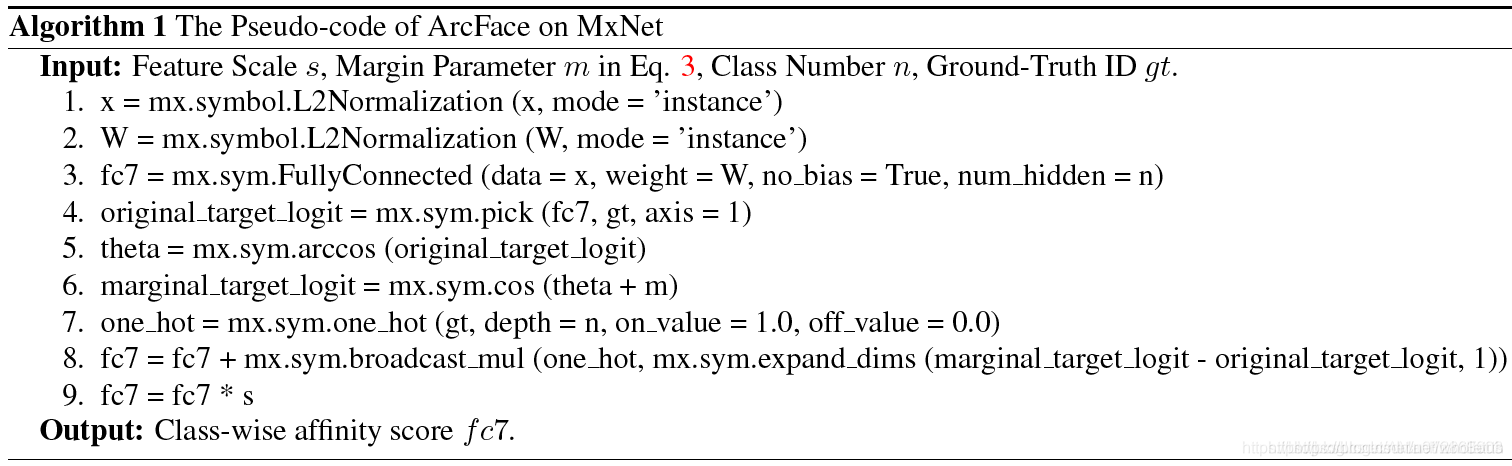
伪代码
class ArcMarginProduct(nn.Module):
    r"""Implement of large margin arc distance: :
        Args:
            in_features: size of each input sample
            out_features: size of each output sample
            s: norm of input feature
            m: margin
            cos(theta + m)
        """
    def __init__(self, in_features, out_features, s=30.0, m=0.50, easy_margin=False):
        super(ArcMarginProduct, self).__init__()
        self.in_features = in_features #输入特征维度
        self.out_features = out_features #输出特征维度
        self.s = s #re-scale
        self.m = m #角度惩罚项
        self.weight = Parameter(torch.FloatTensor(out_features, in_features)) #权重矩阵
        nn.init.xavier_uniform_(self.weight) #权重矩阵初始化

        self.easy_margin = easy_margin
        self.cos_m = math.cos(m)
        self.sin_m = math.sin(m)
        self.th = math.cos(math.pi - m)
        self.mm = math.sin(math.pi - m) * m

    def forward(self, input, label):
        # --------------------------- cos(theta) & phi(theta) ---------------------------
        # 对应伪代码中的1、2、3行:输入x标准化、输入W标准化和它们之间进行FC层得到cos(theta)
        cosine = F.linear(F.normalize(input), F.normalize(self.weight))
        # 计算sin(theta)
        sine = torch.sqrt((1.0 - torch.pow(cosine, 2)).clamp(0, 1))
        # 对应伪代码中的5、6行:计算cos(theta+m) = cos(theta)cos(m) - sin(theta)sin(m)
        phi = cosine * self.cos_m - sine * self.sin_m
        if self.easy_margin:
            phi = torch.where(cosine > 0, phi, cosine)
        else:
            # 当cos(theta)>cos(pi-m)时,phi=cos(theta)-sin(pi-m)*m
            phi = torch.where(cosine > self.th, phi, cosine - self.mm)
        # --------------------------- convert label to one-hot ---------------------------
        # 对应伪代码中的7行:对label形式进行转换,假设batch为2、有3类的话,即将label从[1,2]转换成[[0,1,0],[0,0,1]]
        one_hot = torch.zeros(cosine.size(), device='cuda')
        one_hot.scatter_(1, label.view(-1, 1).long(), 1)
        # 对应伪代码中的8行:计算公式(6)
        # -------------torch.where(out_i = {x_i if condition_i else y_i) -------------
        output = (one_hot * phi) + ((1.0 - one_hot) * cosine)  # you can use torch.where if your torch.__version__ is 0.4
        # 对应伪代码中的9行,进行re-scale
        output *= self.s

        return output
# Copied from https://www.kaggle.com/parthdhameliya77/shopee-pytorch-eca-nfnet-l0-image-training
import torch
import torch.nn.functional as F
from torch import nn
import math

class ArcMarginProduct(nn.Module):
    def __init__(self, in_features, out_features, scale=30.0, margin=0.50, easy_margin=False, ls_eps=0.0):
        super(ArcMarginProduct, self).__init__()
        self.in_features = in_features
        self.out_features = out_features
        self.scale = scale
        self.margin = margin
        self.ls_eps = ls_eps  # label smoothing
        self.weight = nn.Parameter(torch.FloatTensor(out_features, in_features))
        nn.init.xavier_uniform_(self.weight)

        self.easy_margin = easy_margin
        self.cos_m = math.cos(margin)
        self.sin_m = math.sin(margin)
        # self.th <=> -self.cos_m
        self.th = math.cos(math.pi - margin)
        # self.mm <=> self.sin_m * margin
        self.mm = math.sin(math.pi - margin) * margin

    def forward(self, input, label):
        # --------------------------- cos(theta) & phi(theta) ---------------------------
        cosine = F.linear(F.normalize(input), F.normalize(self.weight))
        sine = torch.sqrt(1.0 - torch.pow(cosine, 2))
        # cos(theta+m)
        phi = cosine * self.cos_m - sine * self.sin_m
        if self.easy_margin:
            phi = torch.where(cosine > 0, phi, cosine)
        else:
            phi = torch.where(cosine > self.th, phi, cosine - self.mm)
        # --------------------------- convert label to one-hot ---------------------------
        # one_hot = torch.zeros(cosine.size(), requires_grad=True, device='cuda')
        one_hot = torch.zeros(cosine.size(), device='cuda')
        one_hot.scatter_(1, label.view(-1, 1).long(), 1)
        if self.ls_eps > 0:
            one_hot = (1 - self.ls_eps) * one_hot + self.ls_eps / self.out_features
        # -------------torch.where(out_i = {x_i if condition_i else y_i) -------------
        output = (one_hot * phi) + ((1.0 - one_hot) * cosine)
        output *= self.scale

        return output, nn.CrossEntropyLoss()(output,label)
参考链接:
https://blog.csdn.net/u012863603/article/details/119332417
https://zhuanlan.zhihu.com/p/76541084


 660
660

 被折叠的 条评论
为什么被折叠?
被折叠的 条评论
为什么被折叠?
 到【灌水乐园】发言


