


Photon Server是一款实时的Socket服务器和开发框架,快速、使用方便、容易扩展,服务端架构在Windows系统平台上。
1 首先需要下载SDK ,下载后目录如下
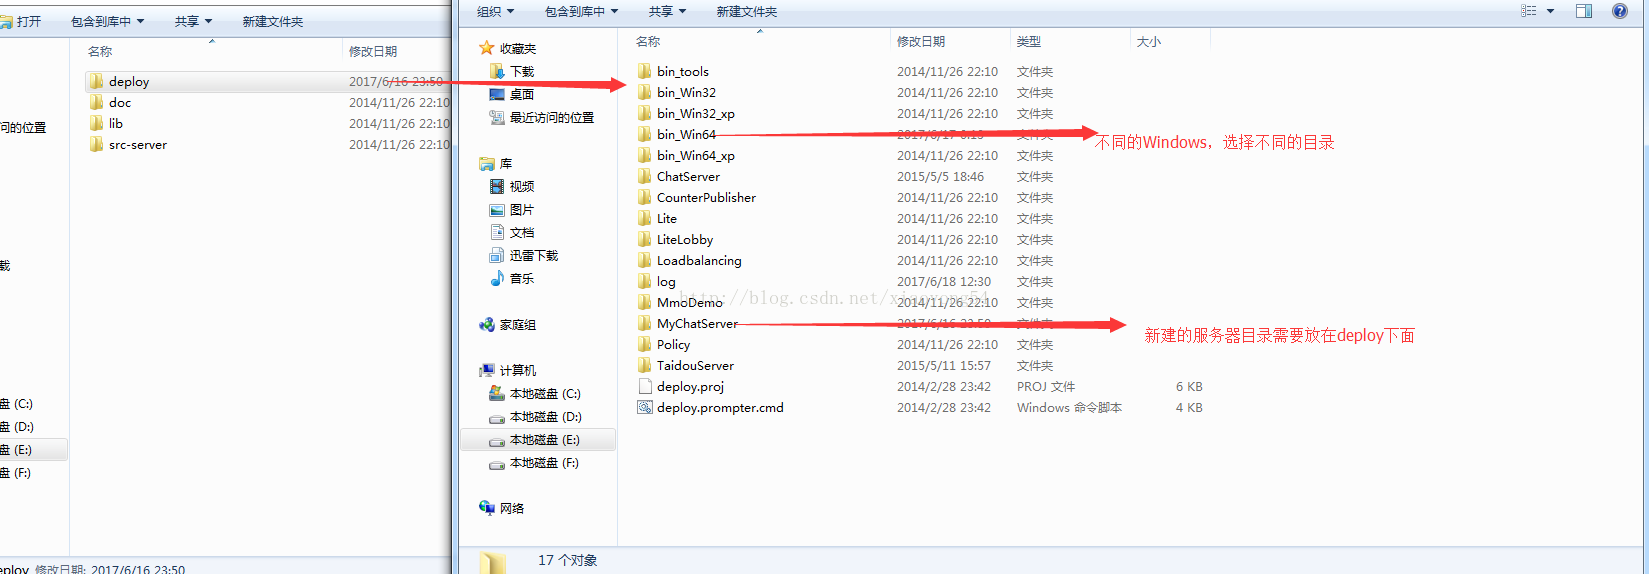
deploy:主要存放photon的服务器控制程序和服务端Demo
doc:顾名思义,文档
lib:Photon类库,开发服务端需要引用的
src-server:服务端Demo源代码
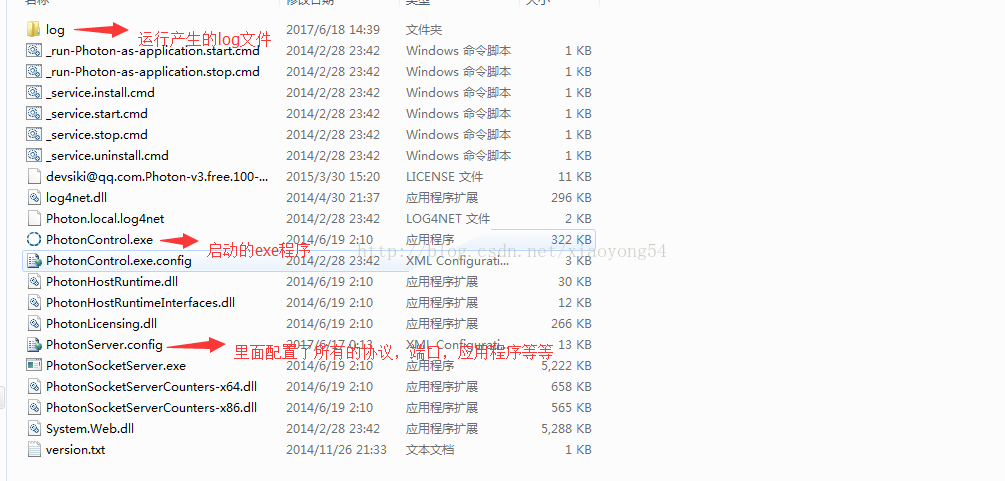
这边重点是看deploy目录:里面包含了服务器配置以及启动的exe
下面我们新建一个测试项目:ChatServer
新建一个类,ChatServer。然后在项目添加Photon的相关dll引用(导入其中的类库)ExitGamesLibs.dll,Photon.SocketServer.dll,PhotonHostRuntimeInterfaces.dll三个文件

using Photon.SocketServer;
using System;
using System.Collections.Generic;
using System.Linq;
using System.Text;
using System.Threading.Tasks;
using PhotonHostRuntimeInterfaces;

namespace ChatServer
{
    class ChatPeer : PeerBase
    {
        public ChatPeer(IRpcProtocol  irp, IPhotonPeer  peer) : base(irp,peer) {

        }
        protected override void OnDisconnect(DisconnectReason reasonCode, string reasonDetail)
        {
            throw new NotImplementedException(reasonDetail);
            Console.WriteLine("my"+reasonDetail);
        }
        //客户端发起请求调用
        protected override void OnOperationRequest(OperationRequest operationRequest, SendParameters sendParameters)
        {
            //throw new NotImplementedException();

            Dictionary<byte, object> dictiony = new Dictionary<byte, object>() ;
            //dictiony = operationRequest.Parameters;
            dictiony.Add(1, "this is server");
            object v = null;
          //  dictiony.TryGetValue(1, out v);
            dictiony.Add(2,"this is  2 server");
            OperationResponse response = new OperationResponse(1, dictiony);
            // 返回给客户端
            SendOperationResponse(response,sendParameters);
        }
    }
}
类需要继承ApplicationBase。服务器的启动类
using Photon.SocketServer;
using System;
using System.Collections.Generic;
using System.Linq;
using System.Text;
using System.Threading.Tasks;

namespace ChatServer
{
    class ChatServer : ApplicationBase
    {
        protected override PeerBase CreatePeer(InitRequest initRequest)
        {
            // throw new NotImplementedException();
            return new ChatPeer(initRequest.Protocol, initRequest.PhotonPeer);
        }

        protected override void Setup()
        {
           // throw new NotImplementedException();
        }

        protected override void TearDown()
        {
           // throw new NotImplementedException();
        }
    }
}
完成后,在解决方案资源管理器中选中当前项目,打开属性,选择生成选项卡,把输出路径改成第一张图片的路径(放大deploy中)
项目放来了,下面就是配置文件了
如下
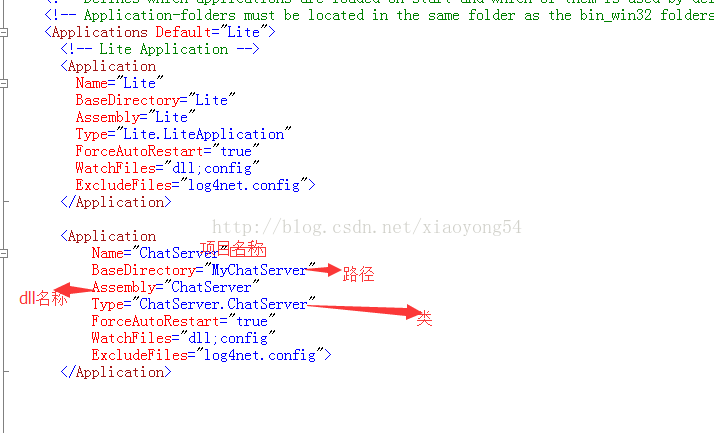
一般修改这几个
服务器搞定了,启动。。。

如果启动失败,注意查看log文件,一般是类写错了。( Type="ChatServer.ChatServer")
下面是客户端:
同样的方法创建,控制台程序,然后添加引用(Photon3DotNet),如上图
客户端代码:
using ExitGames.Client.Photon;
using System;
using System.Collections.Generic;
using System.Linq;
using System.Text;
using System.Threading.Tasks;
namespace ChatConsoleClient
{
class ChatServerListener : IPhotonPeerListener
{
public bool isConnect = false;
public void DebugReturn(DebugLevel level, string message)
{
//throw new NotImplementedException();
Console.WriteLine(message);
}
public void OnEvent(EventData eventData)
{
// throw new NotImplementedException();
Console.WriteLine(eventData.ToString());
}
// 跟服务器通信
public void OnOperationResponse(OperationResponse operationResponse)
{
// throw new NotImplementedException();
Dictionary<byte, object> dictionary = operationResponse.Parameters;
object v,v2 = "v2";
dictionary.TryGetValue(1,out v);// kye=>value
dictionary.TryGetValue(2, out v2);
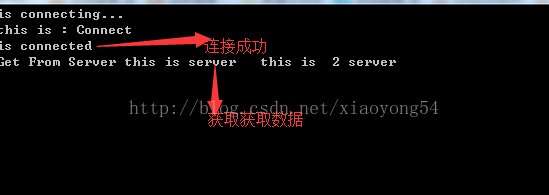
Console.WriteLine("Get From Server "+v.ToString()+" "+v2.ToString());
}
public void OnStatusChanged(StatusCode statusCode)
{
Console.WriteLine("this is : "+statusCode);
// throw new NotImplementedException();
switch (statusCode) {
case StatusCode.Connect:
isConnect = true;
Console.WriteLine("is connected");
break;
}
}
}
public class Class1
{
static void Main(string[] agrs) {
ChatServerListener listener = new ChatServerListener();
PhotonPeer peer = new PhotonPeer(listener, ConnectionProtocol.Tcp);
peer.Connect("127.0.0.1:4530", "ChatServer");
Console.WriteLine("is connecting...");
while (!listener.isConnect) {
peer.Service();
}
// 发消息给服务器
Dictionary<byte, object> dic = new Dictionary<byte, object>();
dic.Add(1,"ly");
dic.Add(2,"123456");
peer.OpCustom(1,dic,true);// 这是异步的过程
while (true)
peer.Service();
}
}
}
over


 1915
1915


 被折叠的 条评论
为什么被折叠?
被折叠的 条评论
为什么被折叠?
 到【灌水乐园】发言


