UnityShader:深度图获取,屏幕后期处理特效 中学习了如何使用unityshader处理摄像机画面,这次来看看多重渲染的使用。
有时候我们想同时获得一个画面的不同后期效果:比如需要同时显示深度图,RGB,像素化等,但是又不想进行多次处理浪费性能,这时候我们就需要多重渲染技术了,通过多重渲染技术,只需要一次就可以将我们想要处理的画面处理成我们需要的多种效果并输出。
一、 多重渲染shader
为了进行多重渲染输出,我们首先要让shader能够输出多个画面。在深度图获取shader中,我们是在frag中输出float4格式的RGBA数据,这样的话一次只能输出一幅画面,为了输出多幅画面,需要对其进行改造。
首先,我们需要定义一个输出多个数据的结构体:
struct PixelOutput {
    float4 col0 : COLOR0;
    float4 col1 : COLOR1;
};
它包含了两个float4格式的数据,也就是只要能输出它,就能同时输出两幅画面。
然后修改frag函数:
PixelOutput fragMRT(v2f pixelData)
{
    PixelOutput o;
    o.col0 = tex2D(_Tex, pixelData.uv);;
    o.col1 = float4(0.0f, 1.0f, 0.0f, 1.0f);
    return o;
}
我们将它改为了fragMRT以示区别。这个函数很简单,输出原图以及一幅绿色图片,其中_Tex是从外部传入待处理的图片,后面会讲到。
完整shader如下:
Shader "Custom/MRT" {
    Properties{
        _MainTex("Base (RGB)", 2D) = "white" {}
    }
    SubShader{
        Tags{ "RenderType" = "Opaque" }

        Pass{
        Cull off

        ZTest Always Cull Off ZWrite Off

        CGPROGRAM

    #pragma glsl
    #pragma fragmentoption ARB_precision_hint_fastest
    #pragma target 3.0
    #pragma vertex vert
    #pragma fragment fragMRT
    #include "unityCG.cginc"


        sampler2D _CameraDepthTexture;
        uniform sampler2D _MainTex;
        uniform sampler2D _Tex;

        struct v2f {
            float4 pos : SV_POSITION;
            float4 scrPos:TEXCOORD0;
            float2 uv : TEXCOORD1;
        };
        struct PixelOutput {
            float4 col0 : COLOR0;
            float4 col1 : COLOR1;
        };
        //Vertex Shader
        v2f vert(appdata_base v) {
            v2f o;
            o.pos = mul(UNITY_MATRIX_MVP, v.vertex);
            o.scrPos = ComputeScreenPos(o.pos);
            o.uv = v.texcoord.xy;
            return o;
        }
        PixelOutput fragMRT(v2f pixelData)
        {
            PixelOutput o;
            o.col0 = tex2D(_Tex, pixelData.uv);;
            o.col1 = float4(0.0f, 1.0f, 0.0f, 1.0f);
            return o;
        }
                ENDCG
            }
    }
    FallBack "Diffuse"
}
二、 C#脚本
多重处理的shader有了,调用这个shader的脚本也要进行相应的修改。
首先,我们需要定义两个RenderTexture和两个RenderBuffer来接收传出来的数据。RenderTexture是摄像机渲染所用的Texture格式,在上一节中由于直接将输出图案用来显示所以并没有定义RenderTexture,而是直接将输出数据显示出来。这次由于要接收多个shader处理结果,所以需要定义两个RenderBuffer。而RenderBuffer是RenderBuffer中存储RGB图和深度图数据的缓存格式。所以两个RenderBuffer分别接收两个RenderTexture的RGB图。
private RenderTexture[] mrtTex = new RenderTexture[2];
private RenderBuffer[] mrtRB = new RenderBuffer[2];
mrtTex[0] = new RenderTexture(textureWidth, textureHeight, 24, RenderTextureFormat.ARGB32);
mrtTex[1] = new RenderTexture(textureWidth, textureHeight, 24, RenderTextureFormat.ARGB32);
mrtRB[0] = mrtTex[0].colorBuffer;
mrtRB[1] = mrtTex[1].colorBuffer;然后我们还需要用Graphics.SetRenderTarget(mrtRB, mrtTex[0].depthBuffer);将渲染目标设置为这两个缓存。
还要使用MRTMat.SetTexture("_Tex", source);设置需要处理的图像。
全部代码:
using UnityEngine;
using System.Collections;
using System.IO;

[RequireComponent(typeof(Camera))]
[ExecuteInEditMode]
public class CameraMRT : MonoBehaviour
{

    public Material MRTMat,composeMat;
    private RenderTexture[] mrtTex = new RenderTexture[2];
    private RenderBuffer[] mrtRB = new RenderBuffer[2];

    Texture2D textureRGB,textureDepth;
    int textureWidth = 640, textureHeight = 380;

    void Start()
    {
        textureRGB = new Texture2D(textureWidth, textureHeight);
        textureDepth=new Texture2D(textureWidth/2, textureHeight);
        mrtTex[0] = new RenderTexture(textureWidth, textureHeight, 24, RenderTextureFormat.ARGB32);
        mrtTex[1] = new RenderTexture(textureWidth, textureHeight, 24, RenderTextureFormat.ARGB32);
        mrtRB[0] = mrtTex[0].colorBuffer;
        mrtRB[1] = mrtTex[1].colorBuffer;
    }

    void OnRenderImage(RenderTexture source, RenderTexture destination)
    {

        RenderTexture oldRT = RenderTexture.active;

        Graphics.SetRenderTarget(mrtRB, mrtTex[0].depthBuffer);

        GL.Clear(false, true, Color.clear);

        GL.PushMatrix();
        GL.LoadOrtho();

        MRTMat.SetPass(0);


        GL.Begin(GL.QUADS);
        GL.TexCoord2(0.0f, 0.0f); GL.Vertex3(0.0f, 0.0f, 0.1f);
        GL.TexCoord2(1.0f, 0.0f); GL.Vertex3(1.0f, 0.0f, 0.1f);
        GL.TexCoord2(1.0f, 1.0f); GL.Vertex3(1.0f, 1.0f, 0.1f);
        GL.TexCoord2(0.0f, 1.0f); GL.Vertex3(0.0f, 1.0f, 0.1f);
        GL.End();

        GL.PopMatrix();

        RenderTexture.active = oldRT;

        MRTMat.SetTexture("_Tex", source);

        Graphics.Blit(source, destination, MRTMat,0);

        StartCoroutine(cameraProcess(mrtTex[0], mrtTex[1]));
    }
    //将RenderTexture转换为Texture2D
    IEnumerator cameraProcess(RenderTexture rtColor, RenderTexture rtDepth)
    {
        yield return new WaitForEndOfFrame();

        RenderTexture.active = rtColor;
        textureRGB.ReadPixels(new Rect(0, 0, rtColor.width, rtColor.height), 0, 0);
        RenderTexture.active = null;
        textureRGB.Apply();

        RenderTexture.active = rtDepth;
        textureDepth.ReadPixels(new Rect(0, 0, rtDepth.width, rtDepth.height), 0, 0);
        RenderTexture.active = null;
        textureDepth.Apply();

    }
    //将转换得到的图片显示在屏幕上
    void OnGUI()
    {

        GUI.DrawTexture(new Rect(50, 50, textureRGB.width, textureRGB.height), textureRGB);

        GUI.DrawTexture(new Rect(50, 50+ textureRGB.height, textureDepth.width, textureDepth.height), textureDepth);
    }
}转载请注明出处:http://blog.csdn.net/ylbs110/article/details/53457576
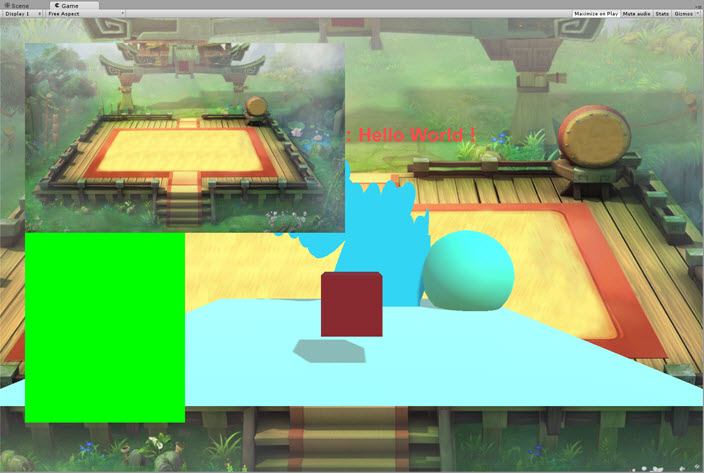
显示结果:


 3690
3690

 被折叠的 条评论
为什么被折叠?


