


1 Navigation地图烘焙
Navigation是unity自带的智能导航插件,通过Window——>AI——Navigation就可以打开管理界面。

其主要使用思路是,通过设置场景对象的Navigation属性,将场景对象设置为可通过和不可通过,然后给人物对象设置Navigation agent,其会自动根据场景对象的Navigation属性自动生成导航路线。
1.1 场景对象设置Navigation属性
1)将对象设置为Navigation static,保证可以设置Navigation属性

2)选择对象切换至Navigation面板,切换到第四个Object选项

Navigation Area选择此物体是否可以通过,通过这种方法,可以将场景对象中的,地形terrain设置为Walkable,然后将树木、大石头等阻挡物设置为Not Walkable。
切换到Bake选项,点击Bake烘焙后,这时再选中Navigation面板的状态下,Scene视图里会显示出可通过(浅蓝色)和不可通过的区域:

右下角可以选择是否显示区域提示。
1.2 设置Navigation Mesh Agent
1)选中我们要导航的人物,add component添加Nav Mesh Agent组件

Agent Type: 表示导航Agent的类型,默认为Humanoid(类人的),也可以手动添加(设置Agent的高度、半径、能上的坡度,能跨的高度等属性)。
Base Offset: 设置导航Agent与人物高度的偏移。
Speed: 自动导航时Agent的最大移动速度。
Angular Speed: 自动导航时Agent的最大角(旋转)速度。
Acceleration: 自动导航刚开始时Agent需到达的其(Speed)速度时,此期间的最大加速度。acceleration值越大,越快达到上面选项设置的速度(Speed)。
Stopping Distance: 设置在自动导航时距离目标点(destination)多少距离时停下。
Auto Braking: 勾选后表示到达目标点或离目标点的距离满足Stopping Distance时自动停止。
Radius: 导航Agent的半径。
Height: 导航Agent的高度。
Quality: 表示躲避障碍物的行为质量,质量越高躲避行为越好,越智能。
Priority: 优先级,范围为0-99,(0优先级最高,99优先级最低)表示高优先级的Agent不会与低优先级的Agent进行碰撞。
Auto Traverse Off Mesh Link: 勾选后表示Agent可以自动的通过,场景中两个分开的物体间所创建的Off Mesh Link。
Auto Repath: 勾选后表示当Agent的当前路径无效时,可以自动计算寻找新的路径前进。
Area Mask: 可以指定Agent可通过哪些层,划分其可通过的区域。
这里的属性也与上文中场景对象的Navigation相对应
它会根据你设置的agent的大小等属性来智能判断场景对象是否能通过,例如虽然整个地形我们设置的是Walkable,但对于超过30°的斜坡会自动判定为不可通过。

在将agent设置为与人物相匹配的大小和属性后,将场景对象的agent属性也配置好,再次烘焙,地图就会根据agent生成合适的Navigation 地图了。
1.3 Nav Mesh Obstacle
Navigation相关组件除了agent还有一个Obstacle,前面设置的场景对象Navigation属性的方式,只能针对场景中不会移动的static对象,而如果是像小石子等可以移动的阻挡物,则可以通过对其添加Nav Mesh Obstacle组件来完成设置。
2 鼠标控制导航移动
上文中完成了地图Navigation导航功能的烘焙,现在我们就可以使用Navigation系统,很轻易的让人物在地图上进行移动。为了让人物移动看起自然,我们可以顺便完成鼠标图标的根据选择物的动态变化,人物动画的基本设置。
2.1 鼠标图标的动态变化
其主要使用方法为Camera.main.ScreenPointToRay(Vector3 pos)和Physics.Raycast最后一个重载
官方文档:
https://docs.unity3d.com/cn/2020.2/ScriptReference/Camera.ScreenPointToRay.html
https://docs.unity3d.com/cn/2020.2/ScriptReference/Physics.Raycast.html
    void SetCursorTexture()
    {
        Ray ray = Camera.main.ScreenPointToRay(Input.mousePosition);
        if (Physics.Raycast(ray,out hitInfo))
        {
            //根据鼠标所在位置,设置图标图案
            switch (hitInfo.collider.tag)
            {
                case "Ground":
                    Cursor.SetCursor(tagert,new Vector2(16,16),CursorMode.Auto);
                    break;


            }
        }
    }
主要逻辑为,从主摄像机向鼠标点击位置发射一条射线,得到这条射线的碰撞信息hitInfo,然后根据碰撞对象的标签类型设置不同的鼠标图标,例如碰撞物体为Ground,则显示tagert这个鼠标图标。
2.2 人物动画状态机Blend Tree简单设置
1)打开人物Animator Controller,此前我们下载的角色资源Controller里面有默认的展示动画,我们先全部删除。
2)创建一个Blend Tree,并给Tree创建三个结点,分别代表idle、walk、run三种状态。
3)新建一个Parameters,Speed参数用于控制行进状态
4)Blend Tree的Parameters改为新建的参数Speed,分别将人物的idle/walk/run三个动画按照顺序拖入不同状态结点中。更多Blend Tree使用参考:https://blog.csdn.net/yupu56/article/details/53585304


2.3 鼠标控制移动
在Navigation中,人物的移动通过设置Navigation.destination即可完成,我们新建一个Player Manager,将它写到里面专门用于控制Player的控制。
public void MoveToTaget(Vector3 targert)
    {
        agent.destination = targert;
    }
随后,绑定MouseManager中的OnMouseClicked事件,当点击对象是Ground地面(要将地形tag设置为Ground)时,触发
    void MouseController()
    {
        if(Input.GetMouseButtonDown(0) && hitInfo.collider!= null)
        {
            if(hitInfo.collider.CompareTag("Ground"))
            {
                OnMouseClicked?.Invoke(hitInfo.point);
            }
        }
    }
ex:为了防止点击在树木上无法移动,可以将树木等遮挡物图层设置为Ignore Raycast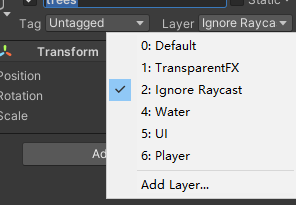
最后测试,人物通过点击可以在地图的可通过区域,自行规划路径移动。

MouseManager完整代码:
using System.Collections;
using System.Collections.Generic;
using UnityEngine;
using UnityEngine.Events;
using System;

public class MouseManager : MonoBehaviour
{
    public static MouseManager Instance;
    public event Action<Vector3> OnMouseClicked;
    public Texture2D point, doorway, attack, tagert, arrow;
    RaycastHit hitInfo;
    void Awake()
    {
        if (Instance != null)
            Destroy(gameObject);
        Instance = this;
    }
    void Update()
    {
        SetCursorTexture();
        MouseController();
    }
    void SetCursorTexture()
    {
        Ray ray = Camera.main.ScreenPointToRay(Input.mousePosition);
        if (Physics.Raycast(ray,out hitInfo))
        {
            //根据鼠标所在位置,设置图标图案
            switch (hitInfo.collider.tag)
            {
                case "Ground":
                    Cursor.SetCursor(tagert,new Vector2(16,16),CursorMode.Auto);
                    break;


            }
        }
    }
    void MouseController()
    {
        if(Input.GetMouseButtonDown(0) && hitInfo.collider!= null)
        {
            if(hitInfo.collider.CompareTag("Ground"))
            {
                OnMouseClicked?.Invoke(hitInfo.point);
            }
        }
    }

}
PlayerManager完整代码:
using System.Collections;
using System.Collections.Generic;
using UnityEngine;
using UnityEngine.AI;

public class PlayerManager : MonoBehaviour
{
    // Start is called before the first frame update
    private NavMeshAgent agent;
    private Animator animator;
    void Awake()
    {
        agent = this.GetComponent<NavMeshAgent>();
        animator = this.GetComponent<Animator>();


    }
    void Start()
    {
        MouseManager.Instance.OnMouseClicked += MoveToTaget;
    }

    // Update is called once per frame
    void Update()
    {
        SwitchAnimation();
    }
    public void MoveToTaget(Vector3 targert)
    {
        Debug.Log(targert);
        agent.destination = targert;
    }
    private void SwitchAnimation()
    {
        animator.SetFloat("Speed",agent.velocity.sqrMagnitude);
    }
}
参考资料:
https://learn.u3d.cn/tutorial/3drpg-core
https://docs.unity3d.com/cn/2020.2/ScriptReference/index.html
https://blog.csdn.net/weixin_45373419/article/details/99703281


 487
487


 被折叠的 条评论
为什么被折叠?
被折叠的 条评论
为什么被折叠?
 到【灌水乐园】发言


