


前文记述了如何使用下载好的deb包在Jetson tk1上安装CUDA和OpenCV的方法。但是目前NVIDIA官网已经不提供单独的CUDA和OpenCV4Tegra的下载包,所有的下载、安装工作都集成到了Jetpack安装文件中去。这就意味着如果你想安装最新的NVIDIA产品,就必须使用Jetpack安装方法。如果你拿到一块新的Jeston tk1或者tx1开发板,笔者建议直接使用Jetpack刷一遍系统并安装好全部程序;如果你已经使用了一段时间,那可以采用(二)中的安装方法,因为使用Jetpack安装稍不留神就会把你板子里原有的系统和数据统统抹去。
1. 准备工作
首先,你必须准备一台Ubuntu X64的计算机。切记Jetpack是在宿主机(Ubuntu X64)上运行的,在Jeston平台上无法运行。
在NVIDIA官网下载最新的Jetpack for L4T:
https://developer.nvidia.com/embedded/downloads
如果你觉得官网慢的话也可以选择我的百度网盘:
链接:http://pan.baidu.com/s/1o8tkp42 密码:yk4z
下载完成之后cd到你保存的路径下并保证你在超级用户模式:
<code class="hljs ruby has-numbering">root<span class="hljs-variable">@ZtyUbuntu</span><span class="hljs-symbol">:~</span><span class="hljs-comment"># chmod -x /home/zty/JetPack-L4T-2.1-linux-x64.run </span>
root<span class="hljs-variable">@ZtyUbuntu</span><span class="hljs-symbol">:~</span><span class="hljs-comment"># /home/zty/JetPack-L4T-2.1-linux-x64.run </span></code>
这时候它会提示你:
<code class="hljs lasso has-numbering">bash: /home/zty/JetPack<span class="hljs-attribute">-L4T</span><span class="hljs-subst">-</span><span class="hljs-number">2.1</span><span class="hljs-attribute">-linux</span><span class="hljs-attribute">-x64</span><span class="hljs-built_in">.</span>run: 权限不够</code>
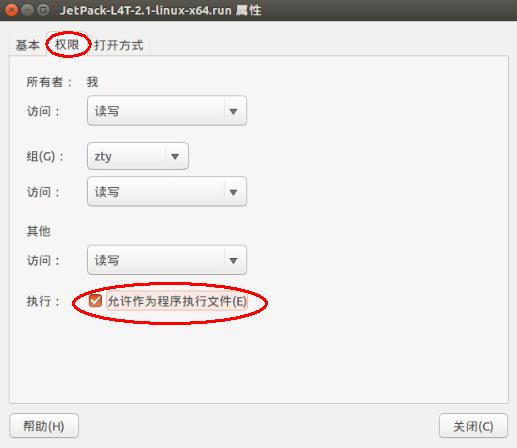
很多人对此有困惑,第一步明明我已经赋予安装包权限了呀,为什么还是运行不了。其实是因为你没有给它作为运用程序运行的权限。右击选择属性,勾选允许作为程序执行文件就可以了。
2. 安装文件详解
安装程序开始之后选择TK1,进入如下界面:
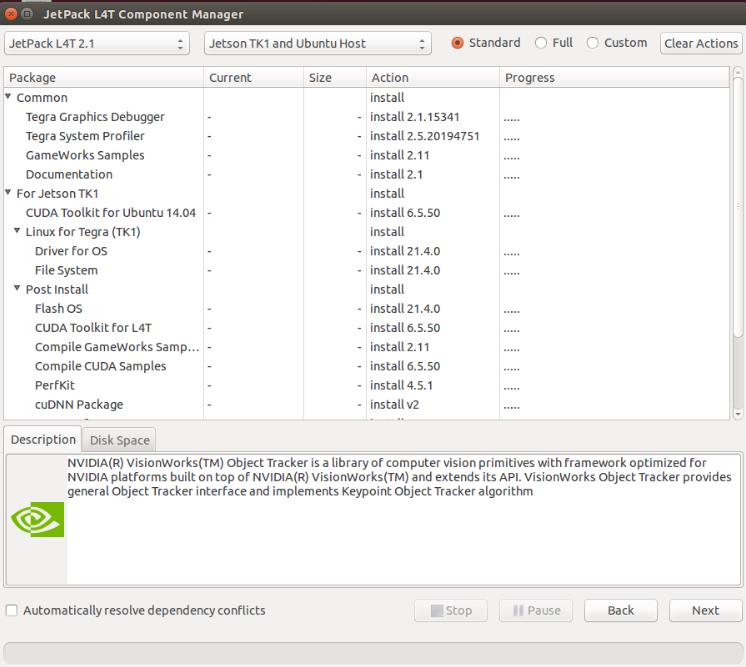
其中Common为Jetson tk1和tx1共用文件,For Jetson TK1是其特有文件。下面为大家介绍一些安装文件的作用。
2.1 CUDA Toolkit for L4T
在移动平台上运行的CUDA,后期编译OpenCV需要,必须安装。
2.2 OpenCV4Tegra for Jetson TK1 Developer Kit
OpenCV优化包,必须安装。
2.3 NVIDIA VisionWorks Toolkit,NVIDIA VisionWorks Plus (SFM),NVIDIA(R) VisionWorks(TM) Object Tracker
NVIDIA自家的视觉库,基于OpenVX,包含了三维重建(SFM)和跟踪模块(Object Tracker)硬件加速能力甩OpenCV一条街,建议安装。
2.4 The NVIDIA CUDA Deep Neural Network library (cuDNN)
NVIDIA自家的深度神经网络库,GPU加速能力超强,建议研究神经网络和机器学习的用户安装(其实TX1还有一个定位就是深度学习机,NVIDIA这点良心啊~)
2.5 CUDA Toolkit on Host for Cross Compiling
安装在宿主机上的CUDA,用于交叉编译。希望使用交叉编译的用户可以选择安装。
2.6 OS and File System
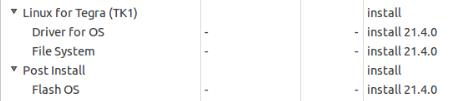
注意,如果你选择了这几项,就意味着你将重装Jetson TK1上的系统并且抹去所有文件,所有这一项慎选!
3. 开始安装
选择好要安装的内容之后,就可以点击下一步了。比起Ubuntu的源,NVIDIA的服务器速度还是比较良心的,除了CUDA和File System比较大之外,其余的应该10分钟左右就能下载好。
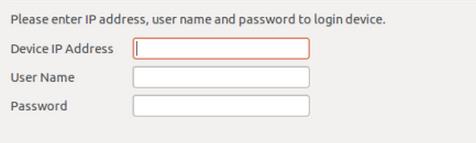
之后输入用户名和密码,默认都是Ubuntu。IP的话如果不填,之后程序会自动计算出,请确保此时你有一根网线和你的宿主机相连,或者他们两者连接在同一个路由器上。推荐使用网线直连法。(但实际我在直连法没有成功,不知道什么原因,大家可以试一下,最后在笔记本和开发板都连接在路由器上组成局域网实现远程访问,并且都可以上网。)

如果你是直接用网线连接的Jetson,那么选择第二个选项。这一步只有在需要刷系统的时候才会出现。
这里系统会自动帮你计算出Jetson的IP地址,但是可能时间比较长。
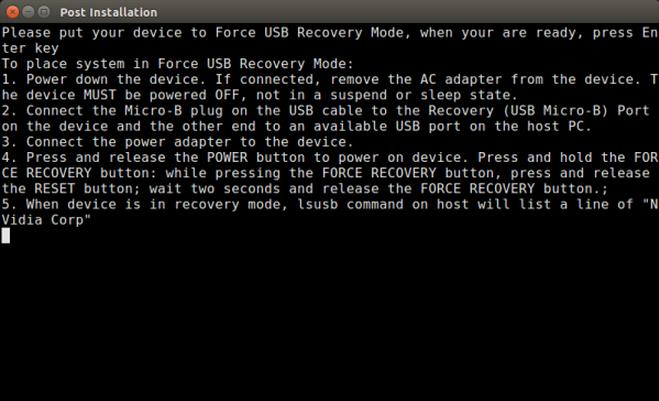
接下来会有提示将Tk1接入Recovery模式,首先对TK1上电,之后按住Recovery按键三秒以上,这时按一下Reset按键,再松开Recovery,Jetson就自动进入了Recovery模式。为了判断是否成功进入Recovery模式,可以使用lsusb命令查看是否有“NVIDIA Corpration”的设备。
接下来的安装都是自动完成的,用户只需要按照提示操作即可。
安装完成之后进入Jetson的系统,按照(二)中所述编译OpenCV源码,这样OpenCV在Jetson上就可以使用了。
Download and Install JetPack L4T
This document is intended to help you get familiar with installing JetPack, using the tools, and running sample code.
Download the Latest JetPack Version
The latest version of JetPack is available in the NVIDIA Embedded Developer Zone at:
All available JetPack downloads can be found at:
Downloading JetPack L4T
- On the host machine running Ubuntu, create a new directory to store installation packages.
- Download
JetPack-${VERSION}.runinto the new directory on the host Ubuntu machine.
Installing JetPack L4T
JetPack L4T runs on the host Ubuntu x86_64 machine and sets up your development environment and Jetson Development Kit target via remote access. Please refer to the System Requirements section for supported hardware configurations.
The following instructions assume you have downloaded the latest JetPack version, JetPack-${VERSION}.run, where ${VERSION} refers to the version string for the installer you have.
- Add exec permission for the
JetPack-${VERSION}.runchmod +x JetPack-${VERSION}.run - Run
JetPack-${VERSION}.runin terminal on your host Ubuntu machine.
- Next, the JetPack installer will indicate the installation directory.

- Select the development environment to setup.

- The JetPack installer will pop up a window to ask for permission to use during the installation process; you will need to enter your sudo password here.

- The Component Manager opens, which allows you to customize which components to install. Select the Jetson Developer Kit you would like to develop for to customize the installation components for each device. Jetson TK1 Developer Kit and Jetson TX1 Developer Kit support are available.


NOTE: To run a standalone Ubuntu install, deselect Jetson target specific entries. - Accept the license agreement for the selected components.

- The Component Manager will proceed with the installation. Once the host installation steps are completed, click the Next button to continue with the installation of target components.

NOTE: JetPack will now proceed with setting up the Jetson Developer Kit target, if the corresponding components were selected (i.e., flashing the OS and pushing components to the Jetson Developer Kit target). - If you de-selected Flash OS in the Component Manager, you will need to enter the IP address, user name, and password to set up an ssh connection to the target device.

After you enter the required information and click Next, JetPack will begin installing components on the target device.
- If you selected Flash OS in the Component Manager, you will need to select the network layout for your specific environment.

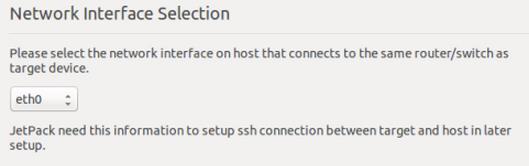
- If you selected the Device access Internet via router/switch layout, you will be asked to select which interface to use for Internet access.

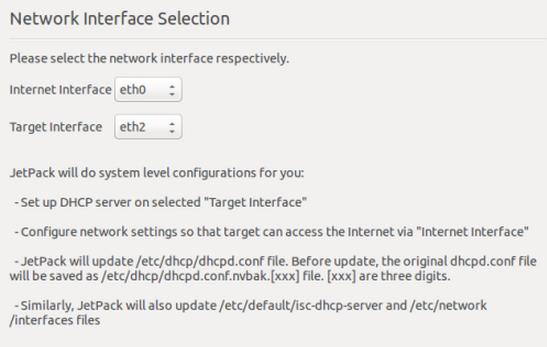
- If you selected the Device get IP assigned by DHCP server on host and access Internet via host machine layout, you must select which interface is to be used for Internet access, and which is to be used for the target interface.

- A pop-up window will instruct you to put your device into Force USB Recovery Mode, so you can flash the OS.

- Next, you will be prompted to install components on the specific target machine, and to compile samples.

- After the post installation tasks have been completed, the installation will be complete.


Compiling Samples
JetPack automatically compiles all samples, if Compile Samples has been checked during the component selection portion of the installation.
- If you have selected CUDA components, the CUDA samples are located in the following directory:
<JetPack_Install_Dir>/NVIDIA_CUDA-<version>_Samples
You can recompile the CUDA 6.5 samples by running:
OPENMPDIR=/usr/arm-linux-gnueabihf/lib EXTRA_LDFLAGS=--unresolved-symbols=ignore-in-shared-libs ARMv7=1 GCC=arm-linux-gnueabihf-g++ make
You can recompile the CUDA 7.0 samples by running:
SMS=53 EXTRA_LDFLAGS=--unresolved-symbols=ignore-in-shared-libs TARGET_ARCH=armv7l make
- If you have selected GameWorks OpenGL samples, the sample files are located in the following directory:
<JetPack_Install_Dir>/GameWorksOpenGLSamples
You can cross-compile them by running the
makecommand under the following subfolder:samples/build/linux-arm32
Run Sample Code
The CUDA samples directory will be copied to the home directory on your device by JetPack. The built binaries are in the following directory:
/home/ubuntu/NVIDIA_CUDA-<version>_Samples/bin/armv7l/linux/release/gnueabihf/
Run the samples at the command line or by double-clicking them in the file browser. For example, when you run the oceanFFT sample, the following screen will be displayed:

GameWorks OpenGL samples are copied to the home directory on the device. The built binaries are in the following directory:
/home/ubuntu/GameWorksOpenGLSamples/samples/bin/linux-arm32
Run the samples at the command line, or by double-clicking them in the file browser. For example, if you run the FeedbackParticlesApp sample, you will see smoke particles rising.


 1万+
1万+


 被折叠的 条评论
为什么被折叠?
被折叠的 条评论
为什么被折叠?
 到【灌水乐园】发言


