


🌞欢迎来到机器学习的世界
🌈博客主页:卿云阁💌欢迎关注🎉点赞👍收藏⭐️留言📝
🌟本文由卿云阁原创!
🌠本阶段属于练气阶段,希望各位仙友顺利完成突破
📆首发时间:🌹2021年6月22日🌹
✉️希望可以和大家一起完成进阶之路!
🙏作者水平很有限,如果发现错误,请留言轰炸哦!万分感谢!
6月22日 星期三 天气晴

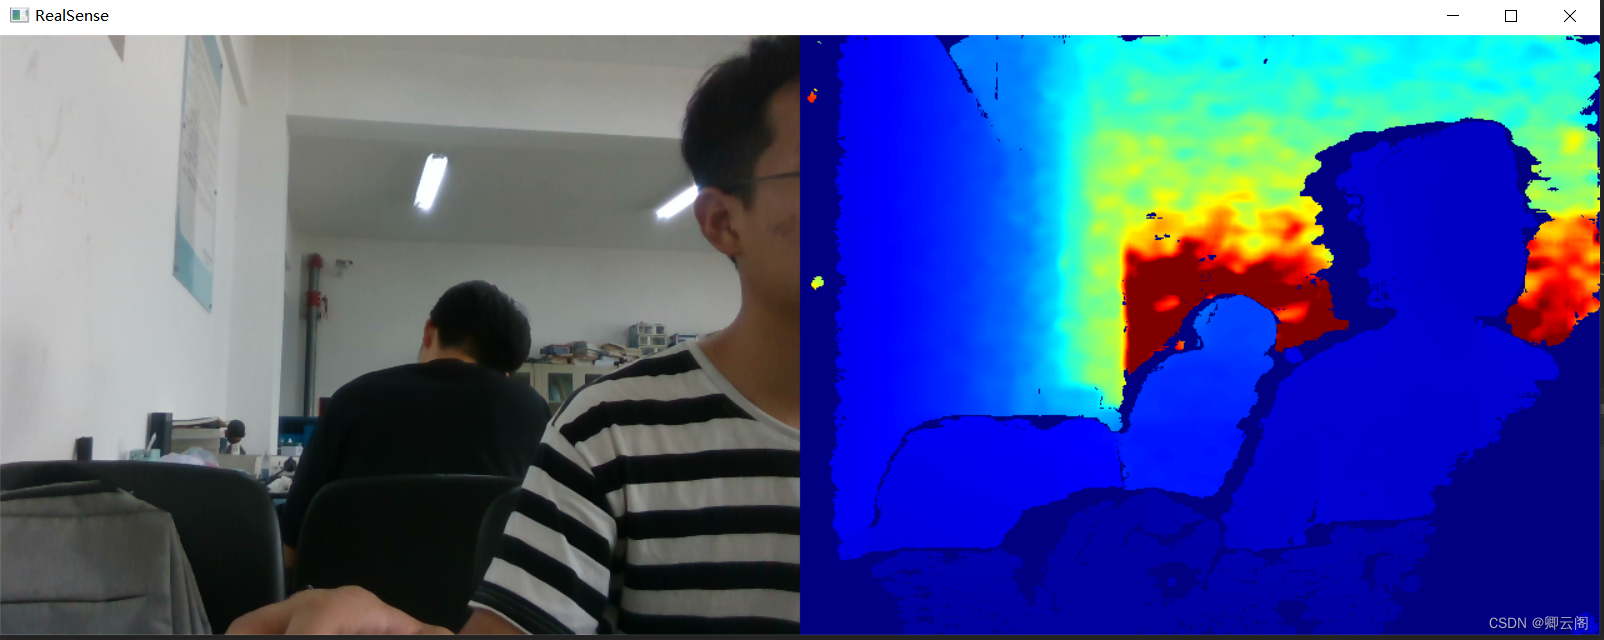
🍈 一、使用 OpenCV 和 Numpy 的帮助渲染深度和彩色图像
## License: Apache 2.0. See LICENSE file in root directory.
## Copyright(c) 2015-2017 Intel Corporation. All Rights Reserved.

###############################################
##      Open CV and Numpy integration        ##
###############################################

import pyrealsense2 as rs
import numpy as np
import cv2

# Configure depth and color streams
pipeline = rs.pipeline()
config = rs.config()

# Get device product line for setting a supporting resolution
pipeline_wrapper = rs.pipeline_wrapper(pipeline)
pipeline_profile = config.resolve(pipeline_wrapper)
device = pipeline_profile.get_device()
device_product_line = str(device.get_info(rs.camera_info.product_line))

found_rgb = False
for s in device.sensors:
    if s.get_info(rs.camera_info.name) == 'RGB Camera':
        found_rgb = True
        break
if not found_rgb:
    print("The demo requires Depth camera with Color sensor")
    exit(0)

config.enable_stream(rs.stream.depth, 640, 480, rs.format.z16, 30)

if device_product_line == 'L500':
    config.enable_stream(rs.stream.color, 960, 540, rs.format.bgr8, 30)
else:
    config.enable_stream(rs.stream.color, 640, 480, rs.format.bgr8, 30)

# Start streaming
pipeline.start(config)

try:
    while True:

        # Wait for a coherent pair of frames: depth and color
        frames = pipeline.wait_for_frames()
        depth_frame = frames.get_depth_frame()
        color_frame = frames.get_color_frame()
        if not depth_frame or not color_frame:
            continue

        # Convert images to numpy arrays
        depth_image = np.asanyarray(depth_frame.get_data())
        color_image = np.asanyarray(color_frame.get_data())

        # Apply colormap on depth image (image must be converted to 8-bit per pixel first)
        depth_colormap = cv2.applyColorMap(cv2.convertScaleAbs(depth_image, alpha=0.03), cv2.COLORMAP_JET)

        depth_colormap_dim = depth_colormap.shape
        color_colormap_dim = color_image.shape

        # If depth and color resolutions are different, resize color image to match depth image for display
        if depth_colormap_dim != color_colormap_dim:
            resized_color_image = cv2.resize(color_image, dsize=(depth_colormap_dim[1], depth_colormap_dim[0]), interpolation=cv2.INTER_AREA)
            images = np.hstack((resized_color_image, depth_colormap))
        else:
            images = np.hstack((color_image, depth_colormap))

        # Show images
        cv2.namedWindow('RealSense', cv2.WINDOW_AUTOSIZE)
        cv2.imshow('RealSense', images)
        cv2.waitKey(1)

finally:

    # Stop streaming
    pipeline.stop()
🍉二、通过将深度图像与彩色图像对齐并执行简单计算以剥离背景来执行背景删除的方法
## License: Apache 2.0. See LICENSE file in root directory.
## Copyright(c) 2017 Intel Corporation. All Rights Reserved.

#####################################################
##              Align Depth to Color               ##
#####################################################

# First import the library
import pyrealsense2 as rs
# Import Numpy for easy array manipulation
import numpy as np
# Import OpenCV for easy image rendering
import cv2

# Create a pipeline
pipeline = rs.pipeline()

# Create a config and configure the pipeline to stream
#  different resolutions of color and depth streams
config = rs.config()

# Get device product line for setting a supporting resolution
pipeline_wrapper = rs.pipeline_wrapper(pipeline)
pipeline_profile = config.resolve(pipeline_wrapper)
device = pipeline_profile.get_device()
device_product_line = str(device.get_info(rs.camera_info.product_line))

found_rgb = False
for s in device.sensors:
    if s.get_info(rs.camera_info.name) == 'RGB Camera':
        found_rgb = True
        break
if not found_rgb:
    print("The demo requires Depth camera with Color sensor")
    exit(0)

config.enable_stream(rs.stream.depth, 640, 480, rs.format.z16, 30)

if device_product_line == 'L500':
    config.enable_stream(rs.stream.color, 960, 540, rs.format.bgr8, 30)
else:
    config.enable_stream(rs.stream.color, 640, 480, rs.format.bgr8, 30)

# Start streaming
profile = pipeline.start(config)

# Getting the depth sensor's depth scale (see rs-align example for explanation)
depth_sensor = profile.get_device().first_depth_sensor()
depth_scale = depth_sensor.get_depth_scale()
print("Depth Scale is: " , depth_scale)

# We will be removing the background of objects more than
#  clipping_distance_in_meters meters away
clipping_distance_in_meters = 1 #1 meter
clipping_distance = clipping_distance_in_meters / depth_scale

# Create an align object
# rs.align allows us to perform alignment of depth frames to others frames
# The "align_to" is the stream type to which we plan to align depth frames.
align_to = rs.stream.color
align = rs.align(align_to)

# Streaming loop
try:
    while True:
        # Get frameset of color and depth
        frames = pipeline.wait_for_frames()
        # frames.get_depth_frame() is a 640x360 depth image

        # Align the depth frame to color frame
        aligned_frames = align.process(frames)

        # Get aligned frames
        aligned_depth_frame = aligned_frames.get_depth_frame() # aligned_depth_frame is a 640x480 depth image
        color_frame = aligned_frames.get_color_frame()

        # Validate that both frames are valid
        if not aligned_depth_frame or not color_frame:
            continue

        depth_image = np.asanyarray(aligned_depth_frame.get_data())
        color_image = np.asanyarray(color_frame.get_data())

        # Remove background - Set pixels further than clipping_distance to grey
        grey_color = 153
        depth_image_3d = np.dstack((depth_image,depth_image,depth_image)) #depth image is 1 channel, color is 3 channels
        bg_removed = np.where((depth_image_3d > clipping_distance) | (depth_image_3d <= 0), grey_color, color_image)

        # Render images:
        #   depth align to color on left
        #   depth on right
        depth_colormap = cv2.applyColorMap(cv2.convertScaleAbs(depth_image, alpha=0.03), cv2.COLORMAP_JET)
        images = np.hstack((bg_removed, depth_colormap))

        cv2.namedWindow('Align Example', cv2.WINDOW_NORMAL)
        cv2.imshow('Align Example', images)
        key = cv2.waitKey(1)
        # Press esc or 'q' to close the image window
        if key & 0xFF == ord('q') or key == 27:
            cv2.destroyAllWindows()
            break
finally:
    pipeline.stop()
🍊三、使用多个摄像头计算物体的长度、宽度和高度的简单演示


 677
677


 被折叠的 条评论
为什么被折叠?
被折叠的 条评论
为什么被折叠?
 到【灌水乐园】发言


