


vuepress-reco主题个人博客搭建
文章目录
前言
之前了解了vuepress的使用与配置,快速实现了个人文档的搭建,而今天则使用vuepress-reco主题来实现个人博客的搭建
官方文档:
https://vuepress-theme-reco.recoluan.com/
我的博客:
https://xingyun-dev.github.io/
一、安装环境准备
前面在介绍vuepress中已经提到了环境的安装,这里不再赘述
#我的node版本
$ node -v
v16.20.2

$ npm -v
8.19.4
二、开始创建
1.安装脚手架工具
npm install @vuepress-reco/theme-cli -g

#在这之前可以尝试先切换淘宝源来加速下载
npm config set registry https://registry.npm.taobao.org
2.创建项目
theme-cli init
执行完上述命令后,命令行窗口出现配置信息:
? Whether to create a new directory? (Y/n)  #是否新建一个目录,输入Y
? What's the name of new directory?   #为新的文件夹命名
? What's the title of your project?   #项目标题
? What's the description of your project?  #项目描述
? What's the author's name?  #作者姓名
? What style do you want your home page to be?(The 2.x version is the beta version)  #选择首页风格,这里我选择blog
如图所示:

3. 启动项目
#进入项目目录
cd xingyun2

#安装依赖
npm install

#运行
npm run dev
访问命令行输出的IP地址,一般为http://localhost:8080/,即可访问博客了

初始界面如图所示:
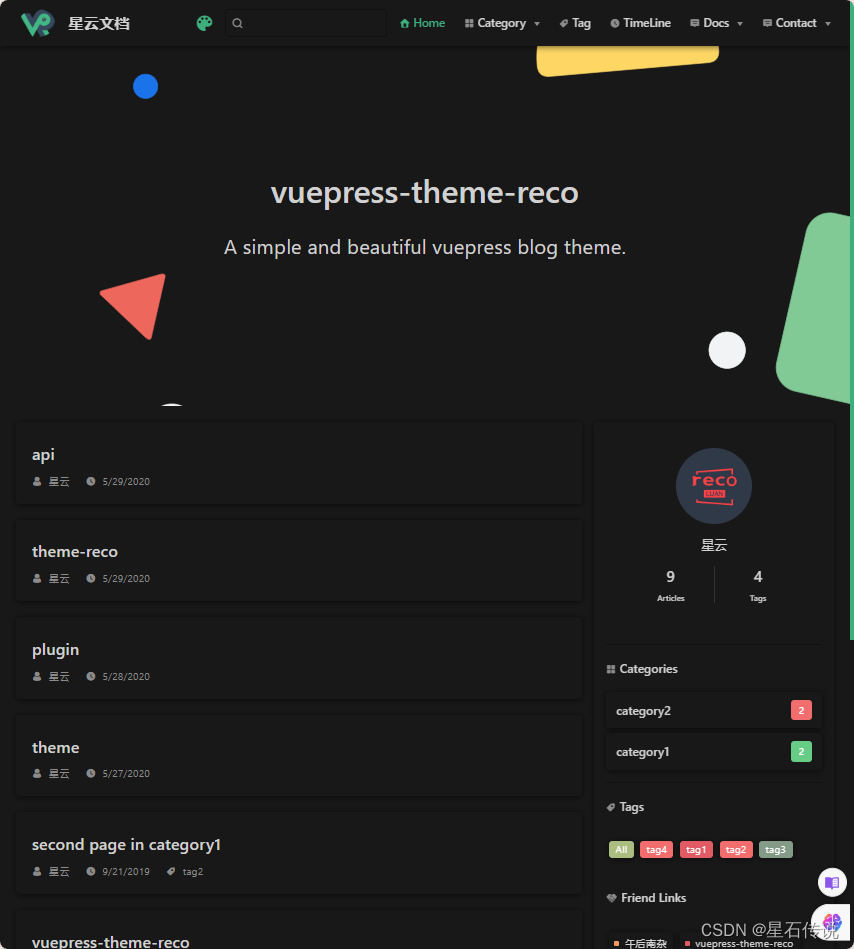
之后则是通过修改配置文件来定制自己的博客。
三、博客配置
我这里用的是vscode编辑器打开代码文件夹
1. 初始的项目结构
├─ node_modules      #这里存放着项目所需的依赖
├─ docs        #该目录下存放编写的文档
│  └─ theme-reco
│     ├─ api.md
│     ├─ plugin.md
│     ├─ theme.md
│     └─ README.md
├─ blogs            #该目录下存放编写的博客文章
│     ├─ category1
│     │  ├─ 2018
│     │  │  └─ 121501.md
│     │  └─ 2019
│     │     └─ 092101.md
│     ├─ category2
│     │  ├─ 2016
│     │  │  └─ 121501.md
│     │  └─ 2017
│     │     └─ 092101.md
│     └─ other
│        └─ guide.md
├─ .vuepress         #存放项目配置文件与静态资源
│   ├─ config.js    #用于配置项目
│   └─ public       #该目录下存放网页中所需的静态资源
│     ├─ hero.png   # 首页大图
│     ├─ logo.png     #网站logo
│     ├─ favicon.ico   #网站图标
│     └─ avatar.png   #头像
├─ package.json      #依赖管理文件
└─ README.md         #存放着博客首页的内容
2. README.md首页
---
home: true  #指定该页为首页
heroText: 星云文档   #居中显示的文本

tagline: 烦死了  #文本下面的字


# heroImage: /hero.png
# heroImageStyle: {
#   maxWidth: '600px',
#   width: '100%',
# }

# 背景图
# bgImage: '/img/bg2.jpg'

bgImageStyle: {   #背景图片样式
  height: '400px'
}


isShowTitleInHome: false
actionText: Guide
actionLink: /views/other/guide
features:
- title: Yesterday
  details: 开发一款看着开心、写着顺手的 vuepress 博客主题
- title: Today
  details: 希望帮助更多的人花更多的时间在内容创作上,而不是博客搭建上
- title: Tomorrow
  details: 希望更多的爱好者能够参与进来,帮助这个主题更好的成长
---

<Font /> #引入打字机效果,后续再介绍
3. 配置config.js文件
我的配置文件如下(为了使主配置文件简单点,故将导航栏、侧边栏、插件等配置分别放到了不同文件中,然后再在主配置文件引入
const head = require('./config/head')
const plugins = require('./config/plugin')
const nav = require('./config/nav')
const sidebar = require('./config/sidebar')

module.exports = {
  title: "星云文档",
  description: "作为个人的项目文档",
  //dest: "public",
  dest: "./dist",
  port: "8080",
  //设置为中文
  locales: {
    '/':{
      lang: 'zh-CN',
    }
  },

  //禁用webpack的最小化优化。(我在生成静态文件时,如果不禁用会导致并不能生成正常的静态文件,或许是我的版本不兼容问题?)
  chainWebpack: config => {
    if (process.env.NODE_ENV === "production") {
      config.optimization.minimize(false);
    }
  },


  head: head,
  plugins: plugins,   //  插件

  markdown: {
    "lineNumbers": true
  },


  //主题
  theme: "reco",
  themeConfig: {
    nav: nav,   //导航栏
    sidebar:sidebar, // 侧边栏


    type: "blog",
    smoothScroll: true,
    blogConfig: {
      "category": {
        "location": 4,  // 在导航栏菜单中所占的位置
        "text": "博客分类"
      },
      "tag": {
        "location": 3,
        "text": "标签"
      }
    },
    logo: "/img/logo.png",  //logo设置


    search: true,  //搜索设置
    searchMaxSuggestions: 10,  //搜索提示数量
    lastUpdated: "更新时间:",  //最后更新时间
    editLinks: true,
    editLinkText: '在 GitHub 上编辑此页 !',

    author: "星云",  //作者
    authorAvatar: "/img/logo.png",     //作者头像

    recordLink: 'https://beian.miit.gov.cn/',    //备案号
    startYear: "2024",

    //友情链接
    friendLink: [
      {
        title: 'CSDN',
        desc: '主要是一些学习编程的学习笔记',
        avatar: "/img/星石传说.jpg",
        link: 'https://blog.csdn.net/2301_78630677?type=blog'
      },

    ],

  },

}
4. 配置侧边栏
如下图所示

在侧边栏的配置中,其中config文件夹中的sidebar,js如下:
module.exports = {

    //对多模块进行分类
	'/docs/guide/': require('../../docs/guide/sidebar'),  //第一个模块下面的侧边栏

	'/docs/vuepress搭建个人文档/': require('../../docs/vuepress搭建个人文档/sidebar'), //第二个模块下面的侧边栏
	'/docs/以flask为后端的博客项目/': require('../../docs/以flask为后端的博客项目/sidebar'), //第三个模块下面的侧边栏
}
以第二个模块下面的侧边栏的配置为例,sidebar.js文件:
module.exports = [
	{
	title:'vuepress搭建个人文档',
	collapsable: true,
	children:
	[
        '',  //默认是README.md文件
        'vuepress介绍',
        'vuepress-reco主题个人博客搭建',
		'vuepress博客部署',
	],
	},
]
5. 导航栏配置
以数组的形式嵌套配置
module.exports = [
    {
    "text": "首页",
    "link": "/",
    "icon": "reco-home"
    },
    {
    "text": "时间线",
    "link": "/timeline/",
    "icon": "reco-date"
    },
    {
    "text": "项目文档",
    "icon": "reco-blog",
    "items": [
        {
            "text": "介绍",
            "link": "/docs/guide/"
        },
        {
        "text": "vuepress搭建个人文档",
        "link": "/docs/vuepress搭建个人文档/"
        },
        {
        "text": "以flask为后端的博客项目",
        "link": "/docs/以flask为后端的博客项目/"
        },

    ]
    },
    {
    "text": "关于项目",
    "icon": "reco-message",
    "items": [
        {
        "text": "GitHub",
        "link": "https://github.com/xingyun-dev",
        // "icon": "reco-github"  // 图标
        },
        {
        "text": 'Gitee',
        "link": 'https://gitee.com/wht050106',
        // "icon": ''
        },

    ]
    },
    {
        "text": "留言板",
        // "icon": "",
        "link": "/docs/留言板.md",
    },

]
6. 配置头部文件
module.exports = [
    ['link', { rel: 'icon', href: '/img/favicon.ico' }],
    ['meta', { name: 'viewport', content: 'width=device-width,initial-scale=1,user-scalable=no' }],
    ['meta', { name: 'keywords', content: '星云文档,vuepress,自建博客' }],
    ['meta', { name: 'description', content: '单纯的个人项目记录文档' }],
    ["meta", {name: "robots", content: "all"}],
    ["meta", {name: "author", content: "星云"}],
    ['link',{rel:"stylesheet",href:"/css/style.css"}],
]
四、所配置的插件
4.1. 动态标题插件
#install
npm i vuepress-plugin-dynamic-title -D

#usage
module.exports = {
   plugins: [
      [
    'dynamic-title',
    {
      showIcon: '/img/favicon.ico',
      showText: '欢迎回来!',
      hideIcon: '/img/favicon.ico',
      hideText: '祝一路顺风!',
      recoverTime: 2000,
    },
 	 ],
   ],
}
https://github.com/moefyit/vuepress-plugin-dynamic-title
4.2. 音乐播放器插件
#install
npm i @vuepress-reco/vuepress-plugin-bgm-player


#usage
 [
    '@vuepress-reco/vuepress-plugin-bgm-player',
    {
      audios: [
        {
          name: '真英雄',
          artist: '隋唐英雄传插曲',
          url: '/music/真英雄.mp3',
          cover: 'https://p1.music.126.net/qTSIZ27qiFvRoKj-P30BiA==/109951165895951287.jpg?param=200y200'
        },
      ] ,

      // 是否默认缩小
      autoShrink: true ,
      // 缩小时缩为哪种模式
      shrinkMode: 'float',
      // 悬浮窗样式
      floatStyle:{ bottom: '40px', 'z-index': '999999' }
    }
  ],
https://gitee.com/vuepress-reco/vuepress-plugin-bgm-player
4.3. 代码复制插件
#install
npm install vuepress-plugin-code-copy


#usage
//代码复制
["vuepress-plugin-code-copy", {
  align: 'top-right',
  successText: '复制成功',
  color: 'green'

  }
],
https://www.npmjs.com/package/vuepress-plugin-code-copy
4.4. PWA插件
PWA,Progressive Web Apps(渐进式 Web 应用)
PWA 指的是使用指定技术和标准模式来开发的 Web 应用,这同时赋予它们 Web 应用和原生应用的特性。
PWA了解参考
https://juejin.cn/post/7065653370903592996
#install
npm install -D @vuepress/plugin-pwa


#usage
 //PWA    站点将具备离线访问能力,并且用户在访问站点时,如果有新内容可用,会弹出一个更新提示,用户可以选择刷新页面以查看最新内容。
  ['@vuepress/pwa', {
    serviceWorker: true,
    updatePopup: {
    message: "发现新内容可用",
    buttonText: "刷新"
    }
  }],
4.5. 添加著作权信息插件
#install
npm install -D vuepress-plugin-copyright


#usage
//处理复制操作
  [
      'copyright',
      {
        noCopy: true, // 选中的文字将无法被复制
        minLength: 100, // 如果长度超过 100 个字符
      },
    ],
https://vuepress-community.netlify.app/zh/plugins/copyright
4.6. 评论插件
在vuepress支持valine和vssue等评论系统
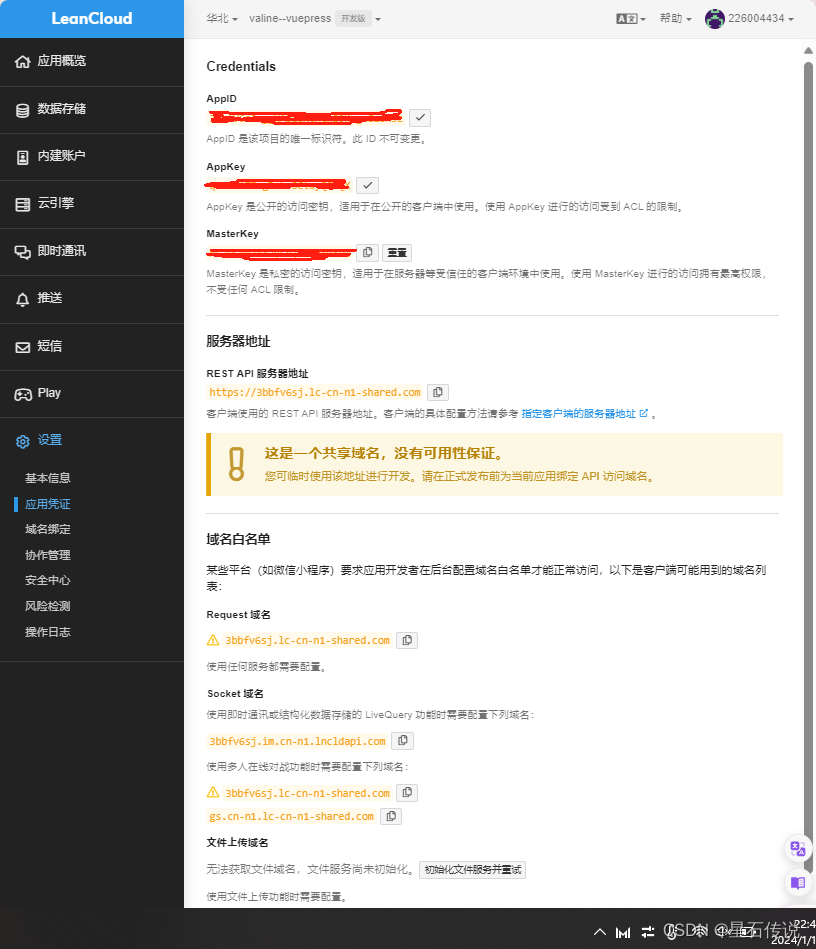
Valine 是一款基于 LeanCloud 的快速、简洁且高效的无后端评论系统,Vssue 是 Vue 驱动的、基于 Issue 的评论插件。
使用 Valine 需要先获取 AppId 和 AppKey。访问 LeanCloud 网站,进行注册登陆。登陆后进入到控制台页面,创建一个新应用,创建成功后,进入创建的应用中,在 设置->应用凭证 选项卡中,就可以看到 AppId 和 AppKey 了。
#install
npm install --save vuepress-plugin-comment

#usage
[
      'vuepress-plugin-comment',
      {
        choosen: 'valine',
        // options选项中的所有参数,会传给Valine的配置
        options: {
          el: '#valine-vuepress-comment',
          appId: 'Your own appId',
          appKey: 'Your own appKey'
        }
      }
    ],
另外因为vuepress-reco主题内置了valine,可以直接在config.js主配置文件中使用:
//valine评论插件
      valineConfig: {
        // your appId
        appId: '',
        // your appKey
        appKey: '',
        placeholder:'来都来了,冒个泡再走呗...',
        //showComment: false,
  },
https://valine.js.org/vuepress.html
4.7. 分页插件
#install
npm i @vuepress-reco/vuepress-plugin-pagation

#usage
//分页
  ['@vuepress-reco/vuepress-plugin-pagation', {
    perPage: 5  // 每页展示条数
  }],
https://www.npmjs.com/package/@vuepress-reco/vuepress-plugin-pagation
4.8. 看板娘插件
#install
npm i @vuepress-reco/vuepress-plugin-kan-ban-niang

#usage
//看板娘插件
  [
    '@vuepress-reco/vuepress-plugin-kan-ban-niang',
    {
      theme: ['blackCat', 'whiteCat', 'haru1', 'haru2', 'haruto', 'koharu', 'izumi', 'shizuku', 'wanko', 'miku', 'z16']
    }
  ],
https://gitee.com/vuepress-reco/vuepress-plugin-kan-ban-niang
4.9. 公告栏弹窗插件
#install
npm i @vuepress-reco/vuepress-plugin-bulletin-popover


#usage
 ['@vuepress-reco/vuepress-plugin-bulletin-popover', {
    title: '消息提示',
    body: [
      {
        type: 'title',
        content: '欢迎加入QQ交流群 🎉🎉🎉',
        style: 'text-aligin: center;'
      },
      {
        type: 'image',
        src: '/rvcode_qq.png'
      }
    ],
    footer: [
      {
        type: 'button',
        text: '打赏',
        link: '/donate'
      },
      {
        type: 'button',
        text: '打赏',
        link: '/donate'
      }
    ]
  }]
https://www.npmjs.com/package/@vuepress-reco/vuepress-plugin-bulletin-popover
4.10. 更多插件
https://vuepress-community.netlify.app/zh/
https://v1.vuepress.vuejs.org/zh/plugin/official/
总结
本文主要介绍了vuepress的一个主题vuepress-theme-reco,并介绍了使用该主题进行的个人博客搭建。下一篇文章则将介绍在不使用服务器的情况下,借助github、gitee来部署该个人博客。
– 2024-1-13


 1741
1741


 被折叠的 条评论
为什么被折叠?
被折叠的 条评论
为什么被折叠?
 到【灌水乐园】发言


