


一,EHH的基本原理
参考文章
群体进化选择消除分析 - 组学大讲堂问答社区 (omicsclass.com)
基于LD衰减和等位基因频率检测自然选择-XPEHH (qq.com)
1.1基本概念介绍和理解
LD通常是指两个等位基因之间的关联程度,在这里,我们用LD来衡量一个位点的单个等位基因与不同距离处的多个位点之间的关联程度。由于重组,突变附近的LD将大幅衰减,大多数等位基因通常是比较古老的突变并且具有较短范围的LD。而一个新突变正在经历正选择(这里主要考虑Hard sweep)的关键特征就是等位基因频率在群体中异常快速上升,发生的时间足够短以至于重组基本上来不及破坏所选突变的单倍型,简而言之,正选择印记就是一个等位基因在给定群体频率下具有异常长范围的LD。LD范围的长短是相对的,主要取决于局部的重组速率,因此,基于LD衰减的检测方法必须控制重组率的局部差异,EHH是使用LD的衰减作为估计等位基因年龄的时钟来检测兴趣位点处的正选择。
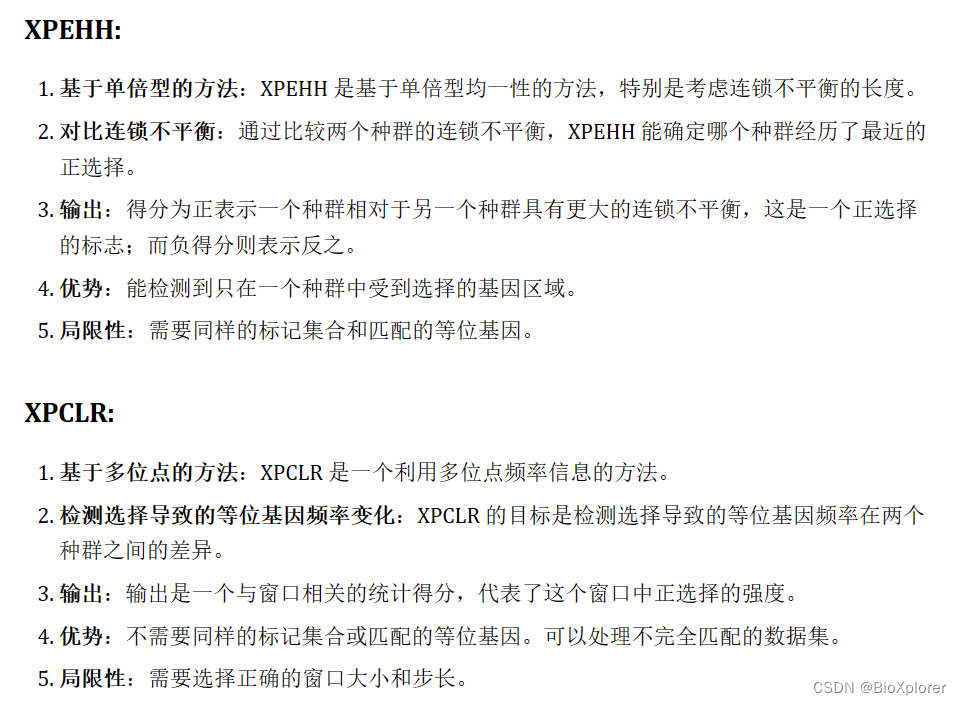
Sabeti在2007年发表了跨群体延展单倍型纯合度(Cross-population Extended Haplotype Homozygosity, XPEHH)方法,适用于所选择的等位基因接近或已经在一个群体中固定,但是在种内所有群体中还保持多态性。
XPEHH 值是一种度量两个群体之间不平衡遗传连锁区域的指标。XPEHH 值通常在不同基因组位置上计算,正值表示一个群在某一基因座位上的连锁单倍型频率高于另一个人群,负值则表示相反情况。较高的 XPEHH 值可能暗示着此基因座位上存在自然选择的迹象。
1.2群体进化选择消除分析
还看到了一个有意思的现象群体选择分析|selscan 计算 XPEHH (qq.com)
1.3什么是Phasing
人类基因组的Phasing原理是什么? - 知乎 (zhihu.com)
人类基因组的Phasing原理是什么? (qq.com)
1.4查考文献
二,操作流程
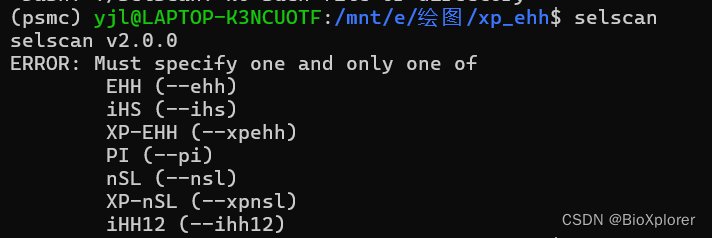
在学习任何一个包之前,我们得先查清楚这个官网就跟snpeff一样
我觉得官网也说得很清楚,原理官网也有。selscan/manual/selscan-manual.pdf at master · szpiech/selscan (github.com)
去官网下载
szpiech/selscan: Haplotype based scans for selection (github.com)
tar -zxvf selscan-2.0.0.tar.gz
找到selscan所在的地方pwd
/mnt/e/绘图/xp_ehh/selscan-2.0.0/bin/linux
vim ~/.bashrc
export PATH=/mnt/e/绘图/xp_ehh/selscan-2.0.0/bin/linux:$PATH
source ~/.bashrc
根据文章说的,我们开始进行下一步
2021-01-04根据SNP验证自然选择—XPEHH分析 - 简书 (jianshu.com)
1.Beagle软件进行phasing和xpehh
要求:
selscan软件要求输入的基因型只能是0或1,而不能是其它。所以我们需要在这里把多等位基因位点过滤掉
从过滤后的vcf文件提取chr/id/physical position这三列,
需要去掉以#号开头的注释行sed -i '/^#/d' dis.map
需要对原始的vcf文件进行phasing
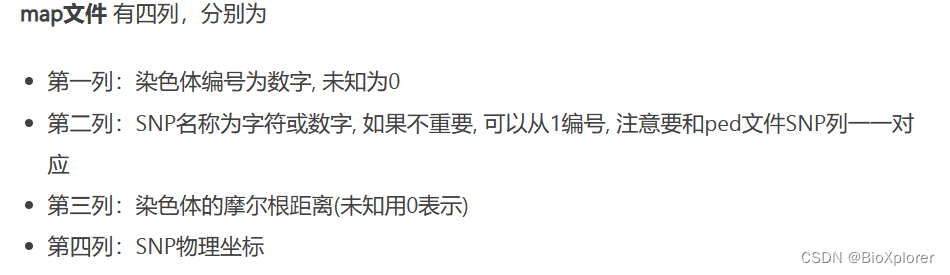
需要准备一个map文件,这个文件主要用来存放每个标记的ID以及所在的染色体、物理位置、遗传距离(cM)这里我们可以先查看一下map文件格式是什么
VCF 生成 plink 输入文件(ped和map) - 简书 (jianshu.com)
1.1根据文章说明selscan软件要求输入的基因型只能是0或1,需要在这里把多等位基因位点过滤掉,然后把vcf文件phasing
conda install -c bioconda vcftools
vcftools --vcf co --min-alleles 2 --max-alleles 2 --recode --out Vitis_all_sample
1.2然后把map文件用PLINK转出来
1.3根据教程链接继续下载,这个教程的是BEAGLE
2021-01-04根据SNP验证自然选择—XPEHH分析 - 简书 (jianshu.com)
Haplotype phasing 常用软件实操介绍 (qq.com)
wget -c https://faculty.washington.edu/browning/beagle/beagle.01Mar24.d36.jar先下载软件,把vcf分成24个,map也是(我寻思map应该也是需要分群的好了的map)
bcftools view Vitis_all_sample.recode.vcf -Oz -o Vitis_all_sample.recode.vcf.gz
bcftools view -S pop1.txt Vitis_all_sample.recode.vcf.gz > pop1.vcf
(这个地方的分群文件我是用的是1群体和2群体),pop1.txt文件格式可以参考使用bcftools提取指定样本的vcf文件(extract specified samples in vcf format) - 橙子牛奶糖 - 博客园 (cnblogs.com)
for i in {1..24}; do vcftools --vcf pop1.vcf --chr $i --recode --out $i.pop1; done
for i in {1..24}; do gzip $i.pop1.recode.vcf; done
plink --vcf Vitis_all_sample.recode.vcf --recode --out Vitis_all_sample_recode_pop1 --chr-set 24
mkdir ./map
mv Vitis_all_sample_recode_pop1.map ./map/
cd map
awk '{print > $1}' new.map
for i in {1..24}; do gzip $i; done
使用Beagle软件进行phasing,
for i in {1..24}; do gzip -d ${i}.gz; done(也可以不需要压缩文件)
for i in {1..24}; do java -Xmx30g -jar beagle.01Mar24.d36.jar gt=//mnt/e/绘图/xp_ehh/pop1/${i}.pop1.recode.vcf.gz map=/mnt/e/绘图/xp_ehh/map/${i} out=${i}.output; done

1.4生成要求的map文件
由于我们的map文件是这样的格式,
第一列是染色体;第二列是位点ID;第三列是遗传位置;第四列是物理位置。cut -f 1,3,2 Vitis_all_sample.recode.vcf > dis.map
awk '{ print $1" "$3" "$2*0.00000166" "$4}' dis.map > dis.4.map
1 . 0.00431434 2599
1 . 0.00772066 4651
1 . 0.00772564 4654
这里需要计算我们的遗传距离,根据文章的意思的是
 #总遗传距离(以厘米为单位)除以基因组的大小(以兆碱基对为单位),从而得到每个单位位置的物理距离。

vitis基因组大小 ~500M,查到16年一篇文献vitis总的遗传距离为2424cM,相当于每单位物理位置为0.00000485cM 生成最终的map文件
2424/500M=4.848cm/Mbp除以100 000 bp =0.00000485cM
然后重新对我们map进行分割
mkdir ./map
mv dis.4.map ./map/
cd map
awk '{print > $1}' dis.4.map
使用Beagle软件进行phasing,
for i in {1..24}; do java -Xmx30g -jar beagle.01Mar24.d36.jar gt=//mnt/e/绘图/xp_ehh/pop1/${i}.pop1.recode.vcf.gz map=/mnt/e/绘图/xp_ehh/map/${i} out=${i}.output; done
这个是跑其中一个群体,接下来我们同样的跑第二个群
需要的文件
总的vcf,分群文件1052_1052


1,selscan软件要求输入的基因型只能是0或1,需要在这里把多等位基因位点过滤掉
conda install -c bioconda vcftools
vcftools --vcf c.vcf --min-alleles 2 --max-alleles 2 --recode --out Vitis_all_sample

2,输出map格式的文件,分成24个
plink --vcf Vitis_all_sample --recode --out Vitis_all_sample --chr-set 24
cut -f 1,2,4 Vitis_all_sample.map > Vitis_all_sample.cut.map
awk '{ print $1" "$2" "$3*0.00000166" "$3}' Vitis_all_sample.cut.map > Vitis_all_sample.cut.awk.map
mkdir ./map
mv Vitis_all_sample.cut.awk.map ./map/
cd map
awk '{print > $1}' Vitis_all_sample.cut.awk.map
cd ..

3,先压缩vcf文件,分成24个
bcftools view Vitis_all_sample.recode.vcf -Oz -o Vitis_all_sample.recode.vcf.gz
bcftools view -S 3.txt Vitis_all_sample.recode.vcf.gz > pop3.vcf
bcftools view -S 1.txt Vitis_all_sample.recode.vcf.gz > pop1.vcf

for i in {1..24}; do vcftools --vcf pop1.vcf --chr $i --recode --out $i.pop1; done
for i in {1..24}; do vcftools --vcf pop3.vcf --chr $i --recode --out $i.pop3; done

for i in {1..24}; do gzip $i.pop1.recode.vcf; done
【for i in {1..24}; do gzip -d ${i}.gz; done(也可以不需要压缩文件)】

使用Beagle软件进行phasing,
for i in {1..24}; do java -Xmx30g -jar beagle.01Mar24.d36.jar gt=/mnt/e/绘图/xp_ehh/pop1/${i}.pop1.recode.vcf.gz map=/mnt/e/绘图/xp_ehh/map/${i} out=${i}.output1; done nthreads=61.5进行xpehh分析
使用 Vcftools 、Selscan、Rehh包进行全基因组选择信号(选择压力)分析 (qq.com)
基于LD衰减和等位基因频率检测自然选择-XPEHH (qq.com)
2021-01-04根据SNP验证自然选择—XPEHH分析 - 简书 (jianshu.com)
等待两个亚群phasing结束后,我们就可以进行XPEHH分析了,考虑到我之前对文件的存放进行了处理需要切换成自己的路径就行
taskset -c 0-3 nice -n 10 bash -c 'for i in {1..24}; do selscan --xpehh --vcf "/mnt/e/绘图/xp_ehh/output1/${i}.output1.vcf.gz" --vcf-ref "/mnt/e/绘图/xp_ehh/output3/${i}.output1.vcf.gz" --map "/mnt/e/绘图/xp_ehh/map/${i}" --threads 6 --out $i ; done'
cut -f 1 *.xpehh.out > 1_3.xpehh
可以得到和文章一样的文件了,接下来进行可视化。
2.shapeit软件进行phasing和xpehh
由于shapeit进行24条染色体填充,所以可以看我另外一篇文章https://blog.csdn.net/2302_79242191/article/details/140787743?spm=1001.2014.3001.5501

要转成24条染色体进行
每个群体都得转,我直接使用shapeit里面的gwas.phased1.vcf进行提取样本,然后进行转map,算出每个群体的map,
1.直接提取群体
for i in {1..24};
do
    plink --vcf gwas.phased${i}.vcf \
          --keep g2.txt \
          --recode vcf \
          --chr-set 24 \
          --out 2g_gwas.phased${i};
done
2.转出map
for i in {1..24};
do
    plink --vcf 2g_gwas.phased${i}.vcf \
          --recode \
          --chr-set 24 \
          --out 2g_gwas.phased${i};
done
3计算map
for i in {1..24};
do
    awk '{ print $1" "$2"  "$4*0.000001679755" "$4}' 2g_gwas.phased${i}.map > 2g_new${i}.map;
done

注意我是在
source activate psmc里面进行的
需要从PLINK切换进psmc
命令是这个
selscan-2.0.3


这篇文章说得很清楚,可以看到,
https://www.jianshu.com/p/ec527cfb06d3

for k in 1 2 3 4 5 6 7 8 9 10 11 12 13 14 15 16 17 18 19 20 21 22 23 24 25 26 27 28 29;
do /home/software/selscan/bin/linux/selscan --xpehh \
                                            --vcf JBC.chr${k}.recode.vcf \如果是选择2号群体
                                            --vcf-ref EU.chr${k}.recode.vcf \参考是8号群体
                                            --map chr${k}.MT.map.distance \我们的map是2号群体的
                                            --threads 10 \
                                            --out  chr${k}.EU_JBC;

所以对应的我们也只需要
for i in {1..24};
do
     selscan-2.0.3 --xpehh \
                                            --vcf 2g_gwas.phased${i}.vcf \
                                            --vcf-ref 8g_gwas.phased${i}.vcf \
                                            --map 2g_new${i}.map \
                                            --threads 10 \
                                            --out  chr${i}.8_2;
done
把当前文件下所有的染色体合并
cat chr*.8_2.xpehh.out > 2_8.xpehh.out3,XPEHH分析结果可视化
#也可以用曼哈顿出图
install.packages("tidyverse")
install.packages("CMplot")
library(tidyverse)
library(CMplot)
getwd()
setwd("E:/plot/x9")
#将当前目录下所有.out结尾的文件合并到black.xpehh
#新建一个文件夹,把所有的结果移动到这个文件夹中,合并所有结果
input="E:/plot/xout"
prefix="black"
#读入文件
xpehh <-read.table(input, header = T) %>%filter(!str_detect(id, 'id')) %>%
  separate(col = id, into = c("chr", 'position'), sep = "-", remove = F) %>%
  select(id, chr, pos, xpehh)
#作图

png(paste(prefix, "_XPEHH.png", sep = ""), width = 800, height = 600)
CMplot(xpehh, type = "p", plot.type = "m", LOG10 = F, cex = 0.2, band = 0.5, ylab.pos = 2, ylab = "XPEHH", file.output = F)#可以加上一个标题
dev.off()
 三,报错分析
1,如果没有跑出output,就单独一个一个的跑
2,直接删掉,记得map里面也需要删掉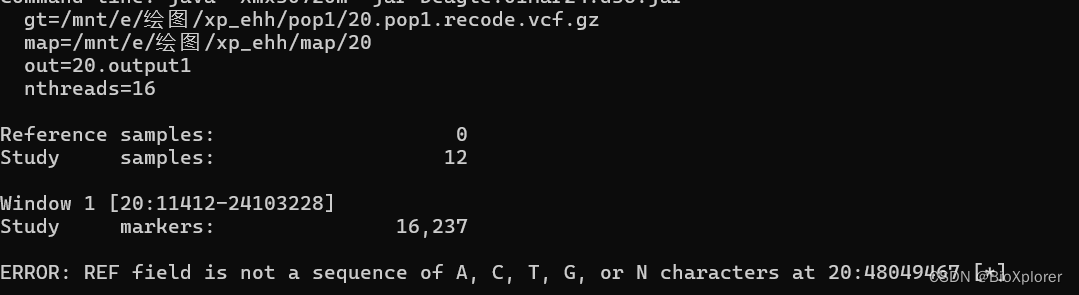

3,出现killed,直接上服务器,或者是
taskset -c 0-3 nice -n 10 java -Xmx10g -jar beagle.01Mar24.d36.jar gt=/mnt/e/绘图/xp_ehh/pop4/18.pop4.recode.vcf.gz map=/mnt/e/绘图/xp_ehh/map/18 out=18.output1
4,出现这个不匹配,因为selscan需要的是snp位点一一配对,需要重新跑一次看看是不是outpu文件有问题


 1746
1746

 被折叠的 条评论
为什么被折叠?
被折叠的 条评论
为什么被折叠?
 到【灌水乐园】发言


