


目录
软件中的设计模式可归纳为三类:创建型,结构型,行为型。🔗DVCon-Applying Design Patterns to accelerate development of reusable, configurable and portable UVCs
本节介绍创建型设计模式在UVM中的应用。
在开始创建型设计模式介绍之前,回顾下Systemverilog中的Parameterized classes 和 Static method 的相关语法。
CSDN并不支持SV语法高亮,源代码地址🔗github
参数化的类
SV中的参数化的类,类似于Verilog中参数化的模块,例化时指定位宽等的值,在SV中一般用于为类增加数据类型的参数。
如下示例,在声明S_bit句柄时,传入的type类型为bit [1:10],W没有指定默认为5,如果type T没有指定,则默认为int型。
class stack # (type T = int, int W = 5);
    T [W:0] data;
endclass : stask

stack # (bit [1:10]) S_bit;
在UVM源代码中随处可见参数化类,对于参数类型的传入,常见两种场景:
第一种:

![]()
![]()
![]()
第二种:

![]()
![]()
第一种场景my_driver在继承uvm_driver时传入需要的数据类型,然后直接声明例化;第二种场景直接使用uvm_analysis_port,在声明时传入。
如果有需求,我们当然可以写成如下方式,这样在my_driver的声明时也可以传输数据类型。
class my_driver # (Type T = int ) extends uvm_driver # (my_transaction);参数化的类大大提高了类的可扩展性。
静态变量和方法
一个类的成员变量前加上static关键词,SV会在类声明的时候就分配内存,相对automatic而言,这个变量的内存在仿真阶段一直存在。无论类实例化多少份,这个变量只有一份,当静态变量改变,所有类的实例化都可见,相当于一个可控的“全局变量”。
如下示例, 通过操作符“ :: ” 放在类名之后,告诉编译器在类的命名空间下访问静态变量。
详细总结见:🔗Systemverilog 作用域解析运算符 ::
当然也可以实例化类,通过句柄" . ” 的方式引用。
class Packet;
    static string id_q[$] ;
endclass : Packet

//第一种 " :: "
Packet::id_q.push_back("AAA");
//第二种 " . "
Packet pkg_h;
pkg_h = new();
pkg_h.id_q.push_back("AAA");一般不会将静态变量直接“暴露"出来,而是通过静态方法进行访问,静态方法只能访问类中的静态成员用,否则编译报错。
使用local 修饰静态变量,限制其访问权限。
class Packet;
    local static string id_q[$] ;
    int val; // 静态方法不可以访问类中的非静态成员
    static function void set_id (string str);
        int num; // automatic variable 静态方法中可以声明非静态变量
        id_q.push_back(str);
    endfunction
endclass : Packet
//第一种
Packet::set_id("AAA");
//第二种
Packet pkg_h;
pkg_h.set_id("AAA"); // 不实例化,只声明,也可以
------------------------------------------------------------------------------------------------------------------------------------------------------------------------------------
2021/05/15补充:
UVM中的类绝大部分都继承于 uvm_object, 每一个实例对象都有一个唯一的id,可以通过 get_inst_id 查看:

object.sprint()中也会显示每个instance的value值,就是inst_id:

ID作为唯一标识,在sequence, transaction中也有使用到。
m_sequence_id : get_sequence_id / set_sequence_id
m_transaction_id: get_transaction_id / set_transaction_id
在使用SNPS VIP时需注意,response_queue[$]的size一般不设限制,调用set_response_queue_depth(-1)。
sequence中的get_response(rsp,reg.get_transaction_id()) 与 driver中的put_response(rsp)握手。若不指明ID,则直接pop出response_queue[$]的transaction。
rsp和req的inst_id一样,说明是同一份实例。
------------------------------------------------------------------------------------------------------------------------------------------------------------------------------------
类的静态变量,便于创建全局资源,同时把静态变量封装到静态方法中,更安全也更抽象。
上面学习了参数化的类和静态方法,我们常使用的UVM的config_db,就结合了这两个语法:
uvm_config_db传入的参数类型是uvm_object_wrapper, 通过 ” :: " 调用静态方法 set() 。

静态类
static也可以声明class, 表示静态类。静态类和静态变量类似,只不过静态类可以封装更多内容。声明静态类的class, 该class的所有实例都可以共享这一个静态类。更多内容🔗UVM设计模式 (三) 静态类、资源管理、uvm_*_pool、uvm_config_db
uvm_object内建了很多方法, compare(), print()等,依靠comparer, printer实现,其内部定义了各种policy和函数,依照 field_automation 机制,调用宏中封装的 _m_uvm_field_automatic() 函数。
每个继承于uvm_object的类都可以通过comparer, printer进行compare, print操作,所以uvm便创建了一个静态类的容器,方便管理。
静态类 __m_uvm_status_container 的例化: ![]()
这个类包含了compare, printer等,一般默认使用uvm_object_globals.svh中的全局变量,uvm_default_comparer, uvm_default_table_printer。也可以自己配置compare, printer中的参数,并在调用compare(), print()时传入即可或者重写do_compare, do_print函数,实现自定义功能。
# uvm_object_globals.svh

// Variable: uvm_default_comparer
//
//
// The default compare policy. Used when calls to <uvm_object::compare>
// do not specify a comparer policy.

uvm_comparer uvm_default_comparer = new(); // uvm_comparer::init();


# uvm_misc.svh

//------------------------------------------------------------------------------
//
// CLASS- uvm_status_container
//
// Internal class to contain status information for automation methods.
//
//------------------------------------------------------------------------------

class uvm_status_container;

  //These are the policy objects currently in use. The policy object gets set
  //when a function starts up. The macros use this.
  uvm_comparer    comparer;
  uvm_packer      packer;
  uvm_recorder    recorder;
  uvm_printer     printer;


# uvm_object_defines.svh
`define uvm_field_int(ARG,FLAG) \
  begin \
    case (what__) \
     .........
      UVM_COMPARE: \
        begin \
          if(local_data__ == null) return; \
          if(!((FLAG)&UVM_NOCOMPARE)) begin \
            if(ARG !== local_data__.ARG) begin \
               void'(__m_uvm_status_container.comparer.compare_field(`"ARG`", ARG, local_data__.ARG, $bits(ARG))); \
               if(__m_uvm_status_container.comparer.result && (__m_uvm_status_container.comparer.show_max <= __m_uvm_status_container.comparer.result)) return; \
            end \
          end \
        end \
      ........
      UVM_PRINT: \
        if(!((FLAG)&UVM_NOPRINT)) begin \
          __m_uvm_status_container.printer.print_int(`"ARG`", ARG, $bits(ARG), uvm_radix_enum'((FLAG)&UVM_RADIX)); \
        end \
      ........
    endcase \
  end


# uvm_object.svh

virtual class uvm_object extends uvm_void;

    static /*protected*/ uvm_status_container __m_uvm_status_container = new;

// compare
// -------

function bit  uvm_object::compare (uvm_object rhs,
                                   uvm_comparer comparer=null);
  bit t, dc;
  static int style;
  bit done;
  done = 0;
  if(comparer != null)
    __m_uvm_status_container.comparer = comparer;
  else
    __m_uvm_status_container.comparer = uvm_default_comparer;
  comparer = __m_uvm_status_container.comparer;

  if(!__m_uvm_status_container.scope.depth()) begin
    comparer.compare_map.clear();
    comparer.result = 0;
    comparer.miscompares = "";
    comparer.scope = __m_uvm_status_container.scope;
    if(get_name() == "")
      __m_uvm_status_container.scope.down("<object>");
    else
      __m_uvm_status_container.scope.down(this.get_name());
  end
  if(!done && (rhs == null)) begin
    if(__m_uvm_status_container.scope.depth()) begin
      comparer.print_msg_object(this, rhs);
    end
    else begin
      comparer.print_msg_object(this, rhs);
      uvm_report_info("MISCMP",
           $sformatf("%0d Miscompare(s) for object %s@%0d vs. null",
           comparer.result,
           __m_uvm_status_container.scope.get(),
            this.get_inst_id()),
            __m_uvm_status_container.comparer.verbosity);
      done = 1;
    end
  end

  if(!done && (comparer.compare_map.get(rhs) != null)) begin
    if(comparer.compare_map.get(rhs) != this) begin
      comparer.print_msg_object(this, comparer.compare_map.get(rhs));
    end
    done = 1;  //don't do any more work after this case, but do cleanup
  end

  if(!done && comparer.check_type && (rhs != null) && (get_type_name() != rhs.get_type_name())) begin
    __m_uvm_status_container.stringv = { "lhs type = \"", get_type_name(),
                     "\" : rhs type = \"", rhs.get_type_name(), "\""};
    comparer.print_msg(__m_uvm_status_container.stringv);
  end

  if(!done) begin
    comparer.compare_map.set(rhs, this);
    __m_uvm_field_automation(rhs, UVM_COMPARE, "");
    dc = do_compare(rhs, comparer);
  end

  if(__m_uvm_status_container.scope.depth()==1)  begin
    __m_uvm_status_container.scope.up();
  end

  if(rhs != null)
    comparer.print_rollup(this, rhs);
  return (comparer.result == 0 && dc == 1);
endfunction


// do_compare
// ----------

function bit  uvm_object::do_compare (uvm_object rhs,
                                      uvm_comparer comparer);
  return 1;
endfunction
单例模式
Singleton Pattern: 一个类只允许创建一个对象(或者叫实例),那这个类就是一个单例类,这种设计模式就叫做单例模式。
两种场景适用使用单例模式:
全局唯一类 : 比如一个全局的配置,我们只需要一份,在任何地方调用,都是使用的同一份配置。
处理资源访问冲突 : 多线程维护访问同一资源,而不是每个线程创建一份资源。
全局唯一类
示例如下:
line5 : local static 修饰,静态变量,且只允许Signleton的内部成员访问,不允许外部直接访问(外部直接通过“ . “引用变量不可以,可以通过子程序调用),子类也无法访问。
line7 : new()函数被local修饰,所以不可以外部使用构造函数,否则编译报错line40,这也保证了全局唯一。
line11: 静态方法,可以通过 Singleton::getInstance()调用,返回Singleton类型的实例。
运行后,只会打印一次 "making new!" , 因为一旦调用一次 Singleton::getInstance()静态方法,line12 不再符合 " ==null" 的条件,保证class Singleon只有 uniqueInstance 这个 唯一实例,后面的调用直接返回这个实例。
package classic;
   // NOTE: This is not thread safe!

class Singleton;
   local static Singleton uniqueInstance;

   local function new();
   endfunction

   // static here
   static function Singleton getInstance();
      if (uniqueInstance == null) begin
         uniqueInstance = new();
         $display("making new!");
      end
      return uniqueInstance;
   endfunction

   function string getDescription();
      $display("I'm a classic Singleton!");
   endfunction

endclass

endpackage

module top;

   import classic::*;
   Singleton singleton;

   initial begin
      $display("HELLO");

      // Error-[SV-ICMA] Illegal class method access
      // Singleton.sv, 41
      // Local method 'new' of class 'Singleton' is not visible to scope 'top'.
      // Please make sure that the above method is called only from its own class
      // properties as it is declared as local.
      //  singleton  = new();
      // GREAT ERROR - WORKS GREAT

      // running from this fork
      // this twice shows the "making new" message only showed up once! yes
      fork
         singleton  = Singleton::getInstance();
         singleton  = Singleton::getInstance();
         singleton  = Singleton::getInstance();
         singleton  = Singleton::getInstance();
         singleton  = Singleton::getInstance();
         singleton  = Singleton::getInstance();
         singleton  = Singleton::getInstance();
         singleton  = Singleton::getInstance();
      join
      singleton.getDescription();
      #1;
      $finish();
   end

endmodule
处理资源访问冲突
示例如下:
userA userB访问同一资源 log.txt 文件,line8虽然设置的权限是“w", 但最终结果 ”AAA“ "BBB"都写入到了log.txt,因为userA, userB虽然在fork join开辟的不同线程上,但是使用的是同一个,唯一的file_h文件句柄,内存位置一样。(*Systemverilog对 prcess 和 thread 没有做出明确区分,一般 initial, always, fork等线程称为 process, 由 simulation kernel进行调度 (IEEE 4.Scheduling semantics clause) 按照时间片执行,但是仿真是基于event的,由消耗时间的事件推进仿真的进行,和纯软件上的理解有出入,linux系统由linux kernel负责线程和进程的调度。对于该示例,仅仅从唯一性的角度考虑即可。* )

🔗设计模式之美 单例模式创建的对象是进程唯一的,而不是线程唯一的。我们编写的代码,通过编译、链接,组织在一起,就构成了一个操作系统可以执行的文件,也就是我们平时所说的“可执行文件”(比如 Windows 下的 exe 文件)。可执行文件实际上就是代码被翻译成操作系统可理解的一组指令,你完全可以简单地理解为就是代码本身。当我们使用命令行或者双击运行这个可执行文件的时候,操作系统会启动一个进程,将这个执行文件从磁盘加载到自己的进程地址空间(可以理解操作系统为进程分配的内存存储区,用来存储代码和数据)。接着,进程就一条一条地执行可执行文件中包含的代码。比如,当进程读到代码中的 User user = new User(); 这条语句的时候,它就在自己的地址空间中创建一个 user 临时变量和一个 User 对象。进程之间是不共享地址空间的,如果我们在一个进程中创建另外一个进程(比如,代码中有一个 fork() 语句,进程执行到这条语句的时候会创建一个新的进程),操作系统会给新进程分配新的地址空间,并且将老进程地址空间的所有内容,重新拷贝一份到新进程的地址空间中,这些内容包括代码、数据(比如 user 临时变量、User 对象)。所以,单例类在老进程中存在且只能存在一个对象,在新进程中也会存在且只能存在一个对象。而且,这两个对象并不是同一个对象,这也就说,单例类中对象的唯一性的作用范围是进程内的,在进程间是不唯一的。🔗进程与线程
UVM_ROOT
在UVM的层级结构(tree structure)中, 最顶层一定是被设计成唯一的,就是uvm_root,uvm_root的创建就使用了单例模式。
uvm_root(唯一实例 uvm_top) 在 uvm_pkg scope中都是可以被直接调用的,uvm_root中提供的都是服务全局的方法,包括所有components的phase control, 对例化component的句柄搜索,全局report的配置等。
uvm_root源码如下,使用单例模式,代码结构和上述示例相同,构造函数new()使用protected修饰,和local一样,无法被外部调用。

m_parent m_children
uvm_root继承于uvm_component, uvm_component的例化对象都会在UVM树形结构中占据一个结点,结点关系通过uvm_component中的成员变量m_parent, m_children维护。(uvm统一代码风格,类内部成员变量和方法一般声明为 “ m_xxx “的格式)
line63: 虚函数uvm_component必须被继承才能实例化.
line1783: 与uvm_root中的line310对应,uvm_root最为最顶层,不会存在parent,直接return跳过。
line1817: 在创建一个component时,如果parent指定为null, 则指定了uvm_root作为其parent。
line1864:为parent component加入child component,line1907,1908为m_children, m_children_by_handle这两个关联数组赋值,一个索引是component名字,一个索引是component handle.

UVM中component的创建在build_phase完成,并且是从上往下创建的,首先在test中例化env![]()
这行代码执行时,调用env的构造函数new(”env",this),env中的m_parent指向了test(this 指向 test),同时env new()函数内调用test中的m_add_childe()函数(m_parent.m_add_childe(this)),为test中的m_children赋值(m_children["env"] = env)。这样依次调用,env中例化agt, agt中例化seqr, mon, drv, 形成了UVM的树状层级结构,如下所示:

run_test()
那么test的parent是谁呢?test的创建并没有采用上述env的创建方式,而是调用了top层的run_test()函数,代码如下图:
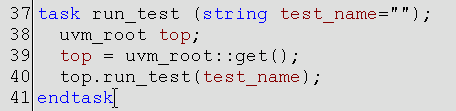
位于uvm_globals.svh中的run_test()函数通过uvm_root::get()创建(这里应该是uvm_root::get()第一次被调用,所以说是创建了uvm_root的实列,其他地方调用是reuturn返回的实例,都是在此处创建的)唯一的uvm_root。然后调用uvm_root中的run_test()函数,代码如下图:
line330 : uvm_factory和uvm_root一样,都是单例模式创建的,全局唯一。
line353 : 获得通过cmd line传入的TEST_NAME。如果没有定义 UVM_NO_DPI, 则通过DPI获得,否则通过$value$plusargs的方式获得。
line392:利用工厂模式,创建test。test的parent指定为”null",指向uvm_root。test的handle name = "uvm_test_top", type_name = "test_name"。

uvm_root作为全局变量,相比其他component, 内部提供的一些方法,在实际工作中被使用的几率更大些。
find()
find()函数可以根据传入的字符串,来查找uvm树形结构中例化的component。调用了DPI,对字符串支持使用通配符 * 和 ? 。
find()函数根据字符串就可以遍历整个树形结构,巧妙之处是find()最终调用了line528 : m_find_all_recurse()这个函数,并递归调用该函数。从上面的学习知道component的成员变量m_children是一个以字符串为索引的关联数组,保存着child component的句柄。遍历从uvm_root的child component开始,依次往下进行,直到某个component没有child component为止。符合所给字符串的句柄会被放入 ref 类型的comp_list[$]中,对于搜索到的匹配数量大于1或者等于0,都会报错。(因为调用了 context 类型的 DPI,![]() 并且需要遍历,如果大量使用会降低仿真速度)
并且需要遍历,如果大量使用会降低仿真速度)
例如: sequence 中使用 uvm_top.find("uvm_test_top") 就可以获得testcase的句柄。

print_topology()
打印UVM层级结构
set_timeout()
设置最大仿真时间,可以通过命令行重写
至此,单例模式在UVM中的应用就学习完毕,除了uvm_root, uvm_facotry , uvm_cmdline_processor, uvm_report_server, uvm_event_pool, uvm_barrier_pool, uvm中的各个phase和 🔗uvm_resource_pool 都使用了单例模式。
工厂模式
Factory Pattern: 定义一个创建对象的接口,隐式的创建( 不是直接调用构造函数new() ) ,可以根据传入的参数,动态的创建不同类型的对象。
一种简单的工厂模式
不调用new()函数,根据传入的字符串,自动匹配创建对象,下面一个简单的示例就可以满足。
class Factory类中的静态函数 create() 根据传入的字符串,case 自动选择需要创建的对象。
这种写法的工厂类,缺点在于无法自动 “注册” ,每增加一个类,都需要改写create函数,否则就会报line32的" No such type class ",有些hardcoding。

加入注册的工厂模式
line38, 45:在构建class A , class B 时,通过typdef objectRegistry#(type T) typeId 实现 类的注册,UVM中通过`uvm_object/component_utuils宏来完成,实现更复杂。
typeId相当于类的代理,class A/ class B 中的typeId并不一样,这是一个参数化的类。
line64: 实例化类,直接通过A::typeId::create()代替new()函数,第一个 “ :: "表示类的作用域,第二个” :: “ 表示typeId中静态函数create()的调用。
line9 : 声明一个facotry, 关联数组。
line19: me是一个私有的静态变量,类型就是这个类本身。me在声明的时候就调用静态函数get()完成创建(line23), 同时将typeId注册到factory中(line24)。
line31: 当调用create()时,会根据工厂中的代理类typeId的类型,调用相应的createObj()函数。createObje()返回的是Ojbect句柄,要做一次cast转换。
line70: 重写工厂中的class A,将其替换成class C的typeId。所以再次调用A::typeId::create()时,执行的其实是class C 的typId中的 createObj()函数,返回的是class C的对象。class C是class A 的子类,调用a_h.display(), 类的多态,打印结果是” This is class C !"

加入注册的工厂模式,相比第一种工厂模式,可以通过声明一个typeId完成注册,和类本身紧耦合,而不是和facotry耦合,避免 hardcoding;同时支持OOP的多态特性,可以实现重写,这也是工厂模式的精华。UVM中的工厂模式大致结构与其类似,实现更加复杂。
UVM中的工厂模式
下面梳理一下UVM中的工厂模式,UVM工厂模式对于创建对象大致流程和加入注册的工厂模式中的示例差不多,对重载的支持实现比较复杂,UVM工厂模式的重载支持四种方式,set_type/inst_override_by_type/name, 还支持命令行中的重写以及对工厂模式的debug功能。工厂模式的重载,仅对平常调用部分进行分析,内部详细实现代码不再罗列,可参考🔗《UVM1.1 应用指南及源码分析》- 12.6 override功能 章节学习。
如下图,代码没有包含factory中的override功能,🔍+ 查看:
- `uvm_component_utils(my_driver)宏展开后,使用typedef对一个参数化的类(uvm_component_registry,字符串和类名相同)进行了类型声明,新类型type_id在声明时便“自动创建”实例me(实例 me为静态变量,在声明时调用 get()函数初始化。driver和monitor中的 type_id虽然名字相同,但类型并不相同,各自的 type_id属于各自类中的成员变量,声明时传入的参数也不同。)
- type_id::me 自动创建时,调用factory类中的register()函数,完成注册。uvm_factory中的关联数组,分别根据class name,class type为索引存放type_id::me这个实例,m_teyp_names["my_driver"] = type_id::me ; m_types[my_driver] = type_id::me。(uvm_facotry为uvm_pkg::范围可见的全局单例类,与uvm_root类似。)
- drv = my_dirver::type_id::create("drv",this)创建时,调用了my_driver中的成员变量type_id的静态函数create(), create()内部调用了facotry的create_component_by_type函数,传入的第一参数get()就是type_id::me这个实例。
- facotry中的create_component_by_type函数中的requested_type就是type_id::me, type_id::me调用内部函数create_componet()创建类型 T 的实例,类型T是声明参数化类type_id类型时传入的参数。(如果是根据 name创建实例,则调用create_component_by_name函数,通过 name在关联数组 m_teyp_names索引到 type_id::me,再调用 type_id::me中的 create_componet函数。对于 object的创建,和 component类似,使用 facotry中的 create_object_by_type/name创建。

UVM共提供四种override方式:
class uvm_component 中内置了4个函数, 可以直接调用,set_type_override_by_type(), set_inst_override_by_type(), set_type_override(), set_inst_override()。前两个传入uvm_object_wrapper类型,可以通过 my_driver::get_type()获得,get_type()函数在 `uvm_component_utils(my_driver)宏中,返回的就是type_id::me这个实例。后两个传入string类型。
class uvm_component 中的4个函数其实是调用uvm_factory中的set_type_override_by_type(), set_inst_override_by_type(), set_type_override_by_name(), set_inst_override_by_name(),实现的,所以也可以在component中调用factory.set_type_override_by_type()来实现重写。
除了在component中通过my_dirver::type_id::create("drv",this)这种方式创建,也可以直接调用factory.create_component_by_name/type的方式创建,上面提到的uvm_root中的run_test()就是这样创建test_case实例的。

UVM Facotry 的使用:
🔗The OVM/UVM Factory & Factory Overrides How They Work - Why They Are Important
Verdi UVM DEBUG MODE下的调试
介绍完上述的uvm_root和uvm_facotry的相关知识,下面在Verdi的🔗UVM Debug Mode 中trace一下。
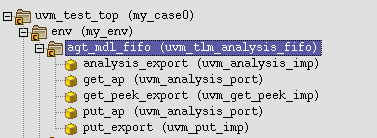
通过trace m_children变量可以看到,uvm_root中m_children存放着my_case0的实例,uvm_test_top中例化了env和v_sqr,env下除了agt,scb,像TLM这些,也属于uvm_component,也被加入到了m_children中。(为什么 TLM 也被当作 component 加入,见🔗UVM设计模式 (七) 观察者模式、uvm_subscriber、TLM、总结)

m_type_names中存放着每个类的代理类的实例,component和object两种类型。

对于重写的记录:![]()
new_monitor重写替代了my_monitor的类型。


 1286
1286


 被折叠的 条评论
为什么被折叠?
被折叠的 条评论
为什么被折叠?
 到【灌水乐园】发言


