deepstream框架下多路源模型部署参考步骤

目录

1.dynamic onnx的生成

2.tensorRT engine模型的生成

3.配置文件的参数指定


在deepstream框架下,想测试SCRFD模型的多路分布式运行,当修改配置文件中相应的batch参数后,运行报错如下

0:00:08.390136614  8575 0xaaab0daf9c70 WARN                 nvinfer gstnvinfer.cpp:643:gst_nvinfer_logger:<primary_gie> NvDsInferContext[UID 1]: Warning from NvDsInferContextImpl::checkBackendParams() <nvdsinfer_context_impl.cpp:1841> [UID = 1]: Backend has maxBatchSize 1 whereas 2 has been requested
0:00:08.390549772  8575 0xaaab0daf9c70 WARN                 nvinfer gstnvinfer.cpp:643:gst_nvinfer_logger:<primary_gie> NvDsInferContext[UID 1]: Warning from NvDsInferContextImpl::generateBackendContext() <nvdsinfer_context_impl.cpp:2018> [UID = 1]: deserialized backend context :/home/leedarson/workspace/models/scrfd_500m_bnkps_shape640x640.engine failed to match config params, trying rebuild
0:00:08.396210854  8575 0xaaab0daf9c70 INFO                 nvinfer gstnvinfer.cpp:646:gst_nvinfer_logger:<primary_gie> NvDsInferContext[UID 1]: Info from NvDsInferContextImpl::buildModel() <nvdsinfer_context_impl.cpp:1923> [UID = 1]: Trying to create engine from model files
ERROR: failed to build network since there is no model file matched.
ERROR: failed to build network.
0:00:10.735614046  8575 0xaaab0daf9c70 ERROR                nvinfer gstnvinfer.cpp:640:gst_nvinfer_logger:<primary_gie> NvDsInferContext[UID 1]: Error in NvDsInferContextImpl::buildModel() <nvdsinfer_context_impl.cpp:1943> [UID = 1]: build engine file failed

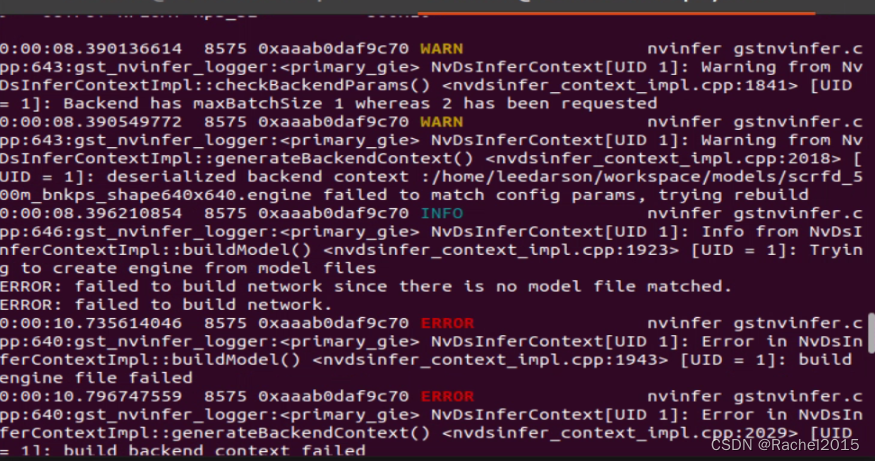
 查看报错信息,大概是SCRFD模型engine的maxBatchSize=1,而使用时却给的参数值为2,所以engine的创建失败。查看deepstream中给出的多路视频运行的配置文件示例,尽管模型实现的功能相同,但是不同的batch使用的模型却不同,这才想起onnx可以分为模型有静态和动态两种,所谓静态onnx模型的输入和输出都是指定好的,转模型的时候不能随意更改,所以如果batchsize一旦给定就不能更改,我一开始生成的SCRFD模型就是静态的,给定batchsize=1,尝试batchsize>1时运行就会报错;而动态onnx模型,可以支持动态给定输入和输出,在转其他模型或者执行的时候指定相应的参数即可。因此如果需要在deepstream框架上进行多路分布式部署运行模型,大概需要三步:1.生成dynamic onnx;2.将dynamic onnx在模型的运行平台上转tensorRT engine;3.在配置文件中给定相应的参数。

1.dynamic onnx的生成

insightface中提供的有SCRFD模型转onnx的Python文件,刚开始按照提示,指定的命令行参数如下运行生成onnx

python3 tools/scrfd2onnx.py configs/scrfd/scrfd_500m_bnkps.py model/scrfd_0.5gkps.pth  --input-img data/test.jpg --shape 640 640

可以在Netron看到生成的onnx模型输入输入结构如下

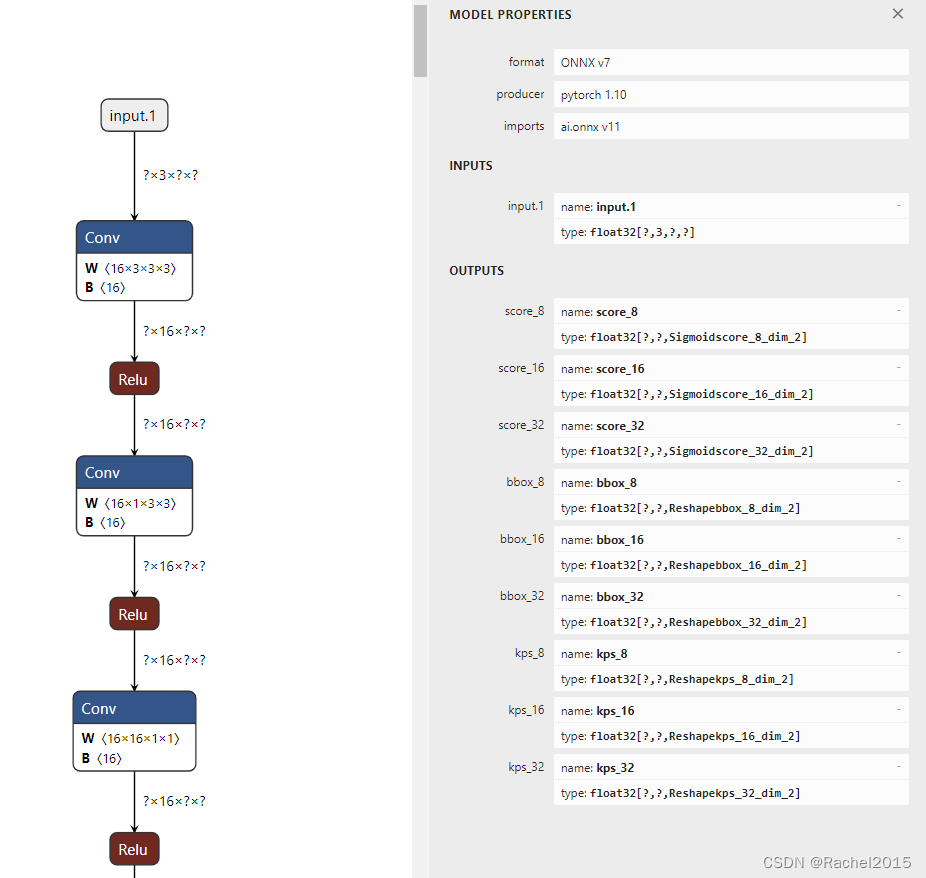
有太多的参数未指定,在转相应的tensorRT engine时就遇到了如下的报错

[02/20/2023-11:07:38] [E] Error[4]: [graphShapeAnalyzer.cpp::processCheck::587] Error Code 4: Internal Error (IAssertionLayer (Unnamed Layer* 4) [Assertion]: condition[0] is false0. For input: 'input.1' all named dimensions that share the same name must be equal. Note: Named dimensions were present on the following axes: 0 (name: '?'), 2 (name: '?'))

[02/20/2023-11:07:38] [E] Error[2]: [builder.cpp::buildSerializedNetwork::636] Error Code 2: Internal Error (Assertion engine != nullptr failed. )

根据trtexec的报错信息,可以理解大概是onnx的输入参数问题。回到insightface的scrfd2onnx.py文件中,查看其对于动态维度的指定代码如下
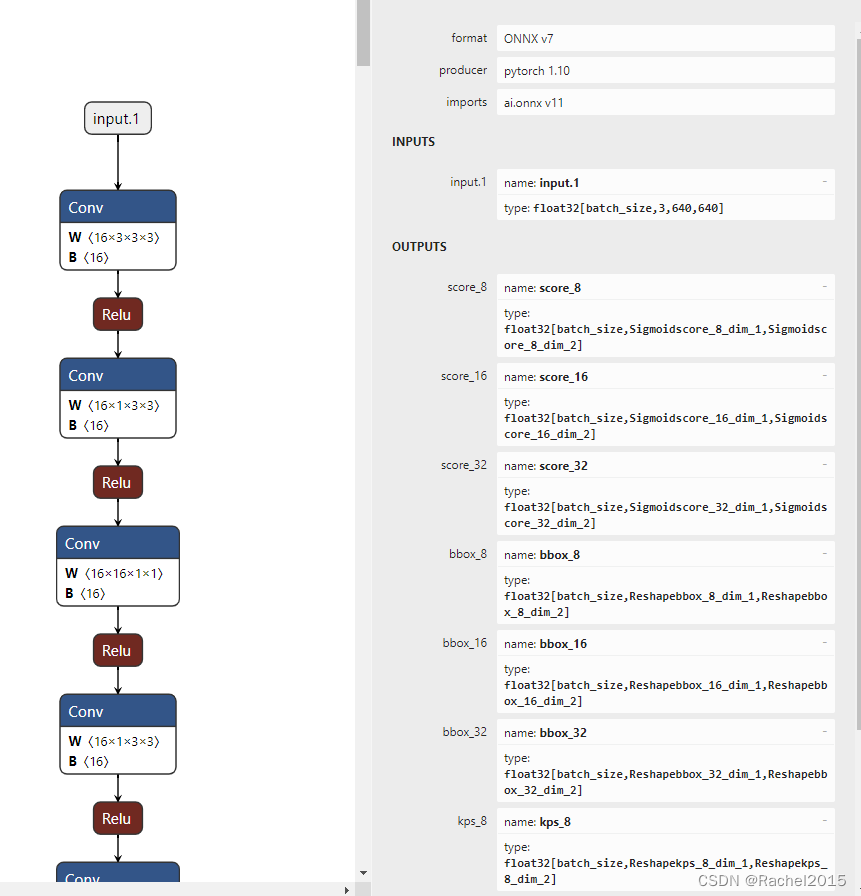
# Define input and outputs names, which are required to properly define

# dynamic axes

input_names = ['input.1']

output_names = ['score_8''score_16''score_32',

                'bbox_8''bbox_16''bbox_32',

                ]

# If model graph contains keypoints strides add keypoints to outputs

if 'stride_kps' in str(model):

    output_names += ['kps_8''kps_16''kps_32']

# Define dynamic axes for export

dynamic_axes = None

if dynamic:

    dynamic_axes = {out: {0'?'1'?'for out in output_names}

    dynamic_axes[input_names[0]] = {

        0'?',

        2'?',

        3'?'

    }

将其更改为如下后

# Define input and outputs names, which are required to properly define

# dynamic axes

input_names = ['input.1']

output_names = ['score_8''score_16''score_32',

                'bbox_8''bbox_16''bbox_32',

                ]

# If model graph contains keypoints strides add keypoints to outputs

if 'stride_kps' in str(model):

    output_names += ['kps_8''kps_16''kps_32']

# Define dynamic axes for export

dynamic_axes = None

if dynamic:

    dynamic_axes = {out: {0'batch_size'for out in output_names}

    dynamic_axes[input_names[0]] = {

        0'batch_size'

    }

执行如下命令,生成相应的dynamic onnx模型。

python3 tools/scrfd2onnx.py configs/scrfd/scrfd_500m_bnkps.py model/scrfd_0.5gkps.pth  --input-img data/test.jpg --shape 640 640

生成的dynamic onnx模型输入输出参数如下图。

2.tensorRT engine模型的生成

deepstream框架下模型的推理运行使用的是tensorRT组件,所以如果要在deepstream框架上运行模型,需要将待运行的模型在将要运行的硬件平台上转为tensorRT能进行推理的engine文件。对于已经生成的dynamic onnx模型文件,执行如下命令进行engine模型文件的生成。

/usr/src/tensorrt/bin/trtexec --onnx=/home/user/workspace/models/scrfd_500m_bnkps_dynamic.onnx --minShapes=input.1:1x3x640x640 --optShapes=input.1:8x3x640x640 --maxShapes=input.1:8x3x640x640 --saveEngine=/home/leedarson/workspace/models/scrfd_500m_bnkps_dynamic.engine --fp16

参考相应的static onnx转engine命令如下。

/usr/src/tensorrt/bin/trtexec --onnx=./scrfd_500m_bnkps.onnx --fp16 --saveEngine=./scrfd_500m_bnkps.engine --device=0

可以看到对于dynamic onnx需要指定minShapes、optShapes和maxShapes,通常情况下optShapes和maxShapes可以给成相同的值。

注:生成tensorRT engine文件的硬件平台必须和模型推理部署的硬件平台保持一致,即转模型和推理部署都必须要在同一个硬件设备上执行,否则会导致推理部署失败。

3.配置文件的参数指定

在生成tensorRT engine文件时,已指定maxShapes=input.1:8x3x640x640,因此该engine最多可以指定8路同时运行,配置文件中batchsize<=8都可以,注意保持[source0]、[streammux]、[primary-gie]、[tiled-display]等组件的batchsize相同即可。模型SCRFD的参考配置参数如下。

config_face.txt

[application]

enable-perf-measurement=1

perf-measurement-interval-sec=5

[tiled-display]

enable=1

rows=2

columns=4

width=1080

height=720

gpu-id=0

#(0): nvbuf-mem-default - Default memory allocated, specific to particular platform

#(1): nvbuf-mem-cuda-pinned - Allocate Pinned/Host cuda memory applicable for Tesla

#(2): nvbuf-mem-cuda-device - Allocate Device cuda memory applicable for Tesla

#(3): nvbuf-mem-cuda-unified - Allocate Unified cuda memory applicable for Tesla

#(4): nvbuf-mem-surface-array - Allocate Surface Array memory, applicable for Jetson

nvbuf-memory-type=0

[source0]

enable=1

#Type - 1=CameraV4L2 2=URI 3=MultiURI

type=3

uri=file:/home/leedarson/workspace/testData/face5.mp4

num-sources=8

gpu-id=0

# (0): memtype_device   - Memory type Device

# (1): memtype_pinned   - Memory type Host Pinned

# (2): memtype_unified  - Memory type Unified

cudadec-memtype=0

[sink0]

enable=1

#Type - 1=FakeSink 2=EglSink 3=File

type=2

sync=1

source-id=0

gpu-id=0

nvbuf-memory-type=0

[sink1]

enable=1

type=3

#1=mp4 2=mkv

container=1

#1=h264 2=h265

codec=1

#encoder type 0=Hardware 1=Software

enc-type=0

sync=0

#iframeinterval=10

bitrate=2000000

#H264 Profile - 0=Baseline 2=Main 4=High

#H265 Profile - 0=Main 1=Main10

profile=0

output-file=out.mp4

source-id=0

[sink2]

enable=0

#Type - 1=FakeSink 2=EglSink 3=File 4=RTSPStreaming

type=4

#1=h264 2=h265

codec=1

#encoder type 0=Hardware 1=Software

enc-type=0

sync=0

bitrate=4000000

#H264 Profile - 0=Baseline 2=Main 4=High

#H265 Profile - 0=Main 1=Main10

profile=0

# set below properties in case of RTSPStreaming

rtsp-port=8554

udp-port=5400

[osd]

enable=1

gpu-id=0

border-width=1

text-size=15

text-color=1;1;1;1;

text-bg-color=0.3;0.3;0.3;1

font=Serif

show-clock=0

clock-x-offset=800

clock-y-offset=820

clock-text-size=12

clock-color=1;0;0;0

nvbuf-memory-type=0

[streammux]

gpu-id=0

##Boolean property to inform muxer that sources are live

live-source=0

buffer-pool-size=1

batch-size=8

##time out in usec, to wait after the first buffer is available

##to push the batch even if the complete batch is not formed

batched-push-timeout=40000

## Set muxer output width and height

width=1920

height=1080

##Enable to maintain aspect ratio wrt source, and allow black borders, works

##along with width, height properties

enable-padding=0

nvbuf-memory-type=0

[primary-gie]

enable=1

gpu-id=0

model-engine-file=/home/user/workspace/models/scrfd_500m_bnkps_dynamic.engine

batch-size=8

#Required by the app for OSD, not a plugin property

bbox-border-color0=1;0;0;1

bbox-border-color1=0;1;1;1

bbox-border-color2=0;0;1;1

bbox-border-color3=0;1;0;1

interval=0

gie-unique-id=1

nvbuf-memory-type=0

config-file=config_detection.txt

[tracker]

enable=1

# For NvDCF and DeepSORT tracker, tracker-width and tracker-height must be a multiple of 32, respectively

tracker-width=640

tracker-height=384

ll-lib-file=/opt/nvidia/deepstream/deepstream/lib/libnvds_nvmultiobjecttracker.so

# ll-config-file required to set different tracker types

# ll-config-file=config_tracker_IOU.yml

ll-config-file=/opt/nvidia/deepstream/deepstream-6.1/samples/configs/deepstream-app/config_tracker_NvDCF_perf.yml

# ll-config-file=config_tracker_NvDCF_accuracy.yml

# ll-config-file=config_tracker_DeepSORT.yml

gpu-id=0

enable-batch-process=1

enable-past-frame=1

display-tracking-id=1

[tests]

file-loop=0

config_detection.txt内容如下。

[property]

gpu-id=0

model-engine-file=/home/user/workspace/models/scrfd_500m_bnkps_dynamic.engine

batch-size=4

net-scale-factor=0.0078125

offsets=127.5;127.5;127.5

force-implicit-batch-dim=1

model-color-format=1

0=FP32, 1=INT8, 2=FP16 mode

network-mode=2

process-mode=1

num-detected-classes=6

labelfile-path=labels.txt

# number of consecutive batches to skip for inference

interval=0

# custom detection parser

parse-bbox-func-name=NvDsInferParseCustomSCRFD

custom-lib-path=nvdsinfer_custom_impl_face/libnvdsinfer_custom_impl_face.so

output-blob-names=score_8;bbox_8;kps_8;score_16;bbox_16;kps_16;score_32;bbox_32;kps_32

force-implicit-batch-dim=1

[class-attrs-all]

# bbox threshold

pre-cluster-threshold=0.5

# nms threshold

post-cluster-threshold=0.45

执行如下命令

deepstream-app -c config_face.txt

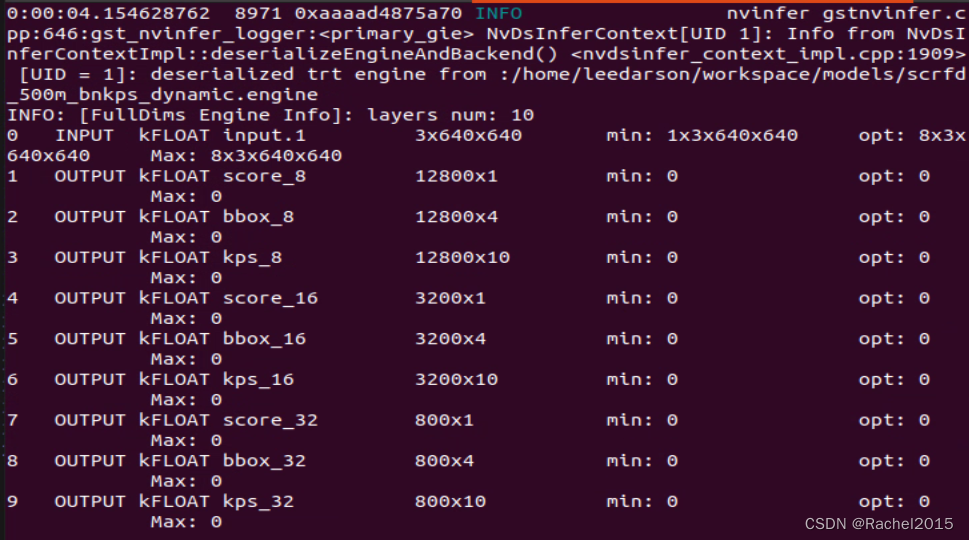
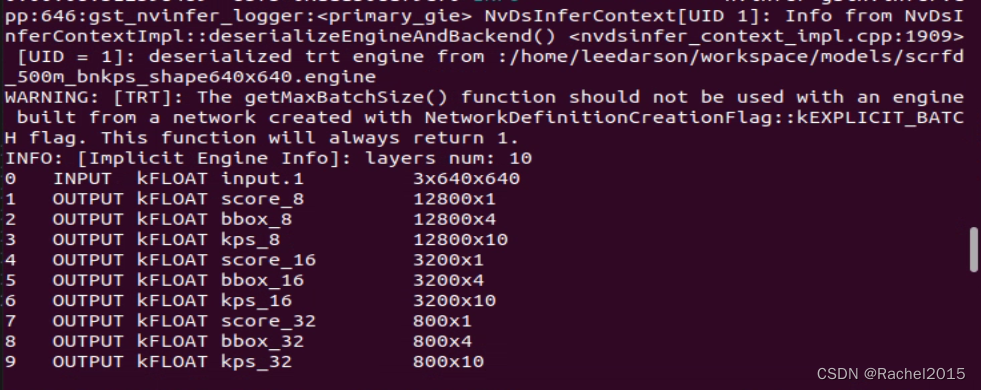
对比deepstream推理SCRFD时解析的网络参数如下。

dynamic engine推理时解析的网络层参数

static engine推理时解析的网络层参数

运行结果如下

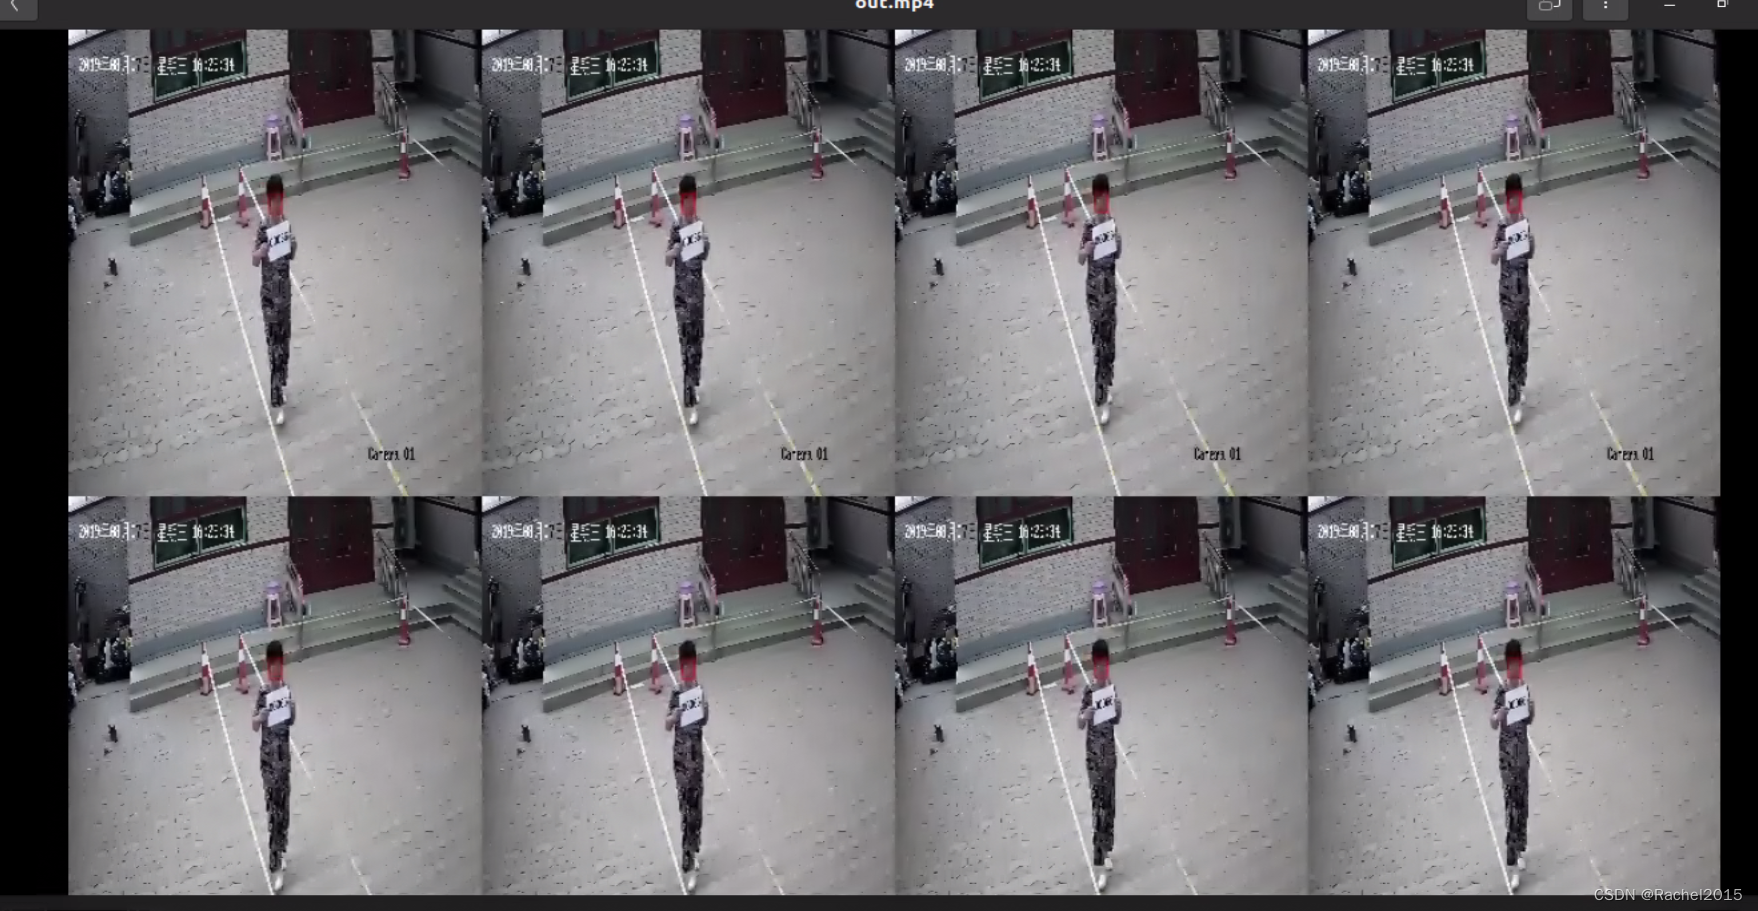
8路640x480大小的视频同时在NVIDIA NX平台上运行,帧率大概16fps;

4路640x480大小的视频同时在NVIDIA NX平台上运行,帧率大概30fps。

  • 0
    点赞
  • 7
    收藏
    觉得还不错? 一键收藏
  • 2
    评论

“相关推荐”对你有帮助么?

  • 非常没帮助
  • 没帮助
  • 一般
  • 有帮助
  • 非常有帮助
提交
评论 2
添加红包

请填写红包祝福语或标题

红包个数最小为10个

红包金额最低5元

当前余额3.43前往充值 >
需支付:10.00
成就一亿技术人!
领取后你会自动成为博主和红包主的粉丝 规则
hope_wisdom
发出的红包
实付
使用余额支付
点击重新获取
扫码支付
钱包余额 0

抵扣说明:

1.余额是钱包充值的虚拟货币,按照1:1的比例进行支付金额的抵扣。
2.余额无法直接购买下载,可以购买VIP、付费专栏及课程。

余额充值