


1. MiniMax
讲解视频:
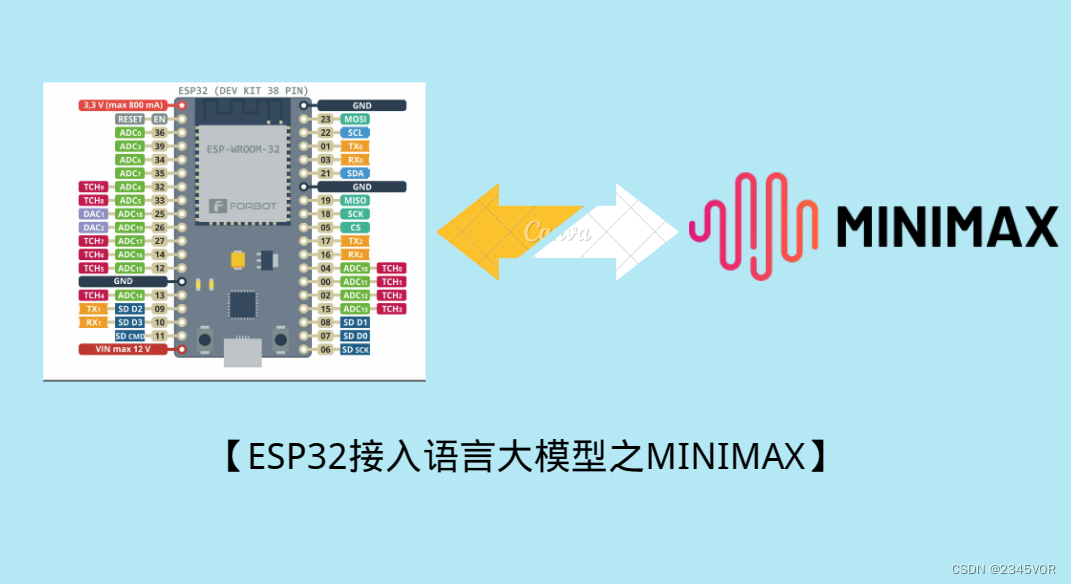
ESP32接入语言大模型之MiniMax
MM智能助理是一款由MiniMax自研的,没有调用其他产品的接口的大型语言模型。MiniMax是一家中国科技公司,一直致力于进行大模型相关的研究。
随着人工智能技术的不断发展,自然语言处理领域也得到了广泛的关注和应用。MiniMax作为千亿参数对话模型,支持多轮对话,具备内容创作、信息归纳总结等能力。可以快速注册体验中国版语言大模型,与GLM大模型进行对话。本文将重点介绍如何通过ESP32接入国产大模型之MiniMax api。
MiniMax官网地址:https://www.minimaxi.com/
上一篇博客已经分享了
【ESP32接入国产大模型之MiniMax】
【ESP32接入语言大模型之智谱清言】
【ESP32接入国产大模型之文心一言】
【ESP32接入语言大模型之通义千问】
下面是不标准测评,参考而已
| 模型 | 响应时间 | 内容质量 | 免费token次数 | 地址 |
|---|---|---|---|---|
| MiniMax | 3s | 8分 | 500万 | https://www.minimaxi.com/ |
| 智谱清言 | 7s | 8分 | 300万 | https://open.bigmodel.cn/ |
| 文心一言 | 10s | 9分 | 500万 | https://cloud.baidu.com/doc/WENXINWORKSHOP/s/Nlks5zkzu |
| 通义千问 | 8s | 8分 | 800万 | https://tongyi.aliyun.com/qianwen/ |
这一次还是采用Arduino编程就会轻松许多开发。这样就可以把大模型装进口袋啦🤣🤣🤣
1.1 了解MiniMax api
为方便用户使用,我们提供了 原生 HTTP 来实现模型 API 的调用。
api简介

1.1.2 HTTP 调用
同时支持标准的 HTTP 调用
POST https://open.bigmodel.cn/api/paas/v3/model-api/{model}/{invoke_method}
请求头
Content-Type : application/json
Authorization : 鉴权token,见如下 接口鉴权说明
路径参数
model : 具体的模型编码
invoke_method : 调用方式,取值为 invoke : 同步调用,async-invoke : 异步调用,sse-invoke : SSE 调用
1.2 Http接口鉴权
- API
https://api.minimax.chat/v1/text/chatcompletion_v2
-
支持token数
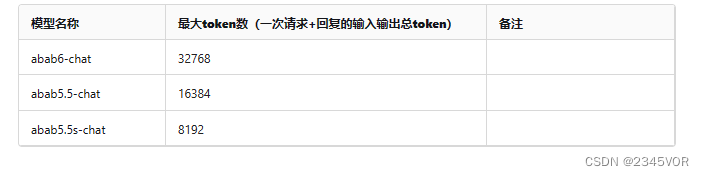
-
接口参数说明
3.1 请求体(request)参数
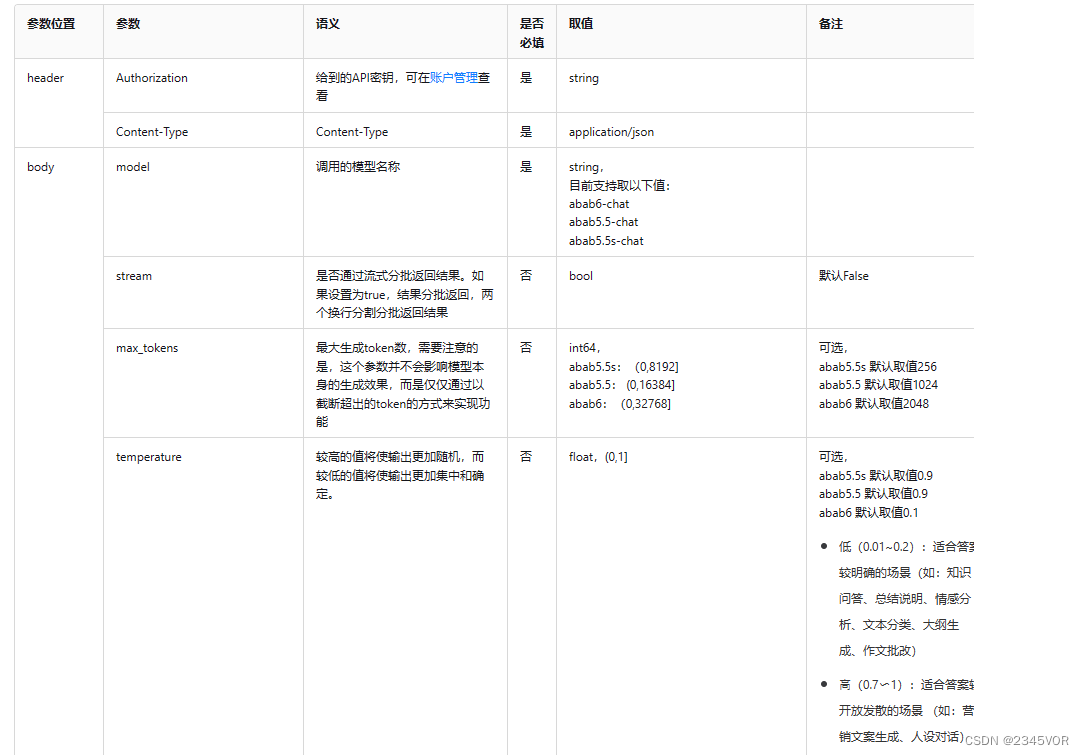
api_key="请填写您的api_key"

curl --location "https://api.minimax.chat/v1/text/chatcompletion_v2" \
--header "Content-Type: application/json" \
--header "Authorization: Bearer ${api_key}" \
--data '{
    "model": "abab5.5-chat",
    "messages": [
      {
        "role": "system",
        "content": "MM智能助理是一款由MiniMax自研的,没有调用其他产品的接口的大型语言模型。MiniMax是一家中国科技公司,一直致力于进行大模型相关的研究。"
      },
      {
        "role": "user",
        "content": "你会按照以下要求回复我的内容:“根据我给出的多段信息分别判断信息文本内容表达了哪类情绪,并给出判断的理由,判断理由务必精简、准确。”我的内容是:“1、学习三星堆正确拍照姿势,留下难忘回忆!2、太可爱啦!换了个小猫图标!3、当代社畜分类图鉴,你是哪种?”"
      }
    ],
    "tool_choice": "none",
    "stream": true,
    "max_tokens": 16384,
    "temperature": 0.1,
    "top_p": 0.9
  }'
3.2 返回(response)参数
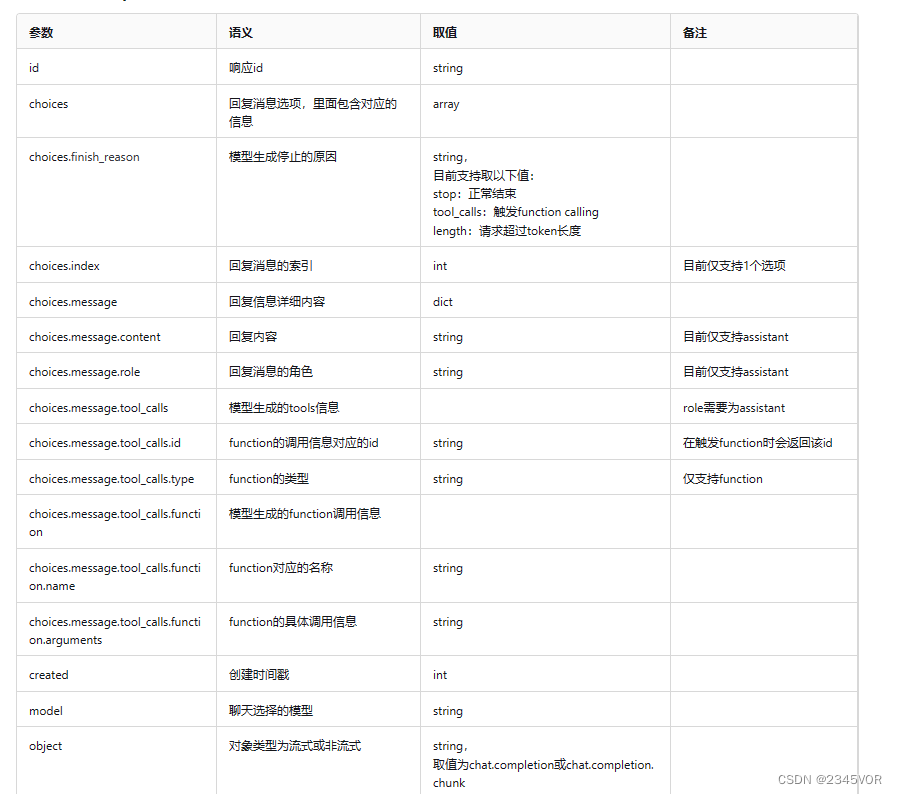
ata: {"id":"0230e4e325f59584349bcfe854f845ca","choices":[{"index":0,"delta":{"content":"1","role":"assistant"}}],"created":1709289956,"model":"abab6-chat","object":"chat.completion.chunk"}

data: {"id":"0230e4e325f59584349bcfe854f845ca","choices":[{"index":0,"delta":{"content":". 积极情绪:文本表达了学习和探索新事物的兴奋和愉悦。\n2. 积极情绪:文本表达了对可爱事物的喜爱和欣赏。\n3. 中性情绪:文本提出了一个关于社会现象的观察,带有","role":"assistant"}}],"created":1709289957,"model":"abab6-chat","object":"chat.completion.chunk"}
data: {"id":"0230e4e325f59584349bcfe854f845ca","choices":[{"finish_reason":"stop","index":0,"delta":{"content":"一定的幽默和讽刺意味。","role":"assistant"}}],"created":1709289957,"model":"abab6-chat","object":"chat.completion.chunk"}

data: {"id":"0230e4e325f59584349bcfe854f845ca","choices":[{"finish_reason":"stop","index":0,"message":{"content":"1. 积极情绪:文本表达了学习和探索新事物的兴奋和愉悦。\n2. 积极情绪:文本表达了对可爱事物的喜爱和欣赏。\n3. 中性情绪:文本提出了一个关于社会现象的观察,带有一定的幽默和讽刺意味。","role":"assistant"}}],"created":1709289957,"model":"abab6-chat","object":"chat.completion","usage":{"total_tokens":199},"base_resp":{"status_code":0,"status_msg":""}}
2. 先决条件
在继续此项目之前,请确保检查以下先决条件。
我们将使用 Arduino IDE 对 ESP32/ESP8266 开发板进行编程,因此在继续本教程之前,请确保已在 Arduino IDE 中安装这些开发板。
2.1 环境配置
- Arduino IDE:下载并安装 Arduino IDE;
- ESP32 开发板库:在 Arduino IDE 中添加 ESP32 支持;
参考博客:【esp32c3配置arduino IDE教程】
为安装过程留出一些时间,具体时间可能因您的互联网连接而异。
2.2 所需零件
要学习本教程,您需要1个 ESP32 开发板或者ESP32C3,建议使用后者,笔者发现同样的代码后者可以轻松调用,ESP32不行(可能板子坏了)。
- 1 x ESP32(阅读最佳 ESP32开发板)
- 1 x ESP32C3(实惠的Arduino开发板——合宙ESP32C3)

推荐合宙esp32c3硬件,请不要使用esp8266,问就是不行

简约版需要设置CDC下载,经典版直接下载

如果用platformio,配置参考如下:
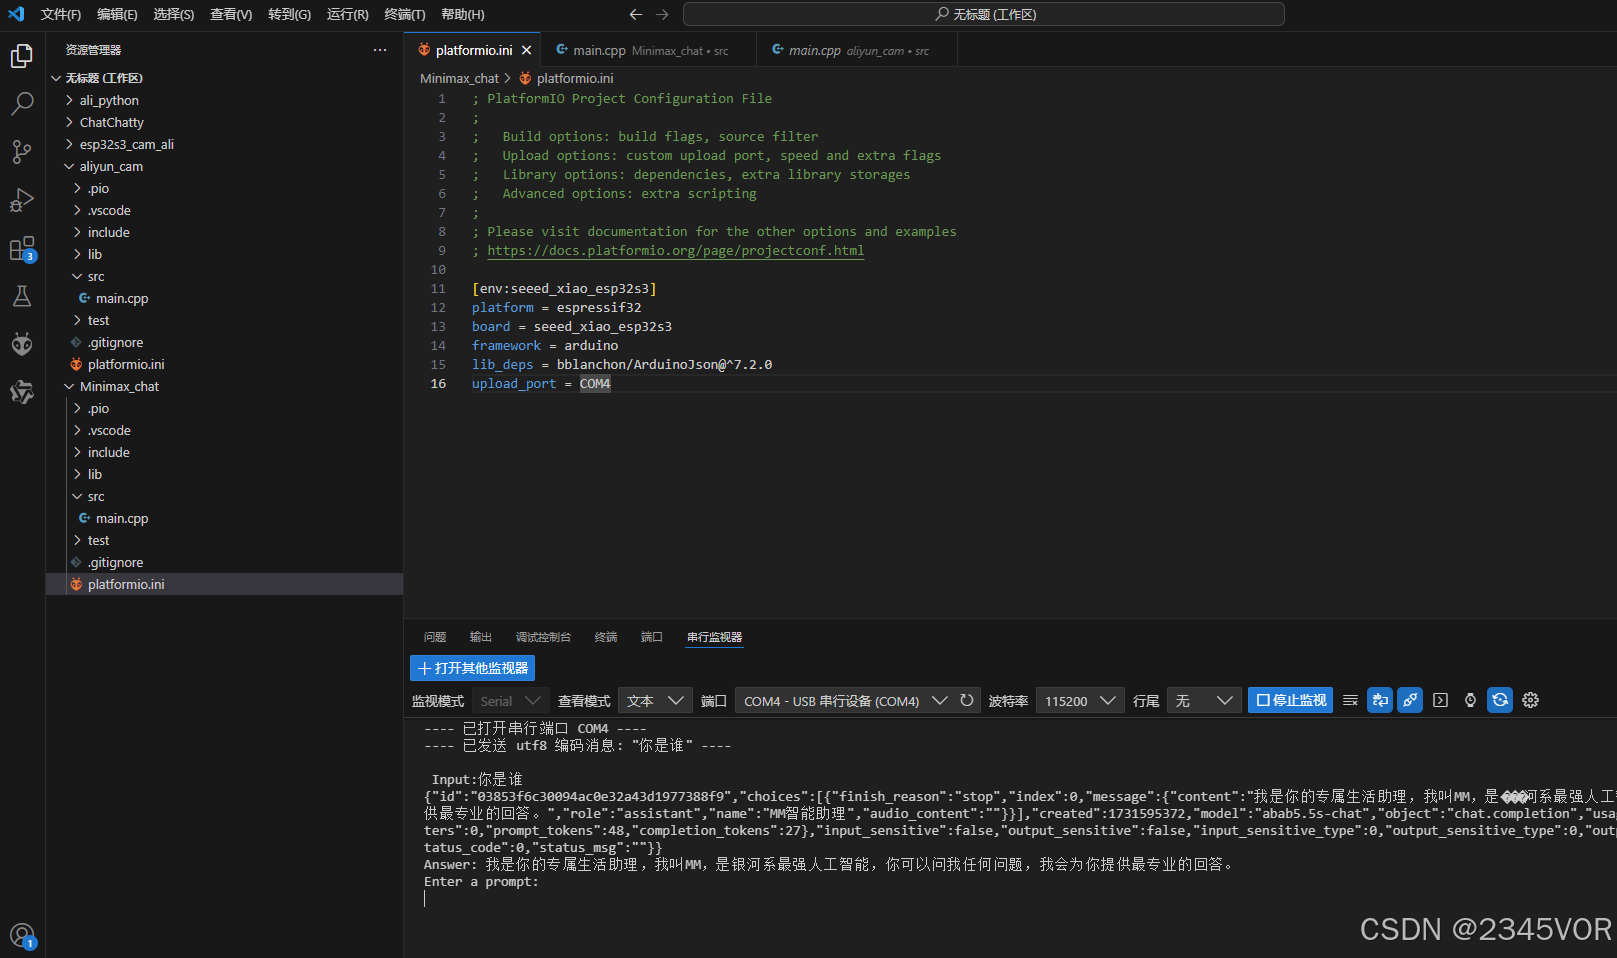
; PlatformIO Project Configuration File
;
;   Build options: build flags, source filter
;   Upload options: custom upload port, speed and extra flags
;   Library options: dependencies, extra library storages
;   Advanced options: extra scripting
;
; Please visit documentation for the other options and examples
; https://docs.platformio.org/page/projectconf.html

[env:seeed_xiao_esp32s3]
platform = espressif32
board = seeed_xiao_esp32s3
framework = arduino
lib_deps = bblanchon/ArduinoJson@^7.2.0
upload_port = COM4
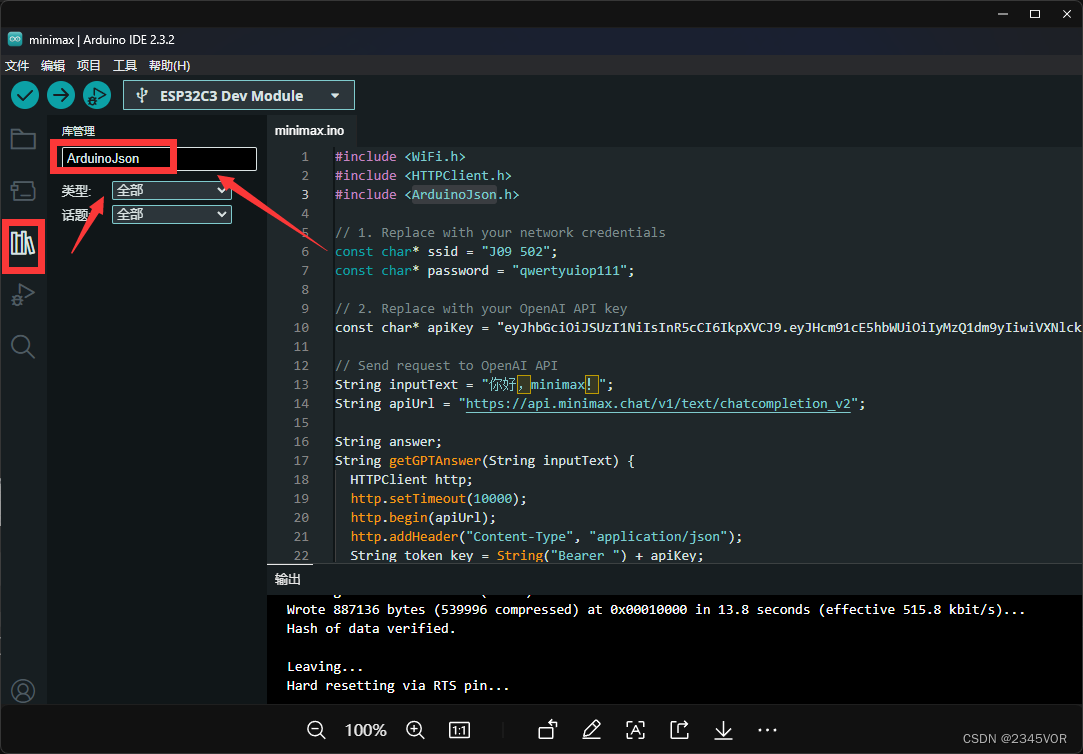
3. 核心代码
esp32 Arduino代码如下
#include <WiFi.h>
#include <HTTPClient.h>
#include <ArduinoJson.h>

// 1. Replace with your network credentials
const char* ssid = "J09 502";
const char* password = "qwertyuiop111";

// 2. Replace with your OpenAI API key
const char* apiKey = "eyJhbGciOiJSUzI1NiIsInR5cCI6IkpXVCJ9.eyJHcm91cE5hbWUiOiIyMzQ1dm9yIiwiVXNlck5hbWUiOiIyMzQ1dm9yIiwiQWNjb3VudCI6IiIsIlN1YmplY3RJRCI6IjE3NTk0ODIxODAxMDAxNzAyMDgiLCJQaG9uZSI6IjE1MDcyNjQxNTYxIiwiR3JvdXBJRCI6IjE3NTk0ODIxODAwOTU5NzU5MDQiLCJQYWdlTmFtZSI6IiIsIk1haWwiOiIiLCJDcmVhdGVUaW1lIjoiMjAyNC0wMy0xNiAxMzoyNDoxOCIsImlzcyI6Im1pbmltYXgifQ.-Y8BOW0WZq2ImaN7Rof7YNtYnYnvPNDyGx23_xRqq5co9P5UkC3ciYEcIch2SUZ5QPkXR-sMUPzhdowSYvfdu1N25kdKJ8GE_63NfCnsdDVt8mv0wQSSweJK0yf_C8a8ADdB1uF4vg_WKMDjHlvzERsoNZgX6FYtr-bee85rIyu4U-OrbUvEpR1FLPXa7lTlx65QvhVIYGbIKde7ERIT_7QLOQoVFvPz0gX-H6V7UlmSRgRy4LK_R9mvV5TqCy3v90WK_AFuwEhPXcg";

// Send request to OpenAI API
String inputText = "你好,minimax!";
String apiUrl = "https://api.minimax.chat/v1/text/chatcompletion_v2";

String answer;
String getGPTAnswer(String inputText) {
  HTTPClient http;
  http.setTimeout(10000);
  http.begin(apiUrl);
  http.addHeader("Content-Type", "application/json");
  String token_key = String("Bearer ") + apiKey;
  http.addHeader("Authorization", token_key);
  String payload = "{\"model\":\"abab5.5s-chat\",\"messages\":[{\"role\": \"system\",\"content\": \"你是鹏鹏的生活助手机器人,要求下面的回答严格控制在256字符以内。\"},{\"role\": \"user\",\"content\": \"" + inputText + "\"}]}";
  int httpResponseCode = http.POST(payload);
  if (httpResponseCode == 200) {
    String response = http.getString();
    http.end();
    Serial.println(response);

    // Parse JSON response
    DynamicJsonDocument jsonDoc(1024);
    deserializeJson(jsonDoc, response);
    String outputText = jsonDoc["choices"][0]["message"]["content"];
    return outputText;
    // Serial.println(outputText);
  } else {
    http.end();
    Serial.printf("Error %i \n", httpResponseCode);
    return "<error>";
  }
}

void setup() {
  // Initialize Serial
  Serial.begin(115200);

  // Connect to Wi-Fi network
  WiFi.mode(WIFI_STA);
  WiFi.begin(ssid, password);
  Serial.print("Connecting to WiFi ..");
  while (WiFi.status() != WL_CONNECTED) {
    Serial.print('.');
    delay(1000);
  }
  Serial.println(WiFi.localIP());
  answer = getGPTAnswer(inputText);
  Serial.println("Answer: " + answer);
  Serial.println("Enter a prompt:");

}

void loop() {
  // do nothing
  if (Serial.available()) {
    inputText = Serial.readStringUntil('\n');
    // inputText.trim();
    Serial.println("\n Input:"+inputText);

    answer = getGPTAnswer(inputText);
    Serial.println("Answer: " + answer);
    Serial.println("Enter a prompt:");
  }
  // delay(2);
}
这段代码是一个基于Arduino平台(可能是ESP32或ESP8266)的示例,它通过WiFi连接到指定的无线网络,并利用HTTPClient库向智谱清言API发送POST请求以获取AI生成的回答。以下是详细的解释:
- 导入必要的库:
#include <WiFi.h>
#include <HTTPClient.h>
#include <ArduinoJson.h>
- 第一处修改定义Wi-Fi网络凭证:
const char* ssid = "J09 502";
const char* password = "qwertyuiop111";
- 第二处修改定义要调用的APIkey:
const char* apiKey = "eyJhbGciOiJSUzI1NiIsInR5cCI6IkpXVCJ9.eyJHcm91cE5hbWUiOiIyMzQ1dm9yIiwiVXNlck5hbWUiOiIyMzQ1dm9yIiwiQWNjb3VudCI6IiIsIlN1YmplY3RJRCI6IjE3NTk0ODIxODAxMDAxNzAyMDgiLCJQaG9uZSI6IjE1MDcyNjQxNTYxIiwiR3JvdXBJRCI6IjE3NTk0ODIxODAwOTU5NzU5MDQiLCJQYWdlTmFtZSI6IiIsIk1haWwiOiIiLCJDcmVhdGVUaW1lIjoiMjAyNC0wMy0xNiAxMzoyNDoxOCIsImlzcyI6Im1pbmltYXgifQ.-Y8BOW0WZq2ImaN7Rof7YNtYnYnvPNDyGx23_xRqq5co9P5UkC3ciYEcIch2SUZ5QPkXR-sMUPzhdowSYvfdu1N25kdKJ8GE_63NfCnsdDVt8mv0wQSSweJK0yf_C8a8ADdB1uF4vg_WKMDjHlvzERsoNZgX6FYtr-bee85rIyu4U-OrbUvEpR1FLPXa7lTlx65QvhVIYGbIKde7ERIT_7QLOQoVFvPz0gX-H6V7UlmSRgRy4LK_R9mvV5TqCy3v90WK_AFuwEhPXcg";
- 定义输入文本和函数 getGPTAnswer(String inputText):
- 输入文本是固定的问候语"你好,文通义千问",在实际应用中可以根据需要修改。
- 函数 getGPTAnswer() 负责执行以下操作:
初始化HTTPClient对象并设置目标URL。设置Content-Type头信息,构造请求体payload,将用户输入的内容添加到JSON结构中。发送POST请求并检查HTTP响应码。如果响应码为200,则读取并解析返回的JSON数据,提取出结果字段作为回答。若非200,则返回错误字符串 “”。
- setup() 函数:
- 初始化串口通信, 连接到指定的Wi-Fi网络。
- 连接成功后,获取一个初始的回答并打印出来,然后提示用户输入新的问题。
- loop() 函数:
- 检查串口是否有可用的数据输入。
- 如果有新输入,读取一行内容,调用 getGPTAnswer() 函数获取AI回答,并将对话过程输出到串口。
注意:虽然代码中有OpenAI API相关注释,但实际上该代码是针对MinimaxAPI编写的。如果你想要与OpenAI API交互,你需要使用OpenAI提供的API URL、access token及相应的JSON结构进行请求。
4. 上传验证
如果提示Compilation error: ArduinoJson.h: No such file or directory

直接在库管理安装Arduinojson库
打开串口监视器,注意右下角选择换行符,选择115200波特率,输入你想问的问题,他就可以回答你
4.1 对话测试
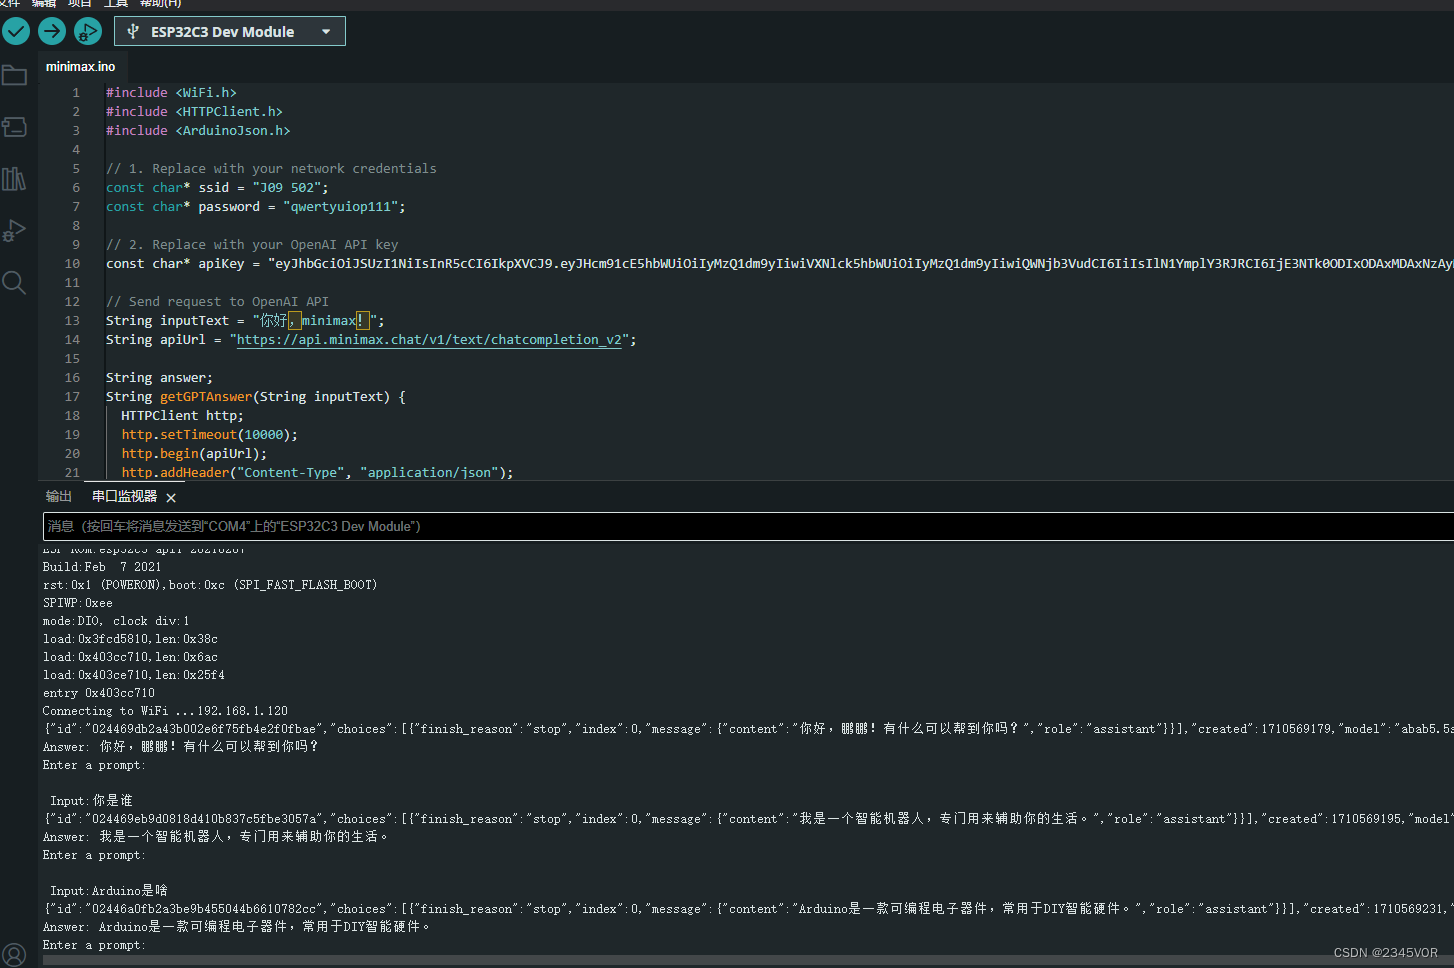
个人感觉MiniMax比其他国内大模型响应要快速许多,大约1s返回,其他平台有时需要10s,太可恶啦!😘😘😘
4.2 报错
如果返回error ,大家对照列表查询错误代码,结合提示排查解决

5. 总结
🥳🥳🥳现在,我们在本教程中,您学习了如何使用ESP32接入语言大模型之MiniMax。🛹🛹🛹从而实现对外部世界进行感知,充分认识这个有机与无机的环境,后期会持续分享esp32跑freertos实用案列🥳🥳🥳科学地合理地进行创作和发挥效益,然后为人类社会发展贡献一点微薄之力。🤣🤣🤣
如果你有任何问题,可以通过下面的二维码加入鹏鹏小分队,期待与你思维的碰撞😘😘😘


 1万+
1万+

 被折叠的 条评论
为什么被折叠?
被折叠的 条评论
为什么被折叠?
 到【灌水乐园】发言


