


 本文介绍了如何使用Gradio这款工具部署目标检测、图像分类和语义分割模型,对比Flask,它简化了前端开发。通过实例展示了如何利用Gradio创建交互式应用并托管至HuggingFace。
gradio是一款基于python的算法快速部署工具,本博文主要介绍使用gradio部署目标检测、图像分类、语义分割模型的部署。相比于flask,使用gradio不需要自己构造前端代码,只需要将后端接口写好即可。此外,基于gradio实现的项目,可以托管到huggingface。
官网地址:https://www.gradio.app/guides/quickstart
文档地址:https://www.gradio.app/docs/interface
优质教程:https://zhuanlan.zhihu.com/p/624712372
安装命令:pip install gradio
托管到huggingface具体步骤如下:

1、基本用法
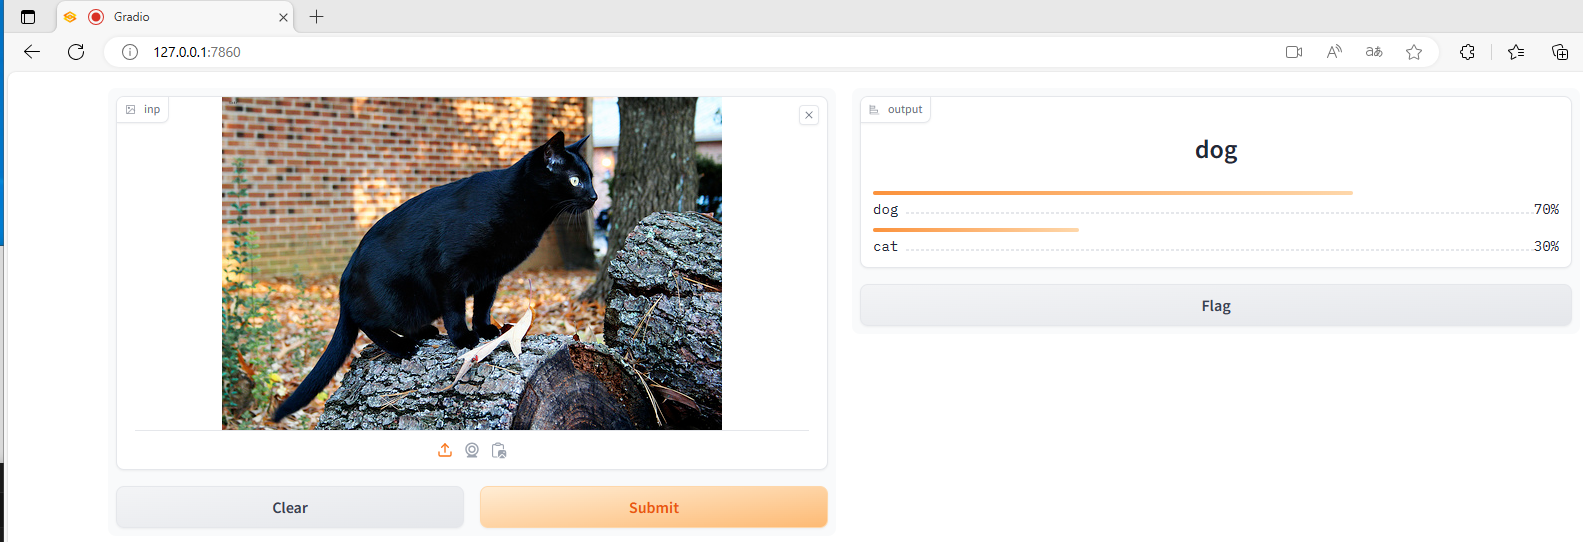
1.1 输入图像返回文本
基本使用方法如下所示
import gradio as gr

def image_classifier(inp):
    return {'cat': 0.3, 'dog': 0.7}

demo = gr.Interface(fn=image_classifier, inputs="image", outputs="label")
demo.launch()
每一个参数的描述如下所示

页面部署效果如下所示
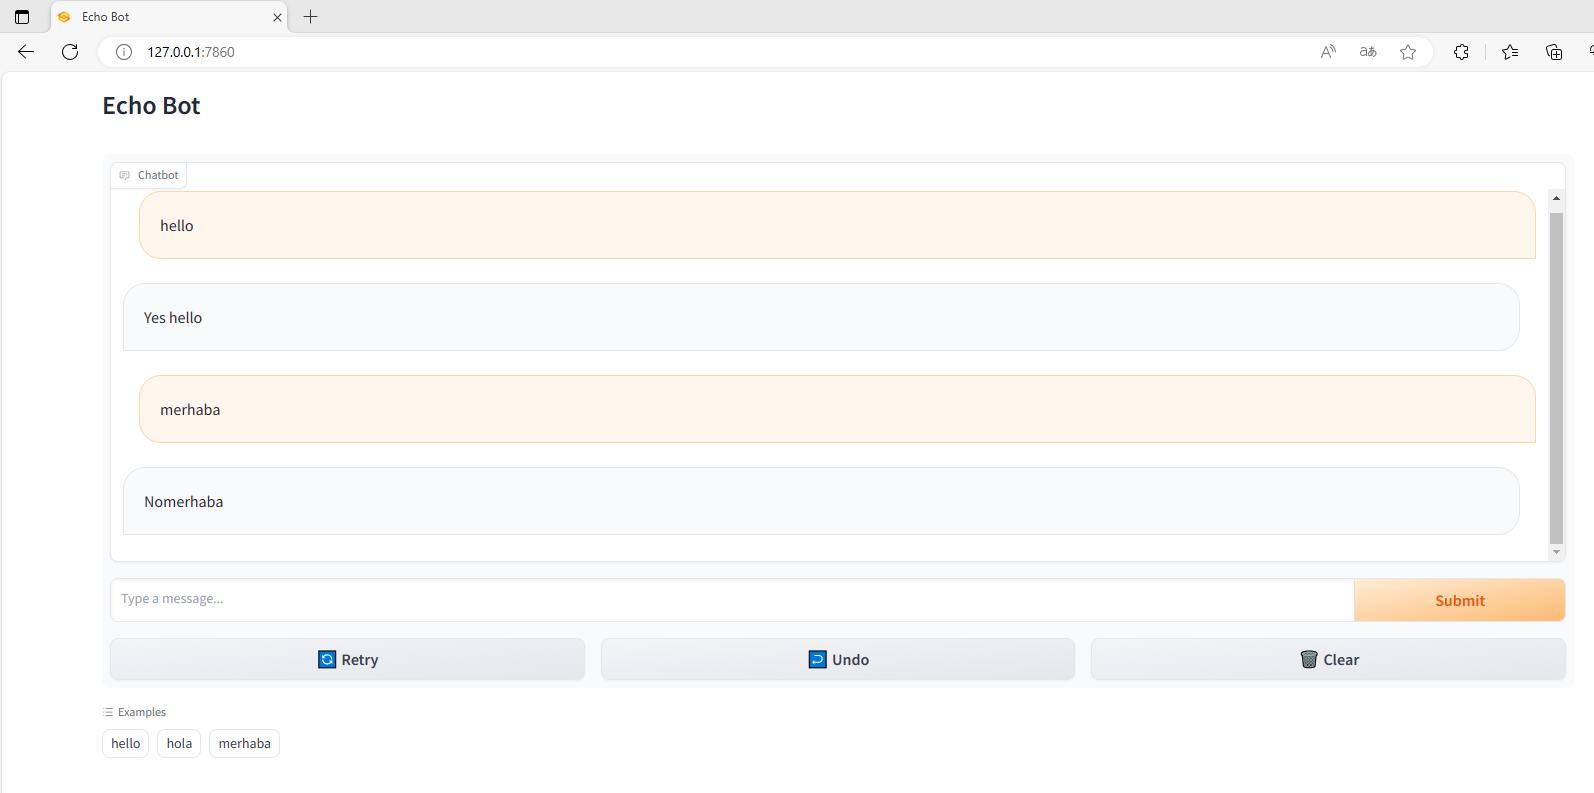
1.2 输入文本返回文本
import random
import gradio as gr

def random_response(message, history):
    return random.choice(["Yes "+message, "No"+message])

demo = gr.ChatInterface(random_response, examples=["hello", "hola", "merhaba"], title="Echo Bot")

if __name__ == "__main__":
    demo.launch()
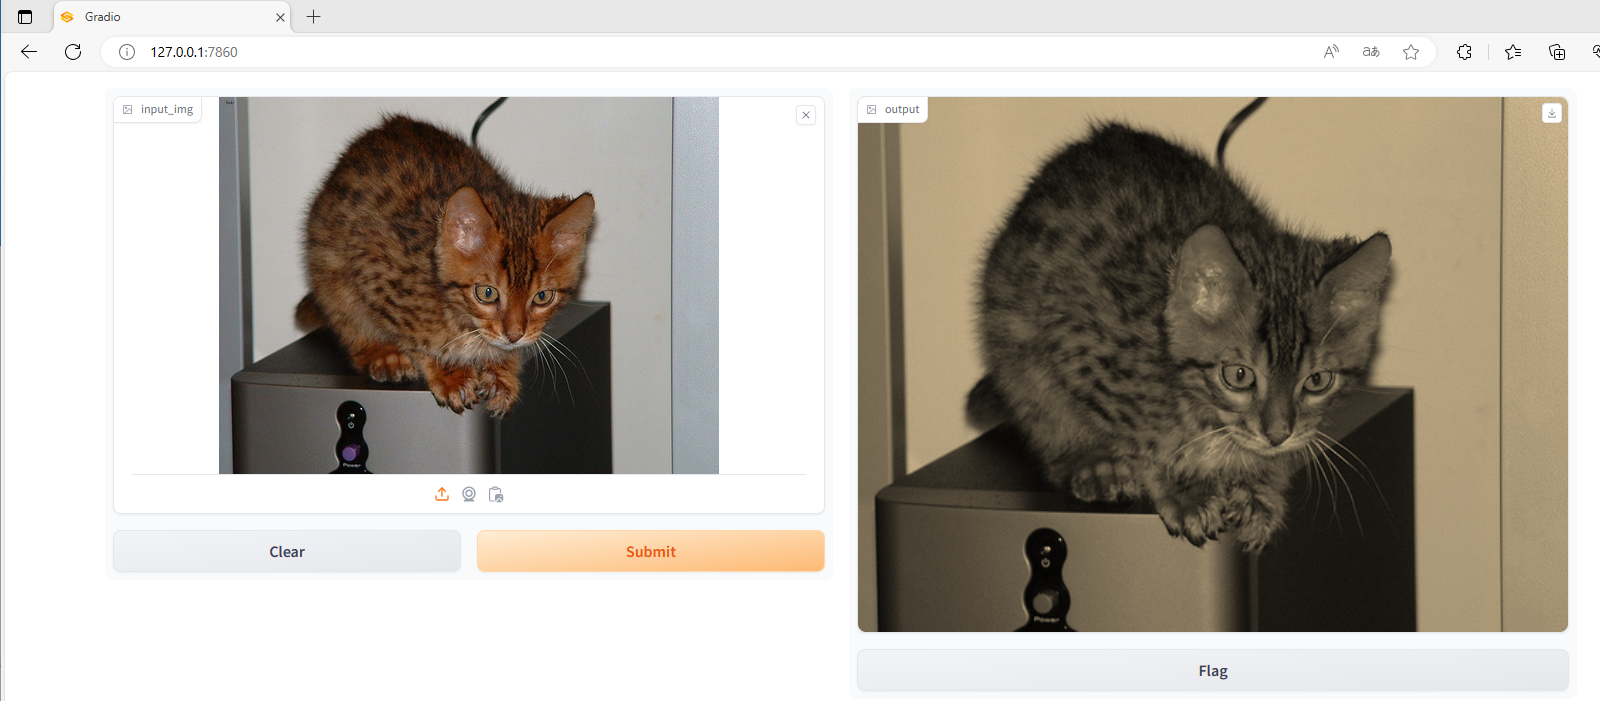
1.3 输入图像返回图像
import numpy as np
import gradio as gr
def sepia(input_img):
    #处理图像
    sepia_filter = np.array([
        [0.393, 0.769, 0.189],
        [0.349, 0.686, 0.168],
        [0.272, 0.534, 0.131]
    ])
    sepia_img = input_img.dot(sepia_filter.T)
    sepia_img /= sepia_img.max()
    return sepia_img
#shape设置输入图像大小
#demo = gr.Interface(sepia, gr.Image(height=200, width=200), "image")
demo = gr.Interface(sepia, inputs=gr.Image(), outputs="image")
demo.launch()
2、部署模型
以下部署代码中的ppDeploy 源自博客paddle 57 基于paddle_infer以面向对象方式2行代码部署目标检测模型、图像分类模型、语义分割模型
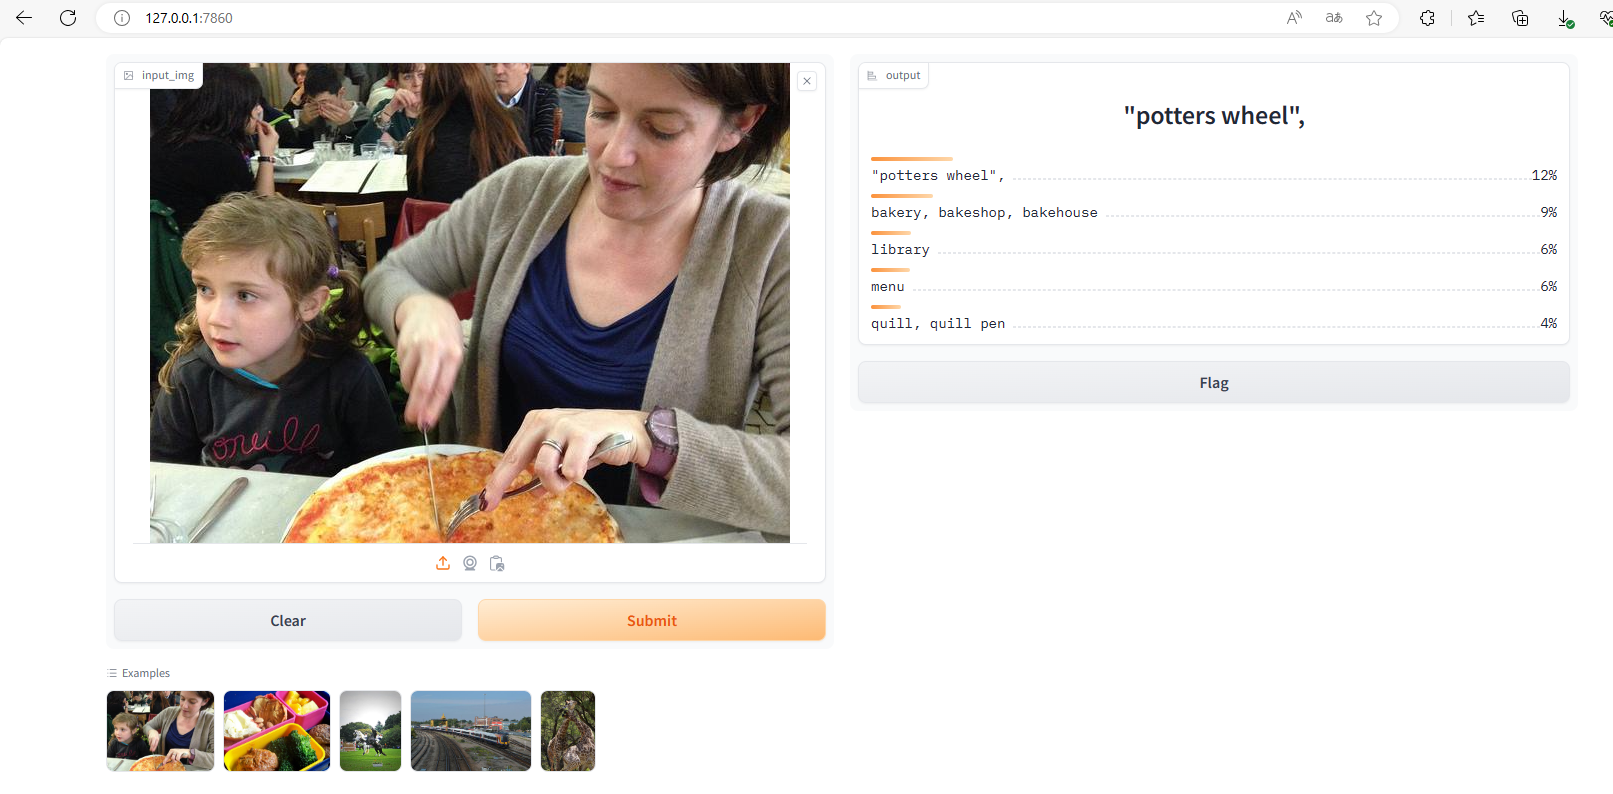
2.1 图像分类
部署代码如下所示
from ppDeploy import *
import gradio as gr
from PIL import Image

cls=clsModel("model/resnet50/",'imagenet1000.txt',imgsz=256)
def cls_predict(input_img):
    res=cls.forword(input_img,topk=5)
    print(res)
    return res

if __name__=="__main__":
    gr.close_all()
    demo = gr.Interface(fn = cls_predict,inputs = gr.Image(type='pil'), outputs = gr.Label(num_top_classes=5),
                        examples = ['examples/1.jpg','examples/2.jpg','examples/3.jpg','examples/4.jpg','examples/5.jpg',])
    demo.launch()
部署效果如下所示
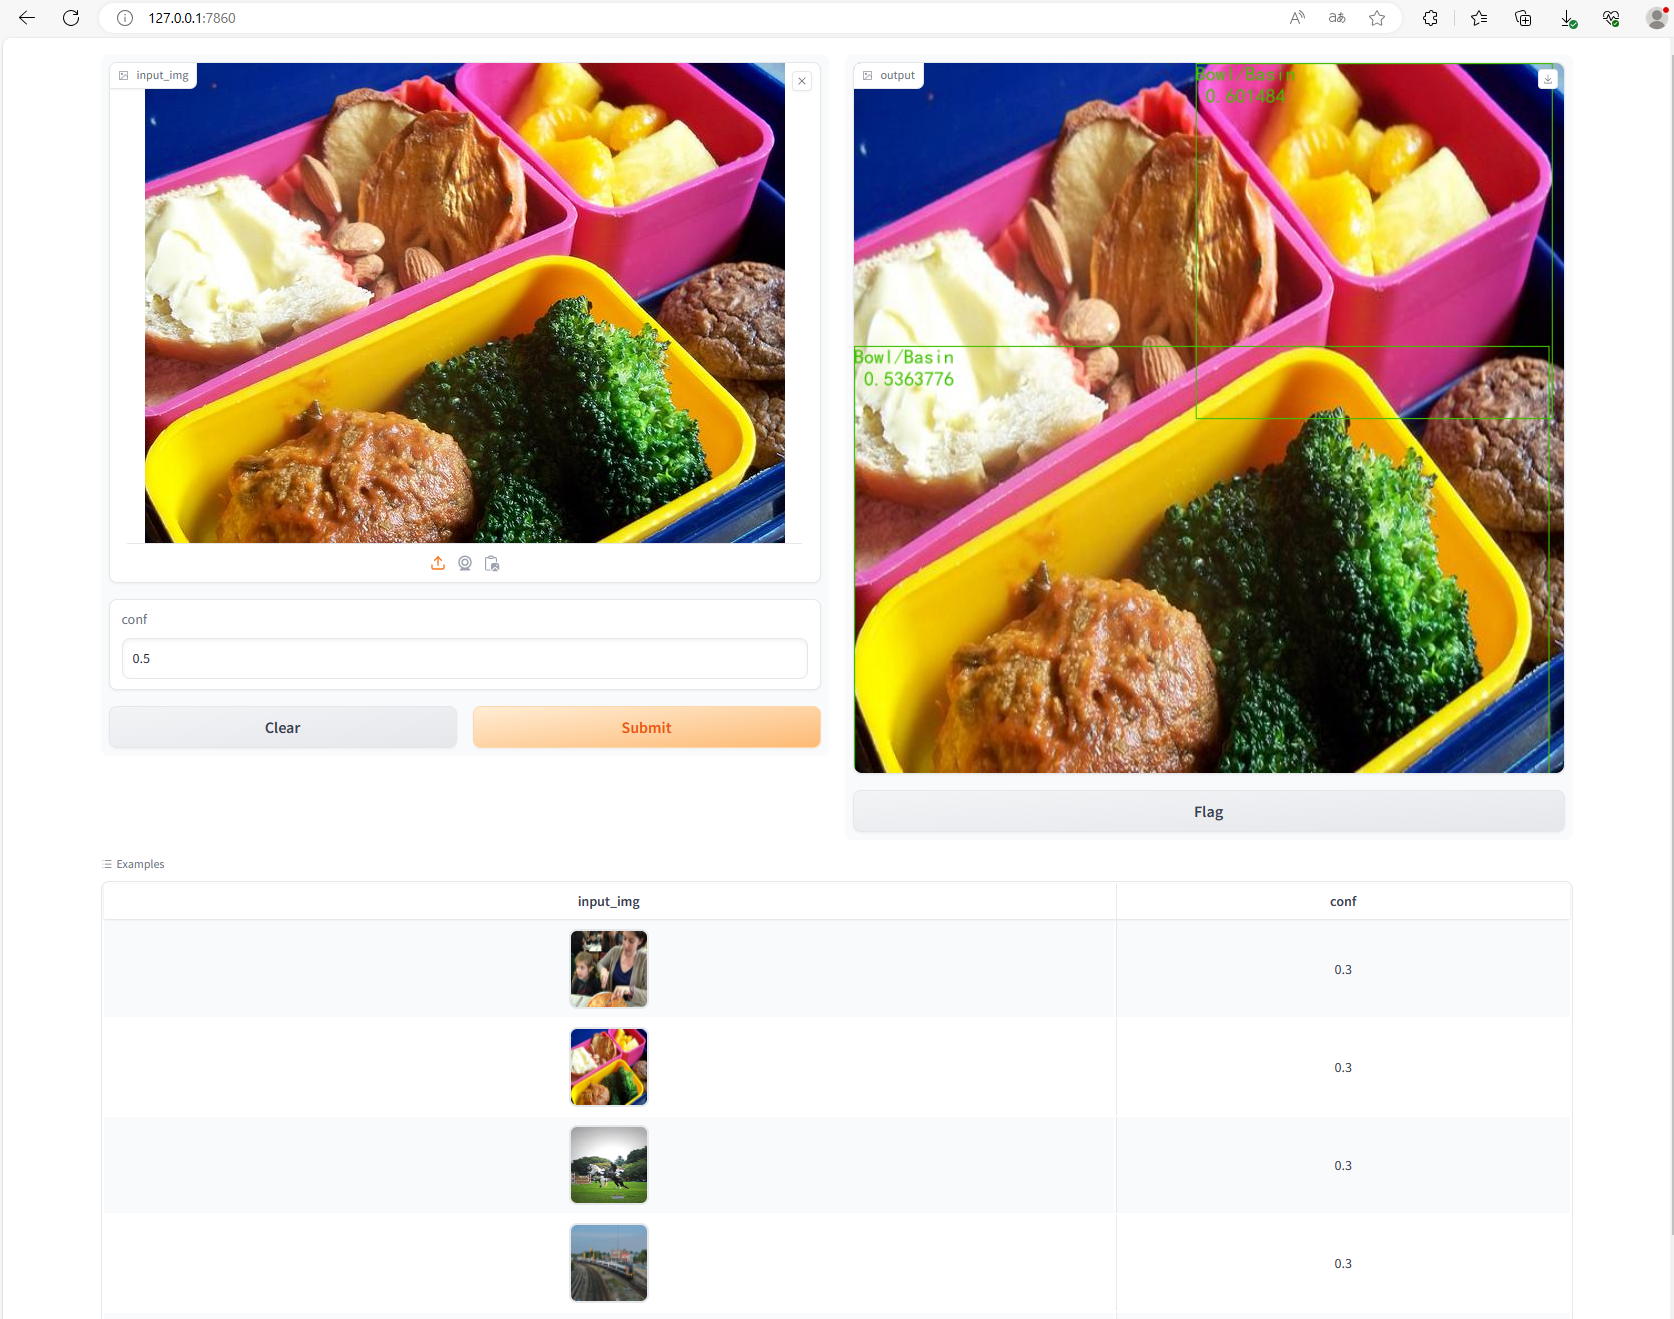
2.2 目标检测
部署代码如下所示,其特点是输入为image+float,输出为flaot,然后examples 需要给出多个(在显示时变成了表格)
from ppDeploy import *
import gradio as gr
from PIL import Image

#cls=clsModel("model/resnet50/",'imagenet1000.txt',imgsz=256)
det=detModel("model/ppyoloe_m/",'object365.txt',imgsz=640)
def det_predict(input_img,conf):
    res=det.forword(input_img,conf)
    return res
if __name__=="__main__":
    gr.close_all()
    #demo = gr.Interface(fn = cls_predict,inputs = gr.Image(type='pil'), outputs = gr.Label(num_top_classes=5), examples = ['examples/1.jpg','examples/2.jpg','examples/3.jpg','examples/4.jpg','examples/5.jpg',])
    demo = gr.Interface(fn = det_predict,inputs = [gr.Image(type='pil'),
                                                   gr.Number(precision=2,minimum=0.01,maximum=1,value=0.3)
                                                   ],
                                        outputs = "image",
                                        examples = [['examples/1.jpg',0.3],
                                                                ['examples/2.jpg',0.3],
                                                                ['examples/3.jpg',0.3],
                                                                ['examples/4.jpg',0.3],
                                                                ['examples/5.jpg',0.3],
                                                                ]
                                                       )
    demo.launch()
运行效果如下所示
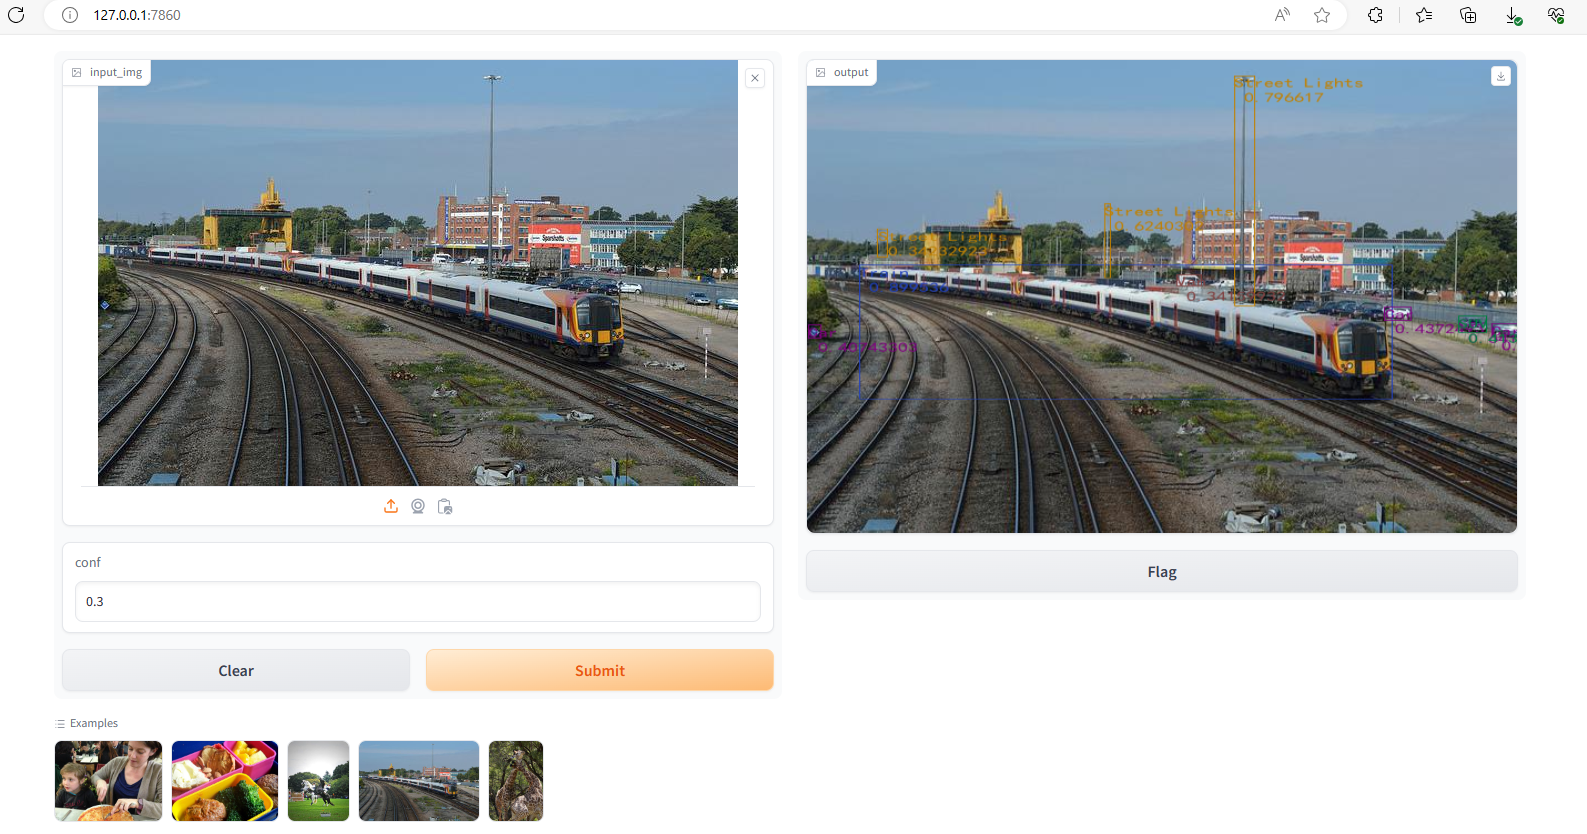
通过对部署代码进行修改,examples仅给出一个nx1的二维数组,其又变成了图片列表
from ppDeploy import *
import gradio as gr
from PIL import Image

#cls=clsModel("model/resnet50/",'imagenet1000.txt',imgsz=256)
det=detModel("model/ppyoloe_m/",'object365.txt',imgsz=640)
def det_predict(input_img,conf):
    res=det.forword(input_img,conf)
    return res
if __name__=="__main__":
    gr.close_all()
    #demo = gr.Interface(fn = cls_predict,inputs = gr.Image(type='pil'), outputs = gr.Label(num_top_classes=5), examples = ['examples/1.jpg','examples/2.jpg','examples/3.jpg','examples/4.jpg','examples/5.jpg',])
    demo = gr.Interface(fn = det_predict,inputs = [gr.Image(type='pil'),
                                                   gr.Number(precision=2,minimum=0.01,maximum=1,value=0.3)
                                                   ],
                                        outputs = "image",
                                        examples = [['examples/1.jpg'],
                                                                ['examples/2.jpg'],
                                                                ['examples/3.jpg'],
                                                                ['examples/4.jpg'],
                                                                ['examples/5.jpg'],
                                                                ]
                                                       )
    demo.launch()
此时执行效果如下所示:
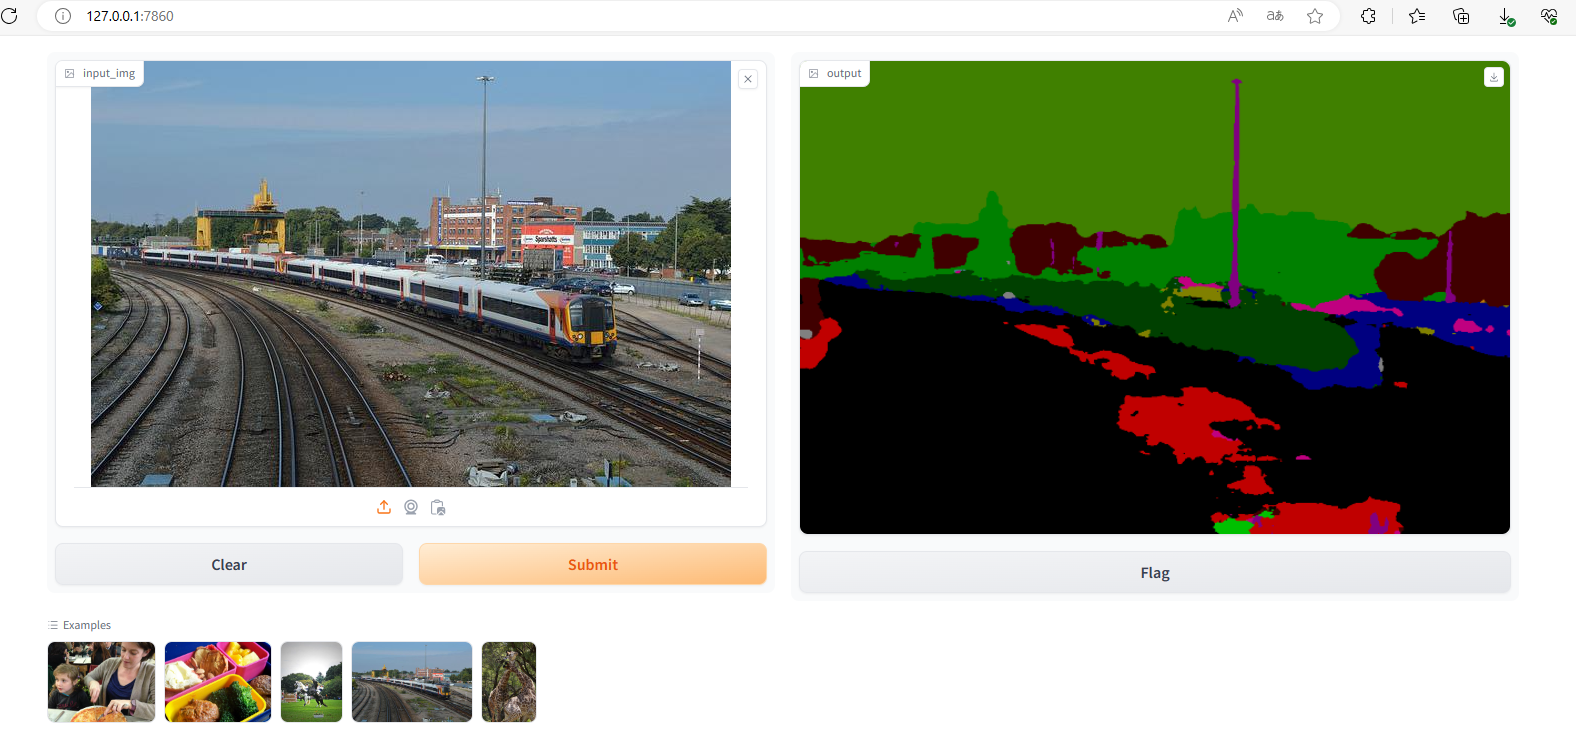
2.3 语义分割
部署代码如下
from ppDeploy import *
import gradio as gr
from PIL import Image

#cls=clsModel("model/resnet50/",'imagenet1000.txt',imgsz=256)
#det=detModel("model/ppyoloe_m/",'object365.txt',imgsz=640)
seg=segModel("model/segformerb1/",imgsz=1024)
def seg_predict(input_img,conf):
    res=seg.forword(input_img,conf)
    return res
if __name__=="__main__":
    gr.close_all()
    #demo = gr.Interface(fn = cls_predict,inputs = gr.Image(type='pil'), outputs = gr.Label(num_top_classes=5), examples = ['examples/1.jpg','examples/2.jpg','examples/3.jpg','examples/4.jpg','examples/5.jpg',])
    demo = gr.Interface(fn = seg_predict,inputs = [gr.Image(type='pil')
                                                   ],
                                        outputs = "image",
                                        examples = ['examples/1.jpg','examples/2.jpg','examples/3.jpg','examples/4.jpg','examples/5.jpg',]
                                                       )
    demo.launch()
部署效果如下
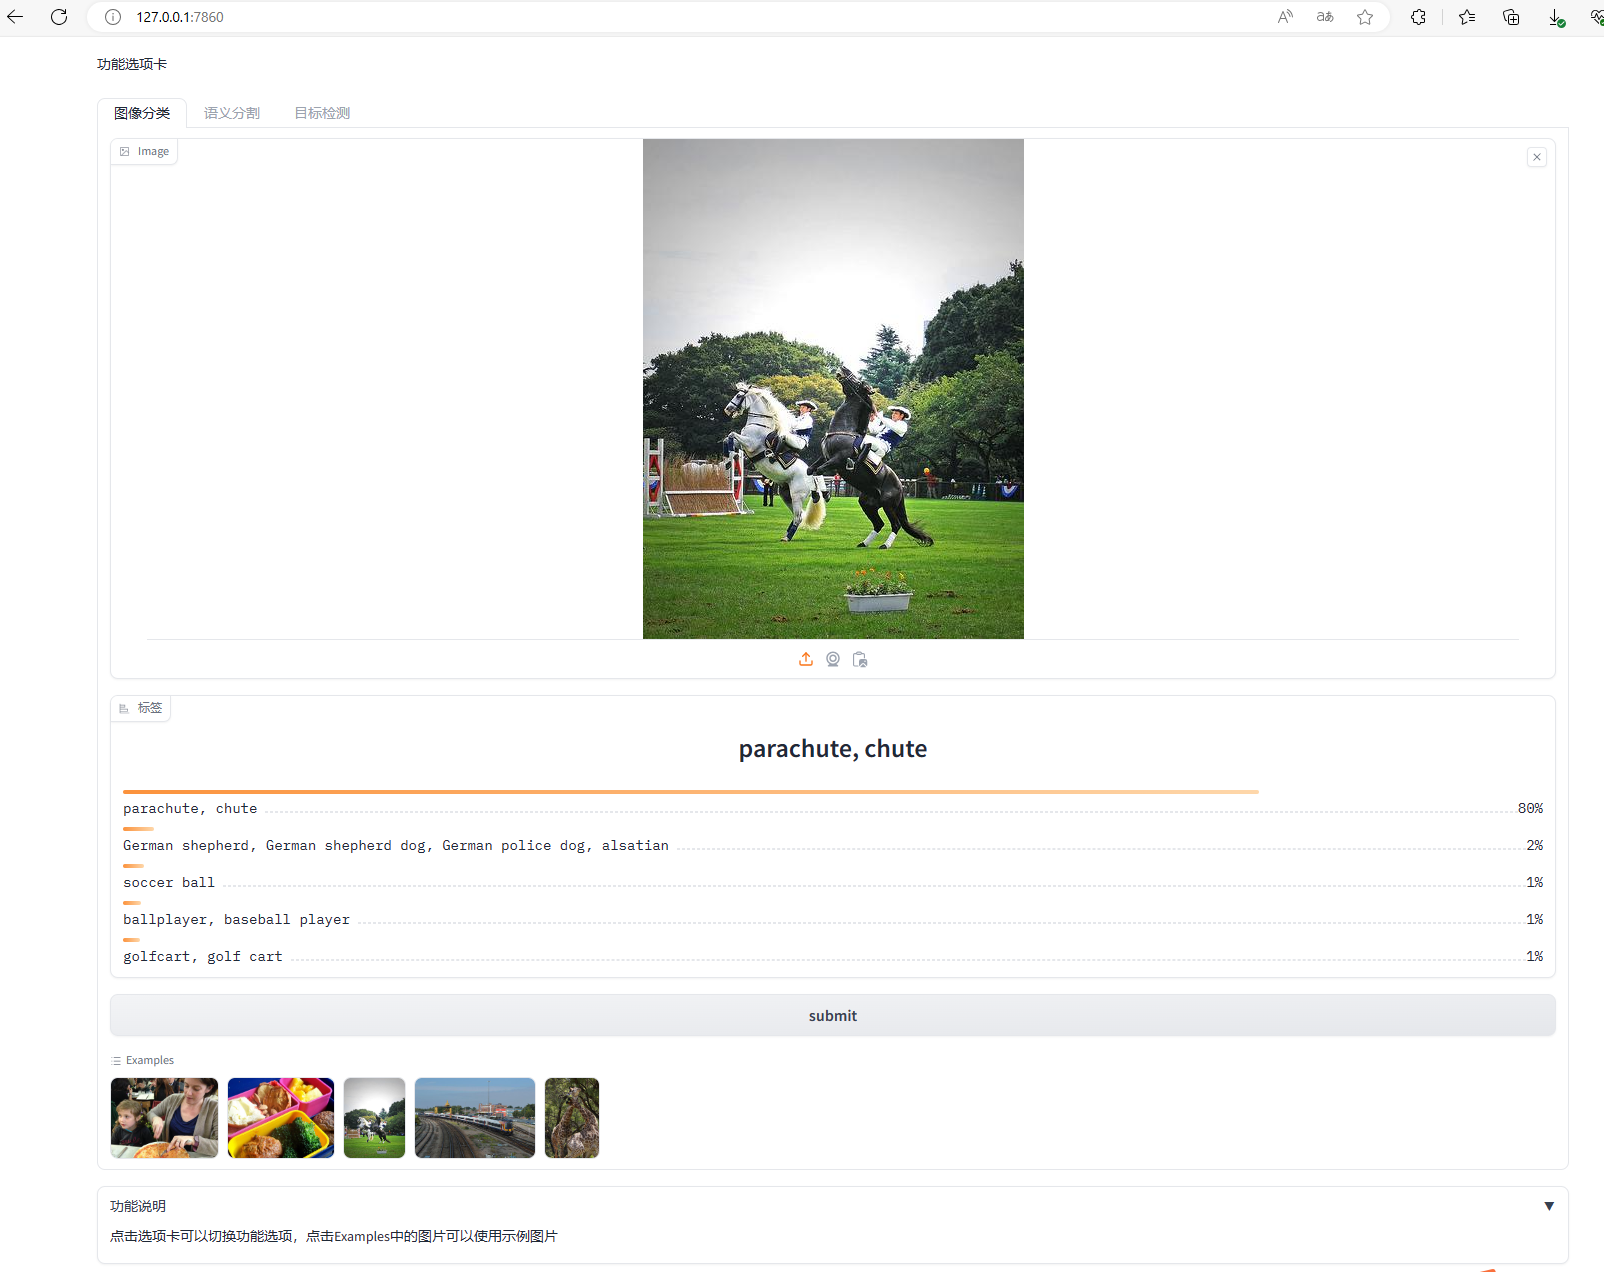
3、同时部署多个模型
3.1 部署代码
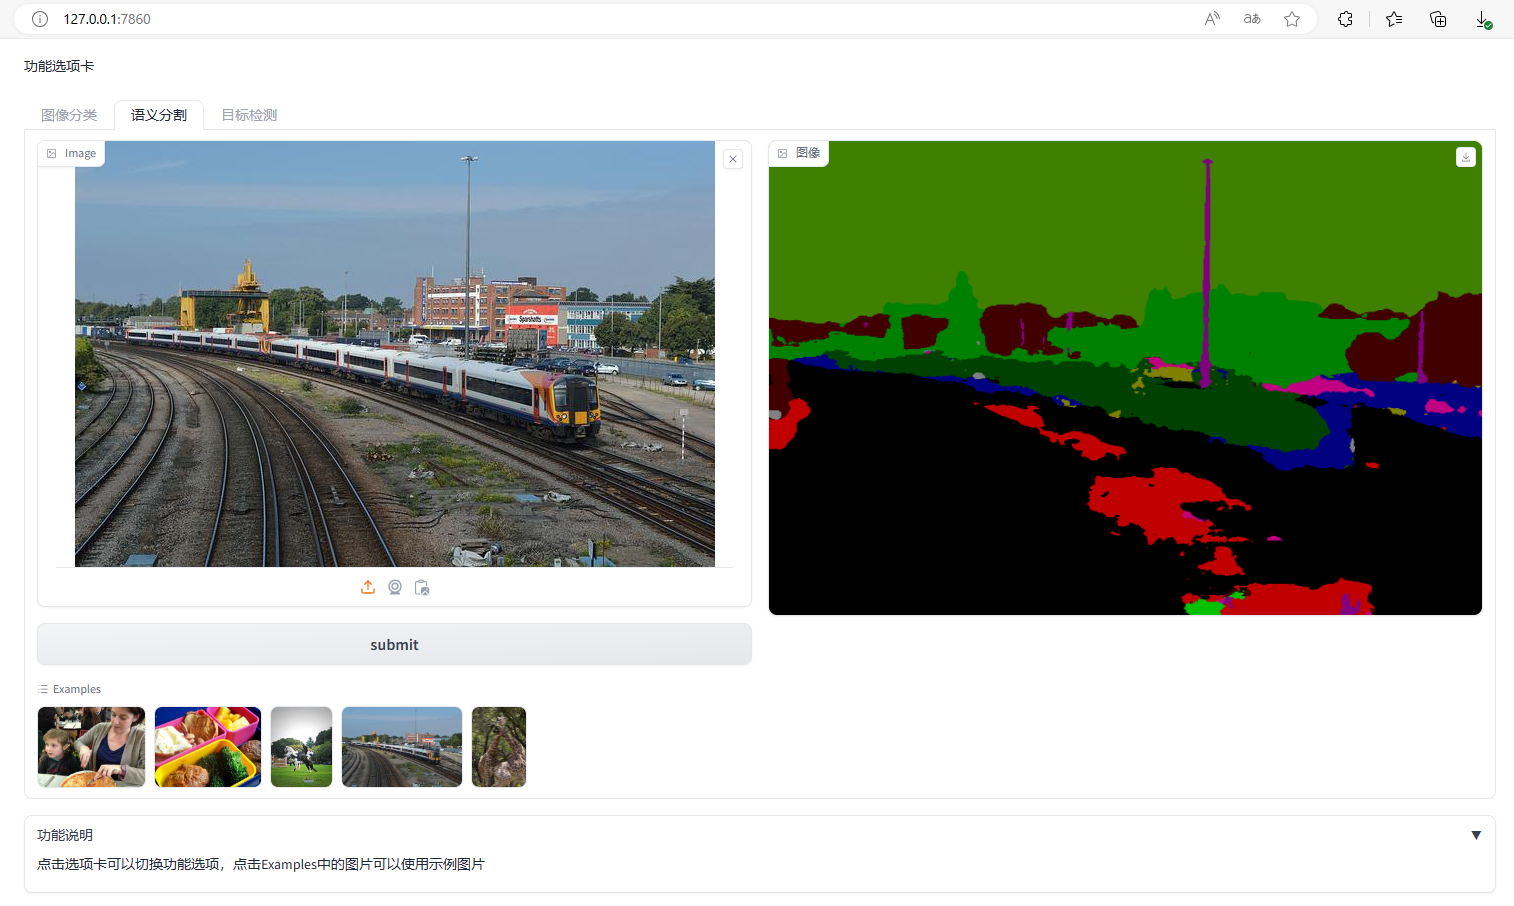
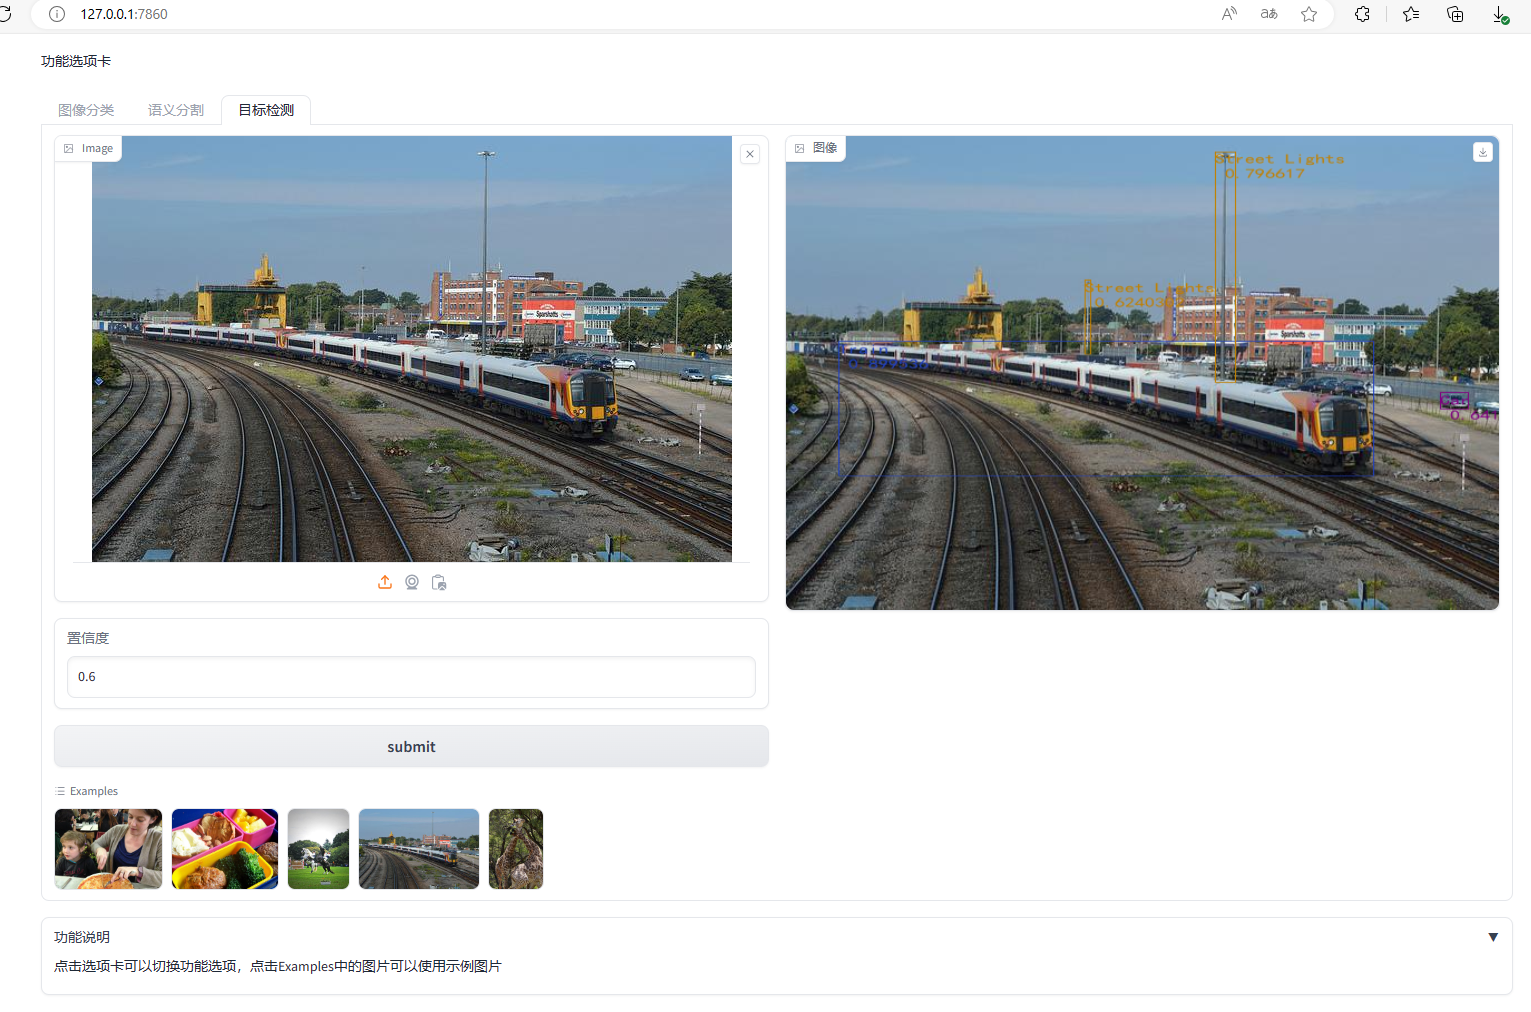
通过以下代码可以用选项卡的形式,同时部署3个模型。
以下代码中,通过with gr.Tab("图像分类"):可以开启一个新的选项卡,通过with gr.Row():可以强制是控件在同一行,通过with gr.Column():可以强制使控件在同一列。具体效果图见章节3.2
from ppDeploy import *
import gradio as gr
from PIL import Image


with gr.Blocks() as demo:
    gr.Markdown("功能选项卡")
    with gr.Tab("图像分类"):
        cls_input = gr.Image(type='pil')
        cls_button = gr.Button("submit",)
        cls_output = gr.Label(num_top_classes=5)
        gr.Examples(
                        examples=['examples/1.jpg','examples/2.jpg','examples/3.jpg','examples/4.jpg','examples/5.jpg',],
                        inputs=[cls_input]
                    )

    with gr.Tab("语义分割"):
        with gr.Row():
            with gr.Column():
                seg_input = gr.Image(type='pil')
                seg_button = gr.Button("submit")
            with gr.Column():
                seg_output = gr.Image(type='pil')
        gr.Examples(
                        examples=['examples/1.jpg','examples/2.jpg','examples/3.jpg','examples/4.jpg','examples/5.jpg',],
                        inputs=[seg_input]
                    )

    with gr.Tab("目标检测"):
        with gr.Row():
            with gr.Column():
                det_input_image = gr.Image(type='pil')
                det_input_number = gr.Number(precision=2,minimum=0.01,maximum=1,value=0.3,label='置信度')
                det_button = gr.Button("submit")
            with gr.Column():
                det_output = gr.Image(type='pil')
        gr.Examples(
                        examples=['examples/1.jpg','examples/2.jpg','examples/3.jpg','examples/4.jpg','examples/5.jpg',],
                        inputs=[det_input_image]
                    )
        #[['examples/1.jpg'],['examples/2.jpg'],['examples/3.jpg'],['examples/4.jpg'],['examples/5.jpg'],['examples/6.jpg'],]

    with gr.Accordion("功能说明"):
        gr.Markdown("点击选项卡可以切换功能选项,点击Examples中的图片可以使用示例图片")

    cls=clsModel("model/resnet50/",'imagenet1000.txt',imgsz=256)
    det=detModel("model/ppyoloe_m/",'object365.txt',imgsz=640)
    seg=segModel("model/segformerb1/",imgsz=1024)

    cls_button.click(cls.forword, inputs=cls_input, outputs=cls_output)
    seg_button.click(seg.forword, inputs=seg_input, outputs=seg_output)
    det_button.click(det.forword, inputs=[det_input_image,det_input_number], outputs=det_output)

if __name__ == "__main__":
    demo.launch()
3.2 部署效果
图像分类效果
语义分割效果
目标检测效果


 1728
1728

 被折叠的 条评论
为什么被折叠?
被折叠的 条评论
为什么被折叠?
 到【灌水乐园】发言


