


第四讲:
GDB
调试器
前言:
GDB(GNU Debugger)
是一个用来
调试
C/C++
程序
的功能强大的
调试器
,是
Linux
系统开发
C/C++
最常用的调试器
程序员可以
使用
GDB
来跟踪程序中的错误
,从而减少程序员的工作量。
Linux
开发
C/C++
一定要熟悉
GDB
VSCode
是通过调用
GDB
调试器来实现
C/C++
的调试工作的;
Windows
系统中,常见的集成开发环境(
IDE
),如
VS
、
VC
等,它们内部已经嵌套了相应的调试
器。
GDB
主要功能:
设置
断点
(
断点可以是条件表达式
)
使程序在指定的代码行上暂停执行,便于观察
单步
执行程序,便于调试
查看程序中变量值的变化
动态改变程序的执行环境
分析崩溃程序产生的
core
文件
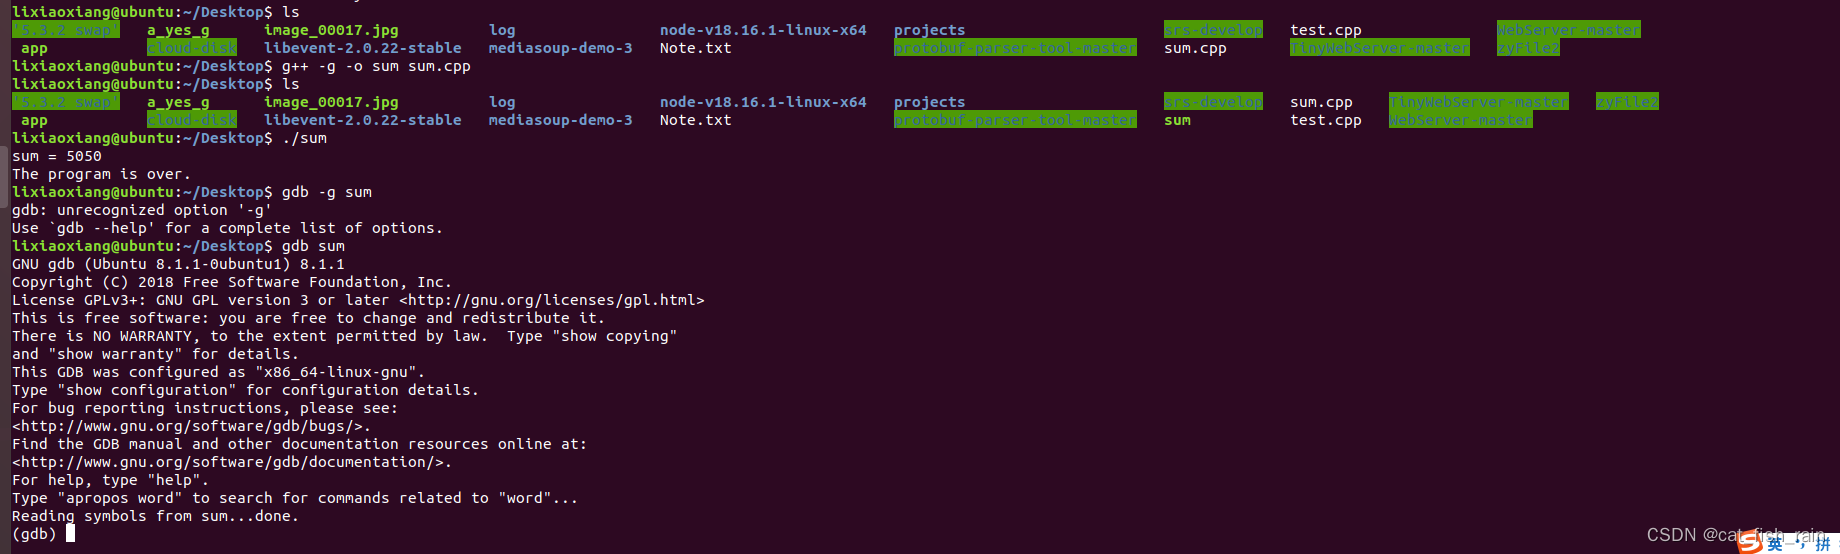
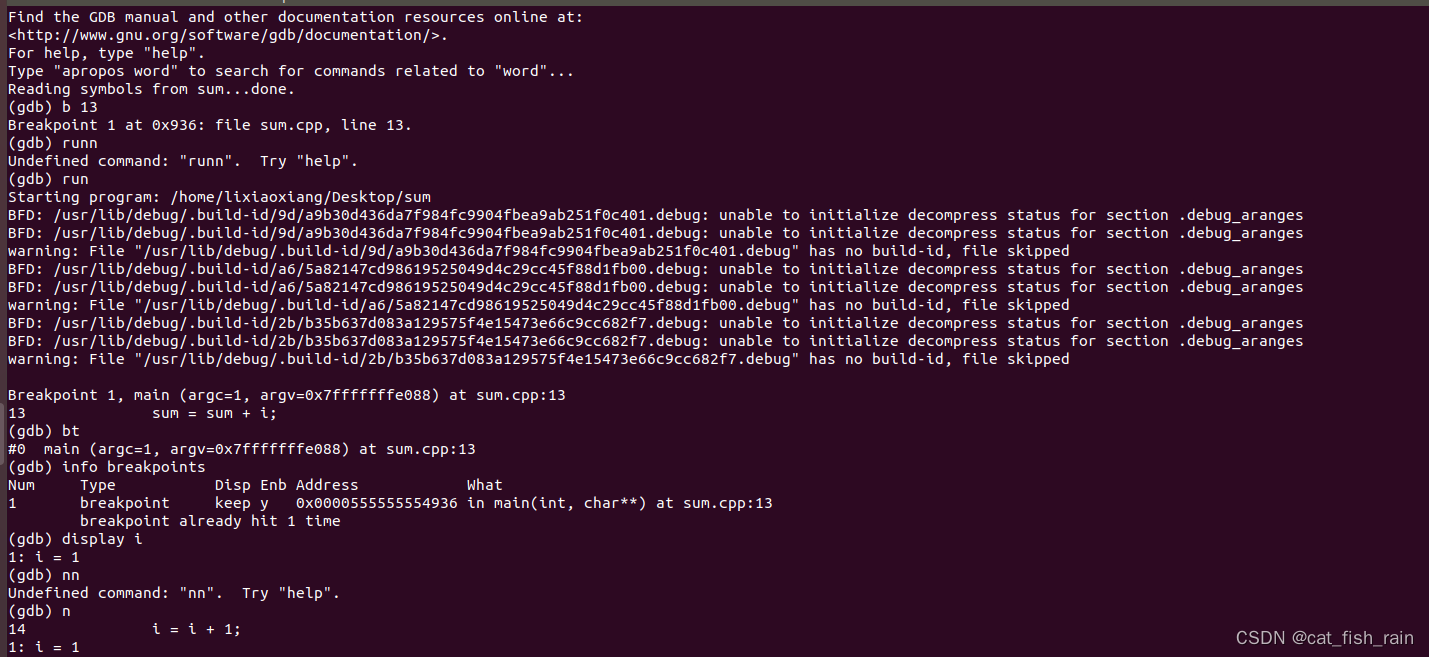
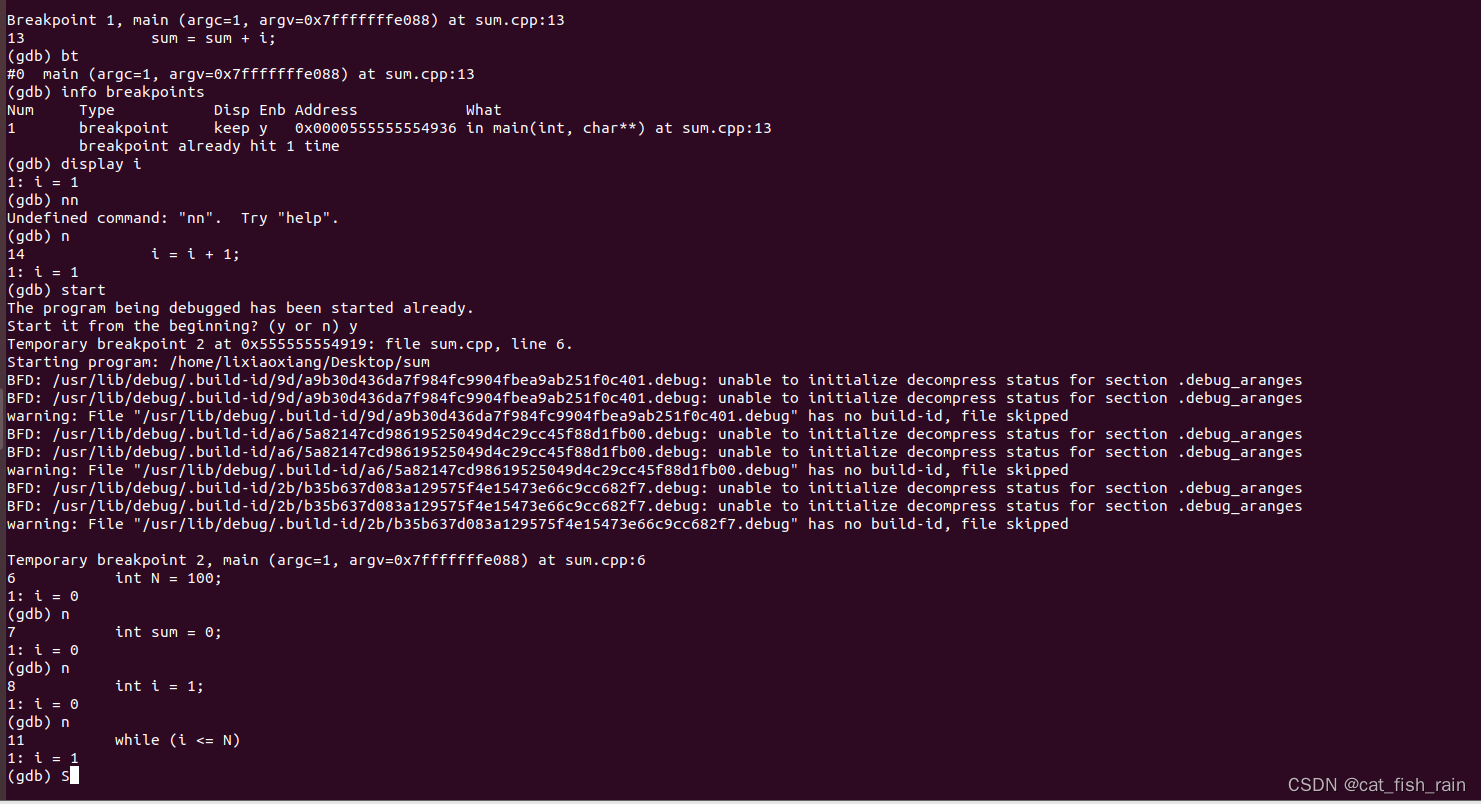
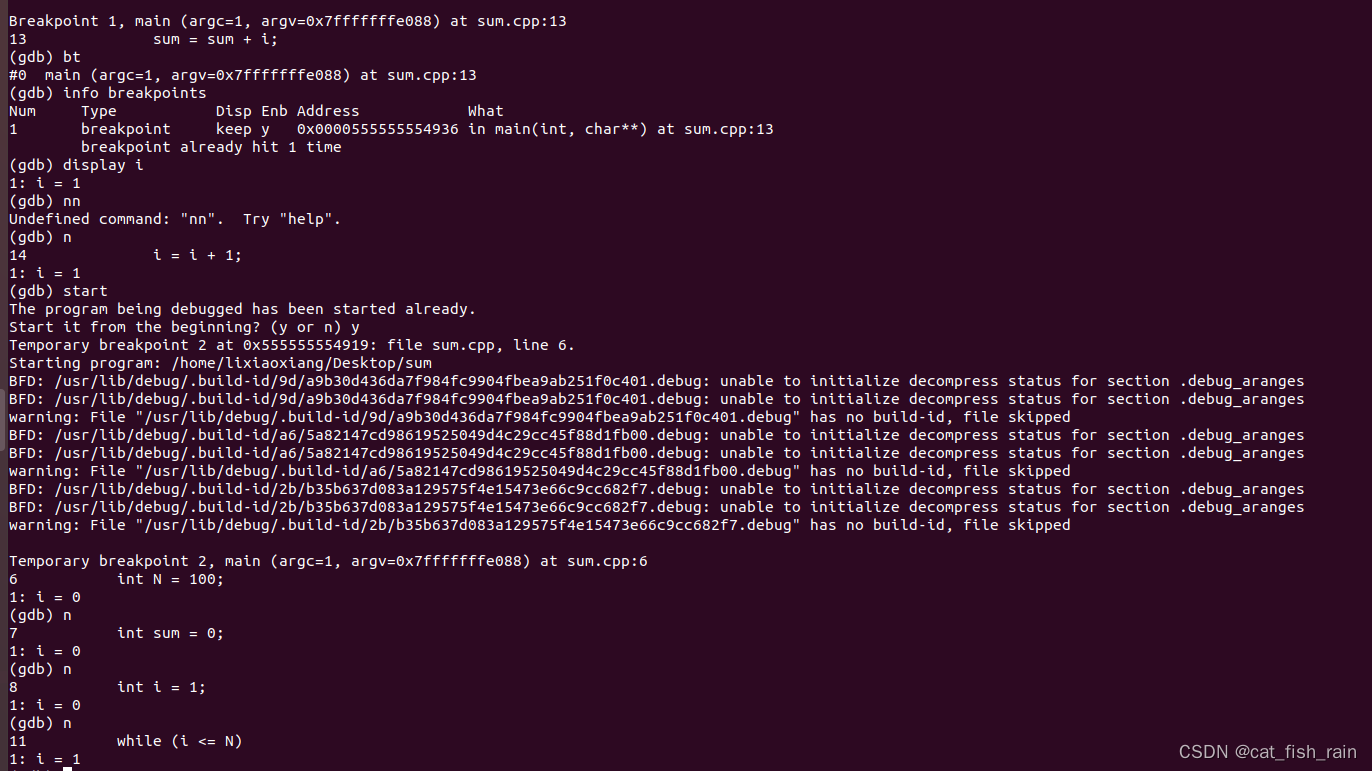
4.1 常用调试命令参数
调试开始:执行
gdb [exefilename]
,进入
gdb 调试程序,其中exefilename为要调试的可执行文件名。
## 以下命令后括号内为命令的简化使用,比如 run( r ),直接输入命令r 就代表命令run(gdb) help (h) # 查看命令帮助,具体命令查询在 gdb 中输入 help + 命令。(gdb) run(r) # 重新开始运行文件( run-text :加载文本文件, run-bin :加载二进制文件)$(gdb) start # 单步执行,运行程序,停在第一行执行语句(gdb) list(l) # 查看原代码( list-n, 从第 n 行开始查看代码。 list+ 函数名:查看具体函数)(gdb) set # 设置变量的值(gdb) next(n) # 单步调试(逐过程,函数直接执行)(gdb) step(s) # 单步调试(逐语句:跳入自定义函数内部执行)(gdb) backtrace(bt) # 查看函数的调用的栈帧和层级关系(gdb) frame(f) # 切换函数的栈帧(gdb) info(i) # 查看函数内部局部变量的数值(gdb) finish # 结束当前函数,返回到函数调用点(gdb) continue(c) # 继续运行(gdb) print(p) # 打印值及地址(gdb) quit(q) # 退出 gdb(gdb) break + num(b) # 在第 num 行设置断点(gdb) info breakpoints # 查看当前设置的所有断点(gdb) delete breakpoints num(d) # 删除第 num 个断点(gdb) display # 追踪查看具体变量值(gdb) undisplay # 取消追踪观察变量(gdb) watch # 被设置观察点的变量发生修改时,打印显示(gdb) i watch # 显示观察点(gdb) enable breakpoints # 启用断点(gdb) disable breakpoints # 禁用断(gdb) x # 查看内存 x/20xw 显示20个单元, 16 进制, 4 字节每单元(gdb) run argv[1] argv[2](gdb) set follow-fork-mode child.
Tips:
1.
编译程序时需要加上
-g
,之后才能用
gdb
进行调试:
gcc -g main.c -o main
2.
回车键:重复上一命令.
4.2 【实战】命令行调试
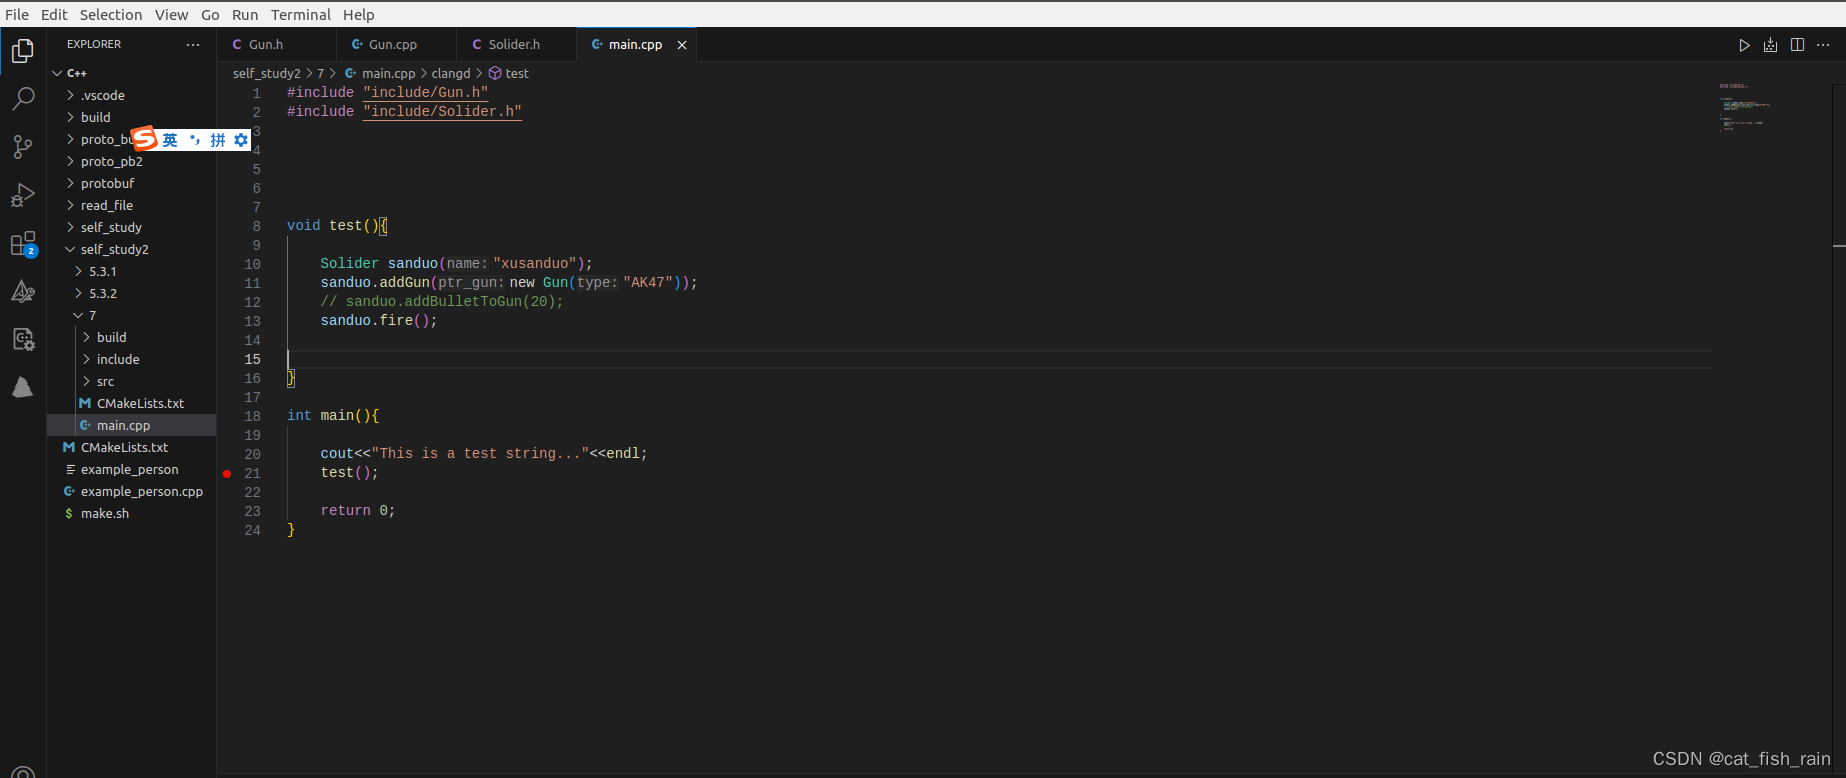
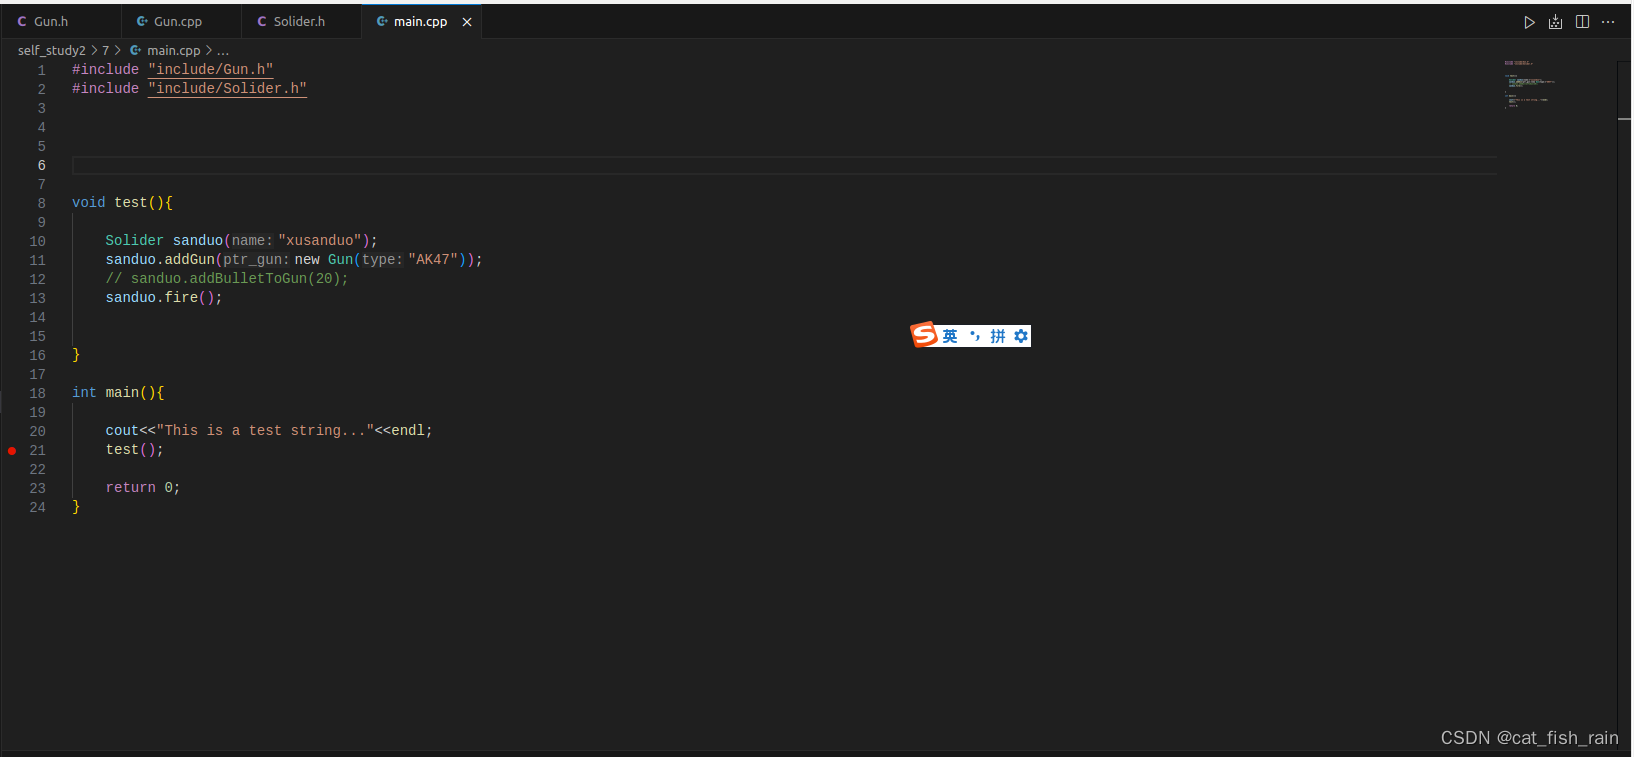
给出一段简单代码,准备调试。
#include <iostream>
using namespace std;
int main(int argc,char **argv)
{
    int N = 100;
    int sum = 0;
    int i = 1;

// calculate sum from 1 to 100
    while (i <= N)
   {
        sum = sum + i;
        i = i + 1;
   }
    cout << "sum = " << sum << endl;
    cout << "The program is over."   << endl;

    return 0;
}
第五讲:
IDE - VSCode

5.1 界面介绍
1.
侧边栏

2.
菜单栏
3.
编辑区
4.
状态栏
![]()
5.2 插件安装
以下三款插件是在
Linux
下开发
C/C++
的三款必备插件
~
C/C++
CMake
CMake Tools
5.3 快捷键
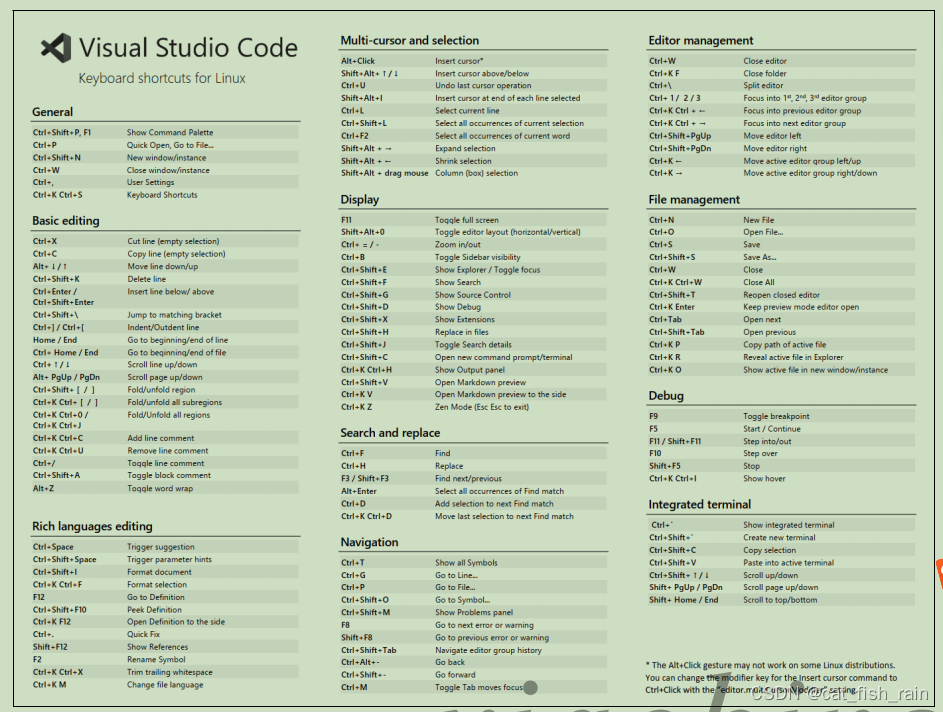
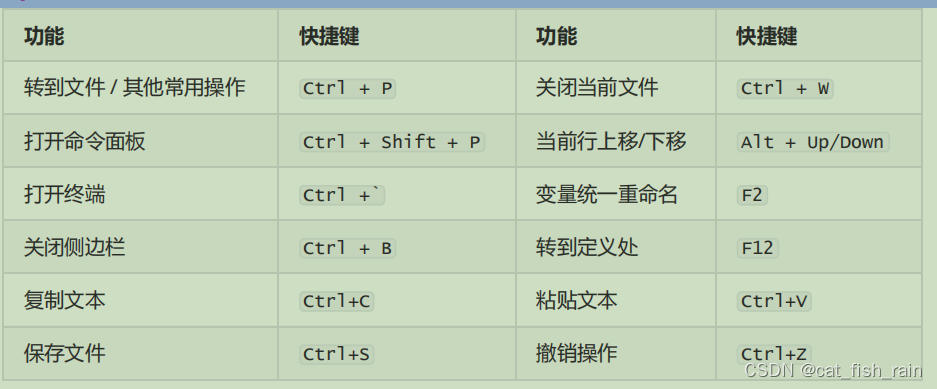
在
Ctrl+P
窗口下还可以
:
直接输入文件名,跳转到文件
?
列出当前可执行的动作
!
显示
Errors
或
Warnings
,也可以
Ctrl+Shift+M
:
跳转到行数,也可以
Ctrl+G
直接进入
@
跳转到
symbol
(搜索变量或者函数),也可以
Ctrl+Shift+O
直接进入
@
根据分类跳转
symbol
,查找属性或函数,也可以
Ctrl+Shift+O
后输入
:
进入
#
根据名字查找
symbol
,也可以
Ctrl+T。
快捷键:编辑器与窗口管理
1.
打开一个新窗口:
Ctrl+Shift+N
2.
关闭窗口:
Ctrl+Shift+W
3.
同时打开多个编辑器(查看多个文件)
4.
新建文件
Ctrl+N
5.
文件之间切换
Ctrl+Tab
6.
切出一个新的编辑器(最多
3
个)
Ctrl+\
,也可以按住
Ctrl
鼠标点击
Explorer
里的文件名
7.
左中右
3
个编辑器的快捷键
Ctrl+1 Ctrl+2 Ctrl+3
8.
3
个编辑器之间循环切换
Ctrl+
9.
编辑器换位置,
Ctrl+k
然后按
Left
或
Right
↓
代码编辑相关的快捷键
↓
快捷键:格式调整
1.
代码行缩进
Ctrl+[
、
Ctrl+]
2.
Ctrl+C
、
Ctrl+V
复制或剪切当前行
/
当前选中内容
3.
代码格式化:
Shift+Alt+F
,或
Ctrl+Shift+P
后输入
format code
4.
上下移动一行:
Alt+Up
或
Alt+Down
5.
向上向下复制一行:
Shift+Alt+Up
或
Shift+Alt+Down
6.
在当前行下边插入一行
Ctrl+Enter
7.
在当前行上方插入一行
Ctrl+Shift+Enter
快捷键:光标相关
1.
移动到行首:
Home
2.
移动到行尾:
End
3.
移动到文件结尾:
Ctrl+End
4.
移动到文件开头:
Ctrl+Home
5.
移动到定义处:
F12
6.
定义处缩略图:只看一眼而不跳转过去
Alt+F12
7.
移动到后半个括号:
Ctrl+Shift+]
8.
选择从光标到行尾:
Shift+End
9.
选择从行首到光标处:
Shift+Home
10.
删除光标右侧的所有字:
Ctrl+Delete
11.
扩展
/
缩小选取范围:
Shift+Alt+Left
和
Shift+Alt+Right
12.
多行编辑
(
列编辑
)
:
Alt+Shift+
鼠标左键
,
Ctrl+Alt+Down/Up
13.
同时选中所有匹配:
Ctrl+Shift+L
14.
Ctrl+D
下一个匹配的也被选中
(
在
sublime
中是删除当前行,后面自定义快键键中,设置与
Ctrl+Shift+K
互换了
)
15.
回退上一个光标操作:
Ctrl+U
快捷键:重构代码
1.
找到所有的引用:
Shift+F12
2.
同时修改本文件中所有匹配的:
Ctrl+F12
3.
重命名:比如要修改一个方法名,可以选中后按
F2
,输入新的名字,回车,会发现所有的文件都修改了
4.
跳转到下一个
Error
或
Warning
:当有多个错误时可以按
F8
逐个跳转
5.
查看
diff
: 在
explorer
里选择文件右键
Set file to compare
,然后需要对比的文件上右
键选择
Compare with file_name_you_chose
快捷键:查找替换
1.
查找
Ctrl+F
2.
查找替换
Ctrl+H
3.
整个文件夹中查找
Ctrl+Shift+F
快捷键:显示相关
1.
全屏:
F11
2. zoomIn/zoomOut
:
Ctrl +/
-
3.
侧边栏显
/
隐:
Ctrl+B
4.
显示资源管理器
Ctrl+Shift+E
5.
显示搜索
Ctrl+Shift+F
6.
显示
Git
Ctrl+Shift+G
7.
显示
Debug
Ctrl+Shift+D
8.
显示
Output
Ctrl+Shift+U
第六讲:CMake
前言:
CMake
是一个
跨平台
的安装
编译工具
,可以用
简单
的语句来描述
所有平台
的安装
(
编译过程
)
。
CMake
可以说已经成为
大部分
C++
开源项目标配
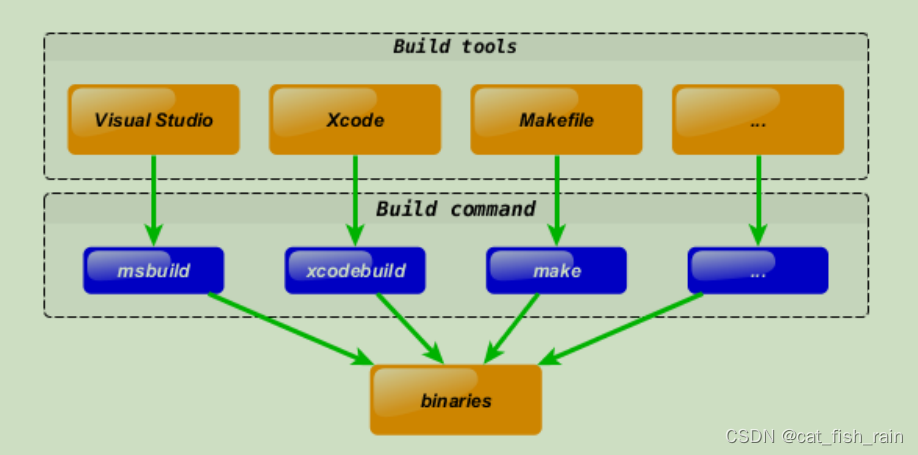
6.1 Cross-platform development
Let’s assume you have some cross-platform project with C++ code shared along different
platforms/IDEs. Say you use
Visual Studio
on Windows,
Xcode
on OSX and
Makefile
for
Linux:
What you will do if you want to add new
bar.cpp
source file? You have to add it to every tool you
use:
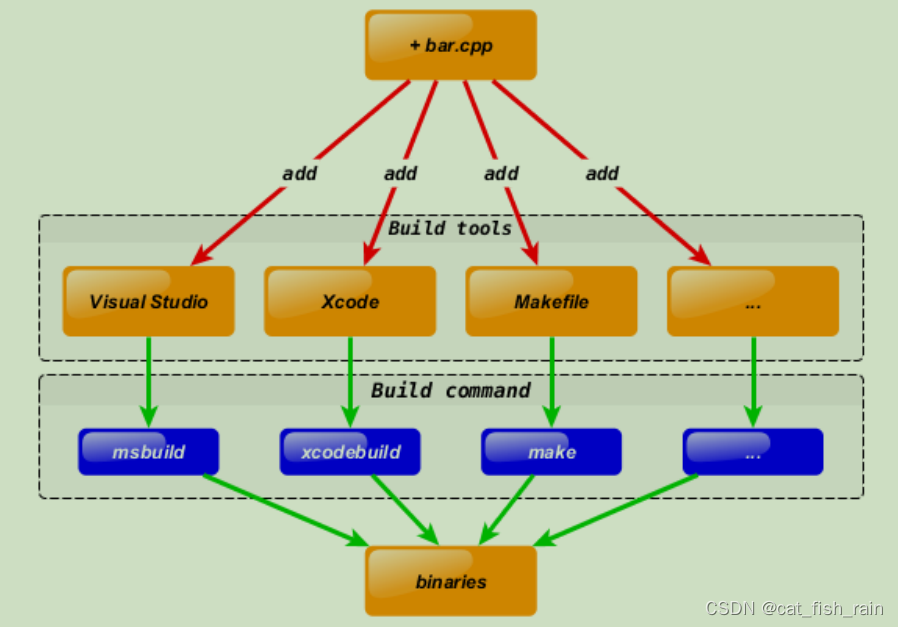
To keep the environment consistent you have to do the similar update several times. And the
most important thing is that you have to do it
manually
(arrow marked with a red color on the
diagram in this case). Of course such approach is error prone and not flexible.
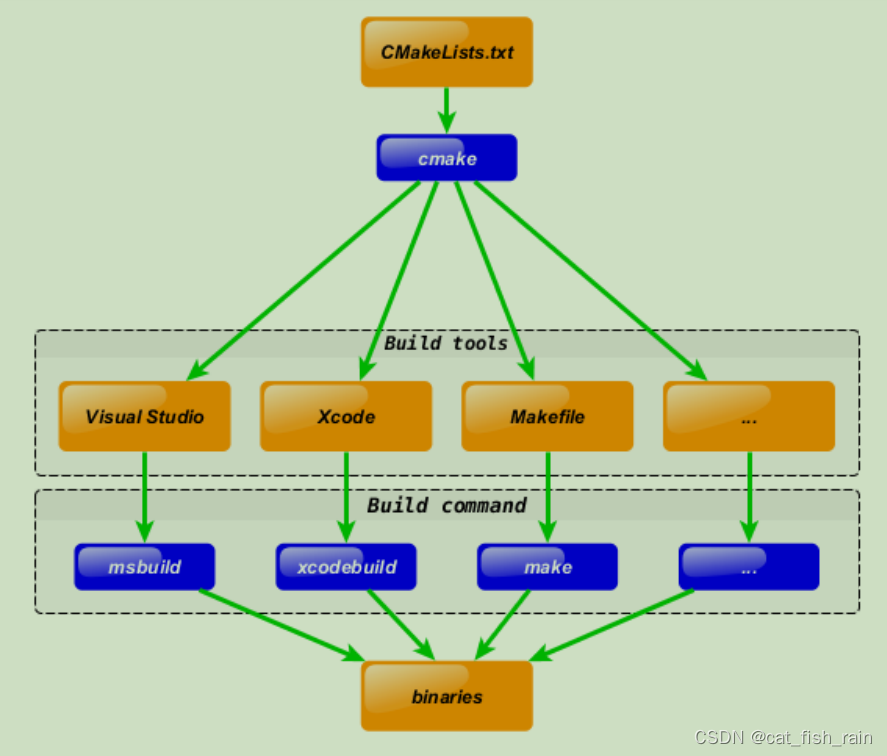
CMake solve this design flaw by adding extra step to development process. You can describe your project in CMakeLists.txt
file and use
CMake
to generate tools you currently interested in using cross-platform
CMake
code:
Same action - adding new bar.cpp file, will be done in one step now:
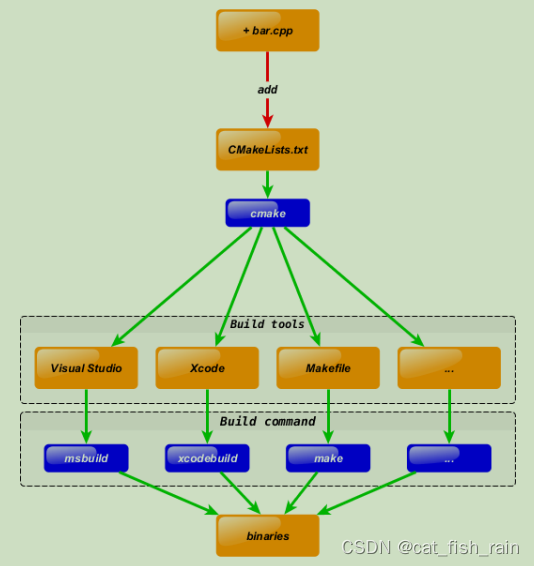
Note that the bottom part of the diagram
was not changed
. I.e. you still can keep using your
favorite tools like
Visual Studio/msbuild
,
Xcode/xcodebuild
and
Makefile/make
!
6.2 语法特性介绍
基本语法格式:指令
(
参数
1
参数
2...)
参数使用
括弧
括起
参数之间使用
空格
或
分号
分开
指令是大小写无关的,参数和变量是大小写相关的
set(HELLO hello.cpp)
add_executable(hello main.cpp hello.cpp)
ADD_EXECUTABLE(hello main.cpp ${HELLO})
变量使用
${}
方式取值,但是在
IF
控制语句中是直接使用变量名
6.3 重要指令和CMake常用变量
6.3.1 重要指令
cmake_minimum_required
-
指定
CMake
的最小版本要求
语法:
cmake_minimum_required(VERSION versionNumber [FATAL_ERROR])
# CMake最小版本要求为2.8.3
cmake_minimum_required(VERSION 2.8.3)
project
-
定义工程名称,并可指定工程支持的语言
语法:
project(projectname [CXX] [C] [Java])
# 指定工程名为HELLOWORLD
project(HELLOWORLD)
set
-
显式的定义变量
语法:
set(VAR [VALUE] [CACHE TYPE DOCSTRING [FORCE]])
#
定义
SRC
变量,其值为
sayhello.cpp hello.cpp
# 定义SRC变量,其值为sayhello.cpp hello.cpp
set(SRC sayhello.cpp hello.cpp)
nclude_directories - 向工程添加多个特定的头文件搜索路径 --->相当于指定g++编译器的-I参数
语法: include_directories([AFTER|BEFORE] [SYSTEM] dir1 dir2 ...)# 将/usr/include/myincludefolder 和 ./include 添加到头文件搜索路径
include_directories(/usr/include/myincludefolder ./include)
link_directories
-
向工程添加多个特定的库文件搜索路径
--->
相当于指定
g++
编译器的
-L
参数
语法:
link_directories(dir1 dir2 ...)
# 将/usr/lib/mylibfolder 和 ./lib 添加到库文件搜索路径
link_directories(/usr/lib/mylibfolder ./lib)
add_library
-
生成库文件
语法:
add_library(libname [SHARED|STATIC|MODULE] [EXCLUDE_FROM_ALL]
source1 source2 ... sourceN)
# 通过变量 SRC 生成 libhello.so 共享库
add_library(hello SHARED ${SRC})
add_compile_options - 添加编译参数
语法:add_compile_options(
# 添加编译参数 -Wall -std=c++11 -O2
add_compile_options(-Wall -std=c++11 -O2
)
add_executable
-
生成可执行文件
语法:add_executable(exename source1 source2 ... sourceN)# 编译main.cpp生成可执行文件main
add_executable(main main.cpp)
target_link_libraries
-
为
target
添加需要链接的共享库
--->
相同于指定
g++
编译器
-l
参数
语法:
target_link_libraries(target library1<debug | optimized> library2...)
# 将hello动态库文件链接到可执行文件main
target_link_libraries(main hello)
add_subdirectory
-
向当前工程添加存放源文件的子目录,并可以指定中间二进制和目标二进制
存放的位置。
语法:
add_subdirectory(source_dir [binary_dir] [EXCLUDE_FROM_ALL])
# 添加src子目录,src中需有一个CMakeLists.txt
add_subdirectory(src)
aux_source_directory
-
发现一个目录下所有的源代码文件并将列表存储在一个变量中,这个指
令临时被用来自动构建源文件列表。
语法: aux_source_directory(dir VARIABLE)# 定义SRC变量,其值为当前目录下所有的源代码文件
aux_source_directory(. SRC)
# 编译SRC变量所代表的源代码文件,生成main可执行文件
add_executable(main ${SRC})6.3.2 CMake常用变量
CMAKE_C_FLAGS
gcc
编译选项
CMAKE_CXX_FLAGS
g++
编译选项
# 在CMAKE_CXX_FLAGS编译选项后追加-std=c++11
set( CMAKE_CXX_FLAGS "${CMAKE_CXX_FLAGS} -std=c++11")
CMAKE_BUILD_TYPE
编译类型
(Debug, Release)
# 设定编译类型为debug,调试时需要选择debug
set(CMAKE_BUILD_TYPE Debug)
# 设定编译类型为release,发布时需要选择release
set(CMAKE_BUILD_TYPE Release)
CMAKE_BINARY_DIR
PROJECT_BINARY_DIR
_BINARY_DIR
1. 这三个变量指代的内容是一致的。
2. 如果是 in source build,指的就是工程顶层目录。
3. 如果是 out-of-source 编译,指的是工程编译发生的目录。
# 编译main.cpp生成可执行文件main
add_executable(main main.cpp)
# 将hello动态库文件链接到可执行文件main
target_link_libraries(main hello)
# 添加src子目录,src中需有一个CMakeLists.txt
add_subdirectory(src)
# 定义SRC变量,其值为当前目录下所有的源代码文件
aux_source_directory(. SRC)
# 编译SRC变量所代表的源代码文件,生成main可执行文件
add_executable(main ${SRC})
# 在CMAKE_CXX_FLAGS编译选项后追加-std=c++11
set( CMAKE_CXX_FLAGS "${CMAKE_CXX_FLAGS} -std=c++11")
# 设定编译类型为debug,调试时需要选择debug
set(CMAKE_BUILD_TYPE Debug)
# 设定编译类型为release,发布时需要选择release
set(CMAKE_BUILD_TYPE Release)4. PROJECT_BINARY_DIR 跟其他指令稍有区别,不过现在,你可以理解为他们是一致
的。CMAKE_SOURCE_DIR
PROJECT_SOURCE_DIR
_SOURCE_DIR
1. 这三个变量指代的内容是一致的,不论采用何种编译方式,都是工程顶层目录。
2. 也就是在 in source build时,他跟 CMAKE_BINARY_DIR 等变量一致。
3. PROJECT_SOURCE_DIR 跟其他指令稍有区别,现在,你可以理解为他们是一致的。
CMAKE_C_COMPILER
:指定
C
编译器
CMAKE_CXX_COMPILER
:指定
C++
编译器
EXECUTABLE_OUTPUT_PATH
:可执行文件输出的存放路径
LIBRARY_OUTPUT_PATH
:库文件输出的存放路径
6.4 CMake编译工程
CMake
目录结构:项目主目录存在一个
CMakeLists.txt
文件
两种方式设置编译规则
:
1.
包含源文件的子文件夹
包含
CMakeLists.txt
文件,主目录的
CMakeLists.txt
通过
add_subdirectory
添加子目录即可;
2.
包含源文件的子文件夹
未包含
CMakeLists.txt
文件,子目录编译规则体现在主目录的
CMakeLists.txt
中;
6.4.1 编译流程
在
linux
平台下使用
CMake
构建
C/C++
工程的流程如下
:
手动编写
CMakeLists.txt
。
执行命令
cmake PATH
生成
Makefile ( PATH
是顶层
CMakeLists.txt
所在的目录
)
。
执行命令
make
进行编译。
# important tips
.
#
表示当前目录
./
#
表示当前目录
..
#
表示上级目录
../
#
表示上级目录
6.4.2 两种构建方式
内部构建
(in-source build)
:不推荐使用
内部构建会在同级目录下产生一大堆中间文件,这些中间文件并不是我们最终所需要的,和工程源
文件放在一起会显得杂乱无章。
## 内部构建
# 在当前目录下,编译本目录的CMakeLists.txt,生成Makefile和其他文件
cmake .
# 执行make命令,生成target
make
外部构建
(out-of-source build)
:
推荐使用
将编译输出文件与源文件放到不同目录中。
## 外部构建
# 1. 在当前目录下,创建build文件夹
mkdir build
# 2. 进入到build文件夹
cd build
# 3. 编译上级目录的CMakeLists.txt,生成Makefile和其他文件
cmake ..
# 4. 执行make命令,生成target
make
6.5 【实战】CMake代码实践
针对第五章写的两个小项目来写对应的
CMakeLists.txt
6.5.1 最小CMake工程(5.3.1 目录)
目录结构
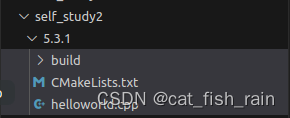
helloworld.cpp
#include <algorithm>
#include <iostream>
#include <string.h>
#include <sys/types.h>
#include <unistd.h>
#include <vector>
using namespace std;

int main(int argc, char *argv[]) {


    cout<<"hello world"<<endl;

    return 0;

}
CMakeLists.txt
# Set the minimum version of CMake that can be used
cmake_minimum_required(VERSION 3.0)
# Set the project name
project (HELLO)
# Add an executable
add_executable(hello_cmake main.cpp)
#命令 mkdir build ->cd build -> cmake ..(build 文件下生成makefile 内容) ->make 6.5.2 多目录工程 - 直接编译(5.3.2)
目录
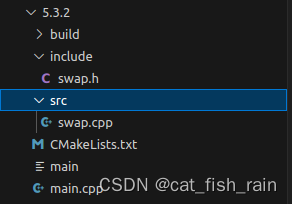
include 文件下
include/swap.h
#pragma once
#include <iostream>
using namespace std;

class swap11 {
private:
  int _a;
  int _b;

public:
  void run();
  void printInfo();

  swap11(int a, int b) {
    this->_a = a;
    this->_b = b;
  }
};
src/
#include "../include/swap.h"
// #include"swap.h"


void swap11::run(){

    int temp;
    temp=_a;
    _a=_b;
    _b=temp;

}


void swap11::printInfo(){

    cout<<"_a:"<<_a<<endl;
    cout<<"_b:"<<_b<<endl;


}
CMakeLists.txt.
# Set the minimum version of CMake that can be used
cmake_minimum_required(VERSION 3.0)
#project name
project(SWAP)
#head file pat
include_directories( include )

#source directory files to var
add_subdirectory( src DIR_SRCS )

#add executable file
add_executable(swap_02 ${TEST_MATH})

#add link library
target_link_libraries(${FS_BUILD_BINARY_PREFIX}sqrt ${LIBRARIES})6.5.3 多目录工程 - 生成库编译
# Set the minimum version of CMake that can be used
cmake_minimum_required(VERSION 3.0)
#project name
project(SWAP_LIBRARY)
#add compile options
add_compile_options("-Wall -std=c++11")
#set CMAKE_BUILD_TYPE
set( CMAKE_BUILD_TYPE Debug )
# set output binary path
set(EXECUTABLE_OUTPUT_PATH ${PROJECT_BINARY_DIR}/bin)
############################################################
# Create a library
############################################################
#Generate the static library from the library sources
add_library( swap_library STATIC src/Swap.cpp )
target_include_directories( swap_lib PUBLIC ${PROJECT_SOURCE_DIR}/include )
############################################################
# Create an executable
############################################################
# Add an executable with the above sources
add_executable( swap_01 main.cpp )
# link the new swap_01 target with the swap_lib target
target_link_libraries( swap_01 swap_liby )
#命令 mkdir build ->cd build -> cmake ..(build 文件下生成makefile 内容) ->make 


 1165
1165

 被折叠的 条评论
为什么被折叠?
被折叠的 条评论
为什么被折叠?
 到【灌水乐园】发言


