


lightmapper
The Lighting Team is going all-in on iteration speed. We designed the Progressive Lightmapper with that goal in mind. Our goal is to provide quick feedback on any changes that you make to the lighting in your project. In 2018.3 we introduced a preview of the GPU version of the Progressive Lightmapper. Now we’re heading towards the feature and visual quality parity with its CPU sibling. We aim to make the GPU version an order of magnitude faster than the CPU version. This brings interactive lightmapping to artistic workflows, with great improvements to team productivity.
照明团队全力以赴地提高迭代速度。 我们在设计渐进式光照贴图程序时就牢记了这一目标。 我们的目标是就您对项目中的照明所做的任何更改提供快速反馈。 在2018.3中,我们介绍了Progressive Lightmapper的GPU版本的预览版。 现在,我们正朝着功能和视觉质量与CPU同级一致的方向发展。 我们旨在使GPU版本比CPU版本快一个数量级。 这为艺术工作流程带来了互动式的灯光映射,极大地提高了团队的生产力。
With this in mind, we have chosen to use RadeonRays: an open source ray tracing library from AMD. Unity and AMD have collaborated on the GPU Lightmapper to implement several key features and optimizations. Namely: power sampling, rays compaction, and custom BVH traversal.
考虑到这一点,我们选择使用 RadeonRays :AMD的开源光线跟踪库。 Unity和AMD 合作开发了 GPU Lightmapper, 以实现多项关键功能和优化。 即:功率采样,射线压缩和自定义BVH遍历。
The design goal of the GPU Lightmapper was to offer the same features of the CPU Lightmapper while achieving higher performance:
GPU Lightmapper的设计目标是 在实现更高性能 的同时提供与 CPU Lightmapper 相同的功能 :
We know that iteration time is the key to empowering artists to improve visual quality and unleash creativity. Interactive lightmapping is the goal here. Not just impressive overall bake times, we also want the user experience to offer immediate feedback.
我们知道迭代时间是赋予艺术家改善视觉质量和释放创造力的关键。 交互式光照贴图是这里的目标。 不仅令人印象深刻的总体烘焙时间,我们还希望用户体验能够立即提供反馈。
We needed to solve a bunch of interesting problems to achieve this. In this post, we will explore some of the decisions we have made.
为此,我们需要解决许多有趣的问题。 在这篇文章中,我们将探讨我们已经做出的一些决定。
渐进式反馈 (Progressive feedback)
For the Lightmapper to offer progressive updates to the user, we needed to make some design decisions.
为了使Lightmapper向用户提供渐进式更新,我们需要做出一些设计决策。
没有预先计算或缓存的数据 (No precomputed or cached data)
We don’t cache irradiance or visibility when doing direct lighting (direct lighting could be cached and reused for indirect lighting). In general, we don’t cache any data and prefer computation steps that are small enough to not create stalls, and provide a progressive and interactive display while baking.
在进行直接照明时,我们不缓存辐照度或能见度(可以将直接照明缓存并重新用于间接照明)。 通常,我们不缓存任何数据,而是选择足够小的计算步骤以免产生停顿,并在烘焙时提供渐进式和交互式显示。
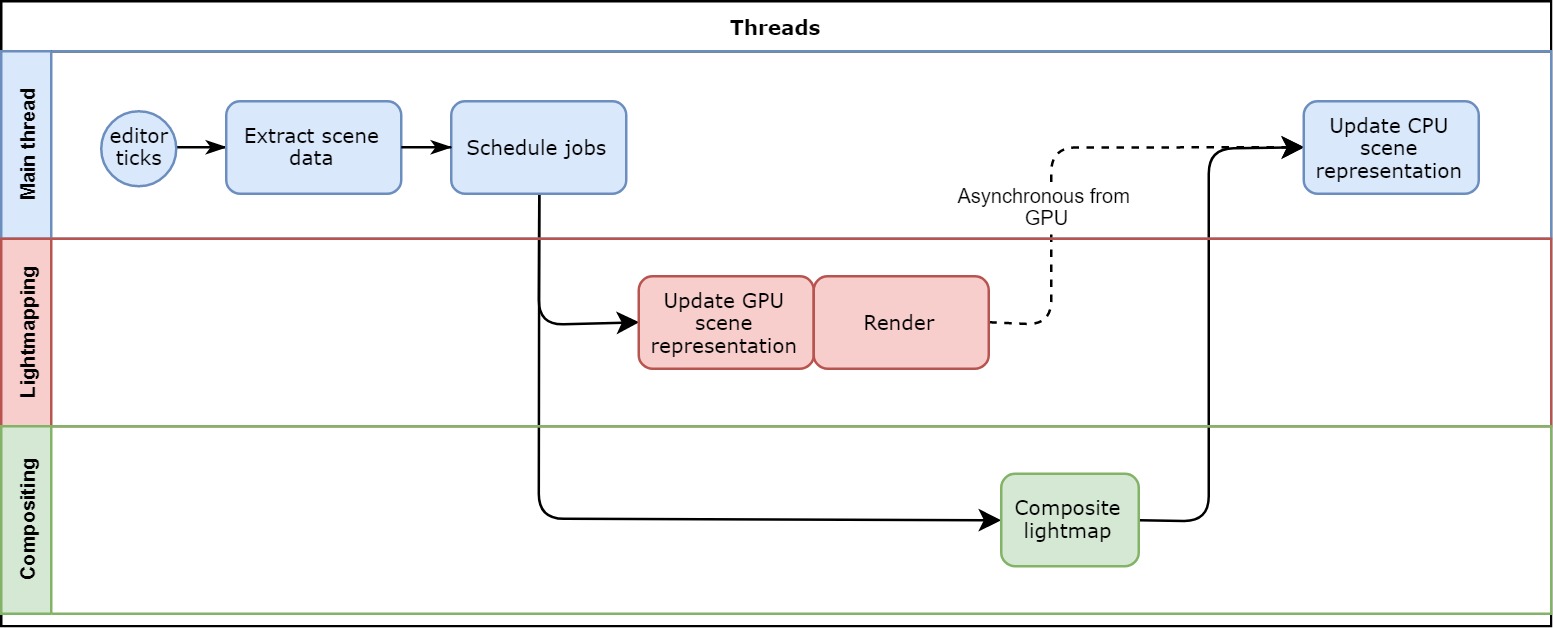
An overview of the control flow of the GPU Lightmapper. This producer/consumer approach allows the Scene to be continuously edited while the GPU Lightmapper is working asynchronously. The results can then be displayed in the editor when ready.
GPU Lightmapper的控制流概述。 这种生产者/消费者方法允许在GPU Lightmapper异步工作时对场景进行连续编辑。 准备好后,结果可以显示在编辑器中。
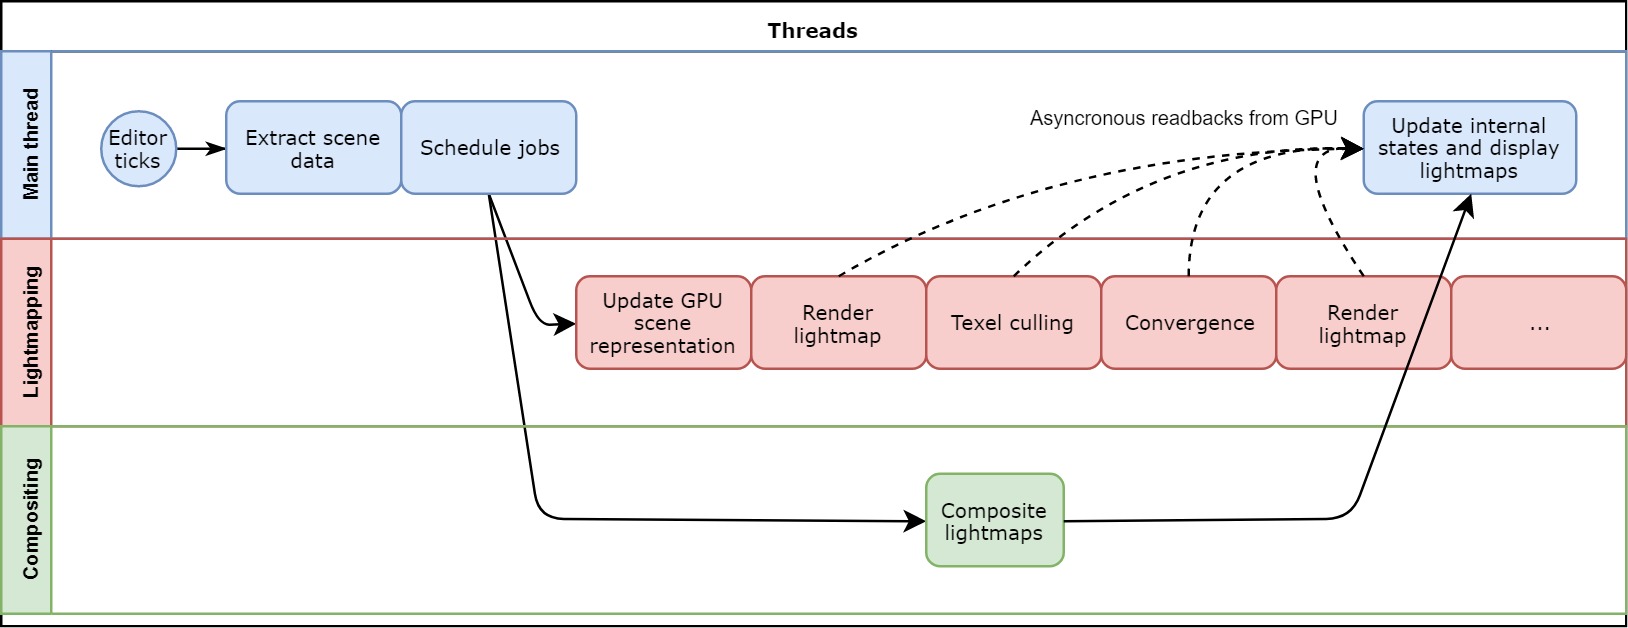
Scenes can potentially be very large and contain many lightmaps. To ensure that work is spent where it offers the most benefit to the user, it is important to focus baking on the currently visible area. To do this, we first detect which of the lightmaps contain most unconverged visible texels on a screen, then we render those lightmaps and prioritize the visible texels (off-screen texels will be baked once all the visible ones have converged).
场景可能非常大,并且包含许多光照贴图。 为了确保将工作花费在为用户带来最大利益的地方,将烘烤重点放在当前可见的区域上非常重要。 为此,我们首先检测屏幕上哪些光照贴图包含最不收敛的可见纹理像素,然后渲染这些光照贴图并对可见纹理像素进行优先级排序(所有可见可见像素融合后,屏幕外的纹理像素将被烘焙)。
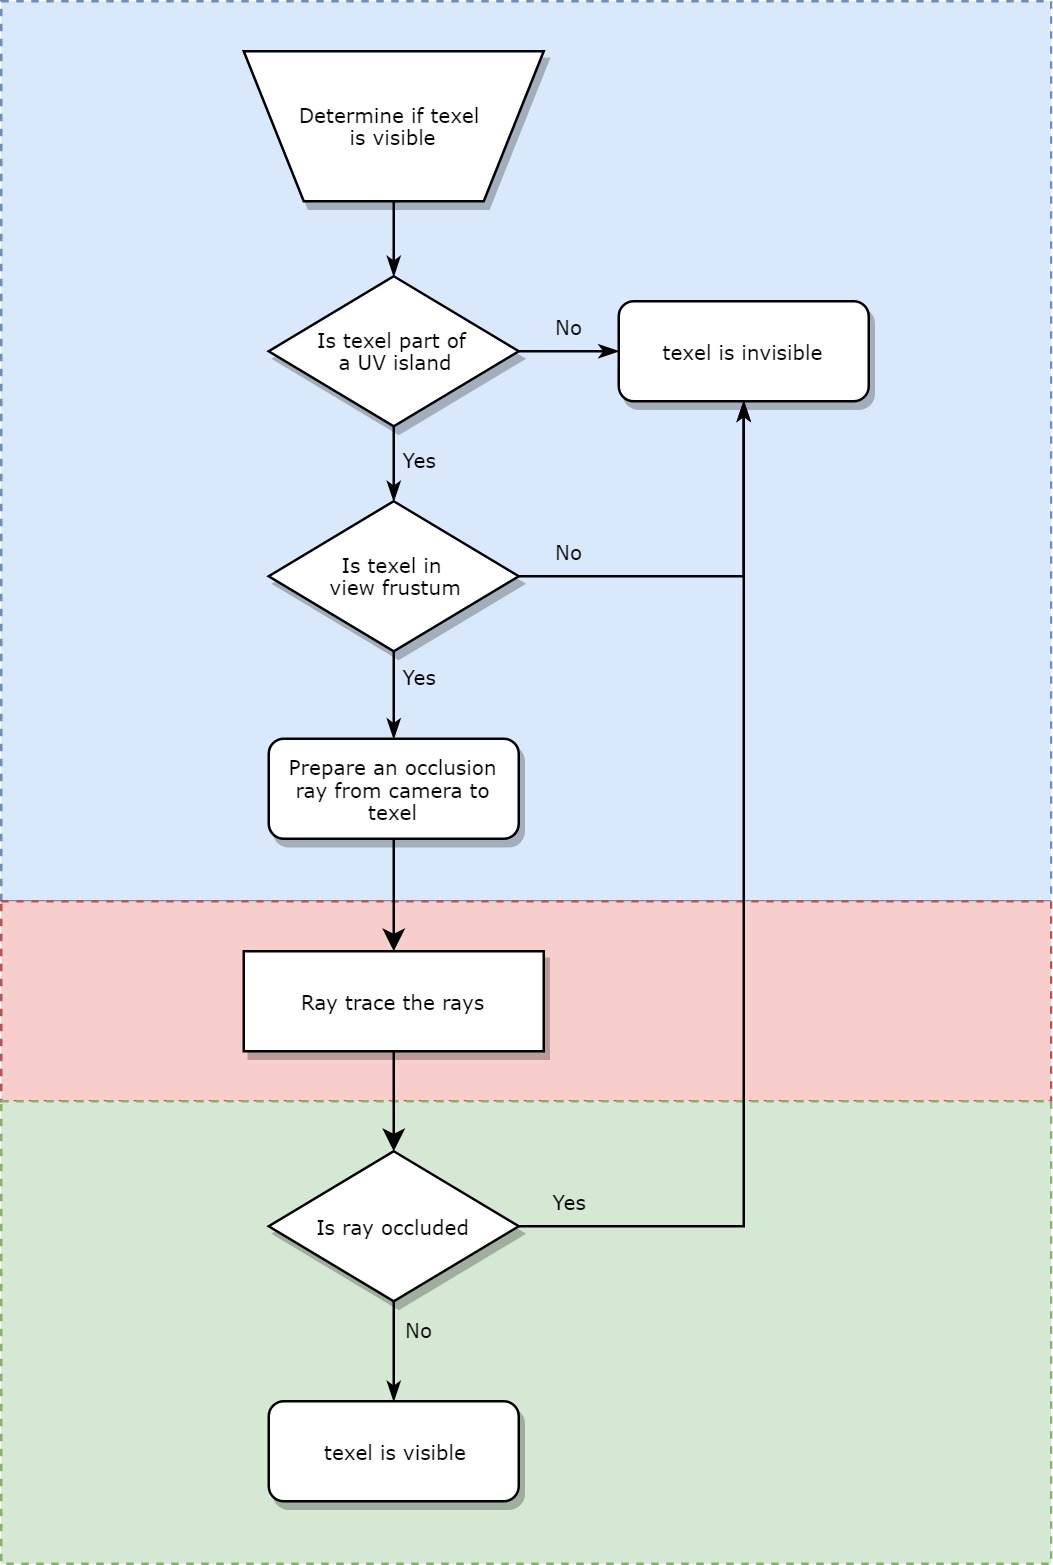
A texel is defined as visible if it’s in the current camera frustum and if it isn’t occluded by any Scene static geometries.
如果纹理像素位于当前的视锥中,并且没有被任何“场景”静态几何图形遮挡,则将其定义为可见。
We do this culling on the GPU (to take advantage of fast ray tracing). Here is the flow of a culling job.
我们在GPU上进行剔除(以利用快速射线追踪)。 这是剔除工作的流程。
The culling jobs have two outputs:
淘汰作业有两个输出:
A culling map buffer, storing whether each texel of the lightmap is visible. This culling map buffer is then used by the rendering jobs.
消隐图缓冲区,用于存储光照图的每个纹理像素是否可见。 然后,渲染作业将使用该剔除贴图缓冲区。
An integer representing the number of visible texels for the current lightmap. This integer will be asynchronously read back by the CPU to adjust lightmap scheduling in the future.
表示当前光照贴图的可见纹理像素数量的整数。 此整数将在将来由CPU异步读回以调整光照贴图计划。
In the video below, we can see the effect of the culling. The bake is stopped midway for demo purposes. So when the Scene view moves, we can see not yet baked texels (i.e. black) that aren’t visible from the initial camera position and direction.
在下面的视频中,我们可以看到剔除的效果。 出于演示目的,烘烤会在中途停止。 因此,当“场景”视图移动时,我们可以看到尚未从初始摄像机位置和方向看到的尚未烘焙的纹理像素(即黑色)。
For performance reasons, the visibility information is updated only every time the camera state ‘stabilizes’. Also, supersampling isn’t taken into account.
出于性能原因,仅在每次摄像机状态“稳定”时才更新可见性信息。 另外,不考虑超级采样。
性能与效率 (Performance and efficiency)
GPUs are optimized for taking huge batches of data and performing the same operation on all of it; they’re optimized for throughput. What’s more, the GPU achieves this acceleration while being more power- and cost-efficient than a many-core CPU. However, GPUs are not as good as a CPUs in terms of latency (intentionally, by the design of the hardware). That’s why we use a data-driven pipeline with no CPU-GPU sync points to get the most out of the GPU’s inherently parallel computation nature.
GPU经过优化,可以处理大量数据并对其全部执行相同的操作; 它们针对吞吐量进行了优化。 而且,GPU可以实现这种加速,同时比多核CPU具有更高的功耗和成本效益。 但是,就延迟而言(故意地,根据硬件设计),GPU不如CPU。 这就是为什么我们使用 没有CPU-GPU同步点 的 数据驱动 管道来最大程度地利用GPU固有的并行计算特性的原因。
However, raw performance isn’t enough. User experience is what matters, and we measure it in visual impact over time aka convergence rate. So we also need efficient algorithms.
但是,仅原始性能是不够的。 用户体验才是最重要的,我们会随着时间的视觉影响(也就是 收敛速度) 对其进行衡量 。 因此,我们还需要高效的算法。
数据驱动的管道 (Data-driven pipeline)
GPUs are meant to be used on large data sets, and they‘re capable of high throughput at the cost of latency. Also, they’re usually driven by a queue of commands filled ahead of time by the CPU. The goal of that continuous stream of large commands is to make sure we can saturate the GPU with work. Let’s look at the key recipes we are using to maximize throughput and thus raw performance.
GPU旨在用于大型数据集,并且能够以延迟为代价实现高吞吐量。 同样,它们通常由CPU提前填充的命令队列驱动。 连续不断的大命令流的目的是确保我们可以使工作饱和。 让我们看看我们正在使用的关键配方,以最大程度地提高吞吐量,从而提高原始性能。
我们的管道 (Our pipeline)
The way we approach the GPU lightmapping data pipeline is based on the following principles:
我们处理GPU光照数据管道的方法基于以下原则:
1. We prepare the data once.
1. 我们准备一次数据。
At this point, CPU and GPU might be in sync in order to reduce memory allocation.
此时,CPU和GPU可能处于同步状态,以减少内存分配。
2. Once the bake has started, no CPU-GPU sync points are allowed.
2. 烘焙开始后,将不允许使用CPU-GPU同步点。
The CPU is sending a predefined workload to the GPU. This workload will be over-conservative in some cases (for example using 4 bounces but all indirect rays finished after the 2nd bounce then we still have enqueued kernels that will be executed but early out).
CPU正在向GPU发送预定义的工作负载。 在某些情况下,此工作负载将过于保守(例如,使用4次反弹,但是所有间接射线在第二次反弹之后完成,然后我们仍将排队等待执行的内核,但要提早完成)。
3. The GPU cannot spawn rays nor kernels.
3. GPU无法产生射线或内核。
Rather, it might be asked to process empty jobs (or very small ones). To handle those cases efficiently, kernels are written in a way where data and instruction coherency is maximized. We handle this via data compaction, more on this later.
相反,可能会要求它处理空作业(或很小的作业)。 为了有效地处理这些情况,以最大程度地提高数据和指令一致性的方式编写内核。 我们将通过数据compaction处理此问题,稍后将对此进行详细介绍。
4. We don’t want any CPU-GPU sync points, nor any sort of GPU bubbles once the bake has started.
4. 我们不希望任何CPU-GPU同步点,也不希望在烘焙开始后出现任何形式的GPU气泡。
For example, some OpenCL commands can create small GPU bubbles (i.e. moments where the GPU have nothing to process), such as clEnqueueFillBuffer or clEnqueueReadBuffer (even in the asynchronous versions), so we avoid them as much as possible. Also, data processing needs to remain on the GPU for as long as possible (i.e. rendering and compositing up to completion). When we need to bring data back to the CPU for additional processing, we will do so asynchronously and neither have it send back to the GPU again. For example, seam stitching is a CPU post-process at the moment.
例如,某些OpenCL命令可以创建较小的GPU气泡(即GPU无需处理的时刻),例如clEnqueueFillBuffer或clEnqueueReadBuffer(即使在异步版本中也是如此),因此我们尽可能避免它们。 同样,数据处理需要在GPU上保留尽可能长的时间(即渲染和合成直到完成)。 当我们需要将数据带回CPU进行其他处理时,我们将以异步方式进行操作,并且它们都不会再次发送回GPU。 例如, 缝线缝合 是目前的CPU后处理。
5. CPU will adapt the GPU load in an asynchronous fashion.
5. CPU将以异步方式适应GPU负载 。
Changing the lightmap being rendered when the camera view changes or when a lightmap is fully converged will incur some latency. CPU threads generate and handle those readback events using a lockless queue to avoid mutex contention.
当相机视图更改或光线图完全收敛时,更改要渲染的光线图将导致某些延迟。 CPU线程使用无锁队列生成并处理这些回读事件,以避免互斥锁争用。
GPU友好的工作规模 (GPU-friendly job size)
One of the key features of the GPU architecture is wide SIMD instruction support. SIMD stands for Single Instruction Multiple Data. A set of instructions will be executed sequentially in lockstep on a given amount of data inside of what is called a warp/wavefront. The size of those wavefronts/warps is 64, 32 or 16 values (depending on the GPU architecture). Therefore a single instruction will apply the same transformation to multiple data – single instruction multiple data. However, for greater flexibility, the GPU is also able to support divergent code paths in its SIMD implementation. To do this it can disable some threads while working on a subset before rejoining. This is called SIMT: Single instruction multiple threads. However, this comes at a cost as divergent code paths within a wavefront/warp will only profit from a fraction of the SIMD unit. Read this excellent blog post for more info.
GPU体系结构的关键功能之一是广泛的SIMD指令支持。 SIMD代表单指令多数据。 一组指令将在所谓的“扭曲/波前”内部按给定数量的数据按锁步顺序执行。 这些波前/扭曲的大小为64、32或16个值(取决于GPU架构)。 因此,一条指令将对多个数据应用相同的转换-一条指令多个数据。 但是,为了获得更大的灵活性,GPU还能够在其SIMD实现中支持不同的代码路径。 为此,它可以在重新加入之前在子集上工作时禁用某些线程。 这称为SIMT:单指令多线程。 但是,这是有代价的,因为波前/经线内的不同代码路径只能从一部分SIMD单元中获利。 阅读 此出色的博客文章 以获取更多信息。
Finally, a neat extension of the SIMT idea is the ability of the GPU to keep around many warps/wavefronts per SIMD core. If a wavefront/warp is waiting for slow memory access, the scheduler can switch to another wavefront/warp and continue working on that in the meantime (providing there is enough pending work). For this to really work however, the amount of resources needed per context needs to be low, so that the occupancy (the amount of pending work) can be high.
最后,SIMT概念的巧妙扩展是GPU能够使每个SIMD内核保持许多扭曲/波阵面。 如果波前/扭曲正在等待缓慢的内存访问,则调度程序可以切换到另一个波前/扭曲并在此期间继续进行操作(前提是有足够的挂起工作)。 但是,要使此方法真正起作用,每个上下文所需的资源量必须较低,以便占用率(未完成的工作量)可以较高。
Summing up we should aim for:
总结一下,我们应该致力于:
Many threads in flight
许多线程在飞行
Avoiding divergent branches
避免分支分歧
Good occupancy
占地好
Having good occupancy is all about the kernel code and is too broad of a subject to be a part of this blog post. Here are some great resources:
占用率与内核代码有关,而且涉及的主题范围太广,因此不能成为本博客文章的一部分。 这里有一些很棒的资源:
Understanding Latency Hiding on GPUs by Vasily Volkov (NVIDIA)
Intro to GPU Scalarization by Francesco Cifariello (Unity Technologies)
Francesco Cifariello(Unity Technologies)的 GPU标量简介
In general, the goal is to use local resources sparsely, especially vector registers and local shared memory.
通常,目标是稀疏使用本地资源,尤其是向量寄存器和本地共享内存。
Let’s take a look at what could be the flow for baking direct lighting on the GPU. This section mostly covers lightmaps however, Light Probes work in a very similar way, except that they don’t have visibility or occupancy data.
让我们看一下在GPU上烘烤直接照明的流程。 本节主要介绍光照贴图,但是光照贴图的工作方式非常相似,不同之处在于它们没有可见性或占用数据。
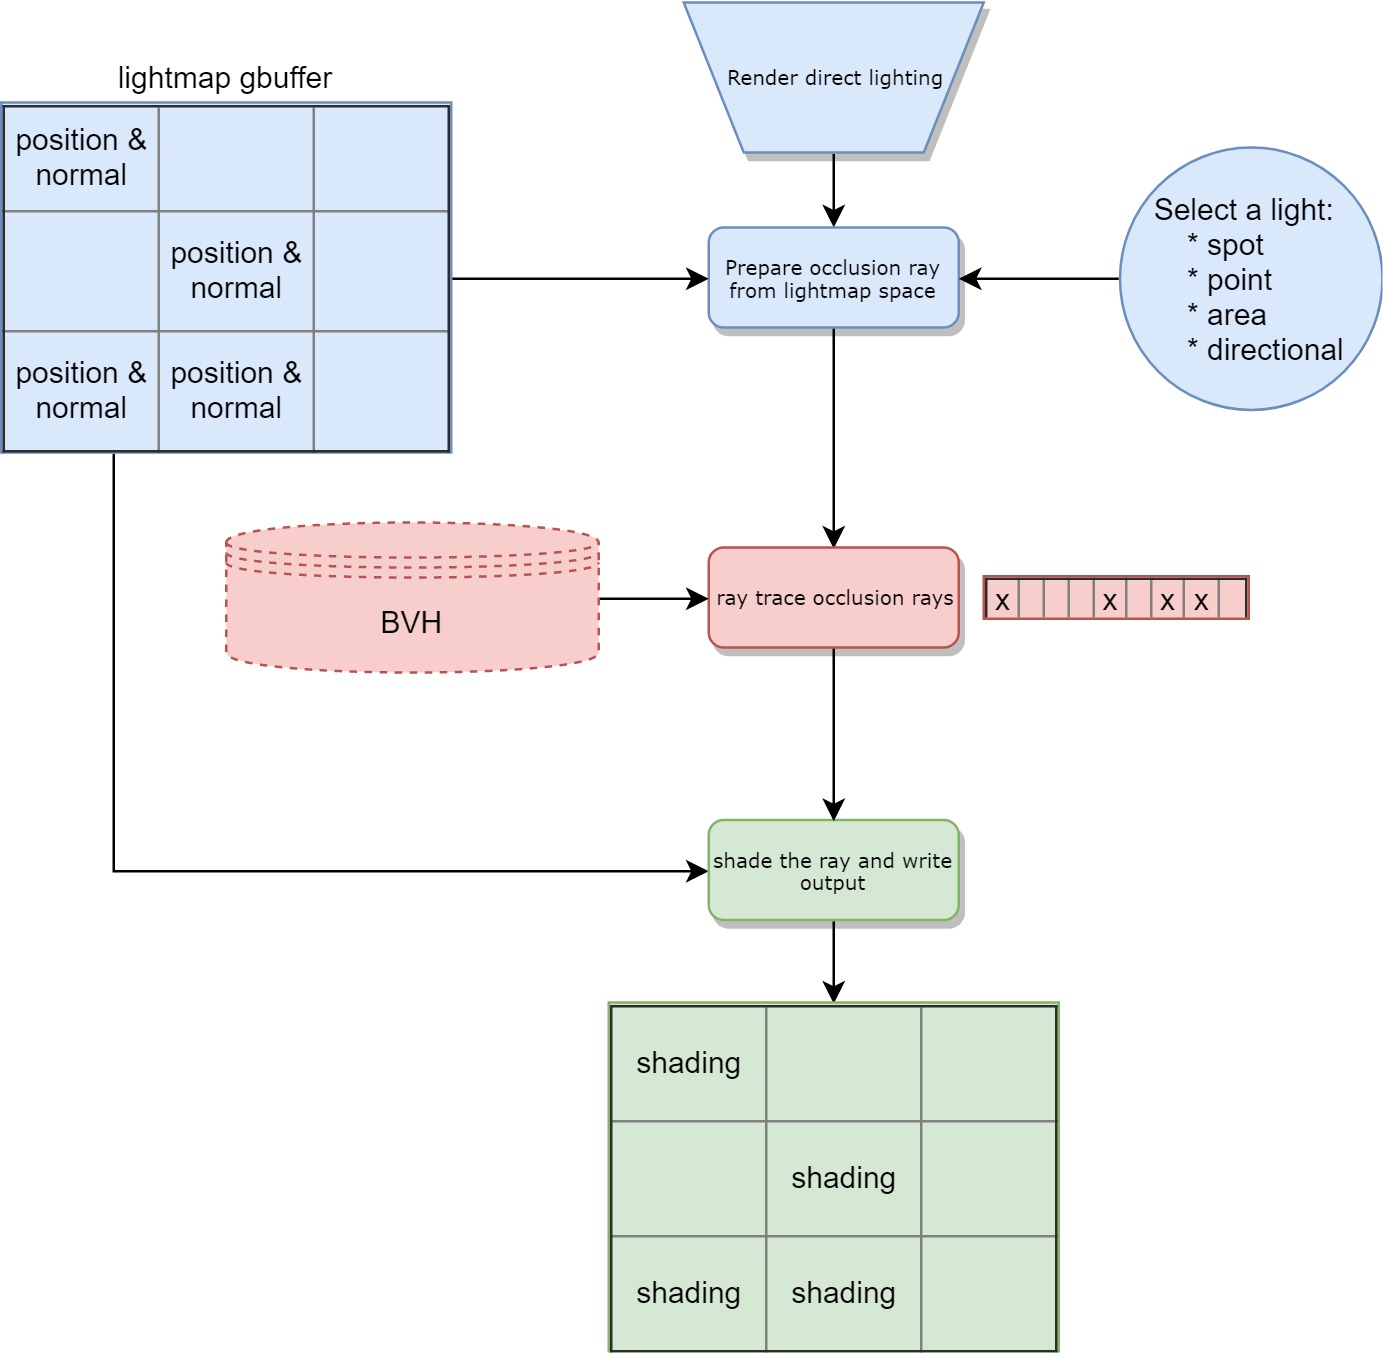
Notes: BVH stands for Bounding Volume Hierarchy, an acceleration structure for ray/triangle intersection.
注意:BVH表示边界体积层次结构,是射线/三角形相交的加速结构。
There are a few problems here:
这里有一些问题:
Lightmap occupancy in that example is 44% (4 occupied texels over 9), so only 44% of the GPU threads will actually produce usable work! On top of that, useful data is sparse in memory so we will pay for bandwidth even for unoccupied texels. In practice, lightmap occupancy is usually between 50% to 70% hence a huge potential gain.
在该示例中,光照贴图的占用率为44%(9个像素占4个),因此实际上只有44%的GPU线程会产生可用的工作! 最重要的是,有用的数据在内存中稀疏,因此我们将为带宽(甚至是未使用的像素)支付带宽。 实际上,光照贴图的占用率通常在50%到70%之间,因此潜在的收益巨大。
Data set is too small. The example is showing a 3×3 lightmap for simplicity but even the common case of a 512×512 lightmap will be a too small data set for recent GPUs to attain top efficiency.
数据集太小。 该示例为简单起见显示了3×3的光照贴图,但即使是512×512光照贴图的常见情况,对于最近的GPU来说也无法获得最高的效率。
In an earlier section, we talked about view prioritization and the culling job. The two points above are even truer as some occupied texels won’t be baked because they are not currently visible in the Scene view, lowering occupancy and overall data set even more.
在前面的部分中,我们讨论了视图优先级和淘汰工作。 上面的两点更为真实,因为某些占用的纹理像素不会被烘焙,因为它们当前在“场景”视图中不可见,从而进一步降低了占用率和整体数据集。
How do we solve that? As part of a collaboration with AMD, ray compaction was added. The idea vastly improves both ray tracing and shading performance. In short, the idea is to create all the ray definitions in contiguous memory allowing all the threads in a warp/wavefront to work on hot data.
我们该如何解决? 作为与AMD合作的一部分,添加了射线压缩。 这个想法极大地改善了光线追踪和着色性能。 简而言之,该想法是在连续内存中创建所有射线定义,从而允许扭曲/波阵面中的所有线程处理热数据。
In practice you also need each ray to know the index of the texel it is related to, we store this in the ray payload. Also, we store the global compacted ray count.
实际上,您还需要每条射线来了解与之相关的纹理像素的索引,我们将其存储在射线有效载荷中。 另外,我们存储全局压缩射线计数。
Here is the flow with compaction:
这是压缩的流程:
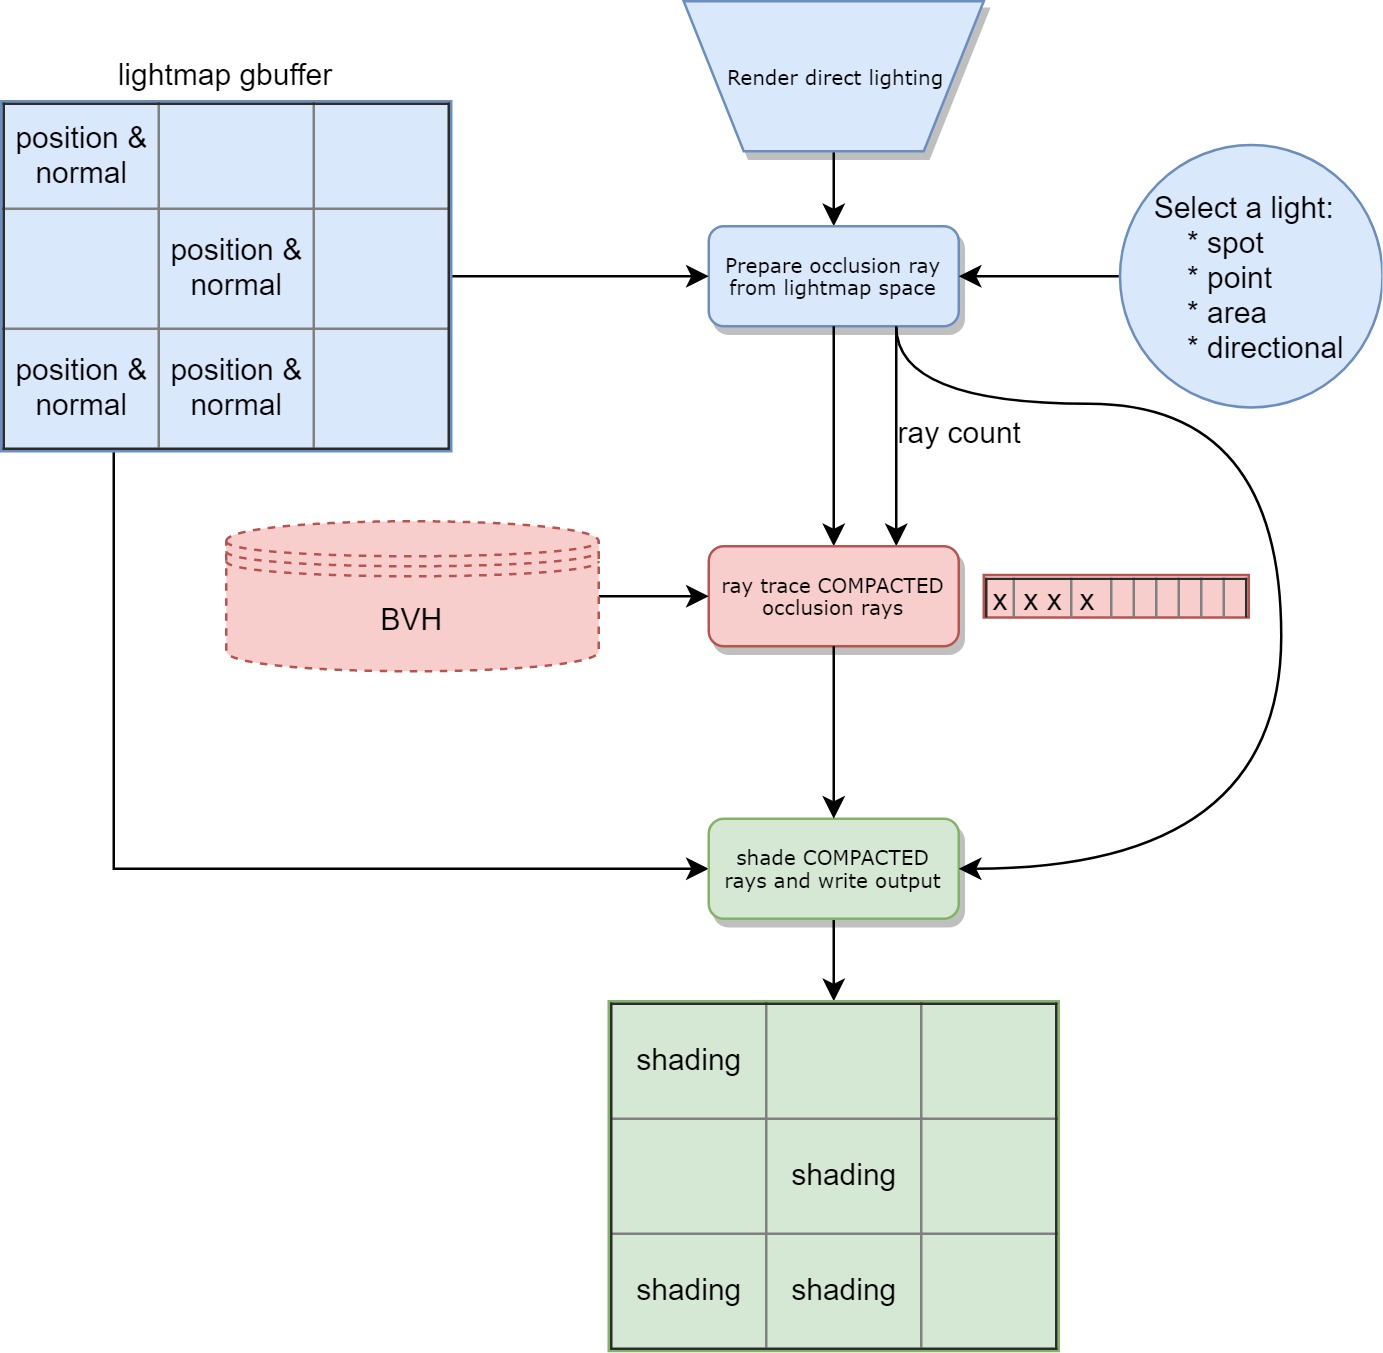
Both the kernels that are shading and tracing the rays can now run only on hot memory and with minimal divergence in code paths.
现在,正在着色和跟踪光线的两个内核都只能在热内存上运行,并且代码路径的差异最小。
What’s next? Well, we haven’t solved the fact that the data set could be too small for the GPU, especially if view prioritization is enabled. The next idea is to decorrelate the generation of rays from the gbuffer representation. With the naive approach, we only generate one ray per texel. Since we will eventually want to generate more rays anyway, we might as well generate several rays per texels up front. In this way, we can create more meaningful work for the GPU to chew on. Here is the flow:
下一步是什么? 好吧,我们还没有解决数据集对于GPU来说可能太小的事实,特别是如果启用了视图优先级。 下一个想法是去关联来自gbuffer表示的射线的生成。 使用幼稚的方法,每个纹理像素仅产生一条射线。 由于我们最终还是想产生更多的光线,因此我们最好也为每个纹理像素产生几条光线。 这样,我们可以为GPU创造更多有意义的工作。 流程如下:
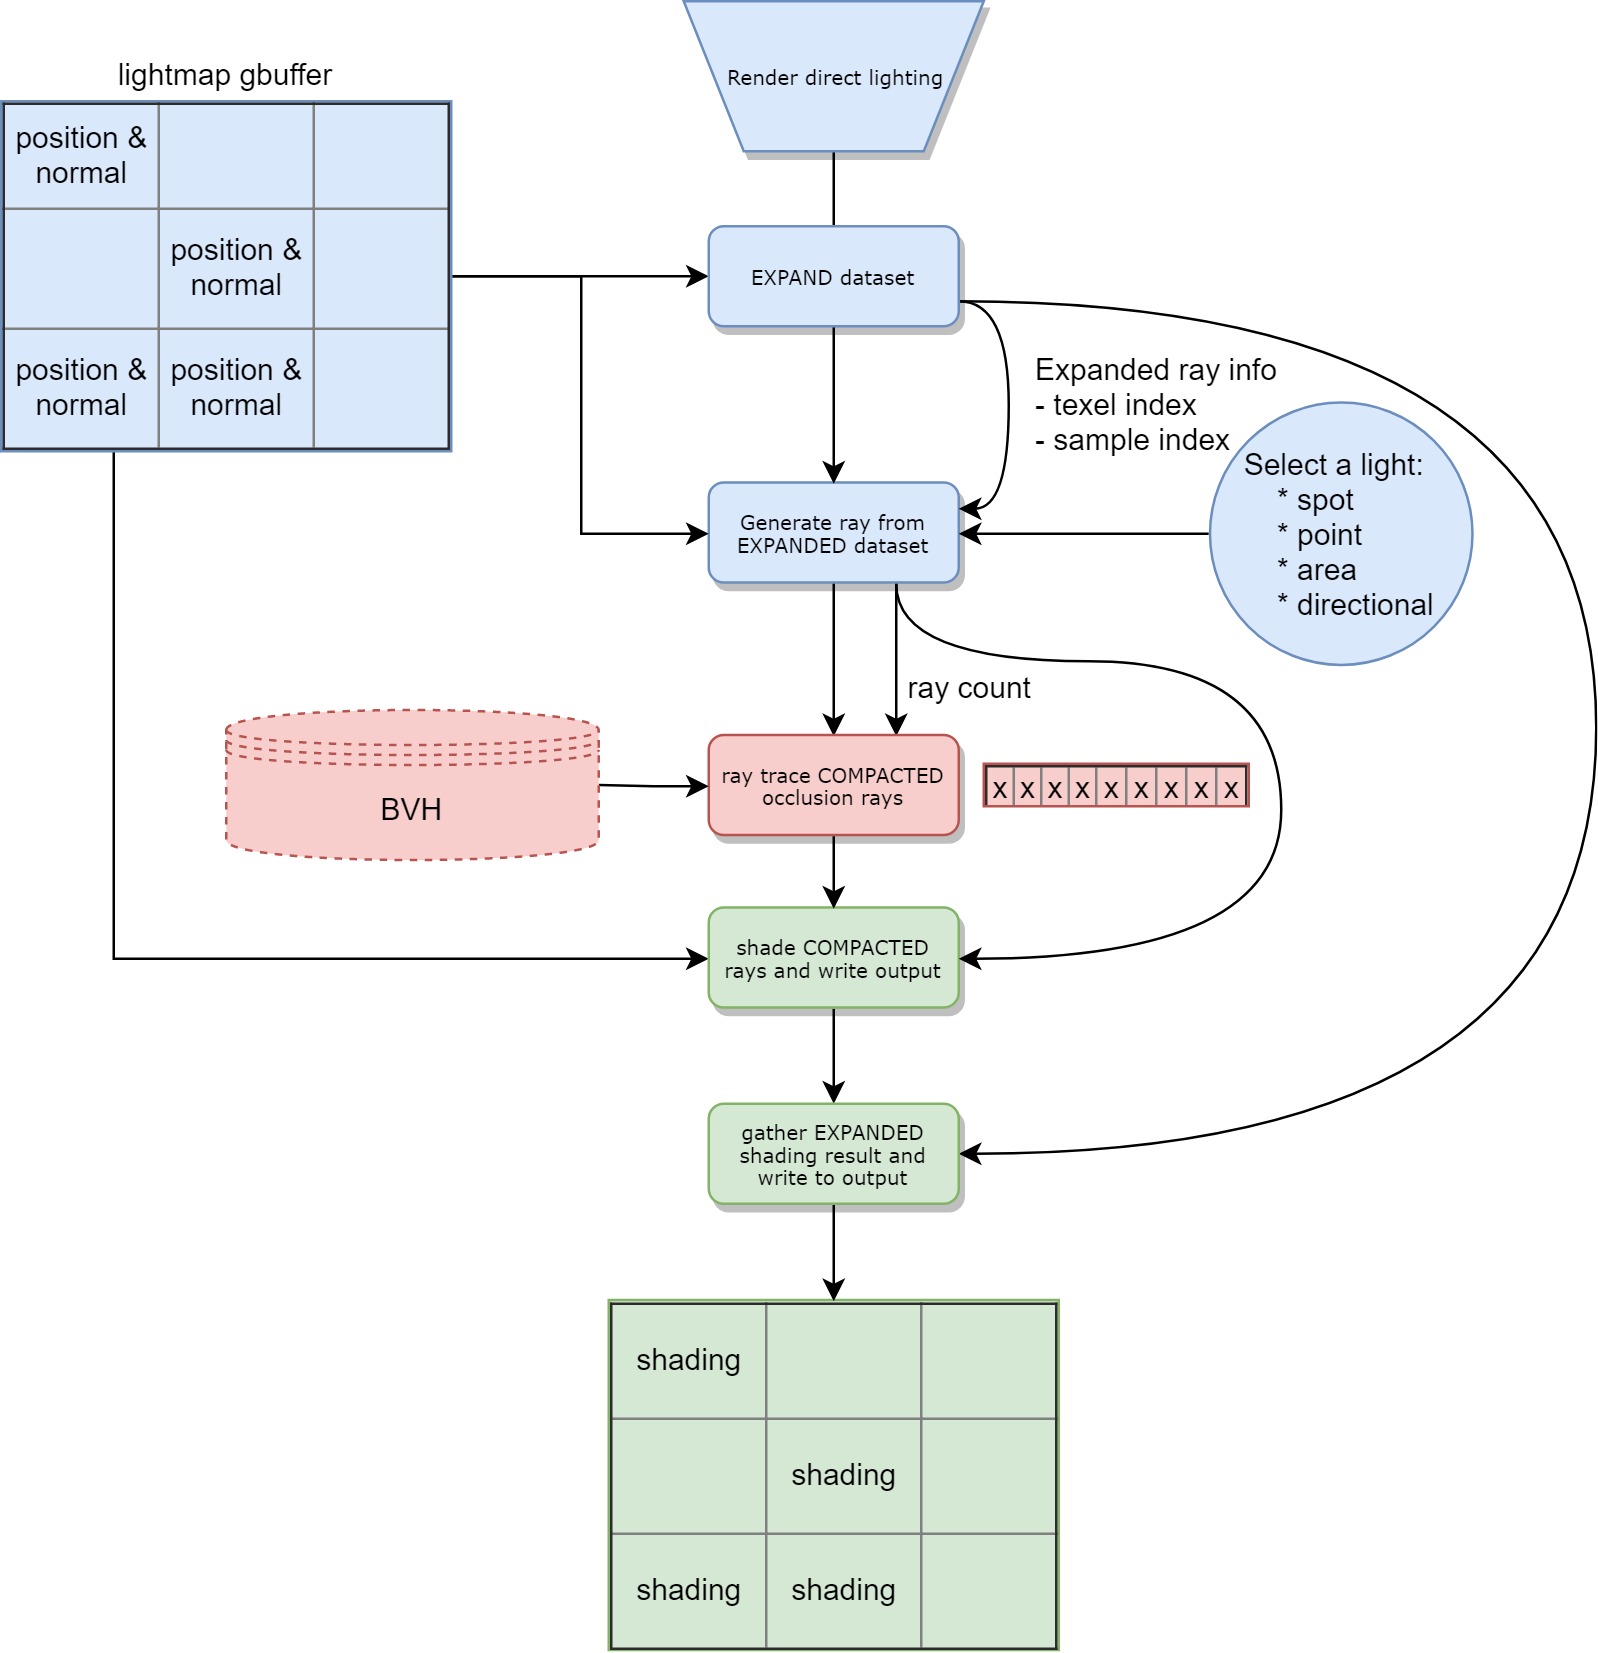
Before compaction we generate many rays per texel and we call this expansion. We also generate meta information that is used in the gather step to accumulate into the correct destination texel.
压实之前,每个纹理像素产生很多射线,我们称此为 膨胀 。 我们还生成在收集步骤中使用的元信息,以累积到正确的目标纹理元素中。
Both the expansion and gather kernels are not executed very often. In practice we expand and then shade every light (for direct) or process all bounces (for indirect), to finally gather only once.
扩展和聚集内核都不经常执行。 在实践中,我们先扩展然后遮住每个灯光(直接照明)或处理所有反弹(间接照明),最后只收集一次。
With these techniques we achieve our goal: we generate enough work to saturate the GPU and we spend bandwidth only on texels that matter.
通过这些技术,我们可以实现我们的目标:我们产生足够的工作来使GPU饱和,并且仅在重要的texel上花费带宽。
These are the benefits of shooting multiple rays per texel:
这些是每个纹理像素发射多条射线的好处:
The set of active rays will always be a large data set even in view prioritization mode.
即使在视图优先模式下,活动光线集也将始终是大数据集。
Preparation, tracing, and shading are all working on very coherent data as the expansion kernel will create rays targeting the same texel in continuous memory.
准备,跟踪和着色都可以处理非常一致的数据,因为扩展内核将在连续内存中创建针对同一纹理像素的光线。
The expansion kernel handles occupancy and visibility, making the preparation kernel much simpler and thus faster.
扩展内核可以处理占用率和可见性,从而使准备内核变得更加简单,因此速度更快。
The size of the expanded/working data set buffers is decoupled from the size of the lightmap.
扩展/工作数据集缓冲区的大小与光照贴图的大小分离。
The number of rays we shoot per texel can be driven by any algorithm, a natural expansion is going to be adaptive sampling.
我们可以通过任何算法来驱动每个纹理像素拍摄的光线数量,自然扩展将是自适应采样。
Indirect lighting uses very similar ideas, albeit more complex:
间接照明使用非常相似的想法,尽管更为复杂:
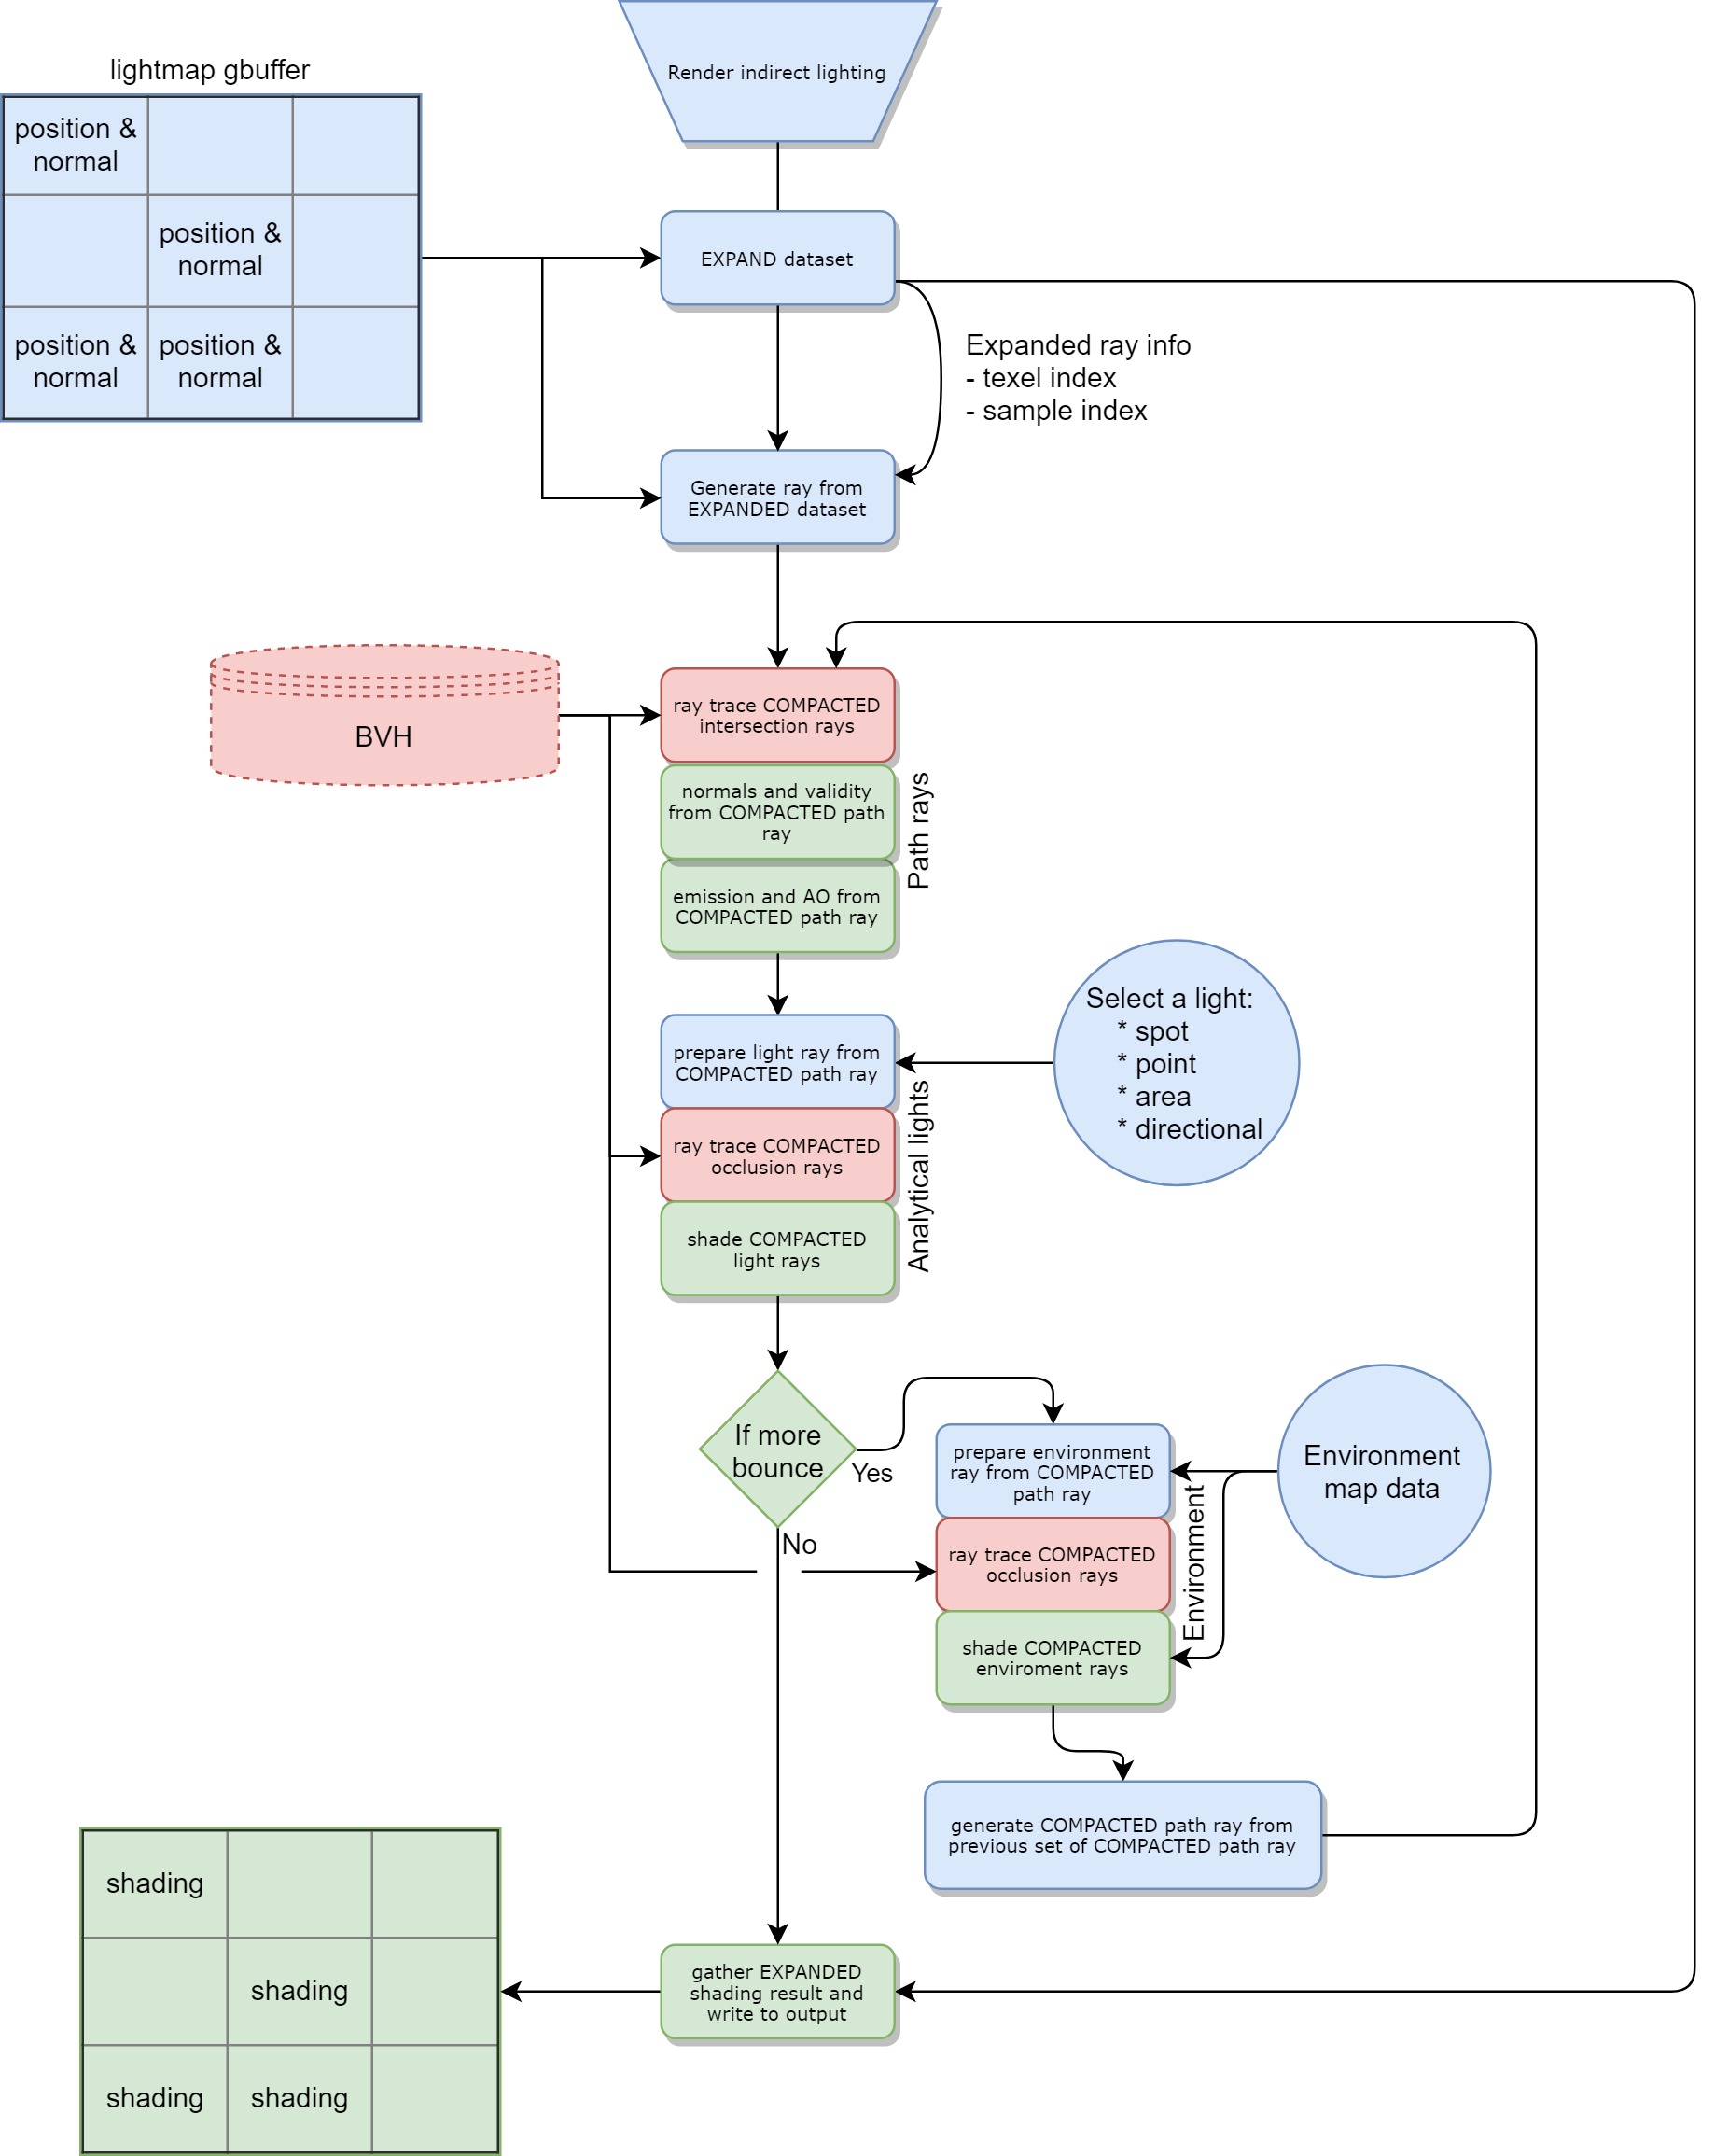
Note: environment rays for the first bounce are treated as direct.
注意:第一次反射的环境光线被视为直接光线。
With indirect light we have to perform multiple bounces, each one can discard random rays. Thus we do compaction iteratively to keep working on hot data.
对于间接光,我们必须执行多次反射,每个反射都可以丢弃随机光线。 因此,我们反复进行压缩以继续处理热门数据。
The heuristic we currently use favors an equal amount of rays per texel. The goal is to get a very progressive output. However, a natural extension of this would be to improve these heuristics by using adaptive sampling, so to shoot more rays where the current results are noisy. Also, the heuristic could aim for a greater coherency, both in memory and in thread group execution, by being aware of the wavefront/warp size of the hardware.
我们目前使用的启发式方法有利于每个纹理像素发出相等数量的射线。 目标是获得非常先进的输出。 但是,这的自然扩展是通过使用自适应采样来改善这些启发式方法,以便在当前结果嘈杂的地方拍摄更多的光线。 同样,启发式技术可以通过了解硬件的波前/翘曲大小,在内存和线程组执行中实现更大的一致性。
透明/半透明 (Transparency/Translucency)
There are many use cases for transparency/translucency. A common way to handle transparency and translucency is to cast a ray, detect intersection, fetch material and schedule a new ray if the encountered material is translucent or transparent. However, in our case, the GPU cannot spawn rays for performance reasons (please refer to the Data-driven pipeline section above). Also, we can’t reasonably ask the CPU to schedule enough rays in advance so we are sure that we handle the worst possible case, as this would be a major performance hit.
有许多透明/半透明的用例。 处理透明和半透明的常用方法是投射射线,检测相交,获取材料并安排新射线(如果遇到的材料是半透明或透明的)。 但是,在我们的情况下,由于性能原因,GPU无法产生光线(请参阅上面的“ Data-driven pipeline部分)。 另外,我们不能合理地要求CPU提前安排足够的光线,因此我们确定我们会处理最坏的情况,因为这会严重影响性能。
Thus we went for a hybrid solution. We handle translucency and transparency differently allowing to solve the issues above:
因此,我们寻求一种混合解决方案。 我们对透明度和透明度的处理方式有所不同,从而可以解决上述问题:
Transparency (when a material is not opaque because of holes in it). In that case, the ray can either go through or bounce off the material based on a probability distribution. Thus the workload prepared in advance by the CPU does not need to change, we are still Scene independent.
透明度 (当材料由于Kong而不透明时)。 在这种情况下,射线可以基于概率分布穿过或反射材料。 因此,CPU预先准备的工作量不需要更改,我们仍然是场景无关的。
Translucency (when a material is filtering the light that goes through it). In that case, we approximate and do not consider refraction. In other words, we let the material color the light, but not change its direction. This allows us to handle translucency while walking the BVH, meaning we can handle easily a large number of cutout materials and scale very well with translucency complexity in the Scene.
半透明 (当材料过滤通过它的光时)。 在这种情况下,我们近似而不考虑折射。 换句话说,我们让材质为光着色,但不改变其方向。 这使我们能够在行走BVH时处理半透明图像,这意味着我们可以轻松处理大量裁切材料,并且在场景中具有半透明复杂度的情况下可以很好地缩放。
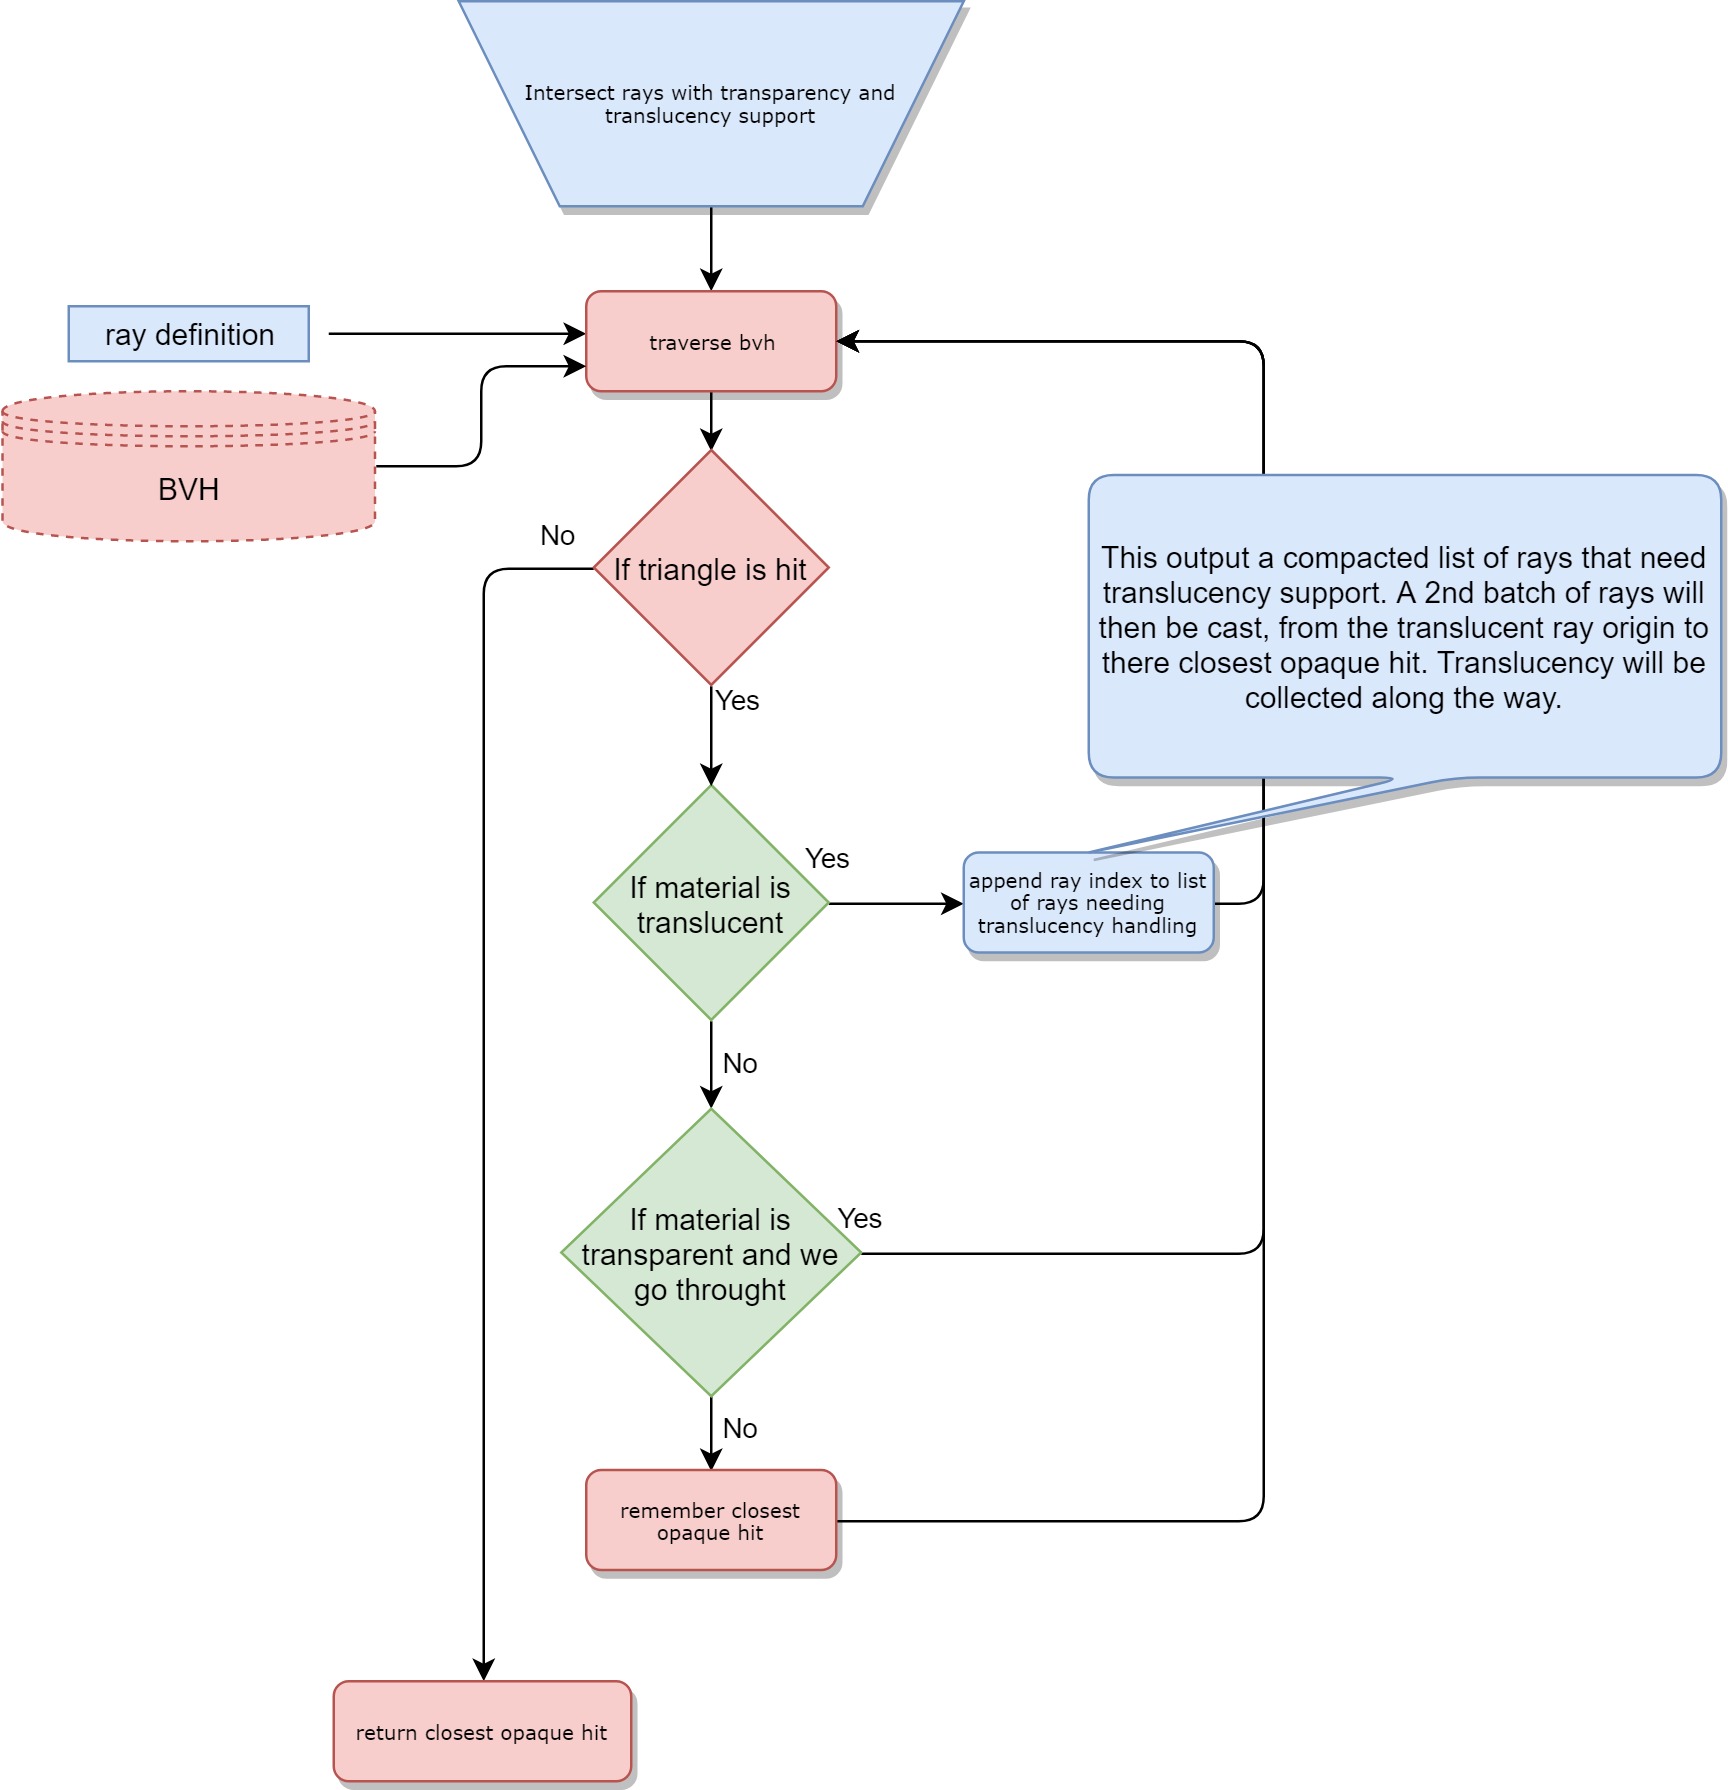
However, there is a quirk; BVH traversal is out of order:
但是,有一个怪癖。 BVH遍历不正确:
In the case of occlusion rays, this is actually fine as we are only interested in the attenuation from translucence of each intersected triangle along the ray. As multiplication is commutative, out of order BVH traversal is not a problem.
对于遮挡射线,这实际上很好,因为我们只对沿射线的每个相交三角形的半透明性感兴趣。 由于乘法是可交换的,无序BVH遍历不是问题。
However for intersection rays what we want is to be able to stop on a triangle (in a probabilistic way when the triangle is transparent) and to collect translucence attenuation for each triangle from the ray origin to the hit point. As BVH traversal is out of order the solution we have chosen is to first only run the intersection to find the hit point, and mark the ray if any translucency was hit. For every marked ray, we thus generate an extra occlusion ray from the intersection ray origin to the intersection ray hit. To do this efficiently we use compaction when generating the occlusion rays, that means one will only pay the extra cost if the intersection ray was marked as needing translucency handling.
但是,对于相交光线,我们想要的是能够停在一个三角形上(当三角形透明时以概率的方式),并为每个三角形收集从射线原点到命中点的半透明衰减。 由于BVH遍历不正常,因此我们选择的解决方案是,首先仅运行相交点以找到命中点,并在射线被击中时标记射线。 因此,对于每个标记的光线,我们会生成一个从交点光线起点到交点光线命中的额外遮挡光线。 为了有效地做到这一点,我们在生成遮挡射线时使用压缩,这意味着只有在将相交射线标记为需要半透明处理的情况下,才需要支付额外的费用。
All of that was possible thanks to the open source nature of RadeonRays which was forked and customized to our needs as part of the collaboration with AMD.
RadeonRays的开源特性使所有这些事情成为可能,它是 与AMD合作的一部分,根据我们的需要进行了 分叉 和定制。
高效算法 (Efficient algorithms)
We have seen what we do in regard to raw performance, great! However, it is only the first part of the puzzle. High samples per second are great but what really matters, in the end, is the bake time. In other words, we want to get the maximum out of every ray we cast. This last statement is actually the root of decades of ongoing research. Here are some great resources:
我们已经看到了我们在原始性能方面的出色表现! 但是,这只是难题的第一部分。 每秒高采样率很棒,但是最后真正重要的是烘烤时间。 换句话说, 我们希望从投射的每条光线中获得最大收益。 最后的陈述实际上是数十年来正在进行的研究的根源。 这里有一些很棒的资源:
Ray Tracing: The Rest of Your Life
Unity GPU Lightmapper is a pure diffuse lightmapper. This simplifies the interaction of the light with the materials a lot and also helps dampen fireflies and noise. However, there is still a lot we can do to improve the convergence rate. Here are some of the techniques that we use:
Unity GPU Lightmapper是一个纯漫射光照贴图器。 这大大简化了光与材料的相互作用,还有助于抑制萤火虫和噪音。 但是,我们仍然可以采取许多措施来提高收敛速度。 这是我们使用的一些技术:
Russian roulette
俄罗斯轮盘
At each bounce, we probabilistically kill the path based on accumulated albedo. One can find a great explanation in Eric Veach’s thesis (page 67).
每次弹跳时,我们都会根据累积的反射率来杀死路径。 在Eric Veach的 论文中 (第67页), 可以找到 很好的解释 。
Environment Multiple Importance Sampling (MIS)
环境多重重要性抽样(MIS)
HDR environments that exhibit high variance can cause a considerable amount of noise in the output, requiring huge sample counts to produce pleasing results. Therefore, we apply a combination of sampling strategies specifically tailored to evaluate the environment by analyzing it first, identifying important areas, and sampling accordingly. This approach, which is not exclusive to environmental sampling, is generally known as multiple importance sampling and was initially proposed in Eric Veach’s thesis (page 252). This was done in collaboration with Unity Labs Grenoble.
表现出高方差的HDR环境会在输出中引起大量噪声,需要大量样本才能产生令人愉悦的结果。 因此,我们采用了专门为评估环境而设计的抽样策略组合,方法是首先对其进行分析,识别重要区域并进行相应抽样。 这种方法不是环境采样所独有的,通常称为多重重要性采样,最初是在Eric Veach的 论文中提出的 (第252页) 。 这是与 Unity Labs Grenoble 合作完成的 。
Many lights
很多灯
At each bounce, we probabilistically select one direct light and we limit the number of lights affecting surfaces with a spatial grid structure. This was done in collaboration with AMD. We are currently investigating deeper in the many light problem as light selection sampling is critical to quality.
在每次反弹时,我们都可能选择一个直接光,并限制影响具有空间网格结构的曲面的光的数量。 这是与AMD合作完成的。 我们目前正在对许多光问题进行更深入的研究,因为光选择采样对质量至关重要。
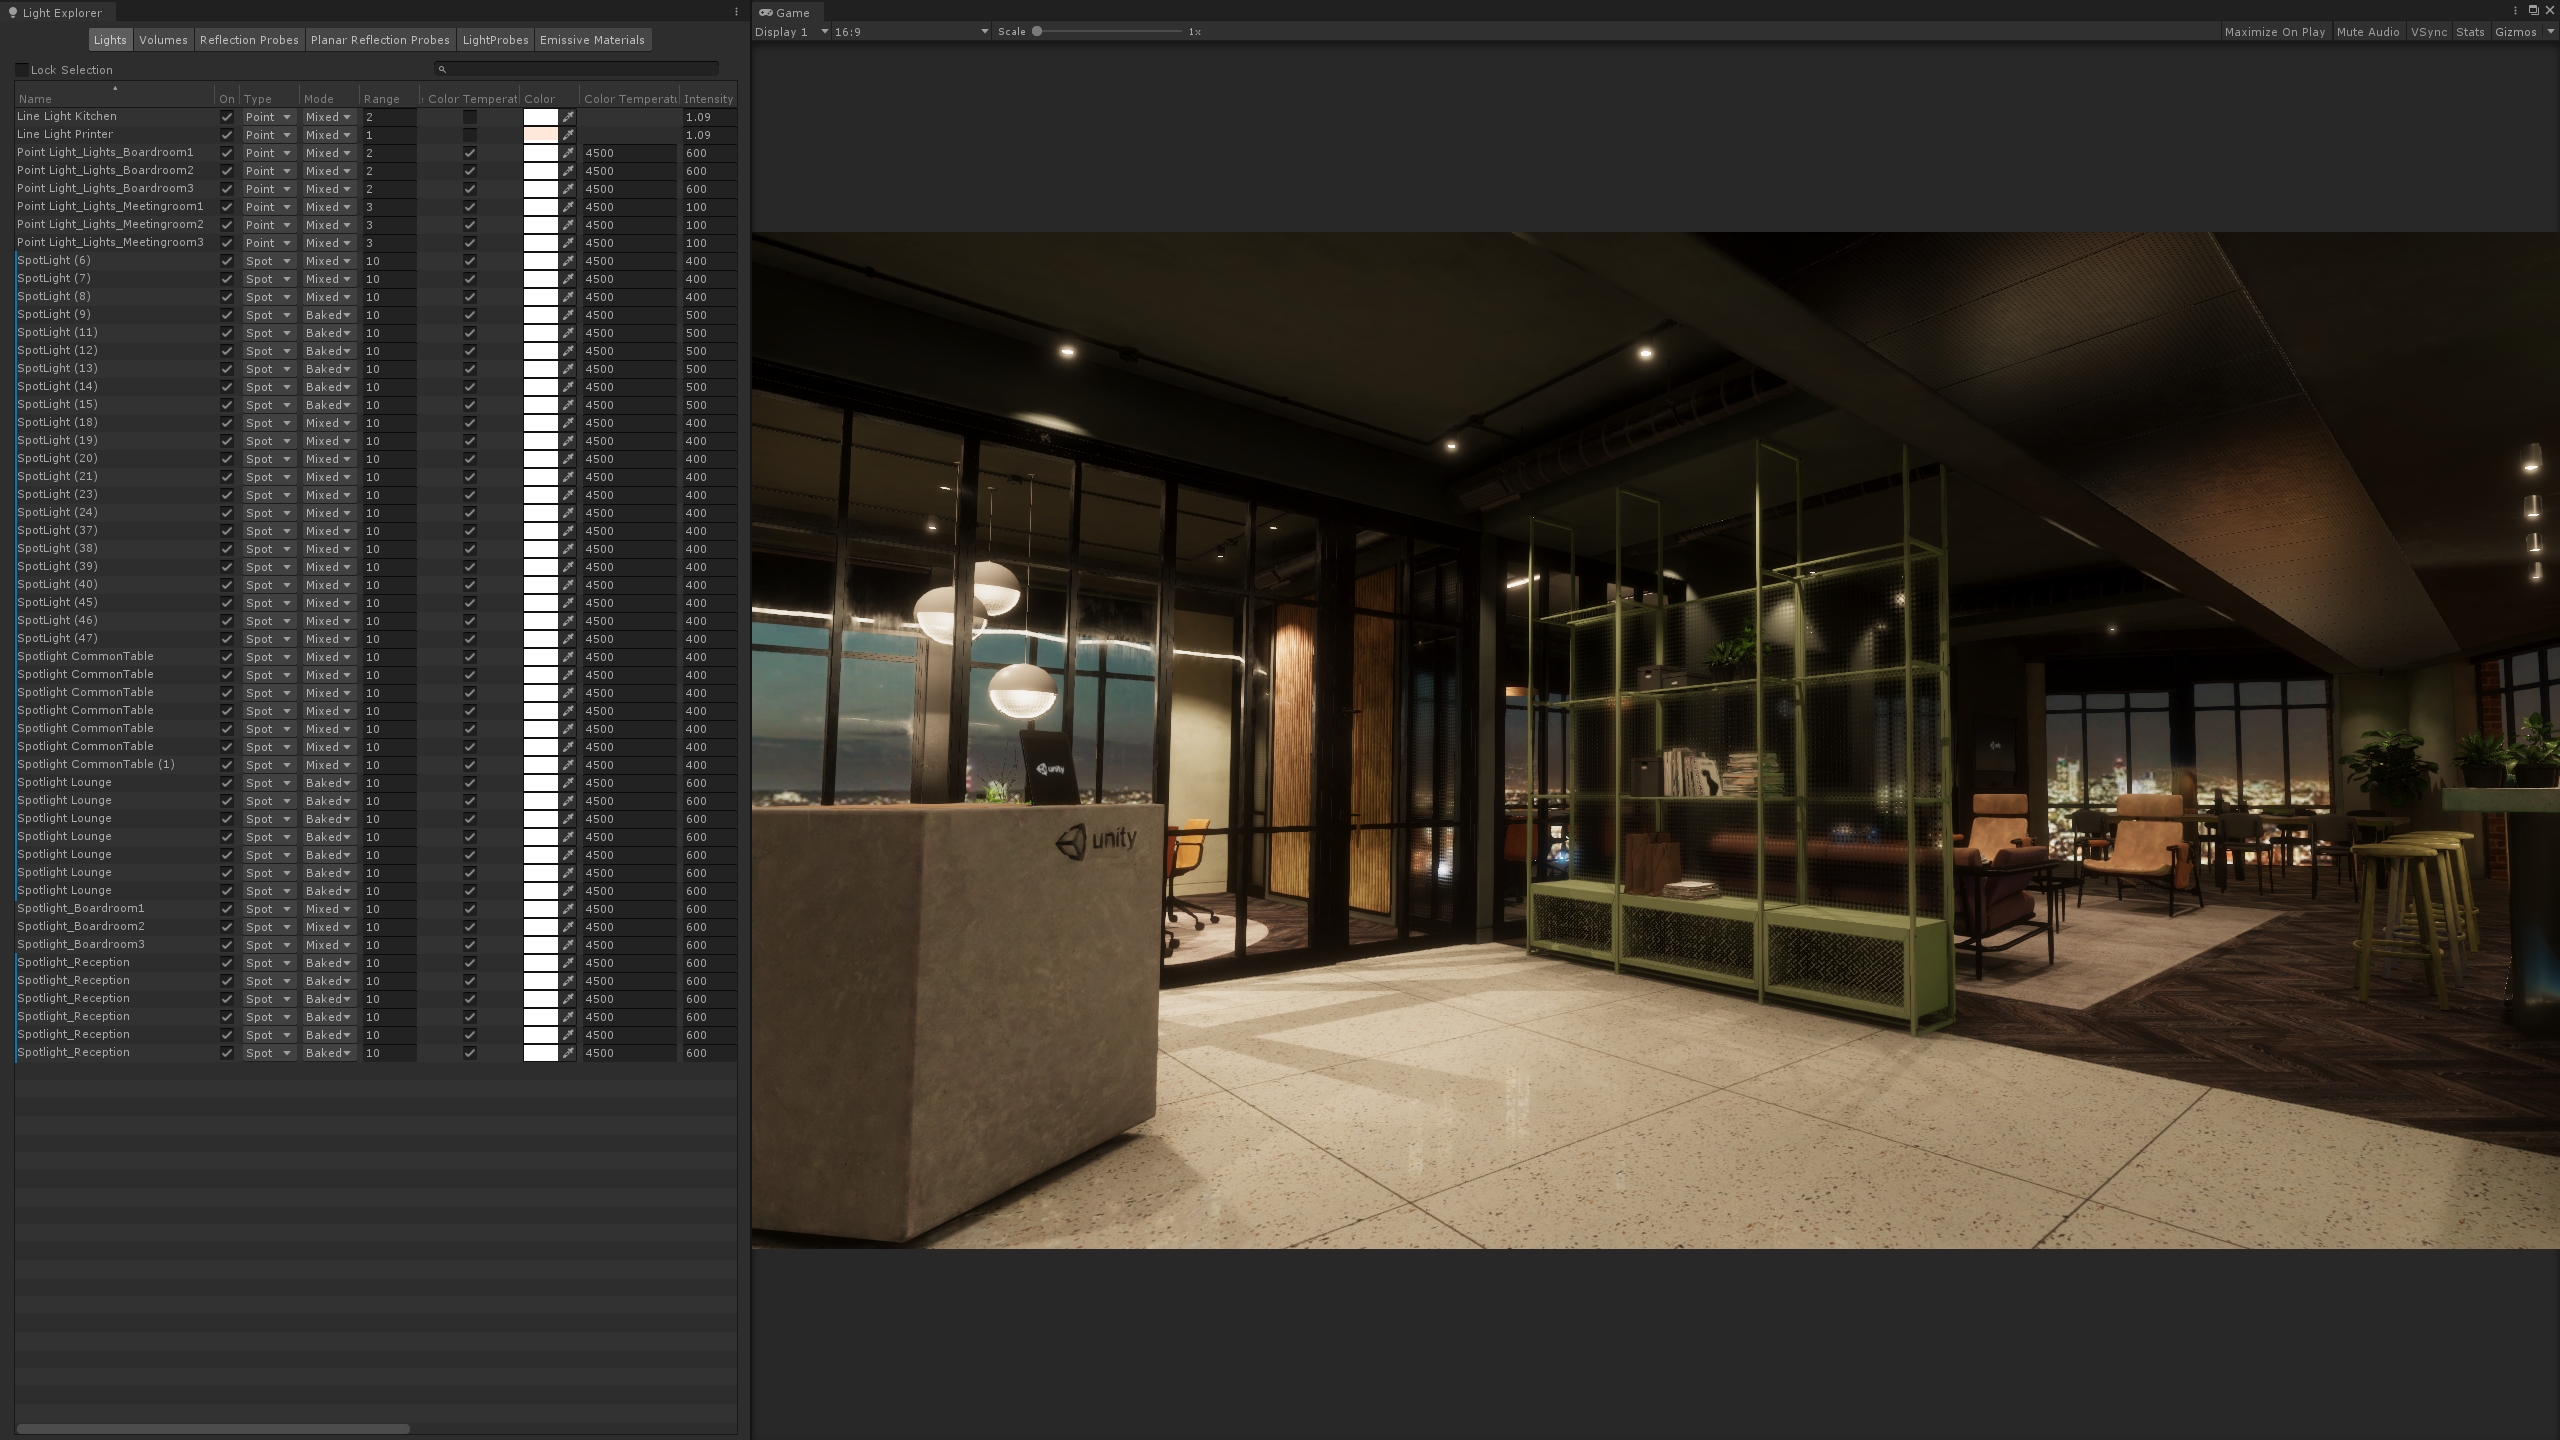
Unity London office rendered with GPU lightmapper and HDRP. A scene with many lights.
使用GPU lightmapper和HDRP渲染的Unity London办公室。 一个有很多灯光的场景。
Denoising
去噪
Noise is removed by using an AI denoiser trained on outputs from a path tracer. See Jesper Mortensen’s Unity GDC 2019 presentation.
通过使用对路径跟踪器的输出进行训练的AI降噪器,可以消除噪声。 请参阅Jesper Mortensen的 Unity GDC 2019演示文稿 。
整理东西 (Wrapping things up)
We have seen how a data-driven pipeline, the attention to raw performance and efficient algorithms are combined together to offer an interactive lightmapping experience with the GPU Lightmapper. Please note that the GPU Lightmapper is in active development and is constantly being improved.
我们已经看到了如何将数据驱动的流水线,对原始性能的关注和高效的算法结合在一起,以提供GPU Lightmapper的交互式光照映射体验。 请注意,GPU Lightmapper正在积极开发中,并且会不断得到改进。
The Lighting Team
照明团队
PS: If you think this was a fun read, and are interested in taking up a new challenge, we’re currently looking for a Lighting Developer in Copenhagen, so get in touch!
PS:如果您认为这是一本有趣的文章,并且有兴趣接受新挑战,那么我们目前正在哥本哈根寻找照明开发人员 ,请与我们联系!
—
-
Want to learn how to optimize graphics in Unity? Check out this tutorial.
想学习如何在Unity中优化图形? 查看本 教程。
翻译自: https://blogs.unity3d.com/2019/05/20/gpu-lightmapper-a-technical-deep-dive/
lightmapper


 2814
2814

 被折叠的 条评论
为什么被折叠?
被折叠的 条评论
为什么被折叠?
 到【灌水乐园】发言


