Are you looking to setup Google Tag Manager in WordPress? Not sure if you need Google Tag Manager on your WordPress site? Don’t worry. In this article, we will show you how to properly install and setup Google Tag Manager in WordPress and explain the benefits.
您是否要在WordPress中设置Google跟踪代码管理器? 不确定在WordPress网站上是否需要Google跟踪代码管理器? 不用担心 在本文中,我们将向您展示如何在WordPress中正确安装和设置Google跟踪代码管理器,并说明其好处。
什么是Google跟踪代码管理器? (What is Google Tag Manager?)

Often website owners need to add multiple code snippets to track their conversions, traffic, and gather other analytical data.
网站所有者通常需要添加多个代码段来跟踪其转化,流量和收集其他分析数据。
With Google Tag manager you can easily add and manage all of these scripts from a single dashboard.
使用Google跟踪代码管理器,您可以从一个仪表板轻松添加和管理所有这些脚本。
There are built-in tag templates for Google Analytics, Adwords, DoubleClick, etc. Tag manager also works with several third party analytics and tracking platforms.
有用于Google Analytics(分析),Adwords,DoubleClick等的内置标记模板。标记管理器还可以与多个第三方分析和跟踪平台一起使用。
Apart from that, you can use custom HTML to add your own tracking or any other code that you want to add.
除此之外,您还可以使用自定义HTML来添加自己的跟踪或任何其他要添加的代码。
This saves you the time of adding and removing tags from your code and rather manage it from an easy dashboard. Not to mention, all of these scripts are loaded in one script.
这样可以节省您在代码中添加和删除标签的时间,而无需通过简单的仪表板进行管理。 更不用说,所有这些脚本都装载在一个脚本中。
Having said that, lets get started with Google Tag Manager.
话虽如此,让我们开始使用Google跟踪代码管理器。
For the sake of this article, we will show you how to add Google Analytics to your site using Google Tag Manager.
为了本文的方便,我们将向您展示如何使用Google跟踪代码管理器将Google Analytics(分析)添加到您的网站。
影片教学 (Video Tutorial)
If you don’t like the video or need more instructions, then continue reading.
如果您不喜欢该视频或需要更多说明,请继续阅读。
入门 (Getting Started)
It’s important to note that this guide is for self hosted WordPress.org sites (see the difference between WordPress.com and WordPress.org). If you don’t have a WordPress site, then please see our WordPress installation guide to create one.
请务必注意,本指南适用于自托管的WordPress.org网站(请参阅WordPress.com和WordPress.org之间的区别 )。 如果您没有WordPress网站,请参阅WordPress安装指南以创建一个。
First you will need to create a Google Analytics account for your website if you haven’t already done so. You can follow the instructions in our how to install Google Analytics in WordPress tutorial.
首先,您需要为您的网站创建一个Google Analytics(分析)帐户。 您可以按照WordPress教程中如何安装Google Analytics(分析)中的说明进行操作。
Follow the steps mentioned in the “how to signup for Google Analytics” section. Stop when you get the tracking code. Instead of adding tracking code directly in WordPress, we will be using the tag manager to do that.
请按照“如何注册Google Analytics(分析)”部分中提到的步骤进行操作。 得到跟踪代码后停止。 与其直接在WordPress中添加跟踪代码,不如使用标记管理器来做到这一点。
设置Google跟踪代码管理器 (Setting Up Google Tag Manager)
Now that we are ready to add Google Analytics, the next step is to setup Google Tag Manager.
现在我们准备添加Google Analytics(分析),下一步就是设置Google跟踪代码管理器。
Visit the Google Tag Manager website and sign up using the same Google account you used with Google Analytics.
访问Google跟踪代码管理器网站,并使用与Google Analytics(分析)相同的Google帐户进行注册。
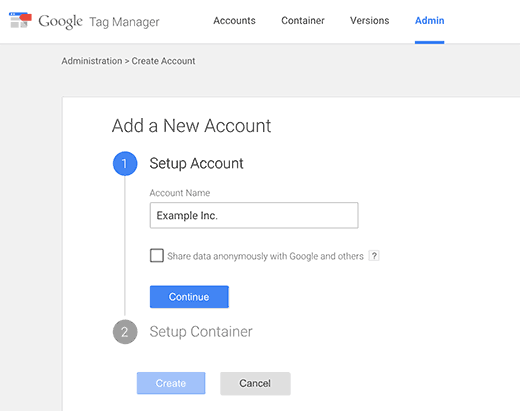
After login you will come to the add new account page. Simply provide a name for your account and click on the continue button.
登录后,您将进入“添加新帐户”页面。 只需提供您的帐户名称,然后单击继续按钮即可。
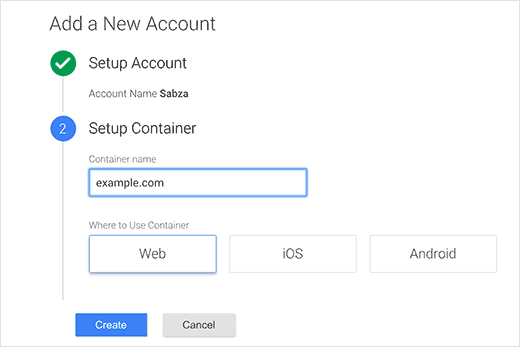
Now you need to add a container to your account. A container could be a website or an app on iOS or Android platforms. In this case we will use the web.
现在,您需要向您的帐户添加一个容器。 容器可以是iOS或Android平台上的网站或应用程序。 在这种情况下,我们将使用网络。
You can use your site’s domain for the container name. You can add multiple containers for each account. Once you’re done click on the create button to continue.
您可以将站点的域用作容器名称。 您可以为每个帐户添加多个容器。 完成后,单击“创建”按钮继续。
Google Tag Manager will now create your account with the container, and you will see your container dashboard. It would look something like this:
Google跟踪代码管理器现在将使用容器创建您的帐户,并且您会看到容器仪表板。 它看起来像这样:
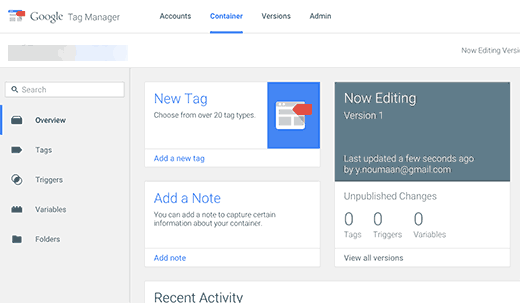
Now your Google Tag Manager account is ready, so the next step is to add a new tag. You can do this by clicking on create new tag.
现在,您的Google跟踪代码管理器帐户已准备就绪,因此下一步就是添加新标记。 您可以通过单击创建新标签来做到这一点。
First you will have to choose a tag product. Currently there are 20+ integration templates available.
首先,您将必须选择标签产品。 当前有20多种集成模板可用。
We will choose Google Analytics for now, but you can always add more tags and choose different products according to your needs. You can even click on custom HTML to add any other custom code snippets.
我们现在将选择Google Analytics(分析),但您始终可以添加更多标签,并根据需要选择其他产品。 您甚至可以单击自定义HTML来添加任何其他自定义代码段。
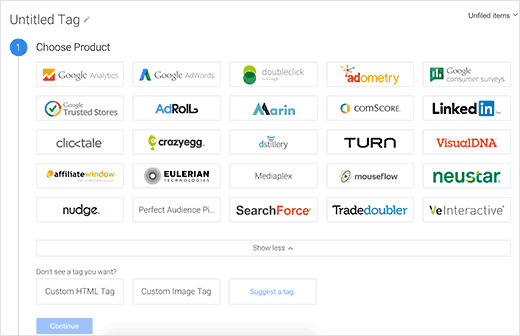
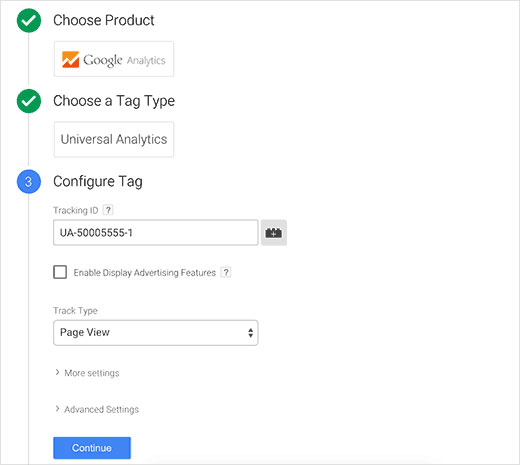
Once you choose Google Analytics, you will be asked to select between Universal Analytics or Classic Analytics. Choose universal analytics, and you will be asked to provide your analytics tracking ID.
选择Google Analytics(分析)后,系统会要求您在Universal Analytics或Classic Analytics之间进行选择。 选择通用分析,然后将要求您提供分析跟踪ID。
This tracking ID is a special code that allows Google to identify your site. You can obtain this ID by logging into your Google Analytics account and visiting the Admin tab.
此跟踪ID是一个特殊代码,可让Google识别您的网站。 您可以通过登录Google Analytics(分析)帐户并访问“管理”标签来获取此ID。
Select the account and property for your site and then click on tracking info to expand it. You will see the tracking code link.
选择您网站的帐户和媒体资源,然后点击跟踪信息以展开它。 您将看到跟踪代码链接。
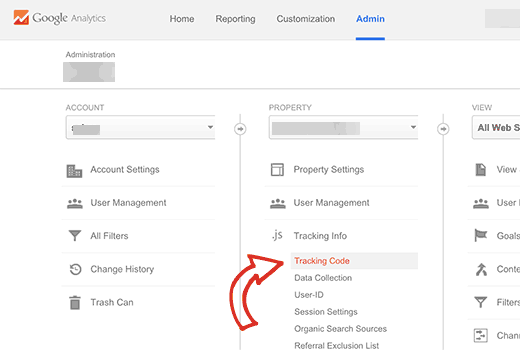
Clicking on tracking code will bring you to the tracking code page and will also reveal your UA tracking ID.
单击跟踪代码将带您进入跟踪代码页面,还将显示您的UA跟踪ID。
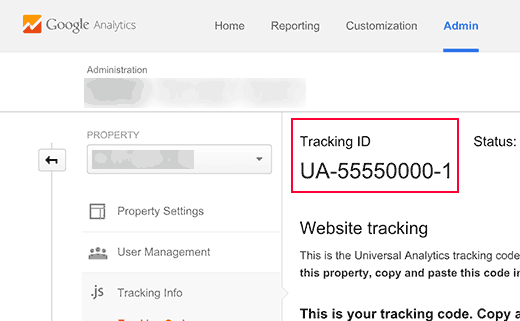
Copy your UA tracking ID and paste it in Google Tag Manager. Under track type choose Page View and then click on the continue button.
复制您的UA跟踪ID,并将其粘贴到Google跟踪代码管理器中。 在轨道类型下,选择页面视图,然后单击继续按钮。
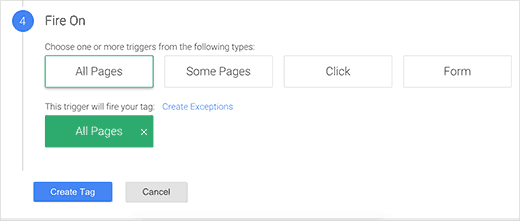
The tag configuration wizard will now ask you when to fire this tag. Select all pages and then click on the create button.
标签配置向导现在将询问您何时触发此标签。 选择所有页面,然后单击创建按钮。
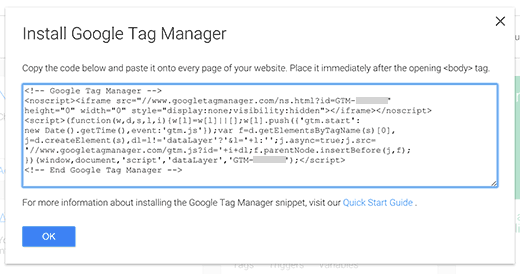
Google Tag Manager will now show you a tracking code that you need to add into your WordPress site. You need to copy this code.
Google跟踪代码管理器现在将向您显示您需要添加到WordPress网站中的跟踪代码。 您需要复制此代码。
在WordPress中添加标签管理器代码 (Adding Tag Manager Code in WordPress)
First thing you will need to do is install and activate Insert Headers and Footers plugin. Upon activation, you need to visit Settings » Insert Headers and Footers.
您需要做的第一件事是安装并激活“ 插入页眉和页脚”插件。 激活后,您需要访问设置»插入页眉和页脚 。
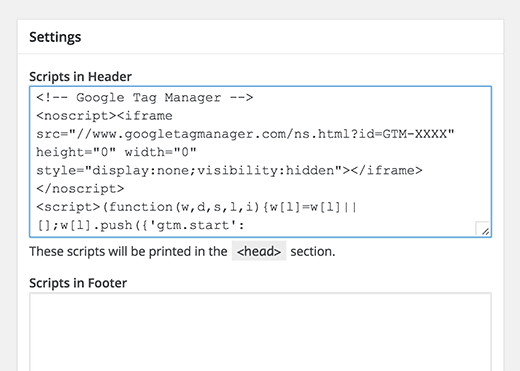
Paste your tag manager code in the header section and click on the save button to store your settings.
将代码管理器代码粘贴到标题部分,然后单击“保存”按钮以存储您的设置。
If you do not wish to install a plugin, then you can also add the Google Tag Manager code in your WordPress theme or Child theme. Simply edit the header.php template and paste the code right after <body> tag.
如果您不想安装插件,则还可以在WordPress主题或Child主题中添加Google跟踪代码管理器代码。 只需编辑header.php模板并将代码粘贴在<body>标签之后。
发布您的容器 (Publish Your Container)
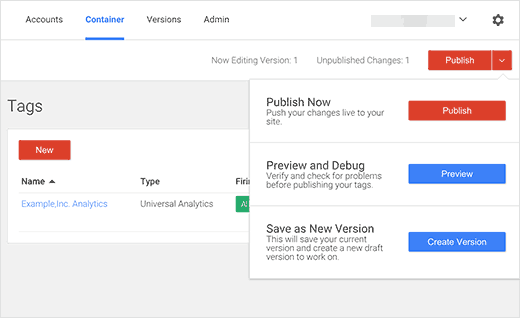
Tags in Google tag manager will not go live until you publish the container. Visit Google Tag Manager dashboard and then click on the publish button.
在您发布容器之前,Google标记管理器中的标记不会生效。 访问Google跟踪代码管理器信息中心,然后单击发布按钮。
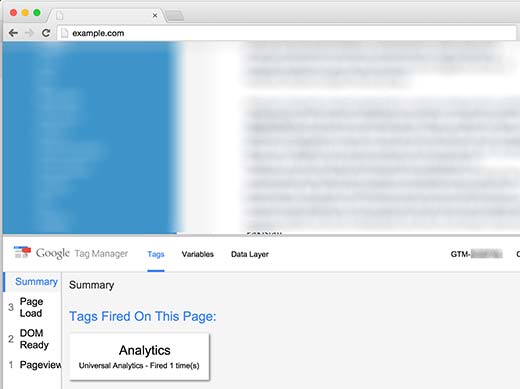
You can also preview your website and Google Tag Manager will show you the tags fired on each page view.
您还可以预览您的网站,并且Google跟踪代码管理器会向您显示在每个页面视图上触发的代码。
That’s all, you have successfully installed and setup Google Tag Manager for your WordPress site. You may also want to see our guide on 7 best analytics solutions for WordPress.
就是这样,您已经成功为WordPress网站安装并设置了Google跟踪代码管理器。 您可能还希望查看有关WordPress的7种最佳分析解决方案的指南。
If you liked this article, then please subscribe to our YouTube Channel for WordPress video tutorials. You can also find us on Twitter and Facebook.
如果您喜欢这篇文章,请订阅我们的YouTube频道 WordPress视频教程。 您也可以在Twitter和Facebook上找到我们。
翻译自: https://www.wpbeginner.com/beginners-guide/how-to-install-and-setup-google-tag-manager-in-wordpress/


 750
750

 被折叠的 条评论
为什么被折叠?


