


前言
1. 开发工具
FBX SDK 是用 C++ 开发的,同时提供 Python 库,本文介绍 FBX Python SDK 的使用。
2. 版本
截止今天(2023年6月14日)官网发布的最新版是2020.3.4,网上很多资料都是老版本的,新版本调用方式有改动模型加载速度也有很大提升。
注意:Python 版本是 3.10,因为 FBX Python SDK 2020.3.4 给的 Python 包是 Python3.10 的,如果想要其它版本的,下载
FBX Python Bindings自己构建。
安装
1. 下载 FBX Python SDK
官网地址,根据你的操作系统,下载相应的 FBX SDK 2020.3.4 Python exe 文件。
2. 安装
- 执行下载的文件
fbx202034_fbxpythonsdk_win.exe,安装完的程序路径我的是D:\Program Files\Autodesk\FBX\FBX Python SDK\2020.3.4。里面有个 Python 的whl包,还有个samples文件夹,这个也有用。 - 安装
whl:pip install fbx-2020.3.4-cp310-none-win_amd64.whl
使用
1. 加载模型
把上面提到的 samples 文件夹中的 FbxCommon.py 文件复制到你的 Python 程序目录。
import FbxCommon

filename = "" # 文件路径
manager, scene = FbxCommon.InitializeSdkObjects() # 初始化
FbxCommon.LoadScene(manager, scene, filename) # 加载场景
2. FbxScene 和 FbxNode
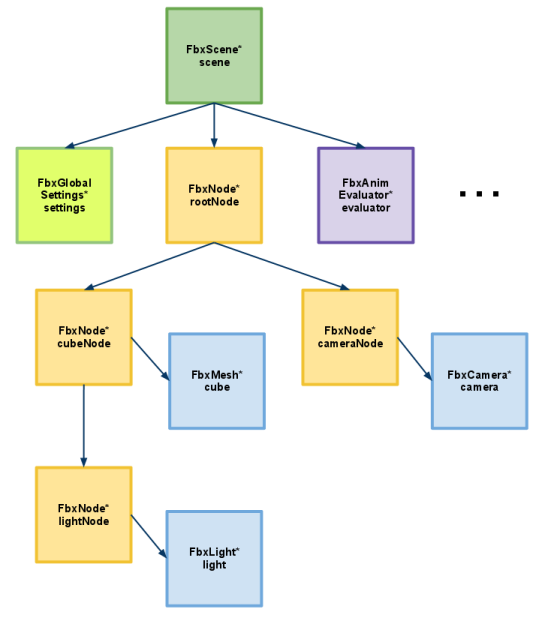
场景是节点组成的树状结构。FbxScene 有个根节点,节点通过 GetChild 方法获取子节点。
root_node = scene.GetRootNode()
for i in range(root_node.GetChildCount()):
    node = root_node.GetChild(i)
由此,可以获取每个节点
def make_tree(scene):
   def get_child(parent_node):
        child_count = parent_node.GetChildCount()
        tree = {}
        for i in range(child_count):
            child_node = parent_node.GetChild(i)
            tree[child_node.GetName()] = get_child(child_node)
        return tree
    root_node = scene.GetRootNode()
    tree = get_child(root_node)


 704
704


 被折叠的 条评论
为什么被折叠?
被折叠的 条评论
为什么被折叠?
 到【灌水乐园】发言


