


 这篇博客详述了在Ubuntu系统中安装TensorRT、CUDA和cuDNN的步骤,包括Anaconda环境的配置、驱动安装、CUDA Toolkit的下载与环境变量设置,以及cuDNN的添加。博主强调了快速获取知识的能力和从官方手册中获取原始资料的重要性。文章还展示了如何验证安装成功的例子,并提供了卸载CUDA的参考链接。
博主的一些基本环境配置可见之前博客非虚拟机环境下Ubuntu配置_jiugeshao的专栏-CSDN博客
TensorRT的介绍见之前博客,TensorRT的安装、TensorRT如何加速Pytorch、Tensorflow、Caffe等框架模型的资料还不是很多,建议还是先多看看官网提供的手册,原汁原味。
Developer Guide :: NVIDIA Deep Learning TensorRT Documentation https://docs.nvidia.com/deeplearning/tensorrt/developer-guide/index.html整了那么多东西之后发现,掌握了多少东西并不重要,快速获取知识的能力才是重要的,要善于从一些官网手册中获取最原始的资料。(博主工作中也经常需要这种探索,无人告知,只能自己去琢磨探索,无形之中适应了这种节奏)
这里安装Anaconda是为了在其python环境里去验证下cuda和cudnn是否配置成功了,同时后面系列博客的python环境也是在通过此Anaconda版本配置
第一步: 准备安装Anaconda
Index of /anaconda/archive/ | 清华大学开源软件镜像站 | Tsinghua Open Source MirrorIndex of /anaconda/archive/ | 清华大学开源软件镜像站,致力于为国内和校内用户提供高质量的开源软件镜像、Linux 镜像源服务,帮助用户更方便地获取开源软件。本镜像站由清华大学 TUNA 协会负责运行维护。 https://mirrors.tuna.tsinghua.edu.cn/anaconda/archive/下载3.5.2版本,完毕后,cd到文件所在目录下,输入如下命令进行安装
bash Anaconda3-5.2.0-Linux-x86_64.sh
按照提示操作即可,到如下信息提示的时候,输入no,完成安装。

重启终端后,输入python,看到如下信息:

第二步:安装显卡驱动
先增加如下的源
sudo add-apt-repository ppa:graphics-drivers/ppa
sudo apt update
如下命令检查可以安装的驱动版本
ubuntu-drivers devices出现如下信息: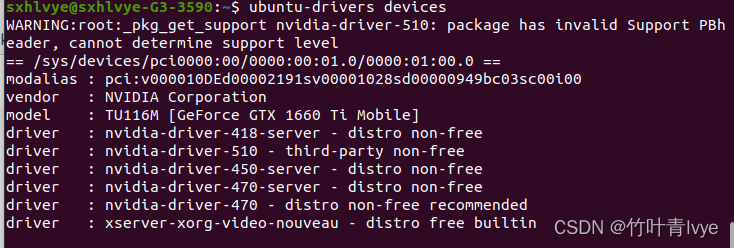
博主这里选择推荐的那一个驱动版本,如下命令进行安装
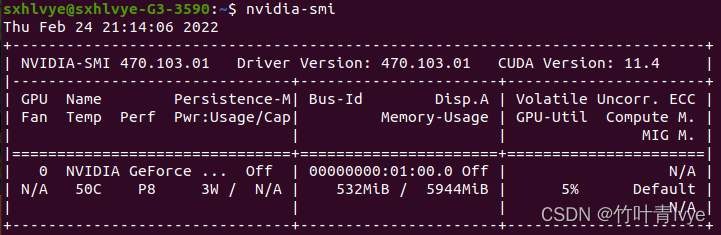
sudo apt install nvidia-driver-470安装前输入nvidia-smi,会出现如下信息:

安装完毕后,输入nvidia-smi
第三步:安装cuda
CUDA Toolkit Archive | NVIDIA Developerhttps://developer.nvidia.com/cuda-toolkit-archive网页上下载cuda11.0
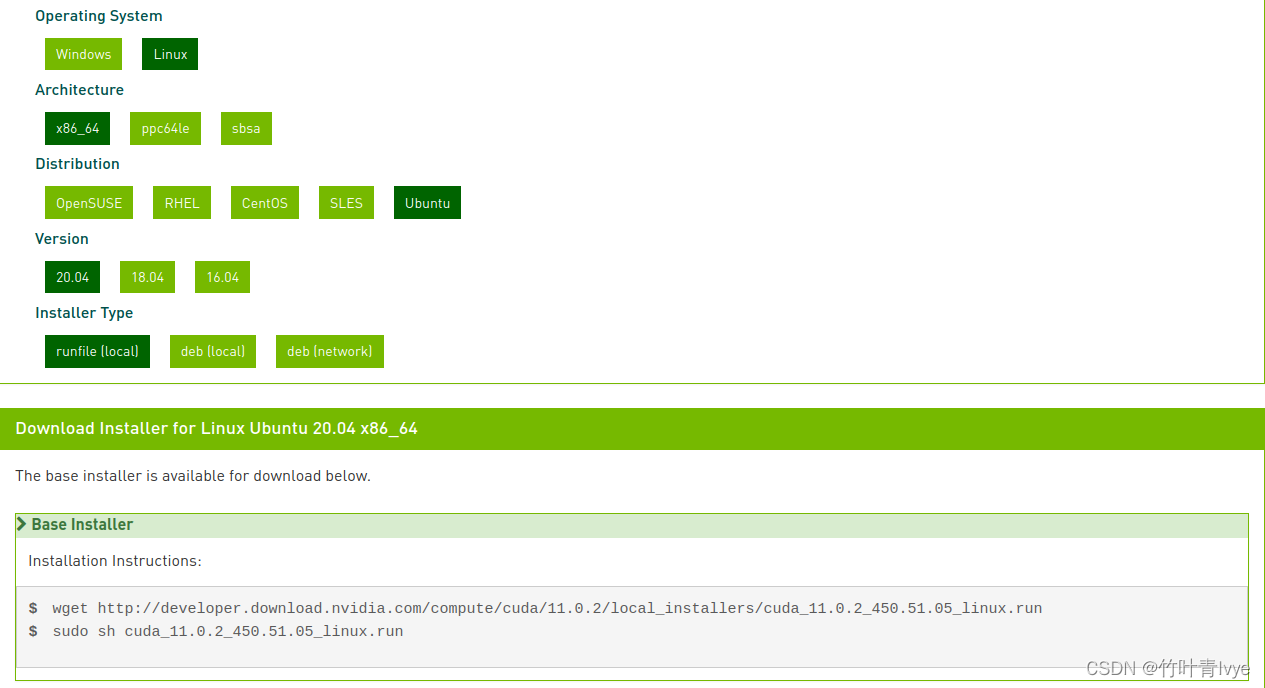
选择配置后,按照提示执行两条命令语句进行下载安装
wget http://developer.download.nvidia.com/compute/cuda/11.0.2/local_installers/cuda_11.0.2_450.51.05_linux.run
sh cuda_11.0.2_450.51.05_linux.run
安装就按照指引来就行了,注意到如下时,去掉驱动安装的选择,因为前面显卡驱动已经安装好了,在每个选项前面enter下即可以选择安装还是不安装
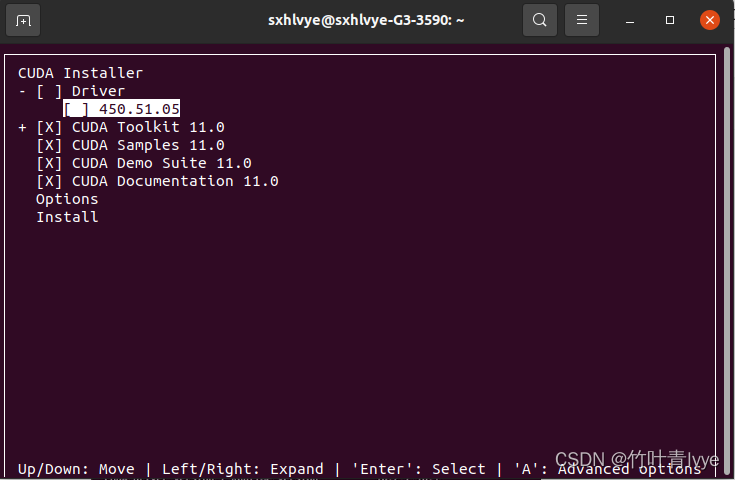
安装完毕后,配置下环境变量
sudo gedit ~/.bashrcexport PATH=/usr/local/cuda-11.0/bin:/usr/local/cuda-11.0/nsight-compute-2020.1.1${PATH:+:${PATH}}
export LD_LIBRARY_PATH=/usr/local/cuda-11.0/lib64${LD_LIBRARY_PATH:+:${LD_LIBRARY_PATH}}
export LD_LIBRARY_PATH=/usr/local/cuda-11.0/extras/CUPTI/lib64${LD_LIBRARY_PATH:+:${LD_LIBRARY_PATH}}sudo source ~/.bashrc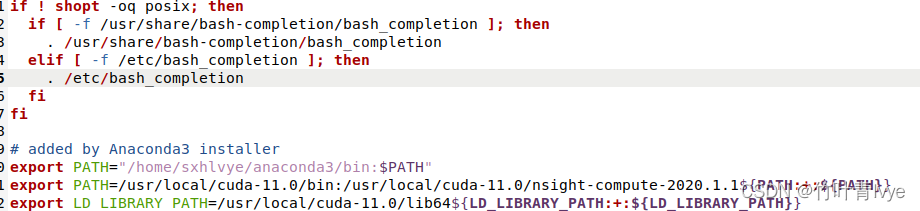
可以运行下cuda自带的sample示例
cd /usr/local/cuda-11.0/samples/1_Utilities/deviceQuery
sudo make
./deviceQuery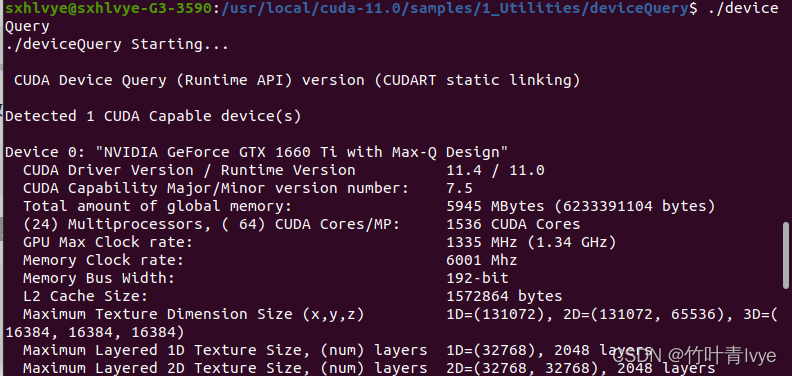
成功安装
若要卸载可以参考博客,亲测是可以的。ubuntu完全卸载CUDA_Venquieu的博客-CSDN博客_ubuntu卸载cuda
第四步:安装cudnn
cuDNN Archive | NVIDIA Developerhttps://developer.nvidia.com/rdp/cudnn-archive下载cudnn8.0版本,选择Linux(x86_64)版本

下载完毕后解压,cd到所下载的文件夹目录下
cd /home/sxhlvye/Downloads/cudnn-11.0-linux-x64-v8.0.5.39然后执行如下命令,替换cuda中的和神经网络相关的库和文件
sudo cp cuda/include/cudnn.h /usr/local/cuda-11.0/include
sudo cp cuda/lib64/libcudnn* /usr/local/cuda-11.0/lib64
sudo chmod a+r /usr/local/cuda-11.0/include/cudnn.h
sudo chmod a+r /usr/local/cuda-11.0/lib64/libcudnn*
验证:
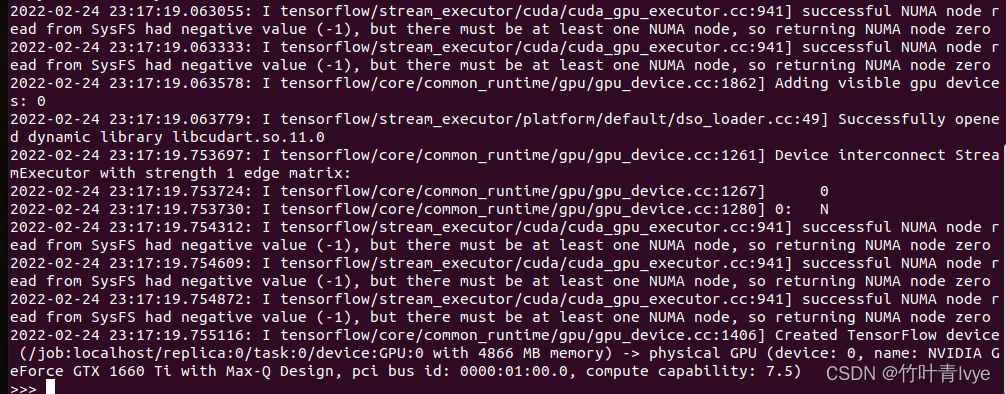
在Anaconda3的python环境下安装库
pip install tensorflow-gpu==2.4.0
tensorflow和cuda、cudnn之间的对应关系可见网址从源代码构建 | TensorFlow
安装完毕后执行如下语句:
import tensorflow as tf
sess = tf.compat.v1.Session()
输入如下信息,成功安装:
第五步:安装TensorRT
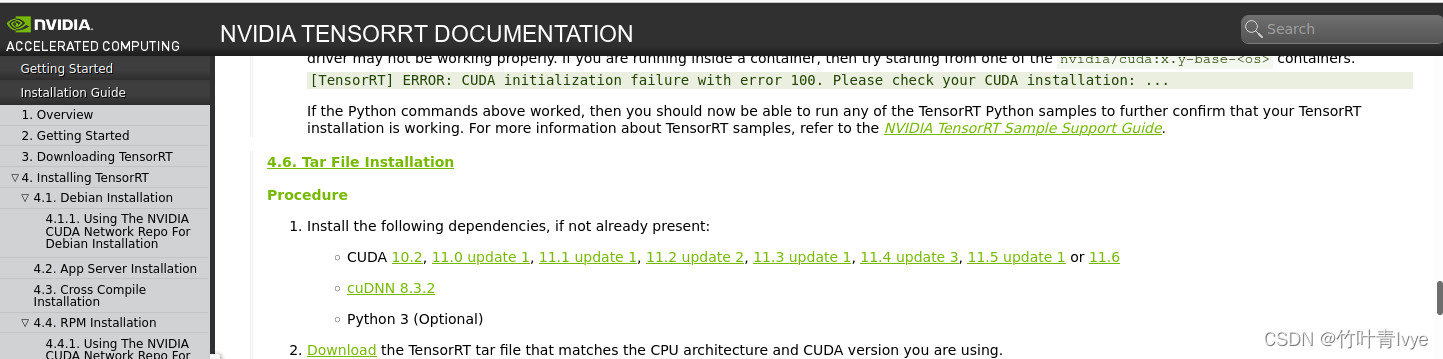
官网上介绍了好几种装方式,博主使用的是从tar文件进行安装
Installation Guide :: NVIDIA Deep Learning TensorRT Documentation
如下网页上进行下载

1. 解压下载的文件
tar -xzvf TensorRT-8.0.0.3.Linux.x86_64-gnu.cuda-11.0.cudnn8.2.tar.gz
解压后的文件夹名为 ensorRT-8.0.0.3
2. 添加环境变量
sudo gedit ~/.bashrcexport LD_LIBRARY_PATH=$LD_LIBRARY_PATH:/home/sxhlvye/Downloads/TensorRT-8.0.0.3/libsource ~/.bashrc
3.这里先省去给python添加TensorRT的库,后面博客会用到,到时候再说
验证:
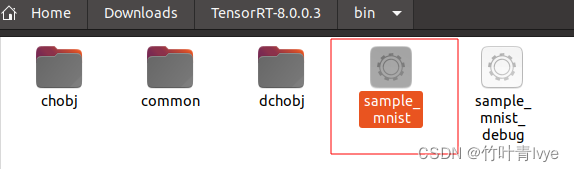
这里跑下其自带的例子sampleMNIST,路径如下
cd /home/sxhlvye/Downloads/TensorRT-8.0.0.3/samples/sampleMNIST然后直接输入make进行编译,完毕后会在路径/home/sxhlvye/Downloads/TensorRT-8.0.0.3/bin下看到编译好的可执行文件
./sample_mnist输出如下信息:
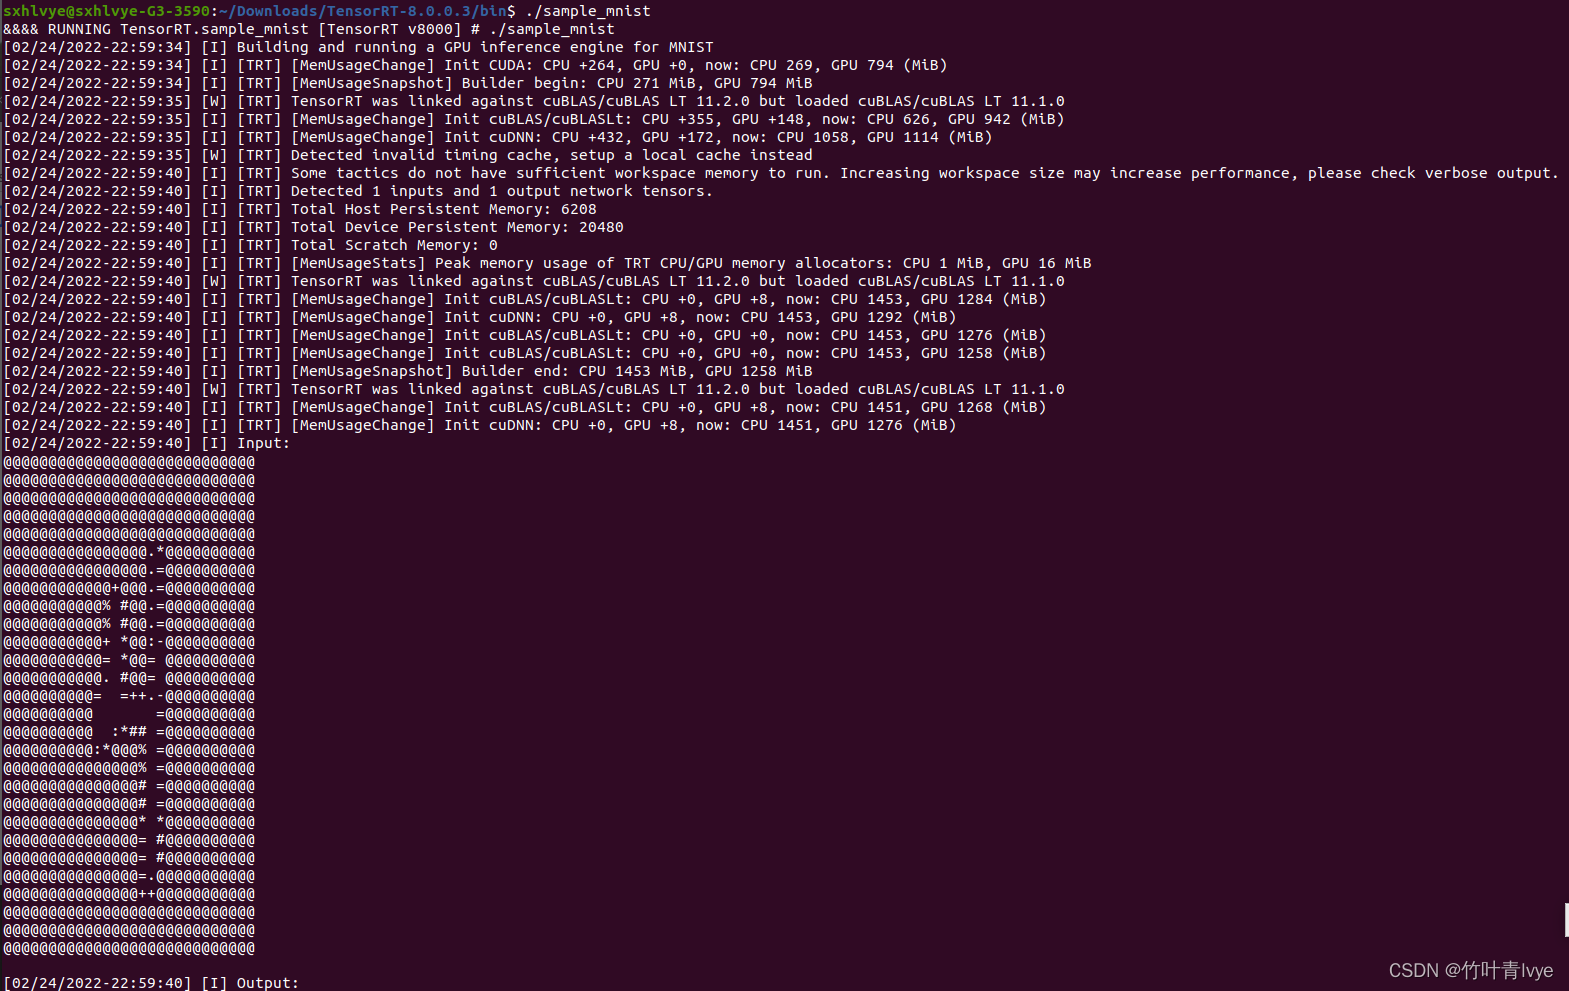
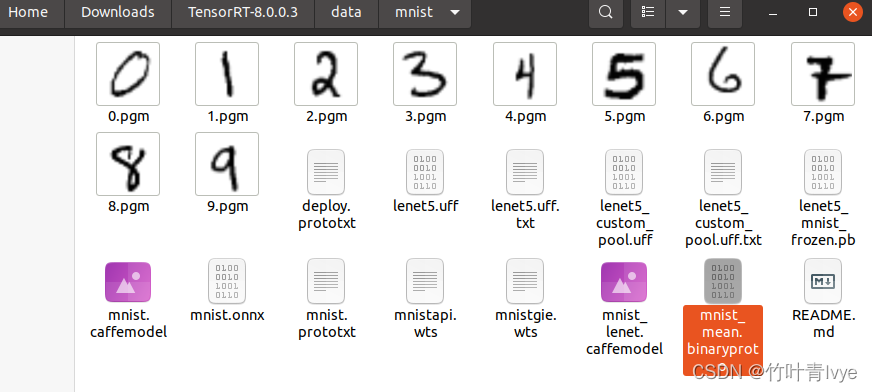
该自带例子演示了如何用用TensorRT在预测阶段如何加快caffe模型对一张图片的预测时间,默认参数下,其会利用路径下/home/sxhlvye/Downloads/TensorRT-8.0.0.3/data/mnist下的deploy.prototxt、mnist.caffemodel、mnist_mean.binaryproto来对该目录下的一张图片预测结果
预测结果以一堆字符堆积形状而成。
Caffe的一些知识点可见我之前博客Caffe基础(二)-使用命令行方式训练预测mnist、cifar10及自己的数据集_jiugeshao的专栏-CSDN博客https://blog.csdn.net/jiugeshao/article/details/104072324
接下来会有系列博客,基本就是围绕如何使用TensorRT来加速各框架训练出来的模型(预测一张图片的速度)
补充:
nvcc -V可以查看cuda的版本

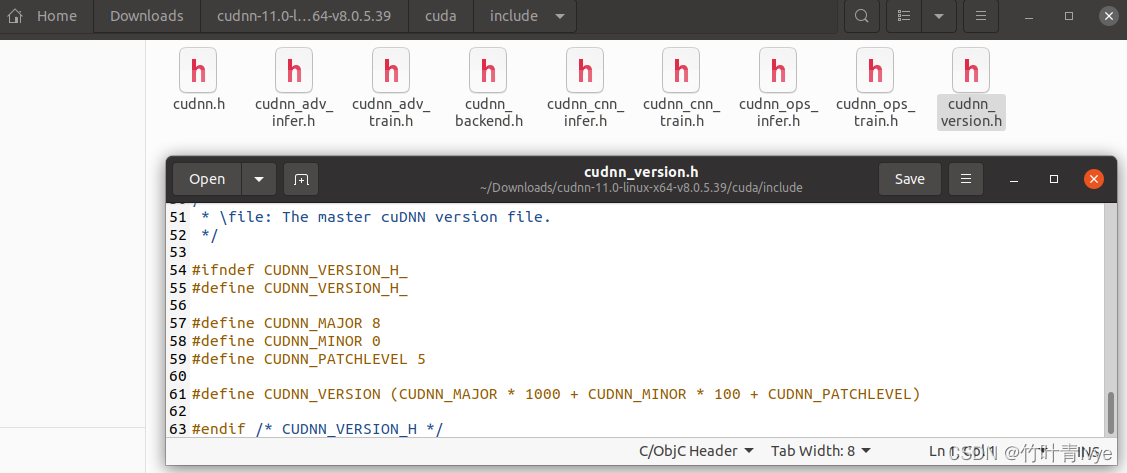
cudnn的版本要去看cudnn_version.h, 但我们一般只是拷贝cudnn.h文件到cuda的文件夹下,然后cudnn的下载文件夹可能也被删掉了,就没有办法查看了
此时也可以通过执行加载tensorrt模型脚本
import torch
import torchvision
from PIL import Image
from torchvision import transforms
import torchvision.models as models
import matplotlib.pyplot as plt
import time
import tensorrt as trt
import pycuda.driver as cuda
import pycuda.autoinit
import pdb
import os
import numpy as np
import cv2

# This logger is required to build an engine
TRT_LOGGER = trt.Logger()

filename = "2008_002682.jpg"
engine_file_path = "vgg16.trt"

class HostDeviceMem(object):
    def __init__(self, host_mem, device_mem):
        """Within this context, host_mom means the cpu memory and device means the GPU memory
        """
        self.host = host_mem
        self.device = device_mem
    def __str__(self):
        return "Host:\n" + str(self.host) + "\nDevice:\n" + str(self.device)
    def __repr__(self):
        return self.__str__()

def allocate_buffers(engine):
    inputs = []
    outputs = []
    bindings = []
    stream = cuda.Stream()
    for binding in engine:
        size = trt.volume(engine.get_binding_shape(binding)) * engine.max_batch_size
        dtype = trt.nptype(engine.get_binding_dtype(binding))
        # Allocate host and device buffers
        host_mem = cuda.pagelocked_empty(size, dtype)
        device_mem = cuda.mem_alloc(host_mem.nbytes)
        # Append the device buffer to device bindings.
        bindings.append(int(device_mem))
        # Append to the appropriate list.
        if engine.binding_is_input(binding):
            inputs.append(HostDeviceMem(host_mem, device_mem))
        else:
            outputs.append(HostDeviceMem(host_mem, device_mem))

    return inputs, outputs, bindings, stream

print("Reading engine from file {}".format(engine_file_path))
with open(engine_file_path, "rb") as f, trt.Runtime(TRT_LOGGER) as runtime:
    engine =  runtime.deserialize_cuda_engine(f.read())

#create the context for this engine
context = engine.create_execution_context()

# #allocate buffers for input and output
inputs, outputs, bindings, stream = allocate_buffers(engine) # input, output: host # bindings
结果如下:
/home/sxhlvye/anaconda3/envs/pytorch-yolo/bin/python /home/sxhlvye/Trial/yolov3-9.5.0/test_logger.py
Reading engine from file vgg16.trt
[TensorRT] WARNING: TensorRT was linked against cuBLAS/cuBLAS LT 11.2.0 but loaded cuBLAS/cuBLAS LT 11.1.0
[TensorRT] WARNING: TensorRT was linked against cuDNN 8.2.0 but loaded cuDNN 8.0.5
[TensorRT] WARNING: TensorRT was linked against cuBLAS/cuBLAS LT 11.2.0 but loaded cuBLAS/cuBLAS LT 11.1.0
[TensorRT] WARNING: TensorRT was linked against cuDNN 8.2.0 but loaded cuDNN 8.0.5

Process finished with exit code 0
从上面的提醒可以看到当前配置所用的cudnn版本
注意执行如下脚本查看到的cuda和cudnn版本不是你通过上面配置的cuda、cudnn版本,而是库里自带的版本。
#!/usr/bin/env python
# -*- coding: utf-8 -*-
# author:Icecream.Shao
import torch
import torchvision
from torch import nn

print(torch.cuda.is_available()) #判断是否支持cuda
print(torch.cuda.device_count()) #当前支持cuda的硬件个数
print(torch.version.cuda)
print(torch.backends.cudnn.version())

device = torch.device("cuda:0" if torch.cuda.is_available() else "cpu") #选择一个gpu
print(device)
used_gpu_name = torch.cuda.get_device_name(device) #获取所选择的gpu名字
print(used_gpu_name)

#print的常用语法
n=3
print('The squre of',n,'is',n*n)
print('The squre of ' + str(n) + ' is ' + str(n*n))
print('The squre of %s is %s' % (n,n*n))
print('The squre of {1} is {0}'.format(n*n, n))
print(f'model cost:{0.3:.3f}s')

#内置模型的加载方法
#vgg16 = torchvision.models.vgg16(pretrained=True).cuda()
# vgg16 = torchvision.models.vgg16(pretrained=True).to(device)
# print(vgg16)
#
# #增加层以及修改层参数
# vgg16.classifier.add_module('my_linear', nn.Linear(1000, 10))
# vgg16.classifier[7] = nn.Linear(1000,2)
# print(vgg16)

#内置数据集的获取方法
#train_data = torchvision.datasets.CIFAR10("./data",train=True,transform=torchvision.transforms.ToTensor)
#print("load ok")
执行结果如下:
/home/sxhlvye/anaconda3/envs/pytorch-yolo/bin/python /home/sxhlvye/Trial/yolov3-9.5.0/test_pytorch.py
True
1
11.0
8005
cuda:0
NVIDIA GeForce GTX 1660 Ti with Max-Q Design
The squre of 3 is 9
The squre of 3 is 9
The squre of 3 is 9
The squre of 3 is 9
model cost:0.300s

Process finished with exit code 0


 1473
1473

 被折叠的 条评论
为什么被折叠?
被折叠的 条评论
为什么被折叠?
 到【灌水乐园】发言


