


前面已有博客介绍了QT的安装和配置VS2019配置Qt5.14.2以及在线配置Qt5.15.2,
这里再接着该版本说明下QT的使用,主要是汇总下之前博客中的内容:
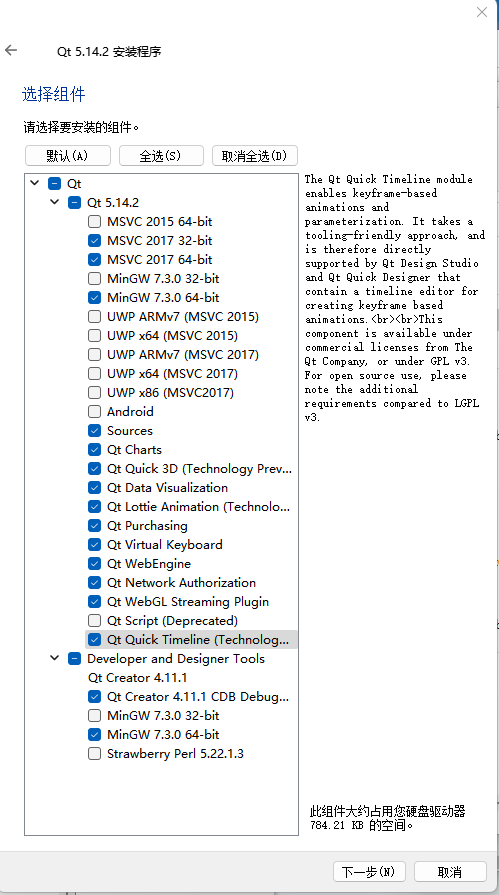
注意前面安装时候,做如下的勾选选择:
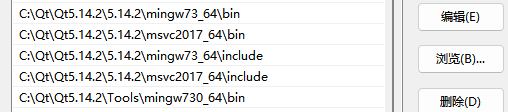
同时系统环境变量里添加如下变量环境
一.命令行方式编译一个简单的qt程序
拿之前博客中的现成例子来演示,VS2019配置Qt5.14.2以及在线配置Qt5.15.2,文章最后有附上一个QTCreator创建的工程链接
链接:https://pan.baidu.com/s/1AomYijJobGY855zeBV5U1g
提取码:rky4
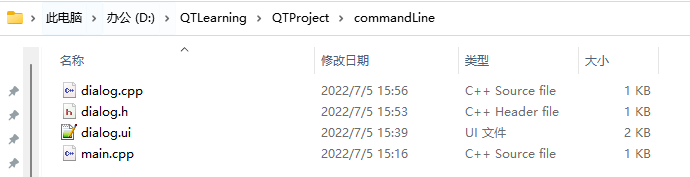
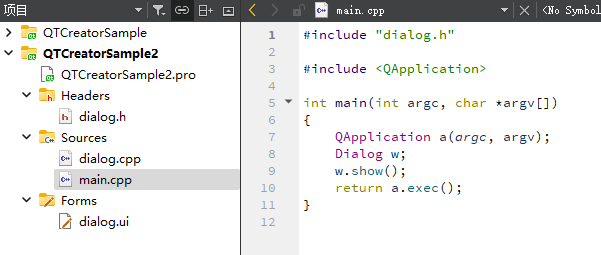
将工程中的四个文件拷贝到一个新建目录下,如下所示:
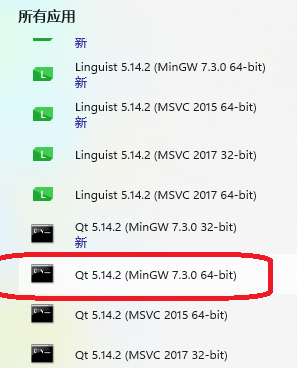
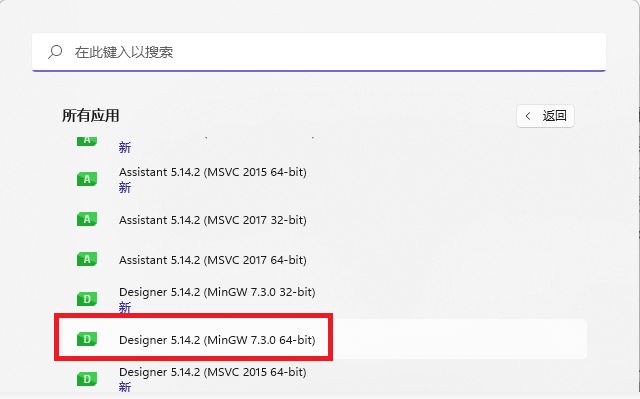
然后运行Qt 5.14.2(MingGW 7.3.0 64-bit)
在弹出来的CMD窗口内先后执行如下命令语句
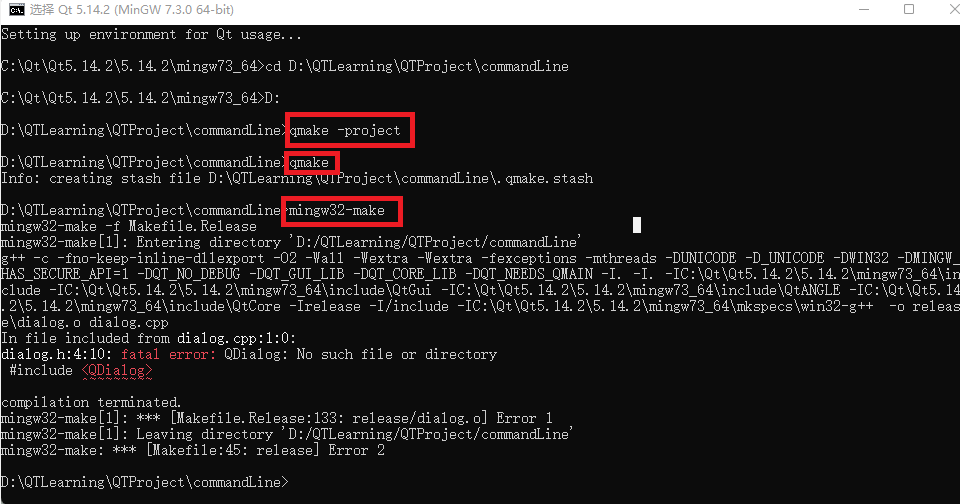
可看到出现了报错信息fatal error: QDialog: No such file or directory,这里可以修改生成的pro文件,如下是原始生成的
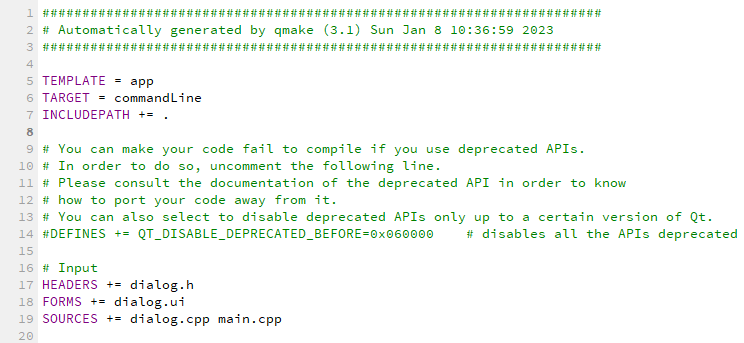
修改为如下:
######################################################################
# Automatically generated by qmake (3.1) Sun Jan 8 10:36:59 2023
######################################################################
QT       += core gui
greaterThan(QT_MAJOR_VERSION, 4): QT += widgets

TEMPLATE = app
TARGET = commandLine
INCLUDEPATH += .

# You can make your code fail to compile if you use deprecated APIs.
# In order to do so, uncomment the following line.
# Please consult the documentation of the deprecated API in order to know
# how to port your code away from it.
# You can also select to disable deprecated APIs only up to a certain version of Qt.
#DEFINES += QT_DISABLE_DEPRECATED_BEFORE=0x060000    # disables all the APIs deprecated before Qt 6.0.0

# Input
HEADERS += dialog.h
FORMS += dialog.ui
SOURCES += dialog.cpp main.cpp
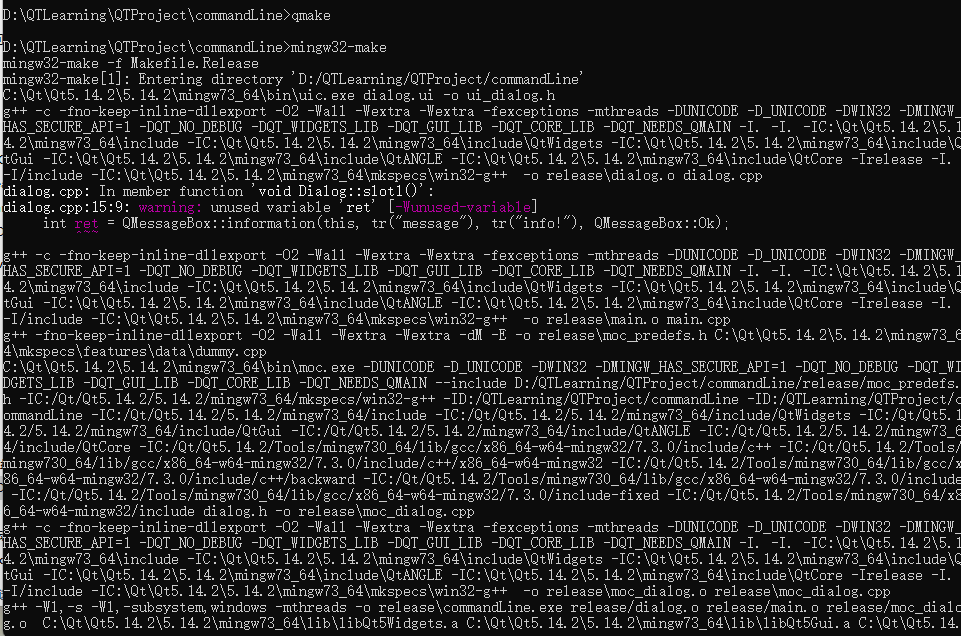
再继续分别执行qmake和mingw32-make命令
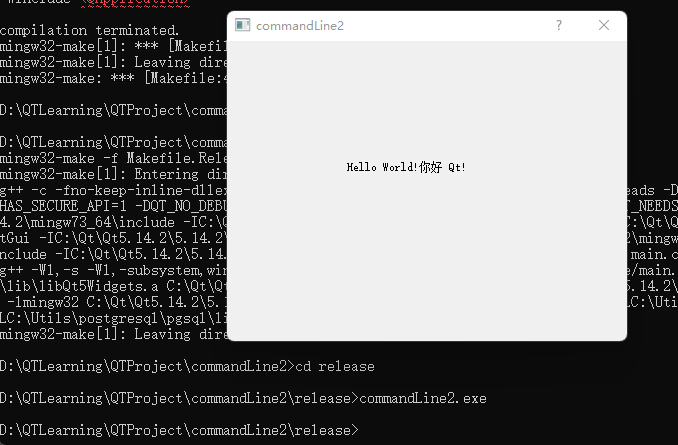
然后cd到release目录下,将生成的exe文件跑起来
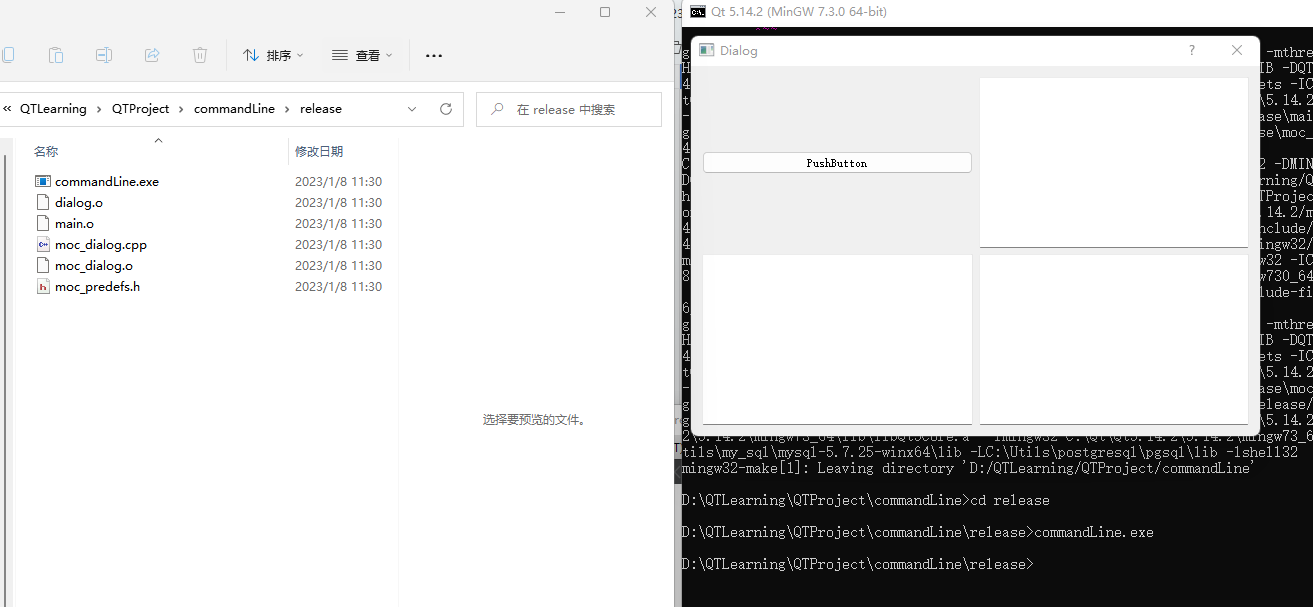
可看到程序功能运行正常
注:这边在使用mingw32-make命令的时候,生成的中间语句可以注意下:

如果要由ui文件获得对应的.h文件可以使用如上命令
给程序添加应用图标
拷贝一个ico文件到上面的目录下,同时在该目录下新建一个myico.rc文件,里面内容(可notepad++)修改为如下:
IDI_ICON1 ICON DISCARDABLE "tubiao.ico"然后打开pro文件,在末尾添加如下一句
RC_FILE += myico.rc
######################################################################
# Automatically generated by qmake (3.1) Sun Jan 8 10:36:59 2023
######################################################################
QT       += core gui
greaterThan(QT_MAJOR_VERSION, 4): QT += widgets

TEMPLATE = app
TARGET = commandLine
INCLUDEPATH += .

# You can make your code fail to compile if you use deprecated APIs.
# In order to do so, uncomment the following line.
# Please consult the documentation of the deprecated API in order to know
# how to port your code away from it.
# You can also select to disable deprecated APIs only up to a certain version of Qt.
#DEFINES += QT_DISABLE_DEPRECATED_BEFORE=0x060000    # disables all the APIs deprecated before Qt 6.0.0

# Input
HEADERS += dialog.h
FORMS += dialog.ui
SOURCES += dialog.cpp main.cpp

RC_FILE += myico.rc
完毕后再分别执行qmake命令和mingw32-make命令,完毕后运行程序,如下:
可看到图标已经正确添加了。
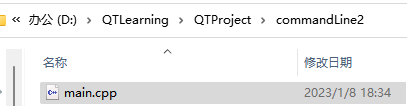
再继续尝试另一个例子,在一个新的文件夹中纯文本编辑一份main.cpp文件,文件中代码如下:
#include <QApplication>
#include <QDialog>
#include <QLabel>
#include <QTextCodec>

int main(int argc, char *argv[])
{
    QApplication a(argc, argv);
    QTextCodec::setCodecForLocale(QTextCodec::codecForLocale());

    QDialog w;
    w.resize(400,300);

    QLabel label(&w);
    label.move(120,120);
    label.setText("Hello World!你好 Qt!");
    w.show();
    return a.exec();
}
然后执行qmake命令获得pro文件,修改pro文件如下:
######################################################################
# Automatically generated by qmake (3.1) Sun Jan 8 18:36:31 2023
######################################################################
QT       += core gui
greaterThan(QT_MAJOR_VERSION, 4): QT += widgets

TEMPLATE = app
TARGET = commandLine2
INCLUDEPATH += .

# You can make your code fail to compile if you use deprecated APIs.
# In order to do so, uncomment the following line.
# Please consult the documentation of the deprecated API in order to know
# how to port your code away from it.
# You can also select to disable deprecated APIs only up to a certain version of Qt.
#DEFINES += QT_DISABLE_DEPRECATED_BEFORE=0x060000    # disables all the APIs deprecated before Qt 6.0.0

# Input
SOURCES += main.cpp
然后再执行qmake命令和mingw32-make命令
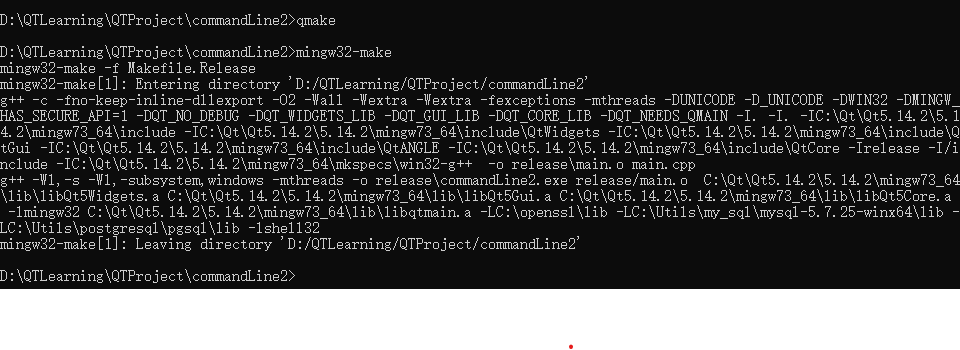
执行exe命令,效果如下:
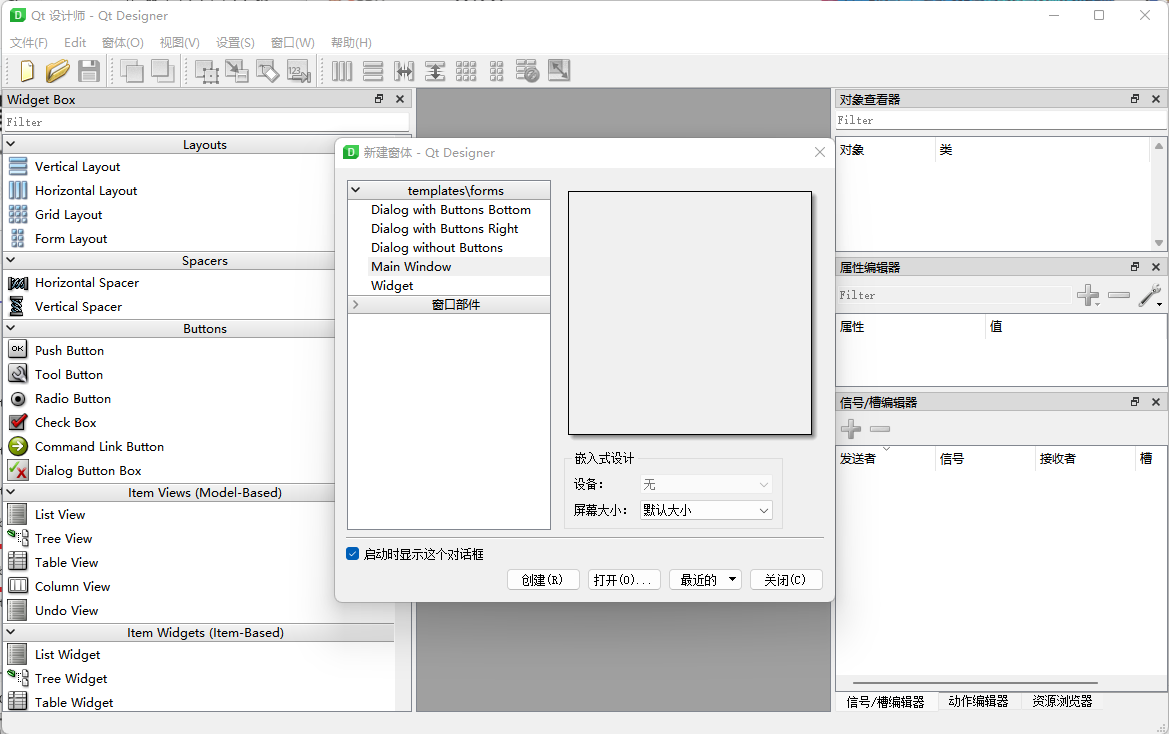
到这边,以这种纯文本形式编辑代码,命令行编译的方式就简单概括了,ui界面的设计可以用Designer 5.14.2(MingGW 7.3.0 64-bit)来设计。对比博客中在ubuntu下命令行形式编译,方法是一样的。
https://blog.csdn.net/jiugeshao/article/details/121845539?spm=1001.2014.3001.5502
但我们更常用的还是通过编译环境来去写代码,方便调试,毕竟还是要站在巨人的肩膀上,善于利用工具,提高效率。
二.利用集成开发环境来设计程序
这里主要来拿QTCreator来做说明。
手动去设计界面
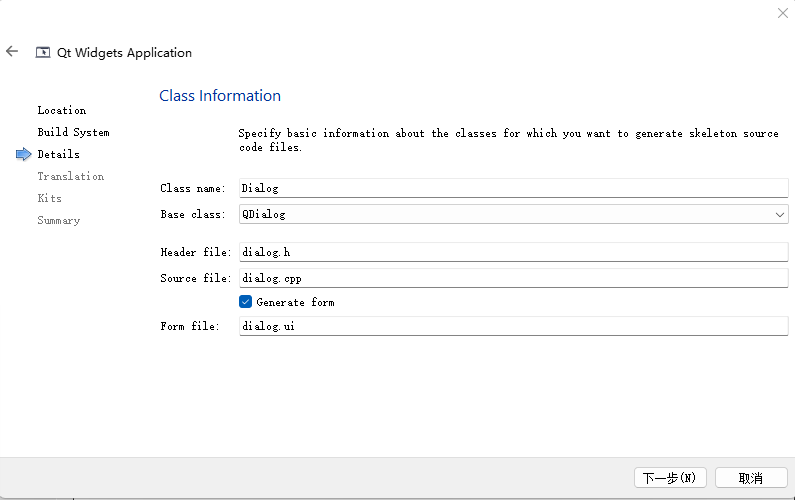
(1)新建项目,基类型选择QDialog
(2)生成的工程目录结构如下:
初始的pro文件中内容如下:
QT       += core gui

greaterThan(QT_MAJOR_VERSION, 4): QT += widgets

CONFIG += c++11

# The following define makes your compiler emit warnings if you use
# any Qt feature that has been marked deprecated (the exact warnings
# depend on your compiler). Please consult the documentation of the
# deprecated API in order to know how to port your code away from it.
DEFINES += QT_DEPRECATED_WARNINGS

# You can also make your code fail to compile if it uses deprecated APIs.
# In order to do so, uncomment the following line.
# You can also select to disable deprecated APIs only up to a certain version of Qt.
#DEFINES += QT_DISABLE_DEPRECATED_BEFORE=0x060000    # disables all the APIs deprecated before Qt 6.0.0

SOURCES += \
    main.cpp \
    dialog.cpp

HEADERS += \
    dialog.h

FORMS += \
    dialog.ui

# Default rules for deployment.
qnx: target.path = /tmp/$${TARGET}/bin
else: unix:!android: target.path = /opt/$${TARGET}/bin
!isEmpty(target.path): INSTALLS += target
初始的dialog.h中内容如下:
#ifndef DIALOG_H
#define DIALOG_H

#include <QDialog>

QT_BEGIN_NAMESPACE
namespace Ui { class Dialog; }
QT_END_NAMESPACE

class Dialog : public QDialog
{
    Q_OBJECT

public:
    Dialog(QWidget *parent = nullptr);
    ~Dialog();

private:
    Ui::Dialog *ui;
};
#endif // DIALOG_H
初始的dialog.cpp中内容如下:
#include "dialog.h"
#include "ui_dialog.h"

Dialog::Dialog(QWidget *parent)
    : QDialog(parent)
    , ui(new Ui::Dialog)
{
    ui->setupUi(this);
}

Dialog::~Dialog()
{
    delete ui;
}
初始的main.cpp中内容如下:
#include "dialog.h"

#include <QApplication>

int main(int argc, char *argv[])
{
    QApplication a(argc, argv);
    Dialog w;
    w.show();
    return a.exec();
}
dialog.ui界面为空
(3)手动在界面上添加如下几个控件
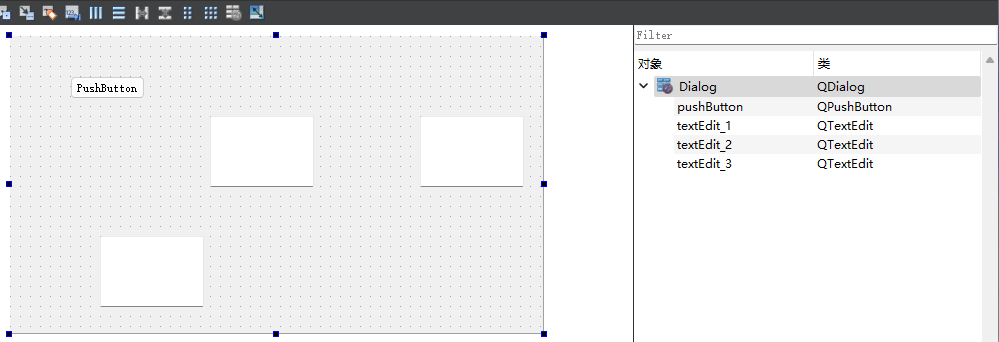
鼠标选中dialog窗体,然后点击栏栅格布局按钮,界面上控件即如下排列了
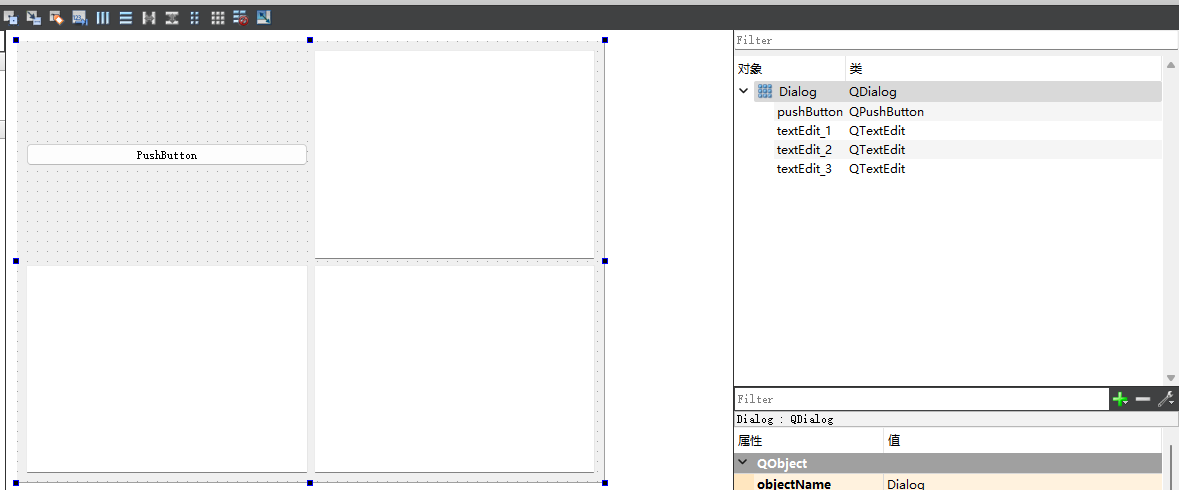
此设计时,并不会影响dialog.h, dialog.cpp, main.cpp中的代码
2.手动添加信号和槽
(1) 给PushButton按钮手动添加信号和对应的槽
选中按钮后,点击Edit Signals/Slots选项
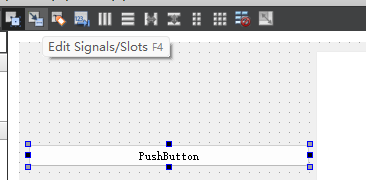
把线拖到界面外的空白处

出现如下的界面
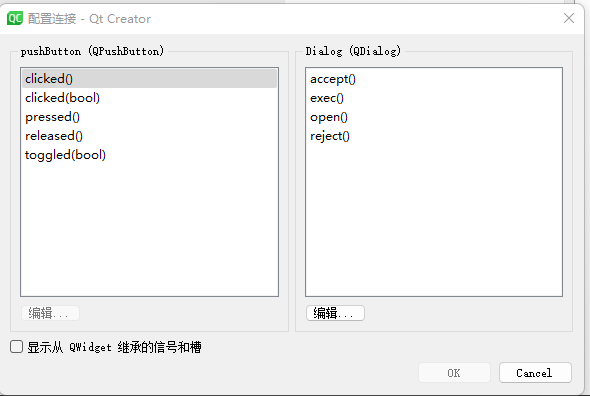
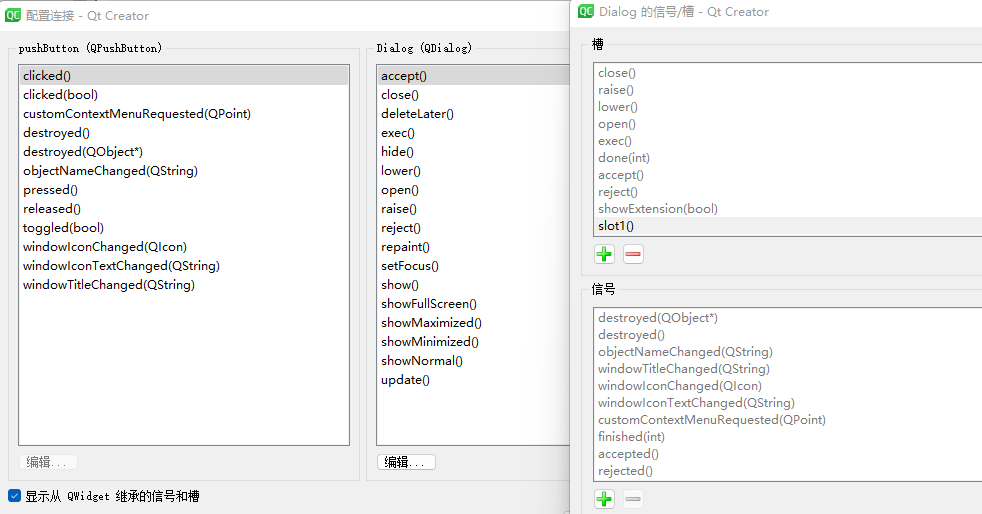
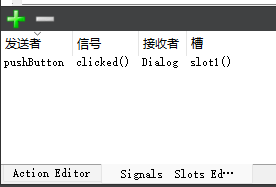
勾选显示从QWidget继承的信号和槽,点击编辑,可以槽一栏中添加slot1槽
完毕后点击OK按钮。如下界面时,点击Edit Widgets
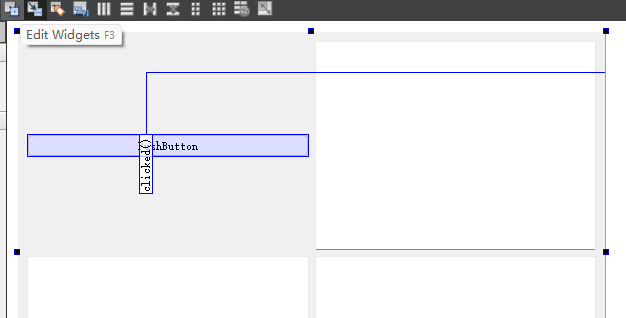
在Signals Slots Edit栏中能看到如下的信息
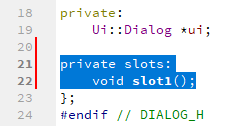
(2)在dialog.h文件中添加如下代码:
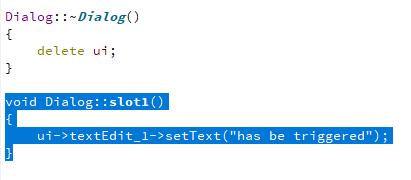
(3)在dialog.cpp文件中添加如下代码:
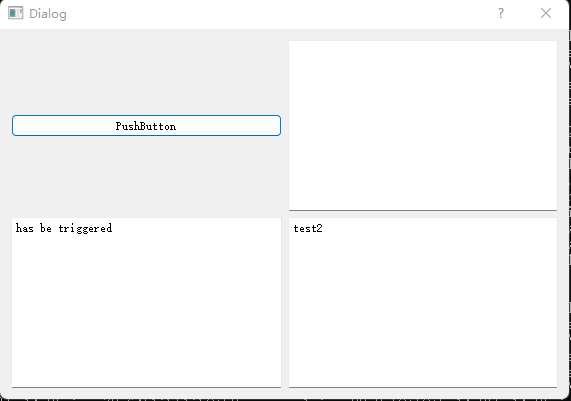
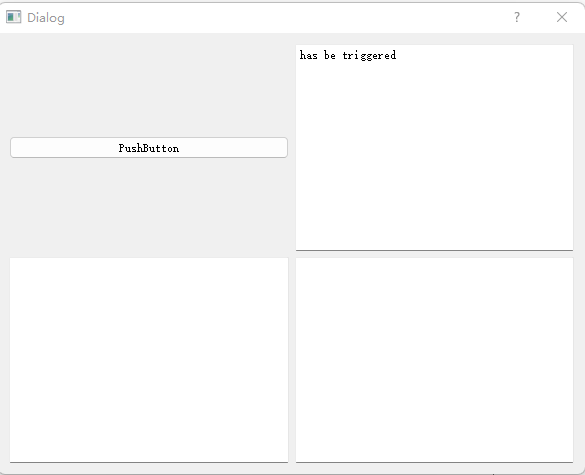
到这里运行效果如下:
3.自定义信号和槽
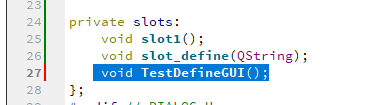
(1)在dialog.h文件中添加如下自定义信号(选中代码)
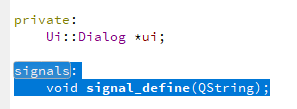
继续再添加自定义槽

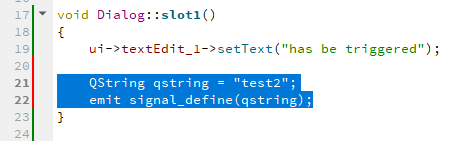
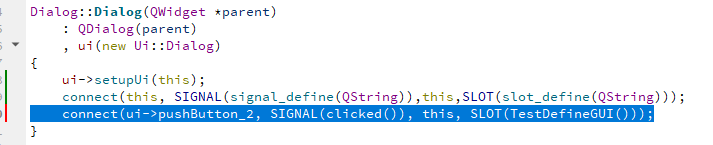
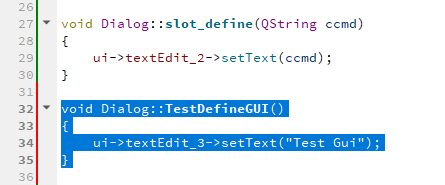
(2)在dialog.cpp文件中添加如下代码(选中代码)


再添加如下代码
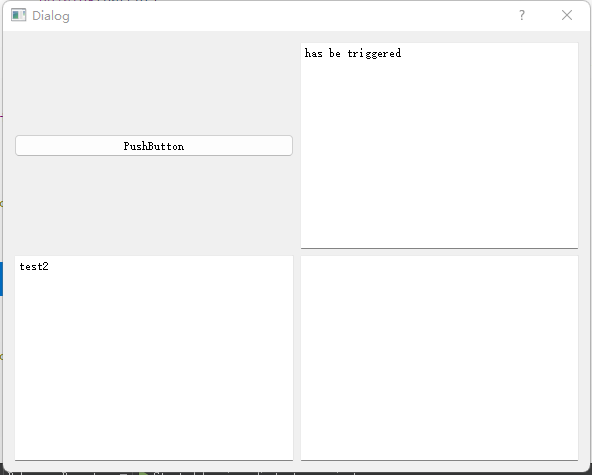
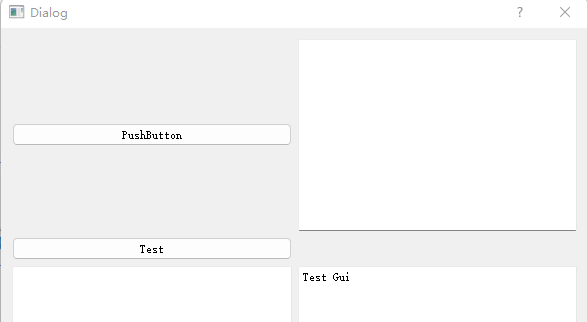
运行效果如下:
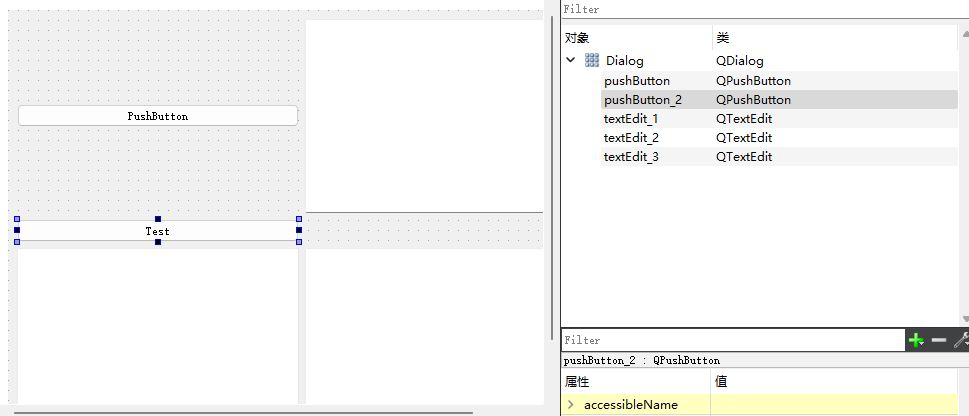
4.代码绑定界面上某个按钮的信号和槽
(1)界面上添加一个新的按钮
(2)在dialog.h文件中添加如下代码
在dialog.cpp文件中添加如下代码
运行效果如下:
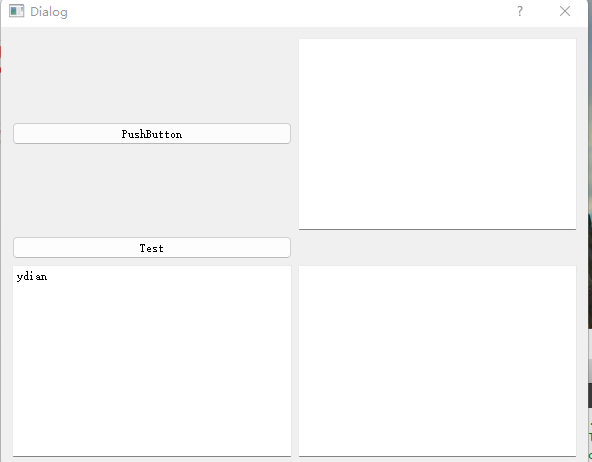
5.自定义对话框,代码设计对话框界面
运行效果如下(点击Test按钮后出现如下界面)
对应该程序dialog.h中代码如下:
#ifndef DIALOG_H
#define DIALOG_H

#include <QDialog>
#include <QGroupBox>
#include <QLabel>
#include <qmessagebox.h>

QT_BEGIN_NAMESPACE
namespace Ui { class Dialog; }
QT_END_NAMESPACE

class Dialog : public QDialog
{
    Q_OBJECT

public:
    Dialog(QWidget *parent = nullptr);
    ~Dialog();

public:
    //全局变量
    QGroupBox *groupBox[10][10];
    QPushButton *status[10][10];

private:
    Ui::Dialog *ui;

signals:
    void signal_define(QString);

private slots:
    void slot1();
    void slot_define(QString);
    void TestDefineGUI();

    void view();
    void check();
};
#endif // DIALOG_H
对应该程序,dialog.cpp中代码如下:
#include "dialog.h"
#include "ui_dialog.h"
Dialog::Dialog(QWidget *parent)
: QDialog(parent)
, ui(new Ui::Dialog)
{
ui->setupUi(this);
connect(this, SIGNAL(signal_define(QString)),this,SLOT(slot_define(QString)));
connect(ui->pushButton_2, SIGNAL(clicked()), this, SLOT(TestDefineGUI()));
}
Dialog::~Dialog()
{
delete ui;
}
void Dialog::slot1()
{
ui->textEdit_1->setText("has be triggered");
QString qstring = "test2";
emit signal_define(qstring);
}
void Dialog::slot_define(QString ccmd)
{
ui->textEdit_2->setText(ccmd);
}
void Dialog::TestDefineGUI()
{
ui->textEdit_3->setText("Test Gui");
//设置字体
QFont font1;
font1.setFamily(QString::fromUtf8("Times New Roman"));
//font1.setBold(true);
//font1.setItalic(true);
font1.setPointSize(16);
//自定义对话框
QDialog *dialog = new QDialog(this);
QGridLayout *parent = new QGridLayout;
QGridLayout *child1 = new QGridLayout;
QGridLayout *child2 = new QGridLayout;
parent->addLayout(child1, 0, 0, 1,1);
parent->addLayout(child2, 1, 0, 30, 1);
QLabel *info = new QLabel;
info->setText(tr("代码设计界面"));
QPushButton *view = new QPushButton;
view->setText("view");
view->setFont(font1);
connect(view, SIGNAL(clicked()), this, SLOT(view()));
QSpacerItem *hSpace1;
hSpace1 = new QSpacerItem(40,20,QSizePolicy::Expanding, QSizePolicy::Minimum);
child1->addWidget(info,0,0,1,1);
child1->addItem(hSpace1, 0,2,1,2);
child1->addWidget(view, 0,5,1,1);
for(int layer=0; layer < 3; layer++)
{
QGridLayout *H=new QGridLayout;
for(int i=0; i<4; i++)
{
QGridLayout *local = new QGridLayout;
groupBox[layer][i] = new QGroupBox(this);
QPalette p = groupBox[layer][i]->palette();
p.setColor(QPalette::WindowText, Qt::green);
groupBox[layer][i]->setPalette(p);
status[layer][i] = new QPushButton(groupBox[layer][i]);
status[layer][i]->setFont(font1);
connect(status[layer][i],SIGNAL(clicked()),this,SLOT(check()));
local->addWidget(groupBox[layer][i],0,0,20,20);
local->addWidget(status[layer][i], 9, 1,8,18);
H->addLayout(local, 0, i*20+1, 1,19);
}
QSpacerItem *vSpace1;
vSpace1 = new QSpacerItem(20,40,QSizePolicy::Minimum, QSizePolicy::Expanding);
child2->addLayout(H,layer,0,1,1);
}
dialog->setLayout(parent);
dialog->setModal(true);
dialog->show();
for(int layer=0; layer < 3; layer++)
{
for(int i=0; i<4; i++)
{
char flag[100];
sprintf(flag,"%d%d",layer,i);
status[layer][i]->setText(flag);
}
}
}
void Dialog::view()
{
int ret = QMessageBox::information(this, tr("提示"), tr("click view!"), QMessageBox::Ok);
}
void Dialog::check()
{
int row, col;
QPushButton *btn=qobject_cast<QPushButton*>(sender());
for(int layer=0; layer < 3; layer++)
{
for(int i=0; i<4; i++)
{
if(btn == status[layer][i])
{
row = layer;
col = i;
}
}
}
char flag[100];
sprintf(flag,"click %d%d",row,col);
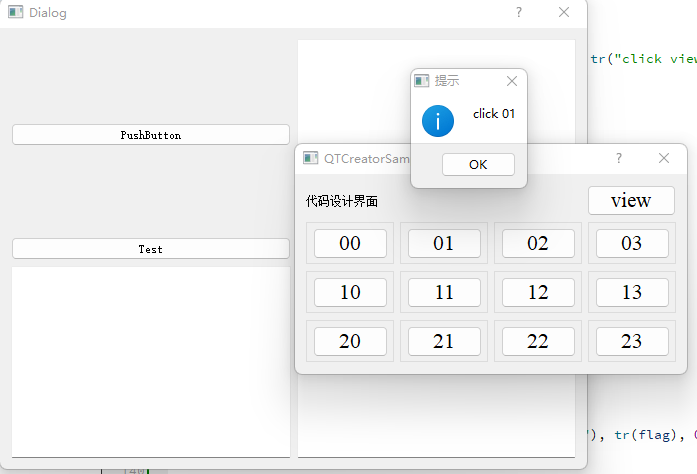
int ret = QMessageBox::information(this, tr("提示"), tr(flag), QMessageBox::Ok);
}
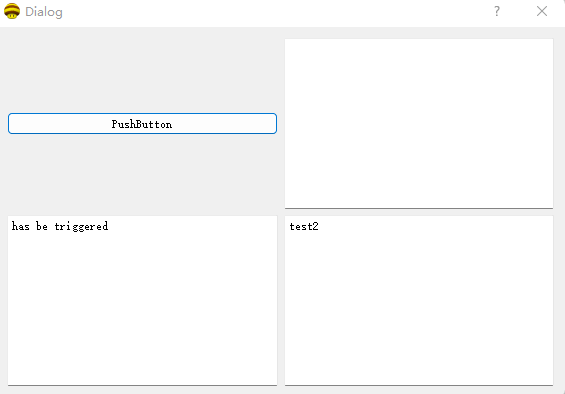
可看到弹跳出来的对话框的界面样式是通过代码实现的
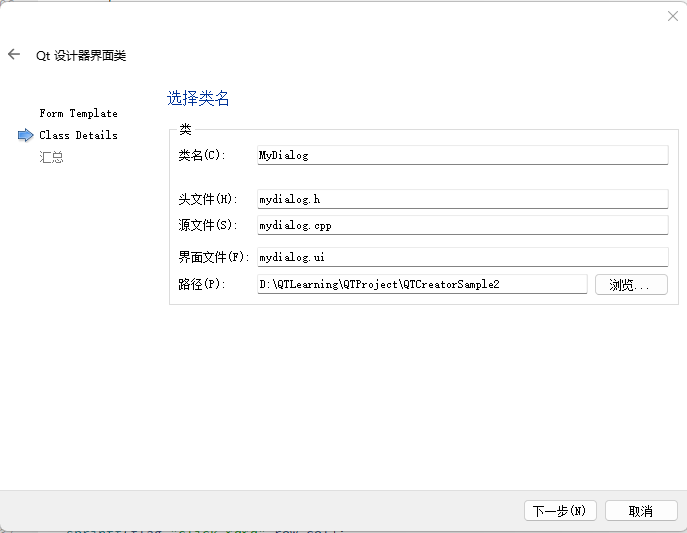
6.调用自己手动设计的对话框界面
(1) 手动设计对话框,新建界面模板

(2)可看到会同时生成头文件和对应的源文件
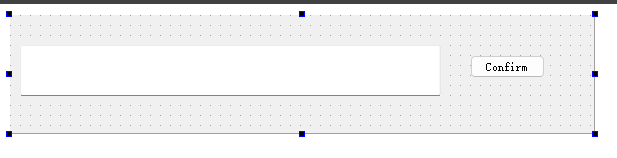
(3)自定义对话框界面简单设计为如下
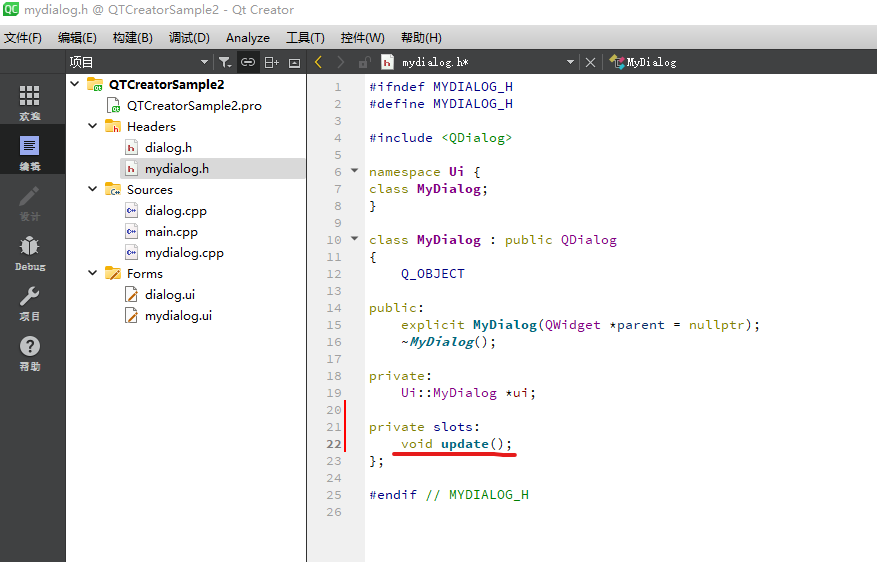
(4)在自动生成的mydialog.h文件中添加如下代码(红色下划线,加一个槽函数)
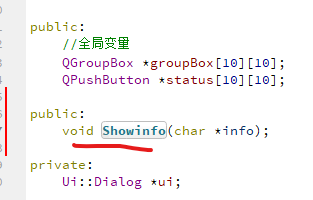
(5)在dialog.h中添加如下代码
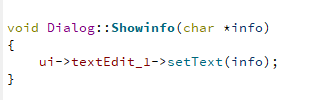
(6)在dialog.cpp中添加如下代码
(7)mydialog.cpp中代码修改为如下
#include "mydialog.h"
#include "ui_mydialog.h"
#include "dialog.h"

MyDialog::MyDialog(QWidget *parent) :
    QDialog(parent),
    ui(new Ui::MyDialog)
{
    ui->setupUi(this);
    connect(ui->pushButton,SIGNAL(clicked()),this,SLOT(update()));
}

MyDialog::~MyDialog()
{
    delete ui;
}

void MyDialog::update()
{
    extern Dialog *ex;
    QString command=ui->lineEdit->text();
    QByteArray ba=command.toLocal8Bit();
    char *mm=ba.data();

    ex->Showinfo(mm);
}
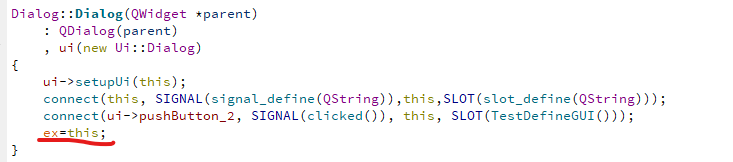
(8)在dialog.cpp开头添加如下代码

同时加入如下语句
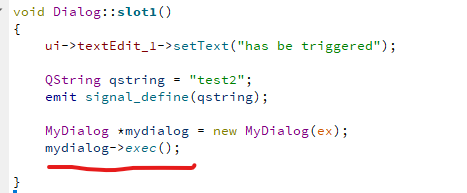
同时在slot1函数末尾添加如下代码:
执行运行效果如下:
点击PushButton按钮
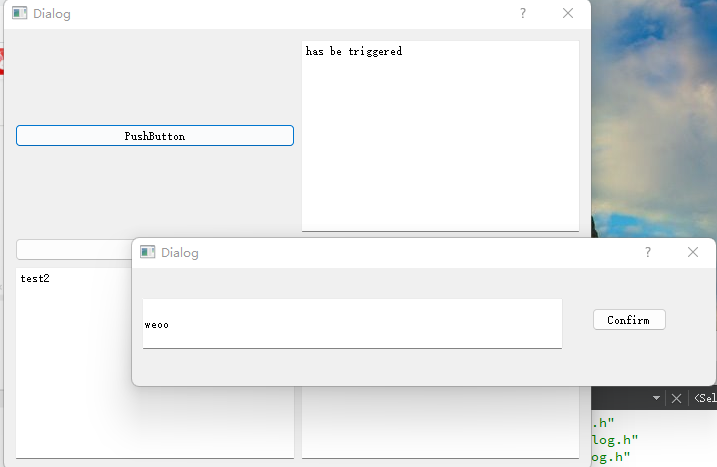
点击confirm按钮后

7.调用自己定义的类
,新建一个myClass类,其中头文件myClass.h中代码如下:
#ifndef MYCLASS_H
#define MYCLASS_H

#endif // MYCLASS_H
#include <iostream>
#include <vector>
#include <string>
#include <sstream>
#include <qmessagebox.h>
#include <QDebug>
using namespace std;

class myClass
{
public:
    myClass(void);
    ~myClass(void);

    string name;
    QString name2;

    bool printInfo();
};
myClass.cpp
#include "myClass.h"

myClass::myClass(void)
{

}

myClass::~myClass(void)
{

}

bool myClass::printInfo()
{
    qDebug() << name2;
}
在dialog.cpp中添加下#include "myClass.h"包含语句,同时在slot1中增加如下代码
    myClass w;
    w.name2 = "jack";
    w.printInfo();
8.开启线程
创建了myThread线程类,其中myThread.h中代码如下:
#ifndef MYTHREAD_H
#define MYTHREAD_H

#endif // MYTHREAD_H
#include <QThread>

class myThread : public QThread
{
    Q_OBJECT

public:
    myThread(QObject *parent=0,char *name=0);
    ~myThread();
    char info[2048];

private:

protected:
    void run();

signals:
    void signal_show(char*);
};
myThread.cpp中代码如下:
#include "myThread.h"
#include <QMutex>

QMutex m_lock(QMutex::Recursive);

myThread::myThread(QObject *parent, char name[])
{
    sprintf(info, "%s", name);
}

myThread::~myThread()
{

}

void myThread::run()
{
  // m_lock.lock();
   //if(strstr(info,"s"))  //可以就实现一个线程类,但可以根据不同的输入实现不同的功能
   //{
      //char temp[100];
     // sprintf(temp, "%s", "hello world");
      emit signal_show(info);
  // }
  // m_lock.unlock();
}
其余dialog.h中代码为:
#ifndef DIALOG_H
#define DIALOG_H

#include <QDialog>
#include <QGroupBox>
#include <QLabel>
#include <qmessagebox.h>

QT_BEGIN_NAMESPACE
namespace Ui { class Dialog; }
QT_END_NAMESPACE

class Dialog : public QDialog
{
    Q_OBJECT

public:
    Dialog(QWidget *parent = nullptr);
    ~Dialog();

public:
    //全局变量
    QGroupBox *groupBox[10][10];
    QPushButton *status[10][10];

public:
    void Showinfo(char *info);

private:
    Ui::Dialog *ui;

signals:
    void signal_define(QString);

private slots:
    void slot1();
    void slot_define(QString);
    void TestDefineGUI();

    void view();
    void check();
    void thread_slot(char*);
};
#endif // DIALOG_H
dialog.cpp中代码如下:
#include "dialog.h"
#include "ui_dialog.h"
#include "mydialog.h"
#include "myClass.h"
#include "myThread.h"
#include "windows.h"
#include <unistd.h>

Dialog *ex = NULL;

Dialog::Dialog(QWidget *parent)
    : QDialog(parent)
    , ui(new Ui::Dialog)
{
    ui->setupUi(this);
    connect(this, SIGNAL(signal_define(QString)),this,SLOT(slot_define(QString)));
    connect(ui->pushButton_2, SIGNAL(clicked()), this, SLOT(TestDefineGUI()));
    ex=this;
}

Dialog::~Dialog()
{
    delete ui;
}

void Dialog::slot1()
{
    ui->textEdit_1->setText("has be triggered");

    QString qstring = "test2";
    emit signal_define(qstring);

    MyDialog *mydialog = new MyDialog(ex);
    mydialog->exec();

    myClass w;
    w.name2 = "jack";
    w.printInfo();

    char s[100];
    sprintf(s, "s");

    myThread *thread = new myThread(this, s);
    connect(thread, SIGNAL(signal_show(char*)), this, SLOT(thread_slot(char*)));
    thread->start();

    qDebug() << "over";
}

void Dialog::thread_slot(char* command)
{
    QString string = command;
    while(true)
    {
       qDebug() << string;
       Sleep(2000);
    }
}

void Dialog::slot_define(QString ccmd)
{
    ui->textEdit_2->setText(ccmd);
}

void Dialog::TestDefineGUI()
{
    ui->textEdit_3->setText("Test Gui");
    //设置字体
    QFont font1;
    font1.setFamily(QString::fromUtf8("Times New Roman"));
    //font1.setBold(true);
    //font1.setItalic(true);
    font1.setPointSize(16);

    //自定义对话框
    QDialog *dialog = new QDialog(this);

    QGridLayout *parent = new QGridLayout;

    QGridLayout *child1 = new QGridLayout;

    QGridLayout *child2 = new QGridLayout;

    parent->addLayout(child1, 0, 0, 1,1);
    parent->addLayout(child2, 1, 0, 30, 1);


    QLabel *info = new QLabel;
    info->setText(tr("代码设计界面"));

    QPushButton *view = new QPushButton;
    view->setText("view");
    view->setFont(font1);

    connect(view, SIGNAL(clicked()), this, SLOT(view()));

    QSpacerItem *hSpace1;
    hSpace1 = new QSpacerItem(40,20,QSizePolicy::Expanding, QSizePolicy::Minimum);

    child1->addWidget(info,0,0,1,1);
    child1->addItem(hSpace1, 0,2,1,2);
    child1->addWidget(view, 0,5,1,1);

    for(int layer=0; layer < 3; layer++)
    {
        QGridLayout *H=new QGridLayout;

        for(int i=0; i<4; i++)
        {
            QGridLayout *local = new QGridLayout;

            groupBox[layer][i] = new QGroupBox(this);
            QPalette p = groupBox[layer][i]->palette();
            p.setColor(QPalette::WindowText, Qt::green);
            groupBox[layer][i]->setPalette(p);

            status[layer][i] = new QPushButton(groupBox[layer][i]);
            status[layer][i]->setFont(font1);
            connect(status[layer][i],SIGNAL(clicked()),this,SLOT(check()));

            local->addWidget(groupBox[layer][i],0,0,20,20);
            local->addWidget(status[layer][i], 9, 1,8,18);
            H->addLayout(local, 0, i*20+1, 1,19);
        }

        QSpacerItem *vSpace1;
        vSpace1 = new QSpacerItem(20,40,QSizePolicy::Minimum, QSizePolicy::Expanding);
        child2->addLayout(H,layer,0,1,1);
    }

    dialog->setLayout(parent);
    dialog->setModal(true); //模态对话框
    dialog->show();

    for(int layer=0; layer < 3; layer++)
    {
        for(int i=0; i<4; i++)
        {
             char flag[100];
             sprintf(flag,"%d%d",layer,i);
             status[layer][i]->setText(flag);
        }
    }


}

void Dialog::view()
{
int ret = QMessageBox::information(this, tr("提示"), tr("click view!"), QMessageBox::Ok);
}

void Dialog::check()
{
   int row, col;

   QPushButton *btn=qobject_cast<QPushButton*>(sender());
   for(int layer=0; layer < 3; layer++)
   {
       for(int i=0; i<4; i++)
       {
           if(btn == status[layer][i])
           {
               row = layer;
               col = i;
           }
       }
   }

   char flag[100];
   sprintf(flag,"click %d%d",row,col);
   int ret = QMessageBox::information(this, tr("提示"), tr(flag), QMessageBox::Ok);
}

void Dialog::Showinfo(char *info)
{
    ui->textEdit_1->setText(info);
}
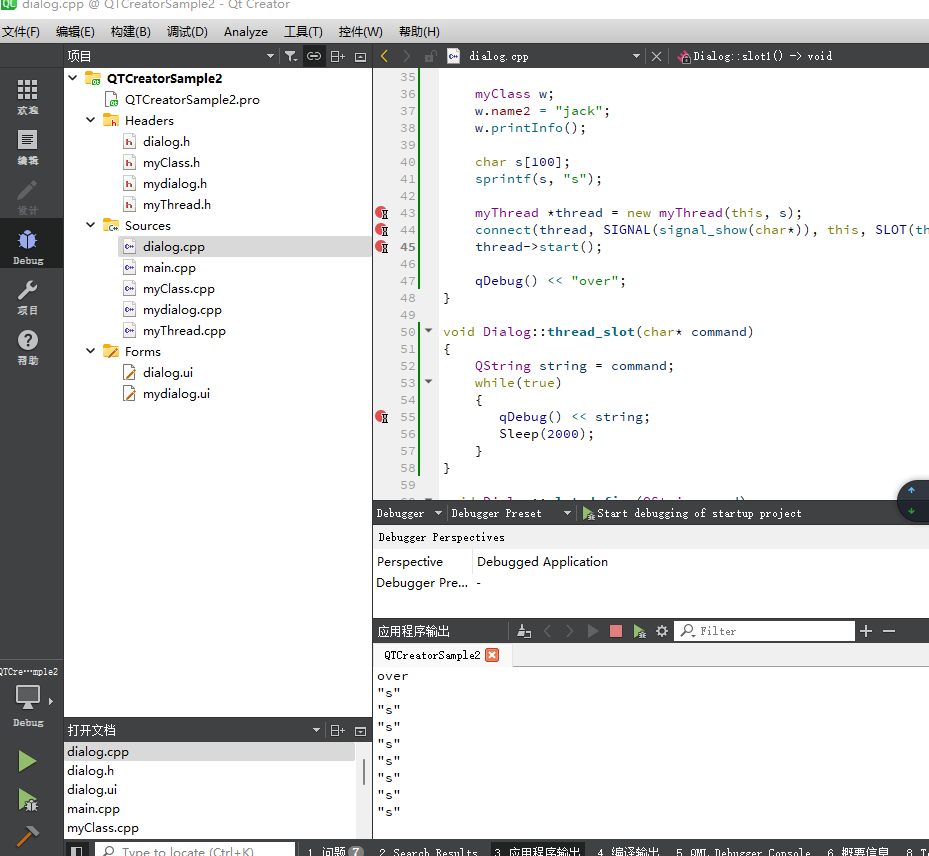
执行结果如下,可看到线程中的while死循环并没有阻塞主线程代码的执行
这边再附上该篇帖子的测试工程程序,链接如下:
链接:https://pan.baidu.com/s/1bsyksfotjux_4DdW3B6w3A
提取码:sbjb


 4989
4989

 被折叠的 条评论
为什么被折叠?
被折叠的 条评论
为什么被折叠?
 到【灌水乐园】发言


