


Lens Distortion
镜头失真效果失真最终渲染的图片,以模拟一个真实的相机镜头的形状。
Using Lens Distortion
镜头失真使用了体积框架,所以要启用和修改镜头失真属性,你必须在场景的体积中添加一个镜头失真覆盖。添加镜头失真到一个体积:
- 在场景或层次视图中,选择一个包含体积组件的游戏对象,在检查器中查看它。
- 在检查器中,导航到 Add Override > Post-processing点击Lens Distortion镜头失真。URP现在使用镜头失真于这个体积影响的任何相机。
Properties
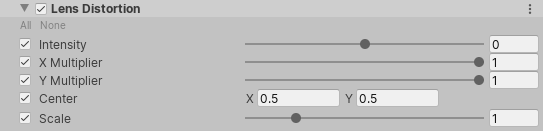
| Property | Description |
|---|---|
| Intensity | Use the slider to set the overall strength of the distortion effect. 使用滑块设置失真效果的整体强度。 |
| X Multiplier | Use the slider to set the distortion intensity on the x-axis. This value acts as a multiplier so you can set this value to 0 to disable distortion on this axis, 使用滑块在x轴上设置失真强度。这个值作为一个倍增器,所以您可以将这个值设置为0来禁用这个轴上的扭曲 |
| Y Multiplier | Use the slider to set the distortion intensity on the y-axis. This value acts as a multiplier so you can set this value to 0 to disable distortion on this axis, 使用滑块设置y轴上的失真强度。这个值作为一个倍增器,所以您可以将这个值设置为0来禁用这个轴上的扭曲 |
| Center | Set the center point of the distortion effect on the screen. 在屏幕上设置扭曲效果的中心点。 |
| Scale | Use the slider to set the value for global screen scaling. This zooms the render to hide the borders of the screen. When you use a high distortion, pixels on the borders of the screen can break because they rely on information from pixels outside the screen boundaries that don't exist. This property is useful for hiding these broken pixels around the screen border. 使用滑块设置全局屏幕缩放的值。这将放大渲染以隐藏屏幕的边界。当使用高失真时,屏幕边界上的像素可能会被破坏,因为它们依赖于屏幕边界以外不存在的像素的信息。此属性对于隐藏屏幕边框周围的这些破碎像素非常有用。 |


 3780
3780


 被折叠的 条评论
为什么被折叠?
被折叠的 条评论
为什么被折叠?
 到【灌水乐园】发言


