


前言
vtkImageCanvasSource2D
vtkImageCanvasSource2D可以根据指定的大小和类型创建一个空白的2D图像的画布。空白是没有标量数据,然后可以在画布上绘制各种图形元素,比如:矩形,椭圆、线段。
主要接口说明
标量维度:
virtual void vtkImageCanvasSource2D::SetNumberOfScalarComponents(int i)
函数功能:设置标量数据维度;
函数参数:int i:维度数值;
virtual int GetNumberOfScalarComponents() const;
函数功能:获取标量数据维度;
设置标量数据类型相关函数接口:
void SetScalarTypeToFloat();
void SetScalarTypeToDouble();
void SetScalarTypeToInt();
void SetScalarTypeToUnsignedInt();
void SetScalarTypeToLong();
void SetScalarTypeToUnsignedLong();
void SetScalarTypeToShort();
void SetScalarTypeToUnsignedShort();
void SetScalarTypeToUnsignedChar();
void SetScalarTypeToChar();
void SetScalarType(int);
int GetScalarType() const;
颜色相关函数接口:
void SetDrawColor(double a) { this->SetDrawColor(a, 0.0, 0.0, 0.0); }
void SetDrawColor(double a, double b) { this->SetDrawColor(a, b, 0.0, 0.0); }
void SetDrawColor(double a, double b, double c) { this->SetDrawColor(a, b, c, 0.0); }
函数功能:设置颜色,vtkImageCanvasSource2D画图的过程就是把颜色值当作标量值,然后赋给图形内部的各个点;
画图相关函数接口:
void FillBox(int min0, int max0, int min1, int max1);
函数功能:绘制方块;
函数参数:int min0,int max0:第一维度从小到大的范围为min0-max0;第二维度从小到大的范围为min1-max1;
void FillTube(int x0, int y0, int x1, int y1, double radius);
函数功能:绘制有宽度的线段;
函数参数:int x0, int y0:线段开始位置点;int x1, int y1:线段结束位置点; double radius:线段宽;
void FillTriangle(int x0, int y0, int x1, int y1, int x2, int y2);
函数功能:绘制三角形;
函数参数:int x0, int y0:三角形第一个点;int x1, int y1:三角形第二个点;int x2, int y2:三角形第三个点;
void DrawCircle(int c0, int c1, double radius);
函数功能:绘制圆形轮廓;
函数参数:int c0, int c1:圆心坐标点;double radius:圆的半径;
void DrawPoint(int p0, int p1);
函数功能:绘制点;
函数参数:int p0, int p1:像素点坐标;
void DrawSegment(int x0, int y0, int x1, int y1);
函数功能:绘制线段在2D图像上;
函数参数:int x0, int y0:线段第一个点;线段的第二个点;
void DrawSegment3D(double* p0, double* p1);
函数功能:在3D空间内绘制线段;
函数参数:double* p0第一个点(x,y,z);double* p1:第二个点(x,y,z);
void DrawSegment3D(double x1, double y1, double z1, double x2, double y2, double z2);
函数功能:在3D空间内绘制线段,函数内部使用 void DrawSegment3D(double* p0, double* p1)来实现功能;
函数参数:double x1, double y1, double z1:第一个点坐标;double x2, double y2, double z2:第二个点坐标;
void DrawImage(int x0, int y0, vtkImageData* i) { this->DrawImage(x0, y0, i, -1, -1, -1, -1); }
函数功能:在画布的x0和y0位置绘制输入图像的子图像。
函数参数:int x0, int y0:起始坐标位置;
void DrawImage(int x0, int y0, vtkImageData*, int sx, int sy, int width, int height);
函数功能:在画布的x0和y0位置绘制输入图像的子图像。子图像由sx、sy、width和height定义。
函数参数:int x0, int y0:起始坐标位置;int sx, int sy:?? int width, int height:图形宽高;
void FillPixel(int x, int y);
函数功能:用另一种颜色填充有颜色的区域。(如连接性)所有连接到像素(x,y)的像素(并且具有相同的值)都被当前的“DrawColor”替换。
函数参数:int x, int y:颜色填充开始的坐标点,在该点附近的连通颜色都会改变;
实例
使用上文提到的接口,实现在画布上绘制线段,圆,方块,带有宽带的线段的示例;
代码
#include "vtkSmartPointer.h"
#include "vtkImageCanvasSource2D.h"
#include "vtkRenderWindowInteractor.h"
#include "vtkImageViewer2.h"

#include "vtkAutoInit.h"
VTK_MODULE_INIT(vtkRenderingOpenGL2);
VTK_MODULE_INIT(vtkInteractionStyle);

using namespace std;
int main()
{
	vtkSmartPointer<vtkImageCanvasSource2D> imageSource = vtkSmartPointer<vtkImageCanvasSource2D>::New();
	imageSource->SetNumberOfScalarComponents(1);
	imageSource->SetScalarTypeToUnsignedChar();
	imageSource->SetExtent(0, 512, 0, 512, 0, 0);
	// 1.设置背景颜色
	imageSource->SetDrawColor(86.0);
	// 2.绘制背景方块;
	imageSource->FillBox(0, 512, 0, 512);
	imageSource->SetDrawColor(0.0);
	// 3.有宽度线段
	imageSource->FillTube(500, 20, 30, 400, 5);
	// 4.设置颜色为白色
	imageSource->SetDrawColor(255.0);
	// 5.线段
	imageSource->DrawSegment(10, 20, 500, 510);
	// 6.设置颜色为黑色
	imageSource->SetDrawColor(0.0);
	// 7.绘制圆轮廓
	imageSource->DrawCircle(400, 350, 80.0);
	imageSource->SetDrawColor(255.0);
	// 8.给圆填充颜色
	imageSource->FillPixel(450, 350);
	imageSource->SetDrawColor(170);
	imageSource->FillTriangle(100, 100, 300, 150, 150, 300);
	imageSource->Update();
	// 生成渲染对象;
	vtkSmartPointer<vtkRenderWindowInteractor> iren = vtkSmartPointer<vtkRenderWindowInteractor>::New();
	vtkSmartPointer<vtkImageViewer2> viewer = vtkSmartPointer<vtkImageViewer2>::New();
	viewer->SetInputConnection(imageSource->GetOutputPort());
	viewer->SetColorLevel(127.0);
	viewer->SetColorWindow(256);
	viewer->SetSize(512, 512);
	viewer->SetupInteractor(iren);
	viewer->Render();
	iren->Initialize();
	iren->Start();
	return 0;
}
运行后效果
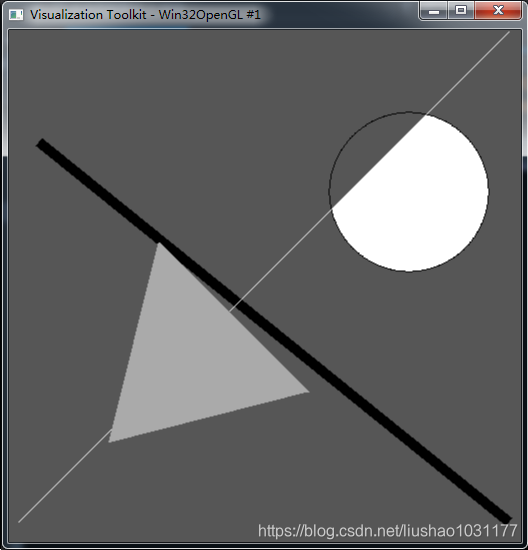
解读
1.创建画布,指定其大小和标量数据类型;
2.绘制6个图形元素,每画一个图形前,都用方法SetDrawColor设置了一个颜色;
注意: 1)画图的过程就是把颜色值当作标量值,然后赋给图形内部的各个点。
2)如果图形的位置有重叠,那么后面画的图形的颜色值会覆盖先前画的;
3)FillPixel方法会使用一种颜色替换掉指定区域的颜色,其参数是一个画布上的点坐标,该点的颜色就是需要被替掉的颜色,在该点的周围,所有颜色相同的区域颜色都要被替换掉,知道遇到不同颜色的区域为止,其效果类似于Windows自带的画图程序中的填充效果。
遇到的问题
1.不知道怎么对圆内的区域进行填充颜色;
引用
1.《VTK图形图像开发进阶》;
2.《医学图像编程技术》;


 755
755


 被折叠的 条评论
为什么被折叠?
被折叠的 条评论
为什么被折叠?
 到【灌水乐园】发言


