


1 运行环境
| 库 | 版本 | 备注 |
|---|---|---|
| anaconda | 3 | |
| python | 3.7 | |
| tensorflow | 2.4.0 | |
| waymo-open-dataset-tf-2-4-0 | ||
| CUDA | 11.0 | 不安装应该会使用CPU计算 |
| cudnn | 8.0 | 不安装应该会使用CPU计算 |
| pyqt | 5 | |
| Mayavi |
1.1 安装环境
其他环境在此不再赘述,之将两个库的安装
- 安装Mayavi
pip3 install mayavi -i https://pypi.tuna.tsinghua.edu.cn/simple
- 安装pyqt5
pip3 install pyqt5 -i https://pypi.tuna.tsinghua.edu.cn/simple
不安装会报错,详情请参考这里
ImportError: Could not import backend for traitsui.  Make sure you
        have a suitable UI toolkit like PyQt/PySide or wxPython
        installed.
2 代码
代码来源酱油与清洛 ,笔者做一些补充,使用时直接复制进python脚本程序,然后将FILENAME后面的路径改为你自己的文件存放路径,python3 {程序名}.py运行即可。
# 作者:酱油与清洛 https://www.bilibili.com/read/cv6933475 出处:bilibili
# 修改:Leo

import os
import tensorflow.compat.v1 as tf
import math
import numpy as np
import itertools
import time

tf.enable_eager_execution()

from waymo_open_dataset.utils import range_image_utils
from waymo_open_dataset.utils import transform_utils
from waymo_open_dataset.utils import frame_utils
from waymo_open_dataset import dataset_pb2 as open_dataset

from mayavi import mlab

# 配置GPU显存自适应分配,防止占用所有显存
# set GPU memory to adaptively be allocated avoid all the memory being occupied
gpus = tf.config.list_physical_devices('GPU')
if gpus:
    try:
        for gpu in gpus:
            tf.config.experimental.set_memory_growth(gpu, True)
            print('info: following GPU is setted as memory_growth:')
            print(gpu)
    except RuntimeError as e:
        print(e)
else:
    print('info: there have no GPUs in this computer')

@mlab.animate(delay=100)
def updateAnimation():
	framenumber = 0
	FILENAME = '../waymo_open_dataset_v_1_3_2/validation/segment-272435602399417322_2884_130_2904_130_with_camera_labels.tfrecord'
	dataset = tf.data.TFRecordDataset(FILENAME, compression_type='')
	MAXPOINT = 200000
	for data in dataset:
		framenumber += 1
		print('Frame Number : {}'.format(framenumber))
		frame = open_dataset.Frame()
		frame.ParseFromString(bytearray(data.numpy()))

		(range_images, camera_projections, range_image_top_pose) = frame_utils.parse_range_image_and_camera_projection(frame)

		points, cp_points = frame_utils.convert_range_image_to_point_cloud(
			frame,
			range_images,
			camera_projections,
			range_image_top_pose)

		x = [0]*MAXPOINT
		y = [0]*MAXPOINT
		z = [0]*MAXPOINT
		for point in points:
			# print('len(point)=',len(point))
			for i in range(len(point)):
				x[i] = point[i][0]
				y[i] = point[i][1]
				z[i] = point[i][2]
			fig.mlab_source.set(x=x, y=y, z=z, mode="point")
		yield

MAXPOINT = 200000
fig = mlab.points3d(
	np.zeros(MAXPOINT),
	np.zeros(MAXPOINT),
	np.zeros(MAXPOINT),
	mode="point")
updateAnimation()
mlab.show()
上面的程序中添加了GPU显存设置,不添加会报错如下所示。当然,如果没有安装CUDA的话应该也不用添加,程序会直接使用CPU进行计算。
F tensorflow/core/util/cuda_solvers.cc:115] Check failed: cusolverDnCreate(&cusolver_dn_handle) == CUSOLVER_STATUS_SUCCESS Failed to create cuSolverDN instance.
视频效果展示看这里
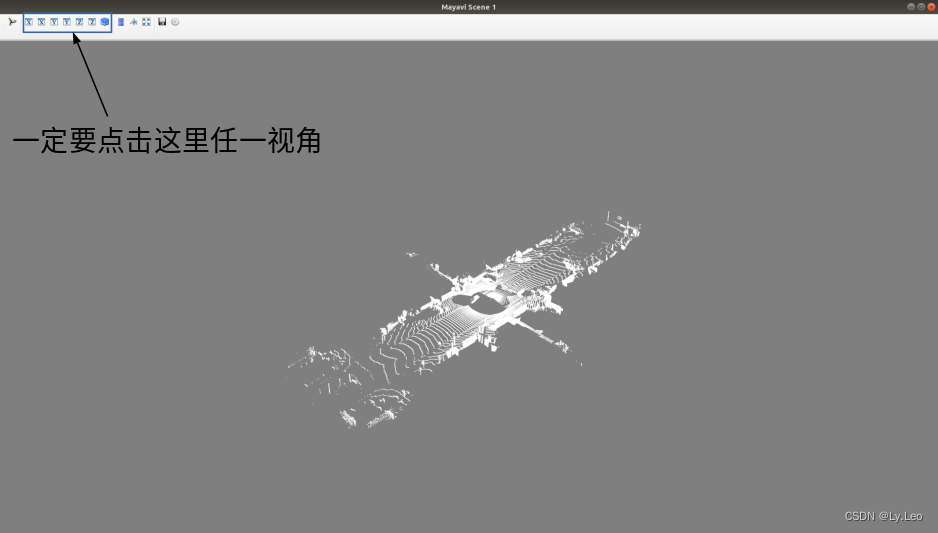
3 注意事项
注意,如下图所示,一定要单击一下这里面的任意一个视图,才可以清楚的看到点云数据。


 1915
1915


 被折叠的 条评论
为什么被折叠?
被折叠的 条评论
为什么被折叠?
 到【灌水乐园】发言


