


一、UV帧动画
举个例子,对于一张四帧贴图(横向):
1.UV缩放:首先就是让它只显示四分之一吧,也就是将uv值压缩(x轴),原来的uv范围由(0,1)转为(0,0.25),用代码表示就是spriteUV.x *= 1.0 / 4
2.UV移动:以贴图的左下角为例(设uv值为(0,0)),那么随着时间的变化,uv值就应该变为(0.25,0),(0.5,0),(0.75,0),(1,0),每次的增加量就是1.0 / 4
Shader "Custom/NewSurfaceShader" {

	Properties {

		_MainTex ("帧序列图", 2D) = "white" {}
		_CellAmount("精灵个数", float) = 0.0
		_Speed("移动速度", float) = 0.0

	}
	SubShader {
		Tags { "RenderType"="Opaque" }

		CGPROGRAM

        #pragma surface surf Lambert

		sampler2D _MainTex;
		half _CellAmount;
		half _Speed;

		struct Input {
			float2 uv_MainTex;
		};

		void surf (Input IN, inout SurfaceOutput o) {

			float2 spriteUV = IN.uv_MainTex;
			float percent = 1.0 / _CellAmount;

			float timeVal = fmod(_Time.y * _Speed, _CellAmount);//取余数,得到一个小于_CellAmount的数
			timeVal = ceil(timeVal);//取整

			spriteUV.x = spriteUV.x * percent + timeVal * percent;

			fixed4 c = tex2D(_MainTex, spriteUV);
			o.Albedo = c.rgb;
			o.Alpha = c.a;
		}
		ENDCG
	}
	FallBack "Diffuse"
}
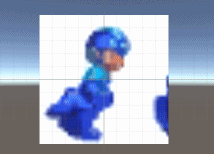
Ps:因为使用的纹理的精灵并不是均匀分布的,所以会有误差
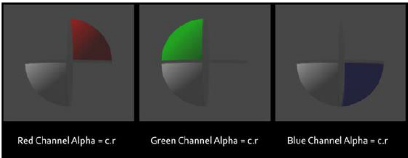
二、纹理混合
lerp(a, b, f):等于a * (1 - f) + b * f
Shader "CookbookShaders/Chapter02/TextureBlending"
{
	Properties
	{
		_MainTint ("Diffuse Tint", Color) = (1,1,1,1)

		//Add the properties below so we can input all of our textures
		_ColorA ("Terrain Color A", Color) = (1,1,1,1)
		_ColorB ("Terrain Color B", Color) = (1,1,1,1)
		_RTexture ("Red Channel Texture", 2D) = ""{}
		_GTexture ("Green Channel Texture", 2D) = ""{}
		_BTexture ("Blue Channel Texture", 2D) = ""{}
		//_ATexture ("Alpha Channel Texture", 2D) = ""{}
		_BlendTex ("Blend Texture", 2D) = ""{}
	}

	SubShader
	{
		Tags { "RenderType"="Opaque" }
		LOD 200

		CGPROGRAM
		#pragma surface surf Lambert

		float4 _MainTint;
		float4 _ColorA;
		float4 _ColorB;
		sampler2D _RTexture;
		sampler2D _GTexture;
		sampler2D _BTexture;
		sampler2D _BlendTex;
		//sampler2D _ATexture;

		struct Input
		{
			float2 uv_RTexture;
			float2 uv_GTexture;
			float2 uv_BTexture;
			//float2 uv_ATexture;
			float2 uv_BlendTex;
		};

		void surf (Input IN, inout SurfaceOutput o)
		{
			//Get the pixel data from the blend texture
			//we need a float 4 here because the texture
			//will return R,G,B,and A or X,Y,Z, and W
			float4 blendData = tex2D(_BlendTex, IN.uv_BlendTex);

			//Get the data from the textures we want to blend
			float4 rTexData = tex2D(_RTexture, IN.uv_RTexture);
			float4 gTexData = tex2D(_GTexture, IN.uv_GTexture);
			float4 bTexData = tex2D(_BTexture, IN.uv_BTexture);
			//float4 aTexData = tex2D(_ATexture, IN.uv_ATexture);

			//No we need to contruct a new RGBA value and add all
			//the different blended texture back together
			float4 finalColor;
			finalColor = lerp(rTexData, gTexData, blendData.g);
			finalColor = lerp(finalColor, bTexData, blendData.b);
			//finalColor = lerp(finalColor, aTexData, blendData.a);
			finalColor.a = 1.0;

			//Add on our terrain tinting colors
			float4 terrainLayers = lerp(_ColorA, _ColorB, blendData.r);
			finalColor *= terrainLayers;
			finalColor = saturate(finalColor);

			o.Albedo = finalColor.rgb * _MainTint.rgb;
			o.Alpha = finalColor.a;
		}
		ENDCG
	}
	FallBack "Diffuse"
}

三、创建可编程纹理
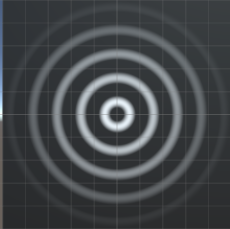
有时,你想在运行时动态创建纹理,改变它们的像素,以此实现特效。我们通常称之为可编程纹理技术(procedural texture effects)。与在图形编辑软件中绘制贴图不同的是,你可以在二维坐标系中创造一组像素,并应用到一个新的贴图中去,最后把这张贴图传递给shader中计算。
这项技术非常实用,它可在已经存在的贴图中,使用动态创建的贴图来给玩家和游戏环境做插值。除此以外,它也可作为一种裁剪类型的特效,或作为程序动态生成的形状。在多数情况下,你想要创建一张这样的全新贴图,把程序逻辑填进去,并在Shader中正常运行。
using UnityEngine;
using System.Collections;

public class ProceduralTexture : MonoBehaviour
{
	#region Public Variables
	//These values will let us control the width/Height
	//and see the generated texture
	public int widthHeight = 512;
	public Texture2D generatedTexture;
	#endregion

	#region Private Variables
	//These variables will be internal to this
	//script
	private Material currentMaterial;
	private Vector2 centerPosition;
	#endregion


	// Use this for initialization
	void Start ()
	{
		//Simple check to make sure we have a material on this transform
		//This will determine if we can make a texture or not
		if(!currentMaterial)
		{
			currentMaterial = transform.GetComponent<Renderer>().sharedMaterial;
			if(!currentMaterial)
			{
				Debug.LogWarning("Cannot find a material on: " + transform.name);
			}
		}

		//generate the procedural texture
		if(currentMaterial)
		{
			//Generate the prabola texture
			centerPosition = new Vector2(0.5f, 0.5f);
			generatedTexture = GenerateParabola();

			//Assign it to this transforms material
			currentMaterial.SetTexture("_MainTex", generatedTexture);
		}

		Debug.Log(Vector2.Distance(new Vector2(256,256), new Vector2(32,32))/256.0f);

	}


	private Texture2D GenerateParabola()
	{
		//Create a new Texture2D
		Texture2D proceduralTexture = new Texture2D(widthHeight, widthHeight);

		//Get the center of the texture
		Vector2 centerPixelPosition = centerPosition * widthHeight;

		//loop through each pixel of the new texture and determine its
		//distance from the center and assign a pixel value based on that.
		for(int x = 0; x < widthHeight; x++)
		{
			for(int y = 0; y < widthHeight; y++)
			{
				//Get the distance from the center of the texture to
				//our currently selected pixel
				Vector2 currentPosition = new Vector2(x,y);
				float pixelDistance = Vector2.Distance(currentPosition, centerPixelPosition)/(widthHeight*0.5f);
				pixelDistance = Mathf.Abs(1-Mathf.Clamp(pixelDistance, 0f,1f));
				pixelDistance = (Mathf.Sin(pixelDistance * 30.0f) * pixelDistance);

				//you can also do some more advanced vector calculations to achieve
				//other types of data about the model itself and its uvs and
				//pixels
				Vector2 pixelDirection = centerPixelPosition - currentPosition;
				pixelDirection.Normalize();
				float rightDirection = Vector2.Angle(pixelDirection, Vector3.right)/360;
				float leftDirection = Vector2.Angle(pixelDirection, Vector3.left)/360;
				float upDirection = Vector2.Angle(pixelDirection, Vector3.up)/360;

				//Invert the values and make sure we dont get any negative values
				//or values above 1.


				//Create a new color value based off of our
				//Color pixelColor = new Color(Mathf.Max(0.0f, rightDirection),Mathf.Max(0.0f, leftDirection), Mathf.Max(0.0f,upDirection), 1f);
				Color pixelColor = new Color(pixelDistance, pixelDistance, pixelDistance, 1.0f);
				//Color pixelColor = new Color(rightDirection, leftDirection, upDirection, 1.0f);
				proceduralTexture.SetPixel(x,y,pixelColor);
			}
		}
		//Finally force the application of the new pixels to the texture
		proceduralTexture.Apply();

		//return the texture to the main program.
		return proceduralTexture;
	}
}
四、透明效果
要在表面着色器使用透明效果,需要在#pragma中加入alpha
Shader "Cookbook/Chapter06/SimpleAlpha"
{
	Properties
	{
		_MainTex ("Base (RGB)", 2D) = "white" {}
		_TransVal ("Transparency Value", Range(0,1)) = 0.5
	}

	SubShader
	{
		Tags { "RenderType"="Opaque"}
		LOD 200

		CGPROGRAM
		#pragma surface surf Lambert alpha

		sampler2D _MainTex;
		float _TransVal;

		struct Input
		{
			float2 uv_MainTex;
		};

		void surf (Input IN, inout SurfaceOutput o)
		{
			half4 c = tex2D (_MainTex, IN.uv_MainTex);

			o.Albedo = c.rgb;
			o.Alpha = c.b * _TransVal;
		}
		ENDCG
	}
	FallBack "Diffuse"
}
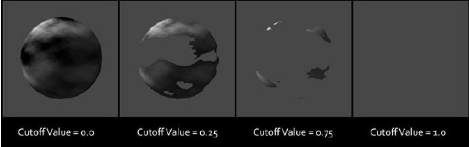
五、裁剪透明
要在表面着色器使用透明效果,需要在#pragma中加入alphatest:
该透明效果只用一个数值就可以简单地把某些像素绘制到屏幕上,要么呈现出完全透明效果,要么是完全不透明效果。
我们的cutoff shader在#pragma指令中使用了一个新的参数,名为alphatest:VariableName。这个参数将我们的Shader设置为一个简化版的透明度。与半透明度效果不同,只有_Cutoff变量控制最终的透明效果。这意味着,如果我们让_Cutoff值为0.4,那么任何低于0.4的灰度值会被认为是透明的,而高于0.4的值被认为是不透明的。
使用这种类型的透明效果的好处是可以提高性能。之前的半透明效果的性能耗费要高于cutoff类型。但是,在移动设备上是正好相反的,这是因为对于这些小型的GPU来说,检查一张贴图中的每一个像素值是相当耗费性能的。因此,如果当你正使用Unity开发一款移动应用时,尽量使用半透明技术,减少使用本节中提到的cutoff透明技术。
Shader "Cookbook/Chapter06/CutoffShader"
{
	Properties
	{
		_MainTex ("Base (RGB)", 2D) = "white" {}
		_Cutoff ("Cutoff Value", Range(0,1)) = 0.5
	}

	SubShader
	{
		Tags { "RenderType"="Opaque" }
		LOD 200

		CGPROGRAM
		#pragma surface surf Lambert alphatest:_Cutoff

		sampler2D _MainTex;

		struct Input
		{
			float2 uv_MainTex;
		};

		void surf (Input IN, inout SurfaceOutput o)
		{
			half4 c = tex2D (_MainTex, IN.uv_MainTex);
			o.Albedo = c.rgb;
			o.Alpha = c.r;
		}
		ENDCG
	}
	FallBack "Diffuse"
}


 496
496


 被折叠的 条评论
为什么被折叠?
被折叠的 条评论
为什么被折叠?
 到【灌水乐园】发言


