


launch文件是用来干什么的?
launch文件实际上是roslaunch的启动项,机器人在运行时需要用到多个节点,而手动的一个一个启动是很麻烦的事情,所以把它们全部写到启动文件里,在启动时一起启动是个不错的解决方案(是的,ROS就是这么想的)。想要在自己的设备(纯雷达、机器人等等)上运行SLAM时,往往需要自己编写相应的launch文件才能正常使用(不只是SLAM,使用机器人时都要用),这篇blog的目的就是,以Cartographer为例,用它安装时自带的launch分析启动文件是怎么写的。
在Cartographer的介绍官网中,有《Running Cartographer ROS on your own bag》这一章,但是我在看完之后仍然是一头雾水,所以去看了自带的launch文件,从自带文件中才缝合出来了自己需要的启动文件。
Google关于Cartographer的使用说明![]() https://google-cartographer-ros.readthedocs.io/en/latest/compilation.html在官网的《Running Cartographer ROS on a demo bag》中,用到了
https://google-cartographer-ros.readthedocs.io/en/latest/compilation.html在官网的《Running Cartographer ROS on a demo bag》中,用到了
- demo_backpack_2d.launch
- offline_backpack_2d.launch
- demo_backpack_2d_localization.launch
- demo_revo_lds.launch
- demo_pr2.launch
五种启动项来演示Cartographer(先看2D的,3D的以后有机会再补上),前三项实际上是2D的不同启动配置,因此我们用同一个bag文件演示。我们下面就来分别分析它们。
先分别给出使用到的bag文件的拉取方法,其实从/bag后面的路径就可以看出它们应该用哪个启动项了。
wget -P ~/Downloads https://storage.googleapis.com/cartographer-public-data/bags/backpack_2d/cartographer_paper_deutsches_museum.bag

wget -P ~/Downloads https://storage.googleapis.com/cartographer-public-data/bags/revo_lds/cartographer_paper_revo_lds.bag

wget -P ~/Downloads https://storage.googleapis.com/cartographer-public-data/bags/pr2/2011-09-15-08-32-46.bag

wget -P ~/Downloads https://storage.googleapis.com/cartographer-public-data/bags/taurob_tracker/taurob_tracker_simulation.bag
在实际开始之前,我们还需要先了解bag文件中都有哪些项,这样才能知道为什么启动项要这么配置,我们以cartographer_paper_deutsches_museum.bag为例,查看它有什么内容
rosbag info cartographer_paper_deutsches_museum.bag文件默认的下载目录是/Downloads,在ros启动的情况下可以直接在Downloads目录的终端下输入,查看bag里有什么
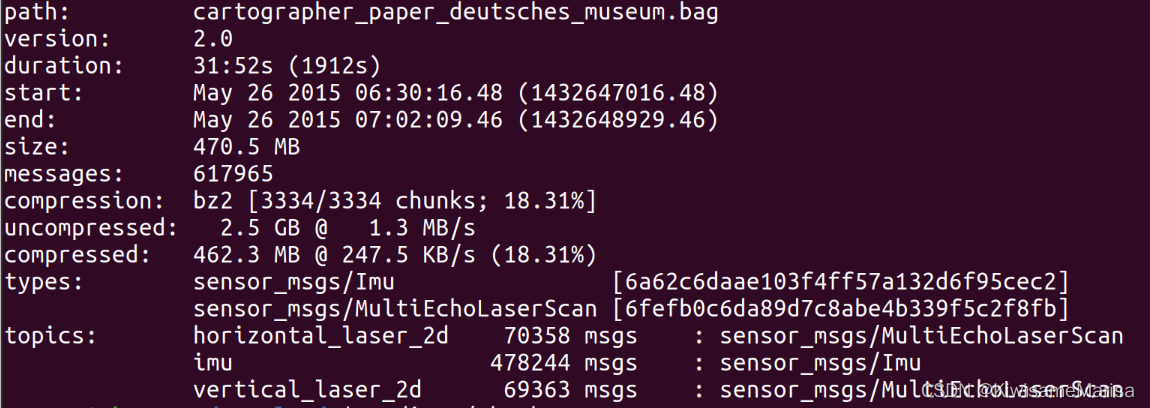
可以看到其中的内容还是很简单的,只有IMU和雷达扫描的数据,正如官网所描述的:
(This data was collected using a 2D LIDAR backpack at the Deutsches Museum. Each bag contains data from an IMU, data from a horizontal LIDAR intended for 2D SLAM, and data from an additional vertical (i.e. push broom) LIDAR.)
接下来,终于可以进入正题,看看launch是怎么使用bag的了
demo_backpack_2d.launch
<!--
  Copyright 2016 The Cartographer Authors

  Licensed under the Apache License, Version 2.0 (the "License");
  you may not use this file except in compliance with the License.
  You may obtain a copy of the License at

       http://www.apache.org/licenses/LICENSE-2.0

  Unless required by applicable law or agreed to in writing, software
  distributed under the License is distributed on an "AS IS" BASIS,
  WITHOUT WARRANTIES OR CONDITIONS OF ANY KIND, either express or implied.
  See the License for the specific language governing permissions and
  limitations under the License.
-->

<launch>
  <param name="/use_sim_time" value="true" />

  <include file="$(find cartographer_ros)/launch/backpack_2d.launch" />

  <node name="rviz" pkg="rviz" type="rviz" required="true"
      args="-d $(find cartographer_ros)/configuration_files/demo_2d.rviz" />
  <node name="playbag" pkg="rosbag" type="play"
      args="--clock $(arg bag_filename)" />
</launch>
可以看到,launch实际上是用xml的文件格式编写的,做过前端的朋友对此肯定不陌生。这里实际上使用的是backpack_2d.launch做启动项,而backpack_2d.launch中是这样写的:
backpack_2d.launch
<!--
  Copyright 2016 The Cartographer Authors

  Licensed under the Apache License, Version 2.0 (the "License");
  you may not use this file except in compliance with the License.
  You may obtain a copy of the License at

       http://www.apache.org/licenses/LICENSE-2.0

  Unless required by applicable law or agreed to in writing, software
  distributed under the License is distributed on an "AS IS" BASIS,
  WITHOUT WARRANTIES OR CONDITIONS OF ANY KIND, either express or implied.
  See the License for the specific language governing permissions and
  limitations under the License.
-->

<launch>
  <param name="robot_description"
    textfile="$(find cartographer_ros)/urdf/backpack_2d.urdf" />

  <node name="robot_state_publisher" pkg="robot_state_publisher"
    type="robot_state_publisher" />

  <node name="cartographer_node" pkg="cartographer_ros"
      type="cartographer_node" args="
          -configuration_directory $(find cartographer_ros)/configuration_files
          -configuration_basename backpack_2d.lua"
      output="screen">
    <remap from="echoes" to="horizontal_laser_2d" />
  </node>

  <node name="cartographer_occupancy_grid_node" pkg="cartographer_ros"
      type="cartographer_occupancy_grid_node" args="-resolution 0.05" />
</launch>
可以看到launch文件是以xml格式编写的,什么是xml?下面这篇W3C的教程可以作为参考
XML 教程![]() https://www.w3cschool.cn/xml/xml-xml-tutorialhc4o1t5m.html
https://www.w3cschool.cn/xml/xml-xml-tutorialhc4o1t5m.html
ROS启动文件通常都包含在 <launch> 标签中,里面包含其他子标签和属性,<node>标签来启动一个ROS节点,它的参数有
pkg: 要启动的节点所属的ROS包type: 节点的可执行文件名name: 启动的节点的名字output: 输出方式,可以是 "screen"、"log" 等args:用于向节点传递命令行参数
<param> 标签用来设置ROS参数,它的参数有
name: 参数的名字value: 参数的值textfile: 从文本文件中读取参数值的路径,从中读取参数的值
<remap> 标签用于重新映射节点(Node)的话题(Topics)、服务(Services)或参数(Parameters)。这允许你在运行时更改节点之间的通信关系,而无需修改节点的源代码
from: 原始名称,即节点实际使用的名称to: 新名称,即你希望将其重新映射为的名称
<include>标签用于引入其他启动项
demo_backpack_2d中的/use_sim_time表示使用模拟时间,将其设置为true(有必要专门列出来然后false吗hhhh)
include为此启动文件引入了backpack_2d.launch
node中启动了rviz节点,使用rviz包中的可执行文件rviz,它指定了一个ROS参数文件 demo_2d.rviz,该文件用于配置rviz的可视化界面。required="true" 表示这个节点是必须的,如果它失败启动,整个启动文件将失败
下面又启动了playbag节点,使用rosbag包中的play可执行文件,--clock参数将ROS时间同步到被播放的ROS bag文件中。
backpack_2d中的robot_description参数的值从backpack_2d.urdf中读取,其中应该是机器人的连接信息?
robot_state_publisher节点使用名称相同的包中的可执行文件,其作用是发布机器人的关节状态,将URDF模型发布到ROS的TF(Transform)系统中
cartographer_node节点使用cartographer_ros包中的可执行文件cartographer_node(这不是和同名差不多吗),args传递的参数有配置文件的目录和基本名称等,backpack_2d.lua是cartographer的配置文件,将其显示在中断上(即output=screen)
cartographer_occupancy_grid_node节点生成的是Cartographer的占用栅格地图,args=-resolution 0.05设置分辨率为0.05.
别忘了,我们还有一个同样隶属于backpack_2d的家伙
demo_backpack_2d_localization.launch
<launch>
  <param name="/use_sim_time" value="true" />

  <param name="robot_description"
    textfile="$(find cartographer_ros)/urdf/backpack_2d.urdf" />

  <node name="robot_state_publisher" pkg="robot_state_publisher"
    type="robot_state_publisher" />

  <node name="cartographer_node" pkg="cartographer_ros"
      type="cartographer_node" args="
          -configuration_directory $(find cartographer_ros)/configuration_files
          -configuration_basename backpack_2d_localization.lua
          -load_state_filename $(arg load_state_filename)"
      output="screen">
    <remap from="echoes" to="horizontal_laser_2d" />
  </node>

  <node name="cartographer_occupancy_grid_node" pkg="cartographer_ros"
      type="cartographer_occupancy_grid_node" args="-resolution 0.05" />

  <node name="rviz" pkg="rviz" type="rviz" required="true"
      args="-d $(find cartographer_ros)/configuration_files/demo_2d.rviz" />
  <node name="playbag" pkg="rosbag" type="play"
      args="--clock $(arg bag_filename)" />
</launch>
与前面两个不同的地方只有在启动cartographer_node节点时加了个remap标签,它的作用是从echoed(传回的数据)重新映射了节点的话题到horizontal_laser_2d(水平方向上的激光)。
demo_pr2.launch
考虑篇幅,接下来就不介绍license部分了,版权声明想必够用了,接下来我们分析demo_pr2.launch
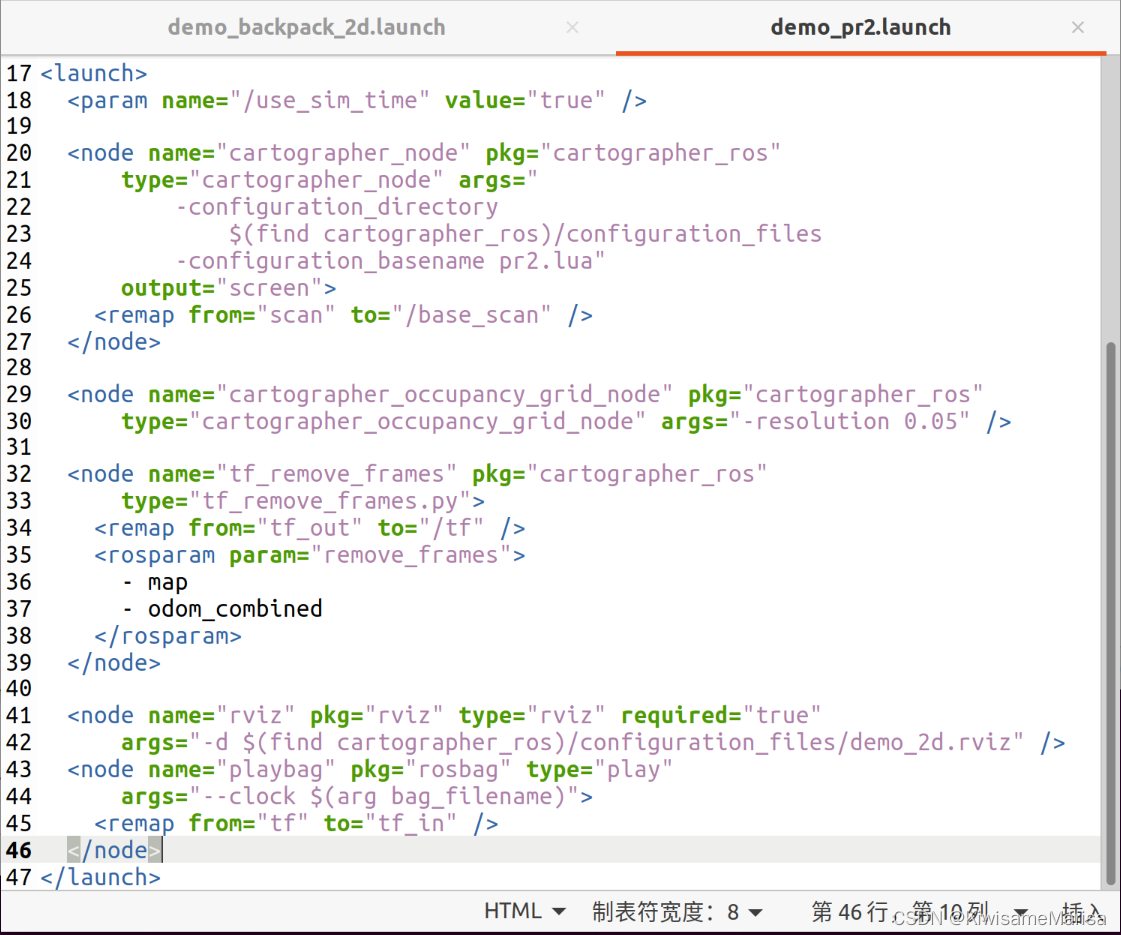
PR2针对的是由PR2机器人采集的数据集,(是的,就是由推出ROS系统的Willow Garage 公司开发的机器人),在cartographer的官方数据集文档里可以找到
cartographer的所有数据集的下载连接![]() https://google-cartographer-ros.readthedocs.io/en/latest/data.html与之前不同的是,用在机器人上时,launch中出现了tf树,这里引用一下别人的文章介绍tf树
https://google-cartographer-ros.readthedocs.io/en/latest/data.html与之前不同的是,用在机器人上时,launch中出现了tf树,这里引用一下别人的文章介绍tf树
tf变换简介![]() http://t.csdnimg.cn/YHBHJ
http://t.csdnimg.cn/YHBHJ
它将cartographer_node节点的remap标签将scan重新映射到了/base scan,对playbag节点也做了重新映射(由tf到tf_in),并增加了节点tf_remove_frames,<rosparam param="remove_frames">设置了需要从TF树中移除的帧,包括map和odom_combined。
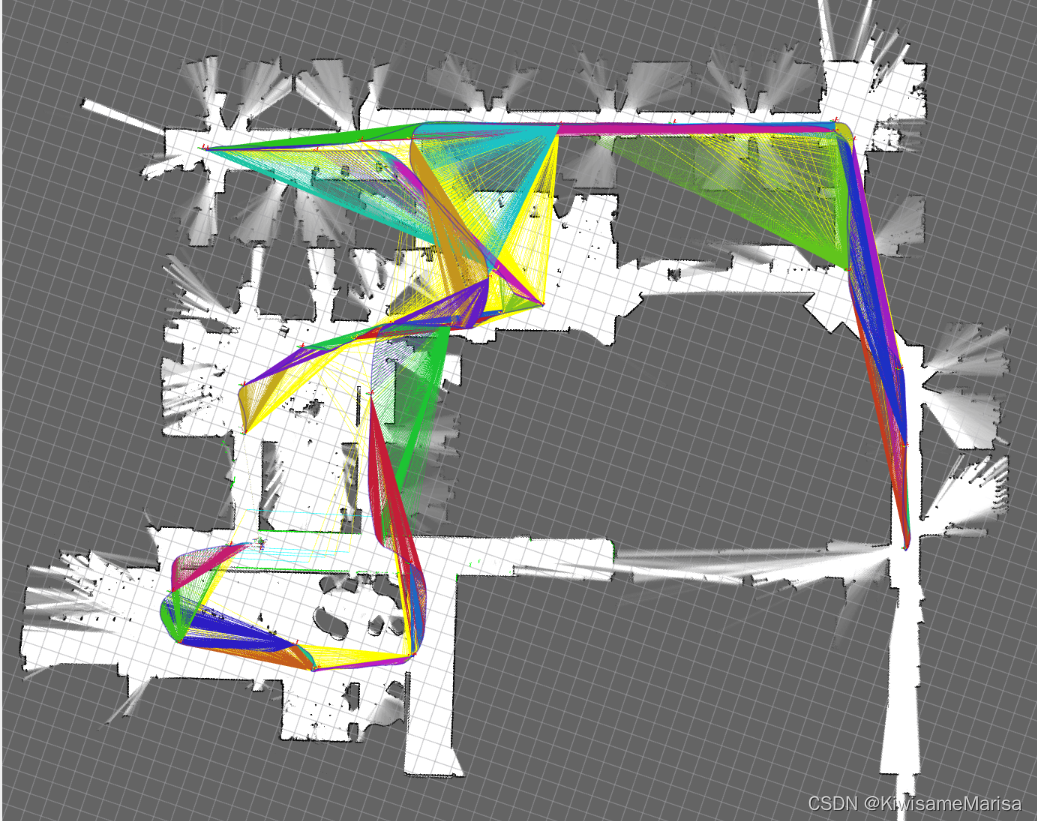
用它,就可以在PR2机器人上使用cartographer了,需要注意的是,tf_remove_frames.py中第一行声明的python路径是#!/usr/bin/python,而python3的默认路径则是#!/usr/bin/python3,要用它的话,需要在后面补上3(因为cartographer是16年推出的老项目了,当时还没用上python3,所以有了这个历史遗留问题),用官网提供都PR2数据集可以验证此launch启动,我们在此演示一遍
source install_isolated/setup.bash
roslaunch cartographer_ros demo_pr2.launch bag_filename:=${HOME}/Downloads/2011-09-15.bag
这里bag_filename以自己的bag名称为准,跑出来的效果如下


 2014
2014


 被折叠的 条评论
为什么被折叠?
被折叠的 条评论
为什么被折叠?
 到【灌水乐园】发言


