


原理

数学原理
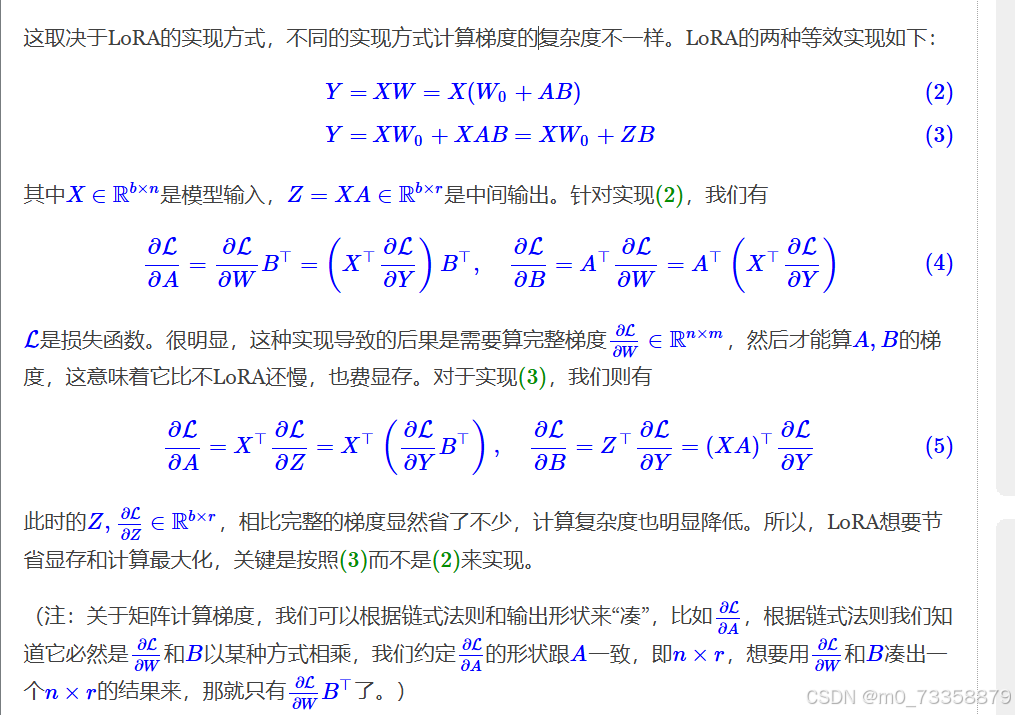
实现
Q:lora的预训练矩阵是不是下载的原模型的原来的参数矩阵,然后lora在这个基础上再加了一层矩阵?

1.数据处理
from transformers import AutoTokenizer
from datasets import load_dataset


# Load a tokenizer to use its chat template
template_tokenizer = AutoTokenizer.from_pretrained("TinyLlama/TinyLlama-1.1B-Chat-v1.0")

def format_prompt(example):
    """Format the prompt to using the <|user|> template TinyLLama is using"""

    # Format answers
    chat = example["messages"]
    prompt = template_tokenizer.apply_chat_template(chat, tokenize=False)

    return {"text": prompt}

# Load and format the data using the template TinyLLama is using
dataset = (
    load_dataset("HuggingFaceH4/ultrachat_200k",  split="test_sft")
      .shuffle(seed=42)
      .select(range(3_000))
)
dataset = dataset.map(format_prompt)


2.Models - Quantization
from transformers import AutoModelForCausalLM, AutoTokenizer, BitsAndBytesConfig

model_name = "Qwen/Qwen2.5-0.5B-Instruct"

# 4-bit quantization configuration - Q in QLoRA
bnb_config = BitsAndBytesConfig(
    load_in_4bit=True,  # Use 4-bit precision model loading
    bnb_4bit_quant_type="nf4",  # Quantization type
    bnb_4bit_compute_dtype="float16",  # Compute dtype
    bnb_4bit_use_double_quant=True,  # Apply nested quantization
)

# Load the model to train on the GPU
model = AutoModelForCausalLM.from_pretrained(
    model_name,
    device_map="auto",

    # Leave this out for regular SFT
    quantization_config=bnb_config,
)
model.config.use_cache = False
model.config.pretraining_tp = 1  # 上面这两个配置,只有在 k-bit 量化的时候需要设置

# Load LLaMA tokenizer
tokenizer = AutoTokenizer.from_pretrained(model_name, trust_remote_code=True)
# tokenizer.pad_token = "<PAD>"  # qwen2 的 pad token 不是 <pad>,所以用 <im_end>,因此需要注释掉
tokenizer.padding_side = "left"   # 训练不重要,推理比较重要
加载一个经过 4-bit 量化的因果语言模型:通过 BitsAndBytesConfig 配置量化参数,并使用 AutoModelForCausalLM.from_pretrained 方法加载模型。
细节:
bnb_4bit_use_double_quant=True: 启用嵌套量化,进一步压缩模型大小。
use_cache=False: 关闭缓存机制,通常在微调时关闭以避免潜在问题。
pretraining_tp=1: 设置预训练的张量并行度(Tensor Parallelism),在量化时需要设置。
3. LoRA 配置
from peft import LoraConfig, prepare_model_for_kbit_training, get_peft_model

# Prepare LoRA Configuration
peft_config = LoraConfig(
    lora_alpha=32,  # LoRA Scaling
    lora_dropout=0.1,  # Dropout for LoRA Layers
    r=64,  # Rank,可训练数据越多,设置越大
    bias="none",
    task_type="CAUSAL_LM",
    target_modules=  ['k_proj', 'v_proj', 'q_proj']
    # Layers to target
    #  ['k_proj', 'gate_proj', 'v_proj', 'up_proj', 'q_proj', 'o_proj', 'down_proj']
)

# prepare model for training
model = prepare_model_for_kbit_training(model)

# 如果没有 prepare_model_for_kbit_training,
# 且 training args 中配置了 gradient_checkpointing=True (这个其实也是为了省显存,其实不重要)
# 那么需要设置 model.enable_input_require_grads()
# model.enable_input_require_grads()

model = get_peft_model(model, peft_config)
细节
LoraConfig: 用于配置LoRA的参数。
prepare_model_for_kbit_training: 准备模型以支持低精度(如4位或8位量化)训练。(这个函数准备模型以支持低精度(如4位或8位量化)训练。它确保模型能够正确处理低精度权重和激活。)
get_peft_model: 将LoRA配置应用到模型上,生成一个带有LoRA适配器的模型。
LoRA参数详解
lora_alpha: 控制LoRA层缩放的比例。较大的值会使LoRA层的影响更大。
lora_dropout: 在LoRA层中使用的Dropout率,有助于防止过拟合。
r: LoRA分解矩阵的秩,决定了需要学习的参数数量。较高的秩意味着更多的可训练参数。
bias: 是否在LoRA层中包含偏置项,这里设置为"none"表示不包含偏置。
task_type: 指定任务类型,这里是因果语言模型(Causal Language Model)。
target_modules: 列表指定哪些层将被LoRA适配器替换。这里的例子指定了k_proj, v_proj, 和 q_proj层
如果你没有使用prepare_model_for_kbit_training并且希望启用梯度检查点(gradient checkpointing),可以通过调用model.enable_input_require_grads()来确保输入张量需要梯度计算。这通常是为了节省显存而采取的一种策略。
4.训练配置
from transformers import TrainingArguments

output_dir = "./results"

# Training arguments
training_arguments = TrainingArguments(
    output_dir=output_dir,
    per_device_train_batch_size=2,
    gradient_accumulation_steps=4,
    optim="adamw_torch",
    learning_rate=2e-4,
    lr_scheduler_type="cosine",
    num_train_epochs=1,
    logging_steps=10,
    fp16=True,
    gradient_checkpointing=True
)
细节
output_dir: 指定训练结果的保存路径。
• per_device_train_batch_size: 每个设备上的训练批次大小。
• gradient_accumulation_steps: 梯度累积步数,用于模拟更大的批次大小。
总 batch_size=train_batch_size * gradient_accumulation_steps:
• optim: 选择使用的优化器。
• learning_rate: 初始学习率。
• lr_scheduler_type: 学习率调度器的类型。
• num_train_epochs: 训练的总轮数。
• logging_steps: 日志记录的频率。
• fp16: 是否启用混合精度训练。
• gradient_checkpointing: 是否启用梯度检查点以节省显存。
5.训练
from trl import SFTTrainer

# Set supervised fine-tuning parameters
trainer = SFTTrainer(
    model=model,
    train_dataset=dataset,
    dataset_text_field="text",   # 注意 dataset 中的 text 字段
    tokenizer=tokenizer,
    args=training_arguments,
    max_seq_length=512,

    # Leave this out for regular SFT
    peft_config=peft_config,
)

# Train model
trainer.train()

# Save QLoRA weights
trainer.model.save_pretrained("qwen2.5-0.5b-instruct-chaofa")
使用 Hugging Face 的 trl(Transformers Reinforcement Learning)库中的 SFTTrainer 来进行监督微调(Supervised Fine-Tuning, SFT),并保存训练后的模型权重。
细节
SFTTrainer: 这是 trl 库中的一个类,用于执行监督微调任务。
6.Merge Adapter (LoRA 和 base model 合并)
from peft import AutoPeftModelForCausalLM

model = AutoPeftModelForCausalLM.from_pretrained(
    "qwen2.5-0.5b-instruct-chaofa",
    low_cpu_mem_usage=True,
    device_map="auto",
)

# Merge LoRA and base model
merged_model = model.merge_and_unload()
细节
“qwen2.5-0.5b-instruct-chaofa”:模型的名称或路径,指向你之前保存的经过 LoRA 微调的模型。
merge_and_unload: 这个方法将 LoRA 适配器与基础模型合并,并卸载适配器,生成一个新的模型对象,其中包含了合并后的权重。这样生成的模型可以直接使用,不需要再依赖 LoRA 适配器。
7.Inference
from transformers import pipeline

pipe = pipeline(task="text-generation", model=merged_model, tokenizer=tokenizer)

prompt_example = """<|im_start|>system
你是一个非常棒的人工智能助手,是UP主 “用代码打点酱油的chaofa” 开发的。<|im_end|>
<|im_start|>user
天气太热了,所以我今天没有学习一点。
翻译成文言文:<|im_end|>
<|im_start|>assistant
"""

print(pipe(prompt_example, max_new_tokens=50)[0]["generated_text"])
细节
max_new_tokens=50: 指定生成的最大新标记数(即生成的文本长度)。
pipe(prompt_example, max_new_tokens=50): 调用 pipeline 对象生成文本。
e 对象生成文本。
[0][“generated_text”]: 获取生成结果中的第一个输出,并提取生成的文本部分。
结果


 3万+
3万+

 被折叠的 条评论
为什么被折叠?
被折叠的 条评论
为什么被折叠?
 到【灌水乐园】发言


