


Zed相机的驱动安装和图像视频获取
和众多的深度相机一样,下载SDK,然后SDK里有个上位机可以用来快速的获取视频和可视化,然后还有一套ROS,C++,python的API可以编写一些定制程序。
型号

| 型号 | ZED mini垃圾 | ZED 2 黑色的 | ZED白色的 最垃圾 | ZED 2I 想要的 |
|---|---|---|---|---|
| 特点 | 不写了自己看 |
驱动安装
ZED SDK-Python 的环境后面装
我的cuda环境:cuda12.4
参考官网的下载方式是SDK,针对不同硬件平台和cuda版本下载不同的SDK版本,这里下载的SDK版本号是4.2。
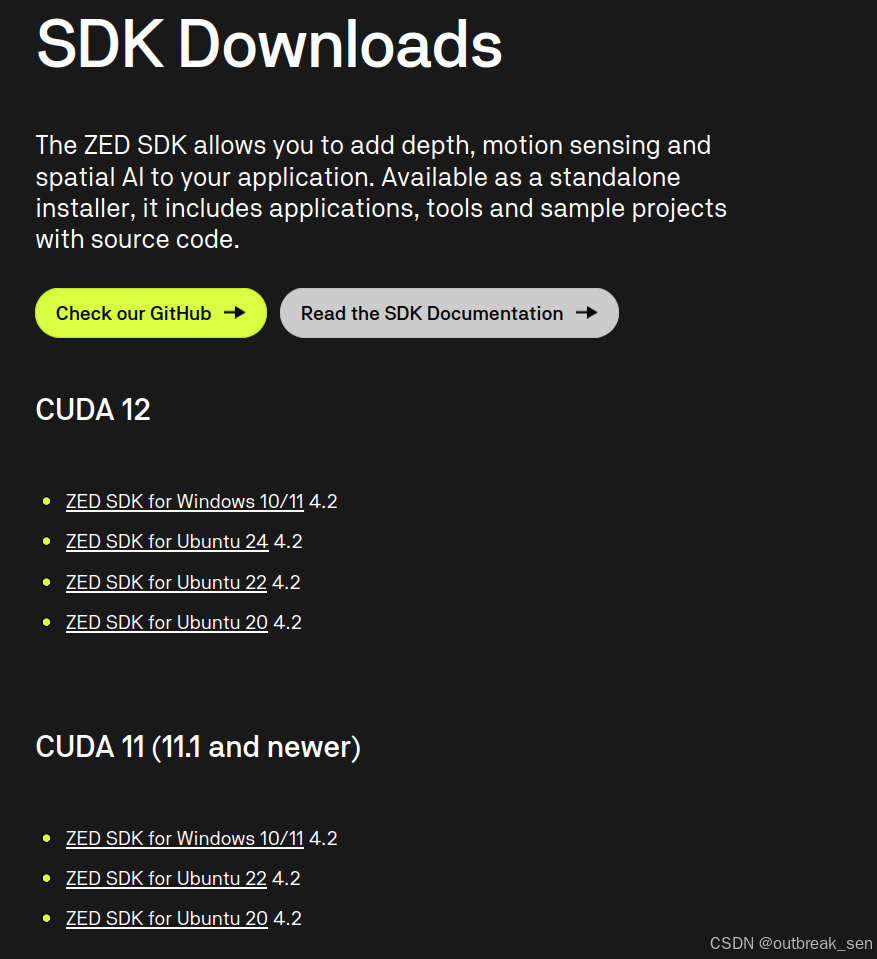
$ sh ./ZED_SDK_Ubuntu22_cuda12.1_v4.2.5.zstd.run

Verifying archive integrity...  100%   MD5 checksums are OK. All good.
Uncompressing 'ZED camera SDK by Stereolabs (Use 'sudo apt install zstd' if zstd is not found)'  100%
Ubuntu version 22.04 detected. OK
To continue you have to accept the EULA. Accept  [Y/n] ?y
Installing...Python 的环境后面装
Installation path: /usr/local/zed #安装路径,tools samples都在这
Checking CUDA version...
OK: Found CUDA 12.4 # 查cuda版本,找不到输出一下路径
Do you want to also install the static version of the ZED SDK (AI module will still require libsl_ai.so) [Y/n] ?y # 必须的
Do you want to install the AI module (required for Object detection and Neural Depth, recommended), cuDNN 8.9 and TensorRT 8.6 will be installed [Y/n] ?y # 这个就是是否需要下载他写好的深度学习的一些方法,可以识别物体这类的,没必要
Install samples (recommended) [Y/n] ?y # sample还是很有必要的,得看看api怎么用的
Installation path: /usr/local/zed/samples/ # sample的路径
Do you want to auto-install dependencies (recommended) ? following packet will be installed via the package manager : libjpeg-turbo8 libturbojpeg libusb-1.0-0 libusb-1.0-0-dev libopenblas-dev libarchive-dev libv4l-0 curl unzip zlib1g mesa-utils libpng-dev python3-dev python3-pip python3-setuptools libglew-dev freeglut3-dev qtbase5-dev qtchooser qt5-qmake qtbase5-dev-tools libqt5opengl5 libqt5svg5 [Y/n] ?y # 装啊,还能不装?
Do you want to install the Python API (recommended) [Y/n] ?N # 这里装的不好,需要指定python的路径,建议看下面python的是怎么安装的
Please specify your python executable: python3 # 这里直接摁了回车 ,我感觉得提前构建一个环境给zed
Requirement already satisfied: numpy in /home/outbreak/anaconda3/lib/python3.11/site-packages (1.24.3)
Requirement already satisfied: requests in /home/outbreak/anaconda3/lib/python3.11/site-packages (2.31.0)
Requirement already satisfied: charset-normalizer<4,>=2 in /home/outbreak/anaconda3/lib/python3.11/site-packages (from requests) (2.0.4)
Requirement already satisfied: idna<4,>=2.5 in /home/outbreak/anaconda3/lib/python3.11/site-packages (from requests) (3.4)
Requirement already satisfied: urllib3<3,>=1.21.1 in /home/outbreak/anaconda3/lib/python3.11/site-packages (from requests) (1.26.16)
Requirement already satisfied: certifi>=2017.4.17 in /home/outbreak/anaconda3/lib/python3.11/site-packages (from requests) (2023.7.22)

ERROR: pip's dependency resolver does not currently take into account all the packages that are installed. This behaviour is the source of the following dependency conflicts.
tables 3.8.0 requires blosc2~=2.0.0, which is not installed.
gensim 4.3.0 requires FuzzyTM>=0.4.0, which is not installed.
numba 0.57.1 requires numpy<1.25,>=1.21, but you have numpy 1.26.4 which is incompatible.
Successfully installed cython-3.0.12 numpy-1.24.3 pyzed-4.2
Done
  To install it later or on a different environment run :
 python -m pip install --ignore-installed /tmp/selfgz29281/pyzed-4.2-cp311-cp311-linux_x86_64.whl
The ZED Python API was installed for 'python3' #这里是报错了,自动安装到anaconda里了,然后有几个下载的package,有的没装,之后自己装吧,但是没关系,因为ZED SDK 安装文件夹中有一个 Python 脚本(get_python_api.py),可以自动检测操作系统、CUDA 和 Python 版本并下载相应的预编译 Python API 包(pyzed)。大家都是安装zedsdk时候不安装这个pythonAPI,然后后面自己安装

Do you want to run the ZED Diagnostic to download all AI models [Y/n] ?y # 深度学习的model,可以不用
Downloading all AI models
Downloading: MULTI CLASS DETECTION...
/usr/local/zed/resources/objects_ 100%[=============================================================>]  35.84M  10.4MB/s    用时 3.7s
Downloading: MULTI CLASS MEDIUM DETECTION...

Do you want to run the ZED Diagnostic to optimize all AI models, it may take a very long time, up to multiple hours but will be done only once. Otherwise it will be optimized just in time when running the ZED SDK [Y/n] ?n # 对不起我赶时间,这个优化我不装了
安装ZED-Python-API(pyzed)-针对conda
ZED SDK 安装文件夹/usr/local/zed中有一个 Python 脚本(get_python_api.py),可以自动检测操作系统、CUDA 和 Python 版本并下载相应的预编译 Python API 的whl包(pyzed)。
$ cd /usr/local/zed
$ conda activate ZED #先激活conda还环境,因为这个脚本需要查看python版本和python路径
$ python get_python_api.py

Detected platform:
	 linux_x86_64
	 Python 3.10
	 ZED SDK 4.2
-> Checking if https://download.stereolabs.com/zedsdk/4.2/whl/linux_x86_64/pyzed-4.2-cp310-cp310-linux_x86_64.whl exists and is available
-> Found ! Downloading python package into /usr/local/zed/pyzed-4.2-cp310-cp310-linux_x86_64.whl
-> Installing necessary dependencies
Requirement already satisfied: numpy in /home/outbreak/anaconda3/envs/pytorch2/lib/python3.10/site-packages (1.26.4)
Processing ./pyzed-4.2-cp310-cp310-linux_x86_64.whl
Collecting numpy<2.0,>=1.13 (from pyzed==4.2)
  Downloading numpy-1.26.4-cp310-cp310-manylinux_2_17_x86_64.manylinux2014_x86_64.whl.metadata (61 kB)
Collecting cython>=3.0.0 (from pyzed==4.2)
  Downloading Cython-3.0.12-cp310-cp310-manylinux_2_17_x86_64.manylinux2014_x86_64.whl.metadata (3.3 kB)
Downloading Cython-3.0.12-cp310-cp310-manylinux_2_17_x86_64.manylinux2014_x86_64.whl (3.6 MB)
   ━━━━━━━━━━━━━━━━━━━━━━━━━━━━━━━━━━━━━━━━ 3.6/3.6 MB 4.6 MB/s eta 0:00:00
Downloading numpy-1.26.4-cp310-cp310-manylinux_2_17_x86_64.manylinux2014_x86_64.whl (18.2 MB)
   ━━━━━━━━━━━━━━━━━━━━━━━━━━━━━━━━━━━━━━━━ 18.2/18.2 MB 5.0 MB/s eta 0:00:00
Installing collected packages: numpy, cython, pyzed
Successfully installed cython-3.0.12 numpy-1.26.4 pyzed-4.2
Done
  To install it later or on a different environment run :
 python -m pip install --ignore-installed /usr/local/zed/pyzed-4.2-cp310-cp310-linux_x86_64.whl


$ python -m pip install --ignore-installed /usr/local/zed/pyzed-4.2-cp310-cp310-linux_x86_64.whl
这个脚本可以测试又没有安装好,这里方便复制,其实就是下面的sample的第一个
import pyzed.sl as sl
def main():
    # Create a Camera object
    zed = sl.Camera()

    # Create a InitParameters object and set configuration parameters
    init_params = sl.InitParameters()
    init_params.sdk_verbose = False

    # Open the camera
    err = zed.open(init_params)
    if err != sl.ERROR_CODE.SUCCESS:
        exit(1)

    # Get camera information (ZED serial number)
    zed_serial = zed.get_camera_information().serial_number
    print("Hello! This is my serial number: {0}".format(zed_serial))

    # Close the camera
    zed.close()


if __name__ == "__main__":
    main()


# 发现报错,这个报错很常见,自己搜一下
Traceback (most recent call last):
  File "/home/outbreak/ZED/samples/tutorials/tutorial 1 - hello ZED/python/hello_zed.py", line 21, in <module>
    import pyzed.sl as sl
ImportError: /home/outbreak/anaconda3/envs/pytorch2/bin/../lib/libstdc++.so.6: version `GLIBCXX_3.4.30' not found (required by /usr/local/zed/lib/libsl_zed.so)
#解决方法:ln -sf /usr/lib/x86_64-linux-gnu/libstdc++.so.6  /home/outbreak/anaconda3/envs/pytorch2/bin/../lib/libstdc++.so.6
上位机的使用
这玩意有多个上位机,可以直接命令行输入命令运行,这些软件的位置都在tools里
/usr/local/zed/tools/ZED Depth Viewer
ZED360             ZED_Depth_Viewer   ZED_Explorer       ZED_Sensor_Viewer
ZED_Calibration    ZED_Diagnostic     ZEDfu              ZED_SVO_Editor
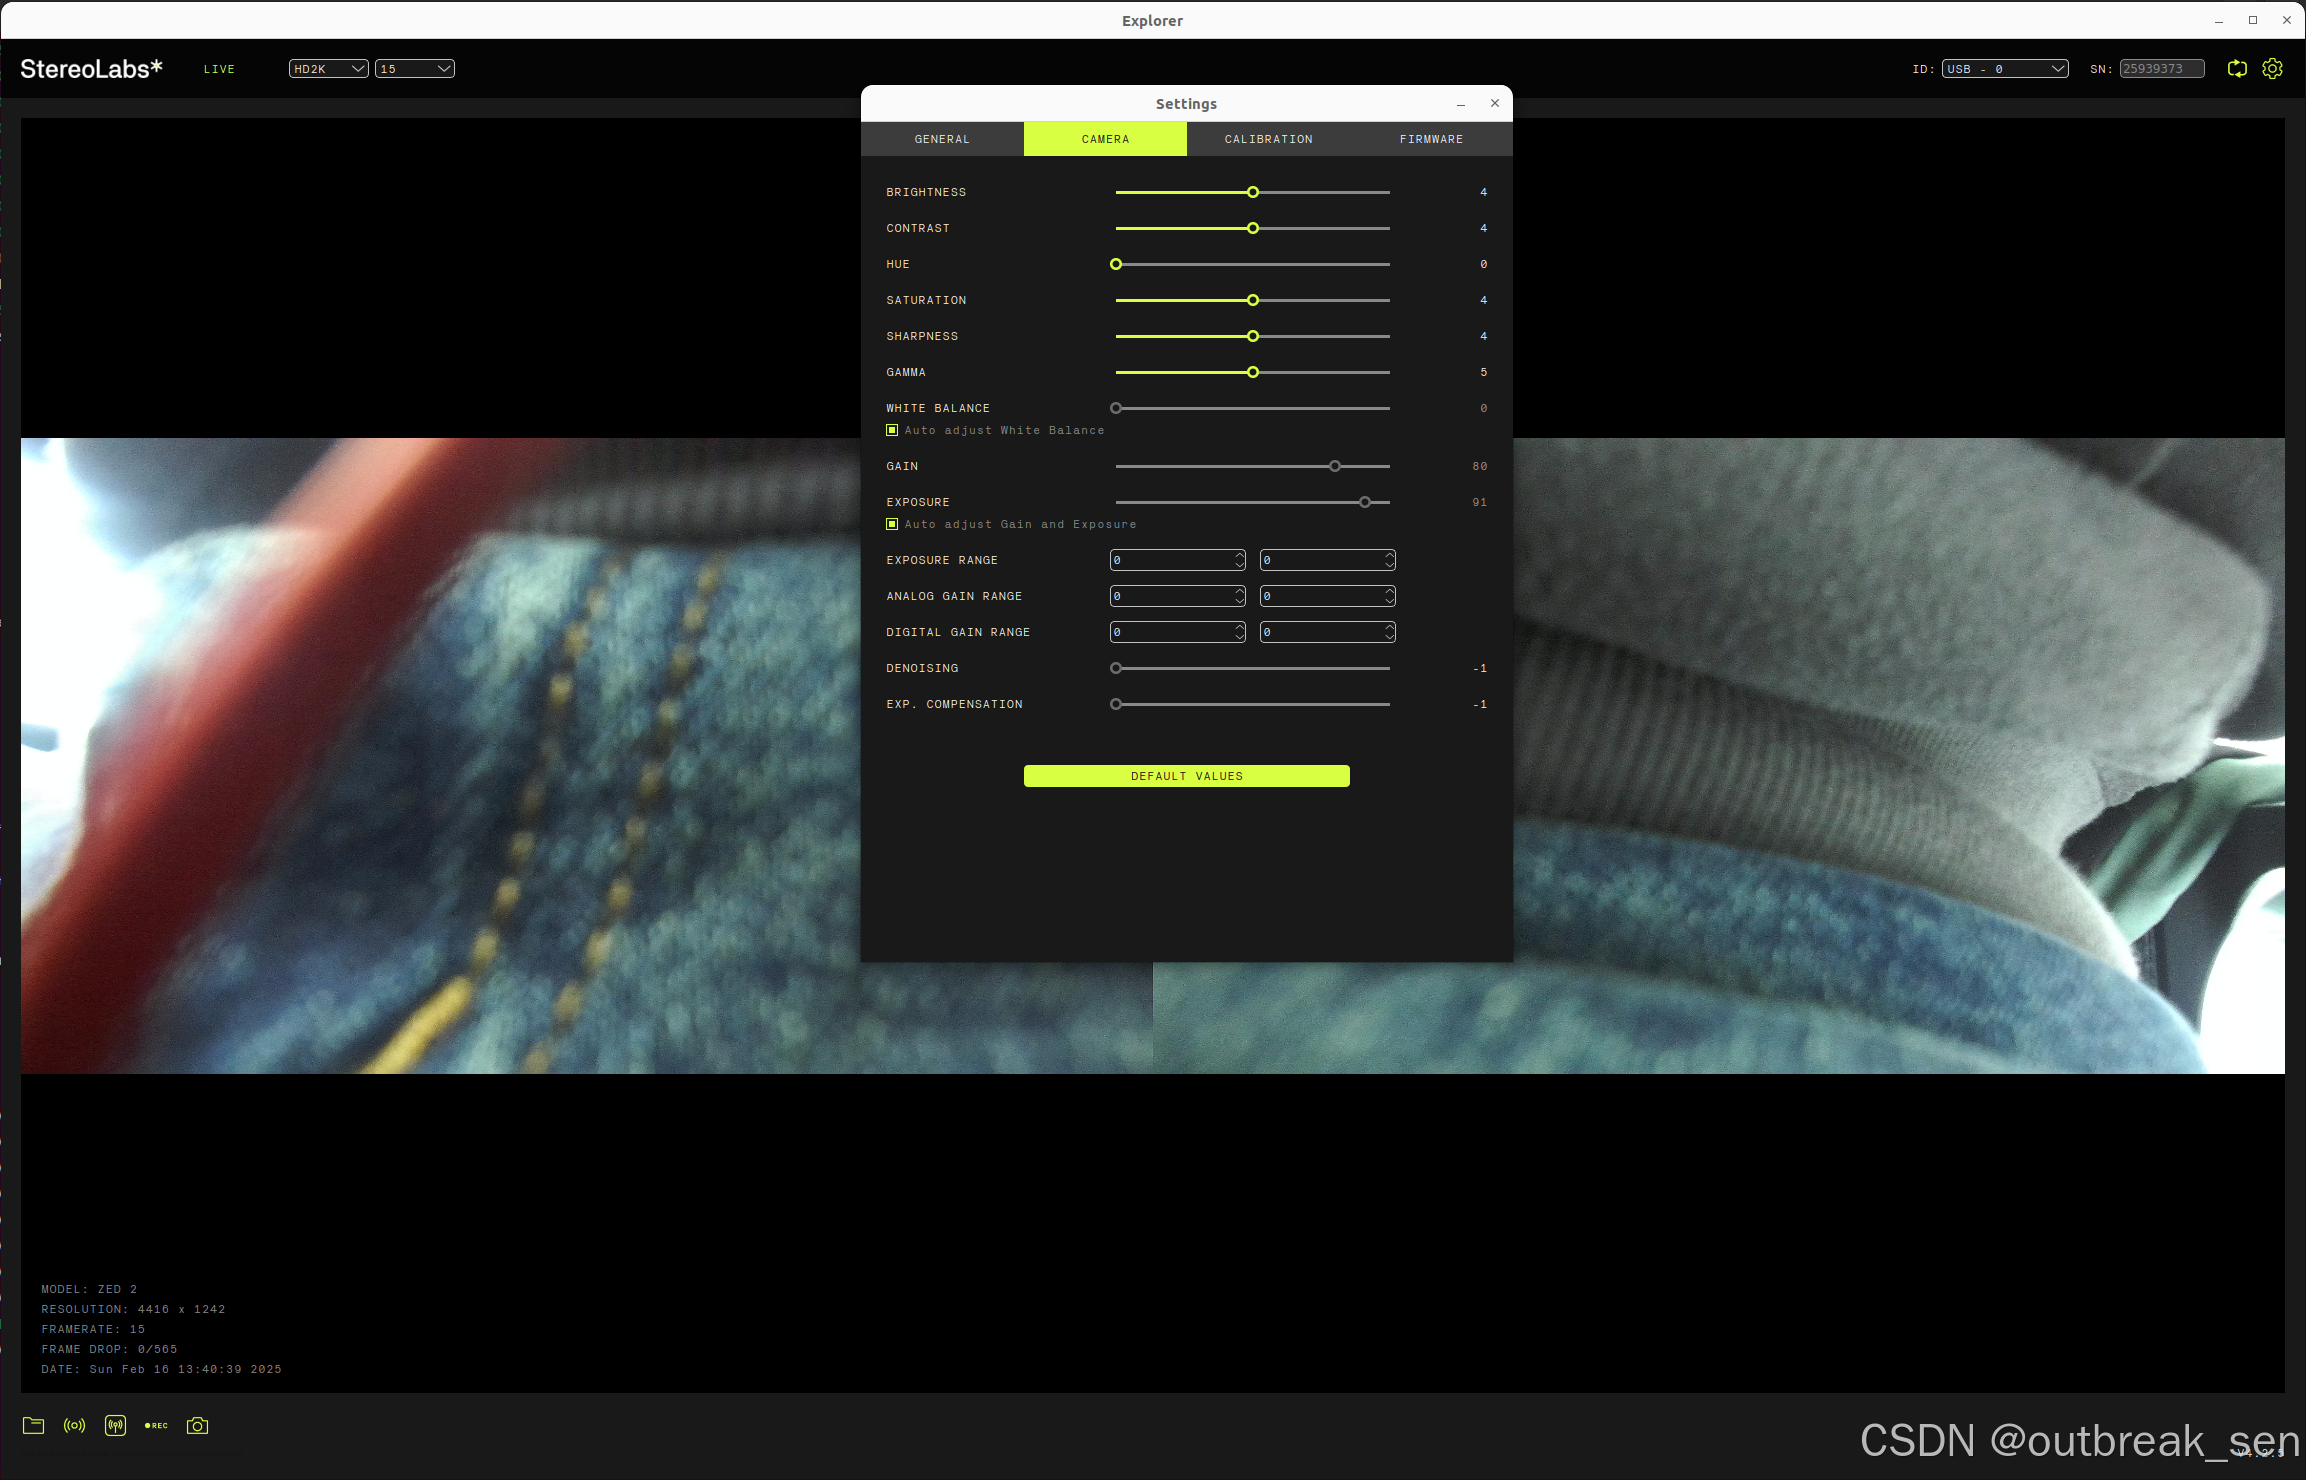
ZED Explorer
ZED Explorer是ZED实时预览和录制的应用程序。它允许您更改视频分辨率、纵横比和相机参数,并捕获高分辨率快照和3D视频。
如果ZED被您的计算机识别,您将看到来自相机的3D视频。
ZED Depth Viewer
ZED Depth Viewer使用ZED SDK捕获和显示深度图和3D点云。运行ZED Depth Viewer,检查深度图是否正确显示。尝试不同的深度模式,以选择最适合您的深度质量/性能比。
工业垃圾,写的一托,相机打不开
ZED_Depth_Viewer
[2025-02-16 05:49:06 UTC][ZED][INFO] Logging level INFO
[2025-02-16 05:49:06 UTC][ZED][INFO] Logging level INFO
[2025-02-16 05:49:06 UTC][ZED][INFO] [Init]  Depth mode: ULTRA
[2025-02-16 05:49:07 UTC][ZED][INFO] [Init]  Camera successfully opened.
[2025-02-16 05:49:07 UTC][ZED][INFO] [Init]  Camera FW version: 1523
[2025-02-16 05:49:07 UTC][ZED][INFO] [Init]  Video mode: HD1080@30
[2025-02-16 05:49:07 UTC][ZED][INFO] [Init]  Serial Number: S/N 25939373
in bool ImageHandler::initialize(sl::Mat&) : Err [999]: unknown error.
Stack trace (most recent call last):
#26   Object "[0xffffffffffffffff]", at 0xffffffffffffffff, in
#25   Object "ZED_Depth_Viewer", at 0x64b315f97e44, in
#24   Object "/lib/x86_64-linux-gnu/libc.so.6", at 0x77912ce29e3f, in __libc_start_main
#23   Object "/lib/x86_64-linux-gnu/libc.so.6", at 0x77912ce29d8f, in
#22   Object "ZED_Depth_Viewer", at 0x64b315f97061, in
#21   Object "ZED_Depth_Viewer", at 0x64b315fc841d, in
#20   Object "ZED_Depth_Viewer", at 0x64b315fc341e, in
#19   Object "ZED_Depth_Viewer", at 0x64b315fdc499, in
#18   Object "/lib/x86_64-linux-gnu/libQt5Core.so.5", at 0x77912d8b875a, in QEventLoop::exec(QFlags<QEventLoop::ProcessEventsFlag>)
#17   Object "/lib/x86_64-linux-gnu/libQt5Core.so.5", at 0x77912d9130b7, in QEventDispatcherGlib::processEvents(QFlags<QEventLoop::ProcessEventsFlag>)
#16   Object "/lib/x86_64-linux-gnu/libglib-2.0.so.0", at 0x77912d1193e2, in g_main_context_iteration
#15   Object "/lib/x86_64-linux-gnu/libglib-2.0.so.0", at 0x77912d1712b7, in
#14   Object "/lib/x86_64-linux-gnu/libglib-2.0.so.0", at 0x77912d11bd3a, in g_main_context_dispatch
#13   Object "/lib/x86_64-linux-gnu/libQt5Core.so.5", at 0x77912d912d33, in
#12   Object "/lib/x86_64-linux-gnu/libQt5Core.so.5", at 0x77912d9123ea, in QTimerInfoList::activateTimers()
#11   Object "/lib/x86_64-linux-gnu/libQt5Core.so.5", at 0x77912d8b9e39, in QCoreApplication::notifyInternal2(QObject*, QEvent*)
#10   Object "/lib/x86_64-linux-gnu/libQt5Widgets.so.5", at 0x77912e56c712, in QApplicationPrivate::notify_helper(QObject*, QEvent*)
#9    Object "/lib/x86_64-linux-gnu/libQt5Core.so.5", at 0x77912d8e733e, in QObject::event(QEvent*)
#8    Object "/lib/x86_64-linux-gnu/libQt5Core.so.5", at 0x77912d8f57fd, in QTimer::timeout(QTimer::QPrivateSignal)
#7    Object "/lib/x86_64-linux-gnu/libQt5Core.so.5", at 0x77912d8f17c7, in
#6    Object "ZED_Depth_Viewer", at 0x64b315fc8eec, in
#5    Object "ZED_Depth_Viewer", at 0x64b315fc4434, in
#4    Object "ZED_Depth_Viewer", at 0x64b315fd48d3, in
#3    Object "ZED_Depth_Viewer", at 0x64b315fd3368, in
#2    Object "ZED_Depth_Viewer", at 0x64b31603654d, in
#1    Object "ZED_Depth_Viewer", at 0x64b315ff272d, in
#0    Object "/lib/x86_64-linux-gnu/libcuda.so.1", at 0x779139af30e9, in
Segmentation fault (Address not mapped to object [0x1500000015])
[1]    4712 segmentation fault (core dumped)  ZED_Depth_Viewer
工业垃圾的上位机bug一堆
用上位机看zed mini深度图,看不到,还把我系统的所有小图表都崩没了,然后还卡住了,垃圾至极。比realsense不知道拉到哪里去了。
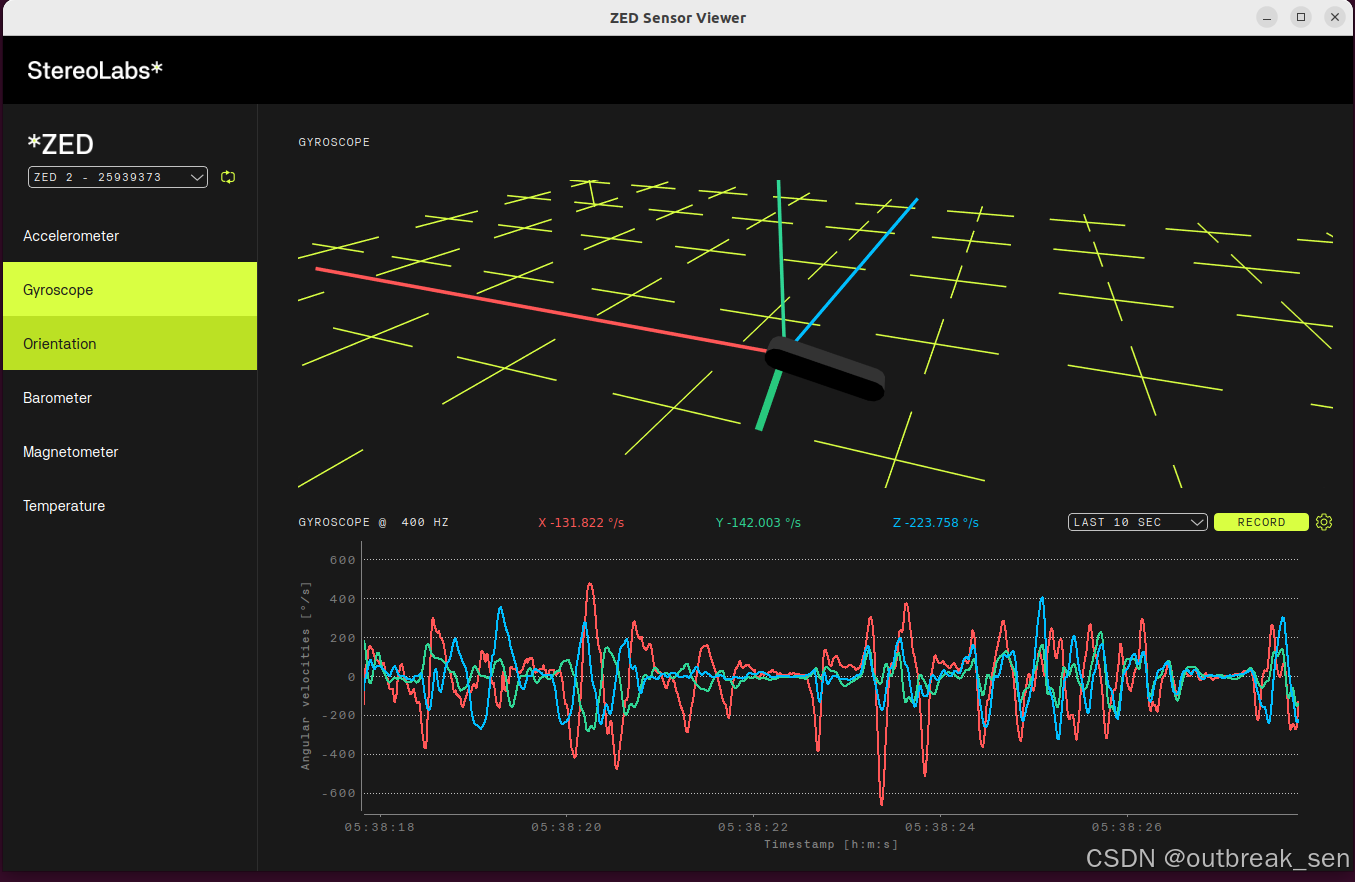
ZED Sensor Viewer
能看到当前的陀螺仪,加速度,磁力计数据。
SED_SVO_Editor
ZED tutorials
ZED SDK包括几个教程和示例,用于学习如何使用视频、深度、位置跟踪、地图和其他信息,以及许多第三方集成。自己看吧。代码路径在/usr/local/zed/samples/tutorials里面
| Tutorial | Description | Link |
|---|---|---|
| Hello ZED | This is the simplest tutorial. It shows how to open a stereo camera and print its serial number in the terminal. | [C++](https://github.com/stereolabs/zed-examples/tree/master/tutorials/tutorial 1 - hello ZED/cpp/) [Python](https://github.com/stereolabs/zed-examples/tree/master/tutorials/tutorial 1 - hello ZED/python/) |
| Image Capture | Shows how to open a stereo camera, capture an image and print its timestamp and image size in the terminal. | [C++](https://github.com/stereolabs/zed-examples/tree/master/tutorials/tutorial 2 - image capture/cpp/) [Python](https://github.com/stereolabs/zed-examples/tree/master/tutorials/tutorial 2 - image capture/python/) |
| Depth Perception | Shows how to retrieve the depth and point cloud of a scene, and print the distance of a given point in the terminal. | [C++](https://github.com/stereolabs/zed-examples/tree/master/tutorials/tutorial 3 - depth sensing/cpp/) [Python](https://github.com/stereolabs/zed-examples/tree/master/tutorials/tutorial 3 - depth sensing/python/) |
| Camera Tracking | Shows how to enable positional tracking and get the position and orientation of the camera in real time. | [C++](https://github.com/stereolabs/zed-examples/tree/master/tutorials/tutorial 4 - positional tracking/cpp/) [Python](https://github.com/stereolabs/zed-examples/tree/master/tutorials/tutorial 4 - positional tracking/python/) |
| Spatial Mapping | Shows how to enable spatial mapping and capture a mesh or fused point cloud of the environment. | [C++](https://github.com/stereolabs/zed-examples/tree/master/tutorials/tutorial 5 - spatial mapping/cpp/) [Python](https://github.com/stereolabs/zed-examples/tree/master/tutorials/tutorial 5 - spatial mapping/python/) |
| 3D Object Detection | Shows how to detect objects in a scene and localize them in 3D. | [C++](https://github.com/stereolabs/zed-examples/tree/master/tutorials/tutorial 6 - object detection/cpp/) [Python](https://github.com/stereolabs/zed-examples/tree/master/tutorials/tutorial 6 - object detection/python/) |
| Using Sensors | Shows how to acquire IMU, barometer and magnetometer data. | [C++](https://github.com/stereolabs/zed-examples/tree/master/tutorials/tutorial 7 - sensor data/cpp/) [Python](https://github.com/stereolabs/zed-examples/tree/master/tutorials/tutorial 7 - sensor data/python/) |
| 3D Body Tracking | Shows how to detect human body skeletons in a 3D scene. | [C++](https://github.com/stereolabs/zed-examples/tree/master/tutorials/tutorial 7 - sensor data/cpp/) [Python](https://github.com/stereolabs/zed-sdk/tree/master/tutorials/tutorial 8 - body tracking/python) |
| Geo-tracking | Shows how to use the Geo-tracking Fusion API to display fused GNSS and positional tracking data on a map. | [C++](https://github.com/stereolabs/zed-examples/tree/master/tutorials/tutorial 7 - sensor data/cpp/) [Python](https://github.com/stereolabs/zed-sdk/tree/master/tutorials/tutorial 8 - body tracking/python) |
只讲解深度图/视差图/彩色图获取
要获得数据,首先要使用grab函数获得数据
然后通过retrieve_image函数获得每个视角的彩色图等
然后通过retrieve_measure函数获得每个视角的深度图视差图等
默认名称获得的是左视角的深度图和视差图,比如说DEPTH是指左目的深度图,如果想获得右目的,那就得参数为DEPTH_RIGHT
| Enumerator | |
|---|---|
| DISPARITY | Disparity map. Each pixel contains 1 float. Type: sl.MAT_TYPE.F32_C1 |
| DEPTH | Depth map in sl.UNIT defined in sl.InitParameters.coordinate_units. Each pixel contains 1 float. Type: sl.MAT_TYPE.F32_C1 |
| CONFIDENCE | Certainty/confidence of the depth map. Each pixel contains 1 float. Type: sl.MAT_TYPE.F32_C1 |
| XYZ | Point cloud. Each pixel contains 4 float (X, Y, Z, not used). Type: sl.MAT_TYPE.F32_C4 |
| XYZRGBA | Colored point cloud. Each pixel contains 4 float (X, Y, Z, color). The color should to be read as an unsigned char[4] representing the RGBA color. Type: sl.MAT_TYPE.F32_C4 |
| XYZBGRA | Colored point cloud. Each pixel contains 4 float (X, Y, Z, color). The color should to be read as an unsigned char[4] representing the BGRA color. Type: sl.MAT_TYPE.F32_C4 |
| XYZARGB | Colored point cloud. Each pixel contains 4 float (X, Y, Z, color). The color should to be read as an unsigned char[4] representing the ARGB color. Type: sl.MAT_TYPE.F32_C4 |
| XYZABGR | Colored point cloud. Each pixel contains 4 float (X, Y, Z, color). The color should to be read as an unsigned char[4] representing the ABGR color. Type: sl.MAT_TYPE.F32_C4 |
| NORMALS | Normal vectors map. Each pixel contains 4 float (X, Y, Z, 0). Type: sl.MAT_TYPE.F32_C4 |
| DISPARITY_RIGHT | Disparity map for right sensor. Each pixel contains 1 float. Type: sl.MAT_TYPE.F32_C1 |
| DEPTH_RIGHT | Depth map for right sensor. Each pixel contains 1 float. Type: sl.MAT_TYPE.F32_C1 |
| XYZ_RIGHT | Point cloud for right sensor. Each pixel contains 4 float (X, Y, Z, not used). Type: sl.MAT_TYPE.F32_C4 |
| XYZRGBA_RIGHT | Colored point cloud for right sensor. Each pixel contains 4 float (X, Y, Z, color). The color needs to be read as an unsigned char[4] representing the RGBA color. Type: sl.MAT_TYPE.F32_C4 |
| XYZBGRA_RIGHT | Colored point cloud for right sensor. Each pixel contains 4 float (X, Y, Z, color). The color needs to be read as an unsigned char[4] representing the BGRA color. Type: sl.MAT_TYPE.F32_C4 |
| XYZARGB_RIGHT | Colored point cloud for right sensor. Each pixel contains 4 float (X, Y, Z, color). The color needs to be read as an unsigned char[4] representing the ARGB color. Type: sl.MAT_TYPE.F32_C4 |
| XYZABGR_RIGHT | Colored point cloud for right sensor. Each pixel contains 4 float (X, Y, Z, color). The color needs to be read as an unsigned char[4] representing the ABGR color. Type: sl.MAT_TYPE.F32_C4 |
| NORMALS_RIGHT | Normal vectors map for right view. Each pixel contains 4 float (X, Y, Z, 0). Type: sl.MAT_TYPE.F32_C4 |
| DEPTH_U16_MM | Depth map in millimeter whatever the sl.UNIT defined in sl.InitParameters.coordinate_units. Invalid values are set to 0 and depth values are clamped at 65000. Each pixel contains 1 unsigned short. Type: sl.MAT_TYPE.U16_C1 |
| DEPTH_U16_MM_RIGHT | Depth map in millimeter for right sensor. Each pixel contains 1 unsigned short. Type: sl.MAT_TYPE.U16_C1 |
########################################################################
#
# Copyright (c) 2022, STEREOLABS.
#
# All rights reserved.
#
# THIS SOFTWARE IS PROVIDED BY THE COPYRIGHT HOLDERS AND CONTRIBUTORS
# "AS IS" AND ANY EXPRESS OR IMPLIED WARRANTIES, INCLUDING, BUT NOT
# LIMITED TO, THE IMPLIED WARRANTIES OF MERCHANTABILITY AND FITNESS FOR
# A PARTICULAR PURPOSE ARE DISCLAIMED. IN NO EVENT SHALL THE COPYRIGHT
# OWNER OR CONTRIBUTORS BE LIABLE FOR ANY DIRECT, INDIRECT, INCIDENTAL,
# SPECIAL, EXEMPLARY, OR CONSEQUENTIAL DAMAGES (INCLUDING, BUT NOT
# LIMITED TO, PROCUREMENT OF SUBSTITUTE GOODS OR SERVICES; LOSS OF USE,
# DATA, OR PROFITS; OR BUSINESS INTERRUPTION) HOWEVER CAUSED AND ON ANY
# THEORY OF LIABILITY, WHETHER IN CONTRACT, STRICT LIABILITY, OR TORT
# (INCLUDING NEGLIGENCE OR OTHERWISE) ARISING IN ANY WAY OUT OF THE USE
# OF THIS SOFTWARE, EVEN IF ADVISED OF THE POSSIBILITY OF SUCH DAMAGE.
# 我自己根据官方的sample改的
########################################################################

import os
import pyzed.sl as sl
import cv2
import numpy as np
def print_camera_information(cam_info):
    print("ZED Model                 : {0}".format(cam_info.camera_model))
    print("ZED Serial Number         : {0}".format(cam_info.serial_number))
    print("ZED Camera Firmware       : {0}/{1}".format(cam_info.camera_configuration.firmware_version,
                                                       cam_info.sensors_configuration.firmware_version))
    print("ZED Camera Resolution     : {0}x{1}".format(round(cam_info.camera_configuration.resolution.width, 2),
                                                       cam_info.camera_configuration.resolution.height))
    print("ZED Camera FPS            : {0}".format(int(cam_info.camera_configuration.fps))
)
def main():
    # 找到相机,创建相机对象
    zed = sl.Camera()
    # 这个param需要设置开启相机的参数
    init_params = sl.InitParameters()
    # 这里要获得左右视差图,深度图,点云数据,所以要开启右侧测量
    init_params.enable_right_side_measure=True
    # 拍摄2k的图像,或者1080,720,参数查询https://www.stereolabs.com/docs/api/python/classpyzed_1_1sl_1_1RESOLUTION.html
    init_params.camera_resolution = sl.RESOLUTION.HD720   # Use HD2K HD720 opr HD1200 video mode, depending on camera type.
    # 存图路径
    filefolder_name = "2_720"
    # init_params.camera_fps = 30  # Set fps at 30
    # 这里是所有更改的参数,请配合SetCameraSettings文件使用
    zed.set_camera_settings(sl.VIDEO_SETTINGS.LED_STATUS, True)
    zed.set_camera_settings(sl.VIDEO_SETTINGS.BRIGHTNESS, -1)
    zed.set_camera_settings(sl.VIDEO_SETTINGS.CONTRAST, -1)
    zed.set_camera_settings(sl.VIDEO_SETTINGS.HUE, -1)
    zed.set_camera_settings(sl.VIDEO_SETTINGS.SATURATION, -1)
    zed.set_camera_settings(sl.VIDEO_SETTINGS.SHARPNESS, -1)
    zed.set_camera_settings(sl.VIDEO_SETTINGS.GAIN, -1)
    zed.set_camera_settings(sl.VIDEO_SETTINGS.EXPOSURE, -1)
    zed.set_camera_settings(sl.VIDEO_SETTINGS.WHITEBALANCE_TEMPERATURE, -1)
    print("[Sample] Reset all settings to default")
    err = zed.open(init_params)
    if err != sl.ERROR_CODE.SUCCESS:
        print("Camera Open : "+repr(err)+". Exit program.")
        exit()
    # Capture flag
    i = 0
    image_left = sl.Mat()  # 图像
    disparity_left = sl.Mat()  # 视差值
    dep_left = sl.Mat()  # 深度图
    depth_left = sl.Mat()  # 深度值
    point_cloud_left = sl.Mat()  # 点云数据

    image_right = sl.Mat()  # 图像
    disparity_right = sl.Mat()  # 视差值
    dep_right = sl.Mat()  # 深度图
    depth_right = sl.Mat()  # 深度值
    point_cloud_right = sl.Mat()  # 点云数据
    runtime_parameters = sl.RuntimeParameters()
     # 获取分辨率
    cam_info = zed.get_camera_information()
    print_camera_information(cam_info)
    w, h = cam_info.camera_configuration.resolution.width , cam_info.camera_configuration.resolution.height
    x,y = int(w/2),int(h/2)  # 中心点

    # 获得当前相机的两个相机的标定参数,Intrinsics and extrinsic stereo parameters for rectified/undistorted images.
    calibration_params = zed.get_camera_information().camera_configuration.calibration_parameters
    # Focal length of the left eye in pixels
    focal_left_x = calibration_params.left_cam.fx
    focal_left_y = calibration_params.left_cam.fy
    opticalCenter_left_x = calibration_params.left_cam.cx
    opticalCenter_left_y = calibration_params.left_cam.cy
    distolist_lfet  = calibration_params.left_cam.disto
    focal_length_meteric_left = calibration_params.left_cam.focal_length_metric

    # Focal length of the right eye in pixels
    focal_right_x = calibration_params.right_cam.fx
    focal_right_y = calibration_params.right_cam.fy
    opticalCenter_right_x = calibration_params.right_cam.cx
    opticalCenter_right_y = calibration_params.right_cam.cy
    distolist_right  = calibration_params.right_cam.disto
    focal_length_meteric_right = calibration_params.right_cam.focal_length_metric

    print('左目焦距',focal_left_x,focal_left_y,'右目焦距',focal_right_x,focal_right_y)
    print('左目光心',opticalCenter_left_x,opticalCenter_left_y,'右目光心',opticalCenter_right_x,opticalCenter_right_y)
    print('左目畸变参数',distolist_lfet,'右目畸变参数',distolist_right)
    print('左目焦距',focal_length_meteric_left,'右目焦距',focal_length_meteric_right)

    # 获得双目的联合标定参数,看看需要什么
    # get translation and rotation
    rotation = calibration_params.stereo_transform.get_rotation_matrix()#  3*3 matrix sl.Matrix3f
    translation = calibration_params.stereo_transform.get_translation().get() # [tx, ty, tz]
    # Returns the baseline of the camera in the sl.UNIT defined in sl.InitParameters.coordinate_units.
    baseline = calibration_params.get_camera_baseline()
    # Translation between left and right eye on x-axis
    tx = calibration_params.stereo_transform.get_translation().get()[0]
    print('平移向量',translation)
    print('旋转矩阵',rotation)
    print('双目基线',baseline,'左右相机的x轴平移',tx)
    # 导出标定参数到txt文件
    with open(filefolder_name+"/calibration_parameters.txt", "w", encoding="utf-8") as file:
        file.write("左目焦距: fx = {0}, fy = {1}\n".format(focal_left_x, focal_left_y))
        file.write("右目焦距: fx = {0}, fy = {1}\n".format(focal_right_x, focal_right_y))
        file.write("左目光心: cx = {0}, cy = {1}\n".format(opticalCenter_left_x, opticalCenter_left_y))
        file.write("右目光心: cx = {0}, cy = {1}\n".format(opticalCenter_right_x, opticalCenter_right_y))
        file.write("畸变参数格式: [k1, k2, p1, p2, k3, k4, k5, k6, s1, s2, s3, s4]\n")
        file.write("左目畸变参数: {}\n".format(distolist_lfet))
        file.write("右目畸变参数: {}\n".format(distolist_right))
        file.write("左目焦距 (米): {}\n".format(focal_length_meteric_left))
        file.write("右目焦距 (米): {}\n".format(focal_length_meteric_right))
        file.write("双目基线: {}\n".format(baseline))
        file.write("左右相机的x轴平移: {}\n".format(tx))
        file.write("旋转矩阵: {}\n".format(rotation))
        file.write("平移向量: {}\n".format(translation))
    while True:
        # 获取最新的图像,修正它们,并基于提供的RuntimeParameters(深度,点云,跟踪等)计算测量值。
        if zed.grab(runtime_parameters) == sl.ERROR_CODE.SUCCESS:  # 相机成功获取图象
            timestamp = zed.get_timestamp(sl.TIME_REFERENCE.CURRENT)  # 获取图像被捕获时的时间点,用于图像命名
            # 获取左目图像
            zed.retrieve_image(image_left, sl.VIEW.LEFT)  # image:容器,sl.VIEW.LEFT:内容
            d_image_left = image_left.get_data()  # 转换成图像数组,便于后续的显示或者储存
            # 获取视差值
            zed.retrieve_measure(disparity_left,sl.MEASURE.DISPARITY,sl.MEM.CPU)
            d_disparity_left = disparity_left.get_data()
            zed.retrieve_image(dep_left,sl.VIEW.DEPTH)  # 深度图
            d_dep_left = dep_left.get_data()
            # 获取深度
            zed.retrieve_measure(depth_left,sl.MEASURE.DEPTH,sl.MEM.CPU)  # 深度值
            d_depth_left = depth_left.get_data()
            # 获取点云
            zed.retrieve_measure(point_cloud_left,sl.MEASURE.XYZBGRA,sl.MEM.CPU)
            d_point_map_left = point_cloud_left.get_data()

            # 获取左目图像
            zed.retrieve_image(image_right, sl.VIEW.RIGHT)  # image:容器,sl.VIEW.right:内容
            d_image_right = image_right.get_data()  # 转换成图像数组,便于后续的显示或者储存
            # 获取视差值
            zed.retrieve_measure(disparity_right,sl.MEASURE.DISPARITY_RIGHT ,sl.MEM.CPU)
            d_disparity_right = disparity_right.get_data()
            # 获取深度
            zed.retrieve_measure(depth_right,sl.MEASURE.DEPTH_RIGHT,sl.MEM.CPU)  # 深度值
            d_depth_right = depth_right.get_data()
            zed.retrieve_image(dep_right,sl.VIEW.DEPTH_RIGHT)  # 深度图
            d_dep_right = dep_right.get_data()
            # 获取点云
            zed.retrieve_measure(point_cloud_right,sl.MEASURE.XYZBGRA_RIGHT,sl.MEM.CPU)
            d_point_cloud_right = point_cloud_right.get_data()

            print('时间点',timestamp.get_seconds(),'中心点视差值',d_disparity_left[x,y],'中心点深度值',d_depth_left[x,y],'中心点云数据',d_point_map_left[x,y])
            # 利用cv2.imshow显示视图,并对想要的视图进行保存
            view_color = np.concatenate((cv2.resize(d_image_left,(640,360)),cv2.resize(d_image_right,(640,360))),axis=1)
            cv2.imshow("ColorImage", view_color)
            view_depth = np.concatenate((cv2.resize(d_dep_left,(640,360)),cv2.resize(d_dep_right,(640,360))),axis=1)
            cv2.imshow("DepthImage", view_depth)
            key = cv2.waitKey(1)
            if key & 0xFF == ord('q'):  # q退出
                break
            if key & 0xFF == ord('s'):  # 图像保存
                timestamp_ms = timestamp.get_milliseconds()
                savePath = os.path.join(filefolder_name + "/images", "left_{:0>3d}.png".format(i))  # 注意根目录是否存在"./images"文件夹
                cv2.imwrite(savePath, d_image_left)
                savePath = os.path.join(filefolder_name+ "/images", "right_{:0>3d}.png".format(i))
                cv2.imwrite(savePath, d_image_right)
                i = i + 1
    # Close the camera
    zed.close()

if __name__ == "__main__":
    main()

Sample usage
| Sample | Description | Link |
|---|---|---|
| Camera Control | Shows how camera settings like Exposure, Gain, Contrast, Sharpness, etc. can be modified and display the resulting image. | [C++](https://github.com/stereolabs/zed-sdk/tree/master/camera control/cpp) [Python](https://github.com/stereolabs/zed-sdk/tree/master/camera control/python) |
| Camera Streaming | Shows how to stream the ZED stereo video on an IP network, decode the video and display its live 3D point cloud. | [GitHub](https://github.com/stereolabs/zed-sdk/tree/master/camera streaming) |
| Depth Sensing | Shows how to capture a 3D point cloud and display it in an OpenGL window. | [C++](https://github.com/stereolabs/zed-sdk/tree/master/depth sensing/depth sensing/cpp) [Python](https://github.com/stereolabs/zed-sdk/tree/master/depth sensing/depth sensing/python) |
| Positional Tracking | Displays the live position and orientation of the camera in a 3D window. | [C++](https://github.com/stereolabs/zed-sdk/tree/master/positional tracking/positional tracking/cpp) [Python](https://github.com/stereolabs/zed-sdk/tree/master/positional tracking/positional tracking/python) |
| Spatial Object Detection | 2D Display Detect and track objects in the scene, and display their 3D bounding boxes over the live image. | [C++](https://github.com/stereolabs/zed-sdk/tree/master/object detection/image viewer/cpp) [Python](https://github.com/stereolabs/zed-sdk/tree/master/object detection/image viewer/python) |
| Spatial Object Detection | 3D Display Detect and track objects in the scene, and display their 3D bounding boxes over the live point cloud. | [C++](https://github.com/stereolabs/zed-sdk/tree/master/object detection/birds eye viewer/cpp) [Python](https://github.com/stereolabs/zed-sdk/tree/master/object detection/birds eye viewer/cpp) |
| Body Tracking | Shows how to detect and track 3D human bodies in space and display skeletons over the live image. | [C++](https://github.com/stereolabs/zed-sdk/tree/master/body tracking/body tracking/cpp) [Python](https://github.com/stereolabs/zed-sdk/tree/master/body tracking/body tracking/python) |
| Spatial Mapping | Captures a live 3D mesh of the environment and displays it as an overlay on the camera image. | [C++](https://github.com/stereolabs/zed-sdk/tree/master/spatial mapping/spatial mapping/cpp) [Python](https://github.com/stereolabs/zed-sdk/tree/master/spatial mapping/spatial mapping/python) |
| Plane Detection | Shows how to detect floor and planar areas in the scene and draw them on the image. | [C++](https://github.com/stereolabs/zed-sdk/tree/master/plane detection/plane detection/cpp) [Python](https://github.com/stereolabs/zed-examples/tree/master/plane detection/plane detection/python) |
| Video Recording | Shows how to record a lossless or compressed video in SVO format. | C++ Python |
| Video Playback | Shows how to playback a recorded SVO video. | C++ Python |
| Video Export | Opens an SVO file and exports video and depth to PNG or AVI files. | C++ Python |
| Multi Camera | Shows how to open and use multiple ZED cameras at the same time in a single application. | [C++](https://github.com/stereolabs/zed-sdk/tree/master/depth sensing/multi camera/cpp) [Python](https://github.com/stereolabs/zed-sdk/tree/master/depth sensing/multi camera/cpp) |
正在更新


 686
686

 被折叠的 条评论
为什么被折叠?
被折叠的 条评论
为什么被折叠?
 到【灌水乐园】发言


