


今天说的这种渐变色实现方法核心思路就是给顶点着色。另外还加上了显示阴影的功能。直接上代码
顶点的顺序不知道的可以看我另一篇文章《UGUI显示顶点》中第二节 顶点顺序
https://blog.csdn.net/qq_35231953/article/details/106941108
using System.Collections.Generic;
using UnityEngine;
using UnityEngine.UI;
public class GradientTextShadow2 : BaseMeshEffect //-》继承BaseMeshEffect
{
[SerializeField] //定义序列化属性,一会的Editor中需要通过定义的这个属性找到该字段
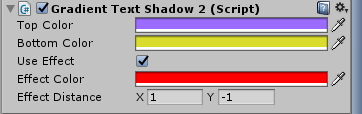
public Color32 topColor = Color.white;//顶部颜色
[SerializeField]
public Color32 bottomColor = Color.black;//底部颜色
[SerializeField]
public bool useEffect = false;//是否使用阴影
[SerializeField]
public Color effectColor = new Color(0f, 0f, 0f, 0.5f);//阴影颜色
[SerializeField]
public Vector2 effectDistance = new Vector2(1f, -1f);//阴影偏移
private const int DefautlVertexNumPerFont = 6;//顶点数
//给顶点着色
private void ModifyVertexColor(List<UIVertex> vertexList, int index, Color color)
{
UIVertex temp = vertexList[index];
temp.color = color;
vertexList[index] = temp;
}
//修改网格时调用
public override void ModifyMesh(VertexHelper vh)
{
if (!IsActive())
{
return;
}
List<UIVertex> vertexBuffers = ListPool<UIVertex>.Get();
vh.GetUIVertexStream(vertexBuffers);//获取顶点
int count = vertexBuffers.Count;
if (count > 0)
{
//给顶点着色( 这里需要明白顶点的顺序,不知道的可以看我另一篇文章《UGUI显示顶点》中第二节 )
for (int i = 0; i < count; i += DefautlVertexNumPerFont)
{
ModifyVertexColor(vertexBuffers, i, topColor);
ModifyVertexColor(vertexBuffers, i + 1, topColor);
ModifyVertexColor(vertexBuffers, i + 2, bottomColor);
ModifyVertexColor(vertexBuffers, i + 3, bottomColor);
ModifyVertexColor(vertexBuffers, i + 4, bottomColor);
ModifyVertexColor(vertexBuffers, i + 5, topColor);
}
}
if(useEffect)//是否使用阴影(如果不需要阴影功能可以这部分代码删掉)
{
//扩充一倍的顶点容量
var neededCapacity = vertexBuffers.Count * 2;
if (vertexBuffers.Capacity < neededCapacity)
vertexBuffers.Capacity = neededCapacity;
for (int i = 0, cnt = vertexBuffers.Count; i < cnt; ++i)
{
var vt = vertexBuffers[i];
vertexBuffers.Add(vt);
Vector3 v = vt.position;
v.x += effectDistance.x;
v.y += effectDistance.y;
vt.position = v;
vt.color = effectColor;
vertexBuffers[i] = vt;
}
}
vh.Clear();
//这个方法向VertexHelper中批量增加三角形顶点数据,参数的长度必须是三的倍数
vh.AddUIVertexTriangleStream(vertexBuffers);
ListPool<UIVertex>.Release(vertexBuffers);
}
}写完脚本了,接下来想调整一下检视面板的布局该怎么办呢,想要不勾选UseEffect的时候就把EffectColor和EffectDistance隐藏掉,勾选时再显示出来。

接下来定义一个Editor脚本(要放在Editor文件夹里)
using UnityEditor;

[CustomEditor(typeof(GradientTextShadow2),true)]//关联脚本
//[CanEditMultipleObjects]
public class GradientTextShadow2Editor : UnityEditor.UI.GraphicEditor
{
    SerializedProperty topColor;//定义属性
    SerializedProperty bottomColor;
    SerializedProperty useEffect;
    SerializedProperty effectColor;
    SerializedProperty effectDistance;

    protected new void OnEnable()
    {
        base.OnEnable();
        //获取定义的属性
        topColor = serializedObject.FindProperty("topColor");
        bottomColor = serializedObject.FindProperty("bottomColor");
        useEffect = serializedObject.FindProperty("useEffect");
        effectColor = serializedObject.FindProperty("effectColor");
        effectDistance = serializedObject.FindProperty("effectDistance");
    }
    public override void OnInspectorGUI()
    {
        serializedObject.Update();
        EditorGUILayout.PropertyField(topColor);//添加属性 topColor
        EditorGUILayout.PropertyField(bottomColor);
        //设置开关组
        EditorGUILayout.PropertyField(useEffect);
        if( useEffect.boolValue )//如果是勾选状态就显示出effectColor和effectDistance
        {
            EditorGUILayout.PropertyField(effectColor);
            EditorGUILayout.PropertyField(effectDistance);
        }
        serializedObject.ApplyModifiedProperties();//将修改内容应用到序列化对象上
    }
}
然后就大功告成啦!
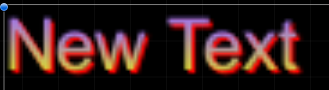
现在知道了怎么弄上下渐变了,也就可以弄4角渐变了,就是给四个顶点设置不同的颜色。

原理一样的,就不上代码了。


 3313
3313


 被折叠的 条评论
为什么被折叠?
被折叠的 条评论
为什么被折叠?
 到【灌水乐园】发言


