


本文对c++推理的yolov5 v6.1代码进行精度对齐实现,以yolov5-l为例。
yolov5:https://github.com/ultralytics/yolov5
本文代码:yolov5-tenssort: yolov5 v6.1 的tensorrt c++推理精度对齐
实验环境
- Ubuntu20.04
- TensorRT-7.2.3.4
- OpenCV3.4.8(c++)、4.6.0(torch)
- CUDA11.1
- RTX3060
tensorrt跑通
git clone https://github.com/wang-xinyu/tensorrtx.git
cd tensorrtx/yolov5
mkdir build
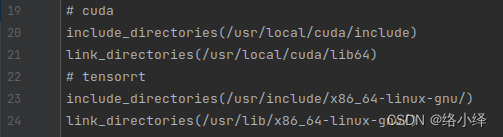
cd build修改CMakeLists.txt中cuda和tensorrt的路径,以及opencv的版本:
![]()
进行cmake:
cmake ..修改网络中对应参数以适应自己数据集要求:
yolov5.cpp:
![]()
yololayer.h:

编译,会在build路径下新生成一个libmyplugins.so文件和yolov5文件:
make参考README.md文件,在yolov5下将训练得到的权重文件best.pt通过get_wts.py转化为best.wts文件,并放至tenosrrtx/yolov5/build路径下:
git clone https://github.com/ultralytics/yolov5
cd yolov5

// 修改gen_wts.py中p28的cpu为gpu:
device = select_device('0')

cp <path>/tensorrtx/yolov5/gen_wts.py ./
python gen_wts.py -w best.pt -o best.wts
cp best.wts <dir_path>/tensorrtx/yolov5/build/

cd <path>/tensorrtx/yolov5/build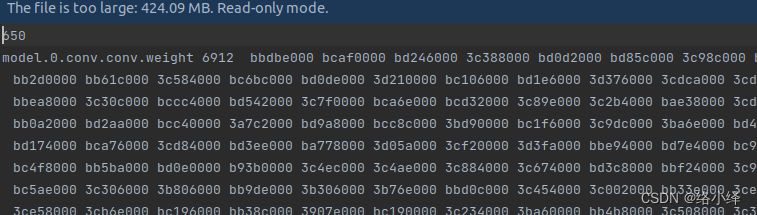
生成engine,会在build路径下生成tensorrt的best.engine模型:
./yolov5 -s best.wts best.engine l读取.engine文件,并根据指定路径下的图片来推理:
./yolov5 -d best.engine <imgs_dir>将在build路径下生成推理结果,并打印推理时间:
torch与tensorrt精度对比
1. tensorrt推理结果
增加c++的txt输出:
// -------yolov5.cpp main(~)
std::string out_path;
// cv::putText(~)下方
out_path = "_" + file_names[f - fcount + 1 + b];
write2txt(out_path.replace(out_path.find("."), 4, ".txt"), std::to_string((int)res[j].class_id), std::to_string(res[j].conf), r);


// -------common.hpp
void write2txt(std::string txtpath, std::string cls, std::string conf, cv::Rect r){
    std::ofstream ofs;
    ofs.open(txtpath, std::ios::app); // std::ios::app不覆盖

    // 对坐标进行处理
    int xmin, xmax, ymin, ymax;
    xmin = (int)r.x;
    ymin = (int)r.y;
    xmax = (int)(r.x + r.width);
    ymax = (int)(r.y + r.height);

    ofs << cls << " " << conf << " " << xmin << " " << ymin << " " << xmax << " " << ymax << std::endl;  //endl用于换行

    ofs.close();
}
将c++的参数值修改为与torch一致:
// yolov5.cpp
#define NMS_THRESH 0.45
#define CONF_THRESH 0.25
// yololayer.h
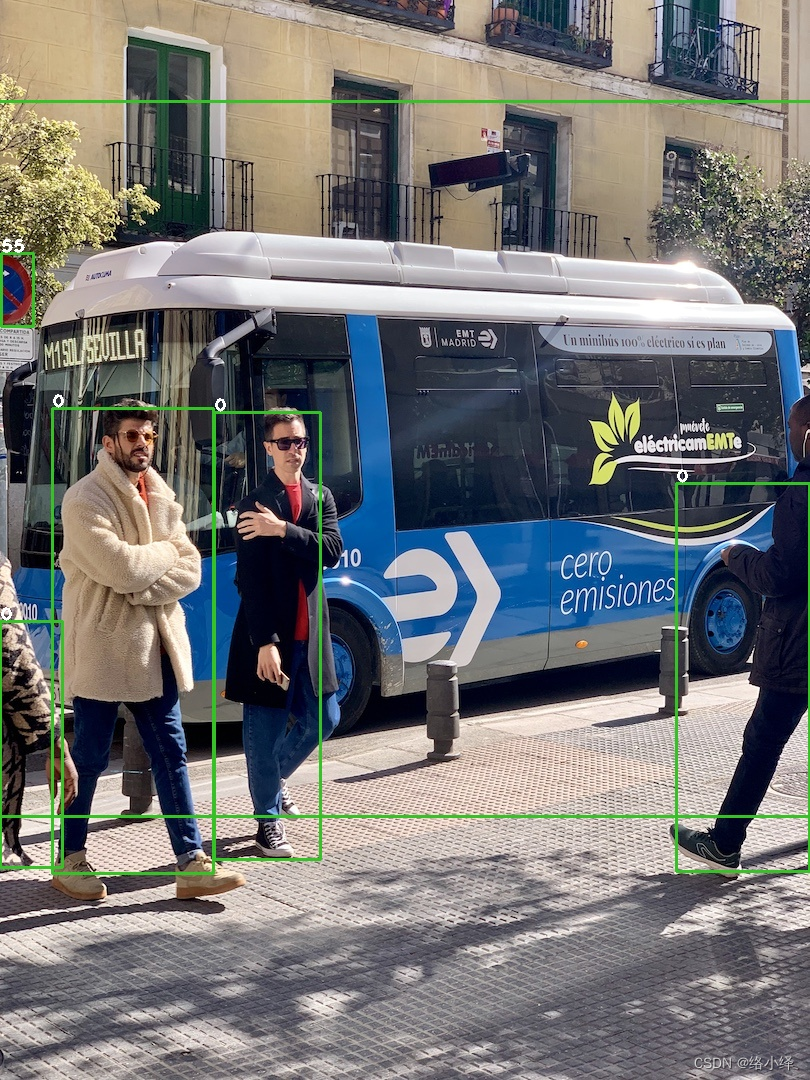
static constexpr float IGNORE_THRESH = 0.25f;对图像进行推理,输出结果:
0 0.926520 52 408 214 874
0 0.906347 214 412 321 860
0 0.870304 676 483 810 872
0 0.863786 0 621 63 868
45 0.950376 -50 101 883 817
55 0.904248 1 253 34 327
2. torch推理结果
通过yolov5/detect.py,进行推理输出:
python detect.py --weights best.pt --source bus.jpg --save-txt --save-conf结果保存在run/detect/exp/下:
3 0.832716 0.618981 0.0382716 0.0824074 0.291247
0 0.041358 0.687963 0.082716 0.246296 0.602841
0 0.0240741 0.386111 0.045679 0.109259 0.658574
0 0.919136 0.618056 0.159259 0.369444 0.77239
55 0.0209877 0.268056 0.0419753 0.0694444 0.893587
0 0.327778 0.588426 0.166667 0.417593 0.907808
0 0.164815 0.592593 0.196296 0.431481 0.932
45 0.5 0.418519 1 0.681481 0.981999
为了方便对比,修改detect.py保存txt的格式:
# Write results
for *xyxy, conf, cls in reversed(det):
    c = int(cls)  # integer class

    if save_txt:  # Write to file
        line = (c, conf, *xyxy) if save_conf else (cls, *xyxy)
        with open(f'{txt_path}.txt', 'a') as f:
            f.write(('%s ') % line[0])
            f.write(('%g ' * (len(line) - 1)).rstrip() % line[1:] + '\n')

    if save_img or save_crop or view_img:  # Add bbox to image
        label = None if hide_labels else (names[c] if hide_conf else f'{names[c]} {conf:.2f}')
        annotator.box_label(xyxy, label, color=colors(c, True))
        if save_crop:
            save_one_box(xyxy, imc, file=save_dir / 'crops' / names[c] / f'{p.stem}.jpg', BGR=True)
3 0.291247 659 624 690 713 0 0.602841 0 610 67 876 0 0.658574 1 358 38 476 0 0.77239 680 468 809 867 55 0.893587 0 252 34 327 0 0.907808 198 410 333 861 0 0.932 54 407 213 873 45 0.981999 0 84 810 820
3. 结果对比
可以发现,对于同一张图片,c++和torch的结果不论是在目标数量上还是在各项数值上均不相同,需要进行排查。
问题排查与解决
1. 图像预处理
根据代码可知,torch使用的是640x*的矩形推理,填充部分为144:

# utils/augmentations.py
def letterbox(im, new_shape=(640, 640), color=(114, 114, 114), auto=True, scaleFill=False, scaleup=True, stride=32):
    # Resize and pad image while meeting stride-multiple constraints
    shape = im.shape[:2]  # current shape [height, width]
    if isinstance(new_shape, int):
        new_shape = (new_shape, new_shape)

    # Scale ratio (new / old)
    r = min(new_shape[0] / shape[0], new_shape[1] / shape[1])
    if not scaleup:  # only scale down, do not scale up (for better val mAP)
        r = min(r, 1.0)

    # Compute padding
    ratio = r, r  # width, height ratios
    new_unpad = int(round(shape[1] * r)), int(round(shape[0] * r))
    dw, dh = new_shape[1] - new_unpad[0], new_shape[0] - new_unpad[1]  # wh padding
    if auto:  # minimum rectangle
        dw, dh = np.mod(dw, stride), np.mod(dh, stride)  # wh padding
    elif scaleFill:  # stretch
        dw, dh = 0.0, 0.0
        new_unpad = (new_shape[1], new_shape[0])
        ratio = new_shape[1] / shape[1], new_shape[0] / shape[0]  # width, height ratios

    dw /= 2  # divide padding into 2 sides
    dh /= 2

    if shape[::-1] != new_unpad:  # resize
        im = cv2.resize(im, new_unpad, interpolation=cv2.INTER_LINEAR)
    top, bottom = int(round(dh - 0.1)), int(round(dh + 0.1))
    left, right = int(round(dw - 0.1)), int(round(dw + 0.1))
    im = cv2.copyMakeBorder(im, top, bottom, left, right, cv2.BORDER_CONSTANT, value=color)  # add border
    return im, ratio, (dw, dh)
首先将输入图像按照长边rezise至640x*,方式为双线性插值,然后将短边padding到32的最小倍数。
而c++使用640x640的letterbox,填充为128:

// preprocess.cu
__global__ void warpaffine_kernel(~){
    ...
    float src_x = m_x1 * dx + m_y1 * dy + m_z1 + 0.5f;
    float src_y = m_x2 * dx + m_y2 * dy + m_z2 + 0.5f;
    ...
}

void preprocess_kernel_img(~){
    ...
    warpaffine_kernel<<<blocks, threads, 0, stream>>>(
        src, src_width*3, src_width,
        src_height, dst, dst_width,
        dst_height, 128, d2s, jobs);
}
鉴于c++修改为动态输入比较复杂,这里只将两者的640x640输入结果进行对齐。
关闭torch的矩形推理:
# utils/augmentations.py --> letterbox(~)
if auto:  # minimum rectangle
    pass
    # dw, dh = np.mod(dw, stride), np.mod(dh, stride)  # wh padding
修改c++的padding为114:
// preprocess.cu
void preprocess_kernel_img(~){
    ...
    warpaffine_kernel<<<blocks, threads, 0, stream>>>(
        src, src_width*3, src_width,
        src_height, dst, dst_width,
        dst_height, 114, d2s, jobs);
}
添加输出两者图片预处理后结果的代码进行查看:
# utils/datasets.py
class LoadImages:
    ...
    # Padded resize
    img = letterbox(img0, self.img_size, stride=self.stride, auto=self.auto)[0]

    # 输出从(400,400)位置开始的10x10区域的像素点rgb值
    for i in range(400, 410):
        for j in range(400, 410):
            print("{}, {}, {}; ".format(img[i][j][0], img[i][j][1], img[i][j][2]), end='')
        print()

    ...
// yolov5.cpp
// 图像预处理
preprocess_kernel_img(img_device, img.cols, img.rows, buffer_idx, INPUT_W, INPUT_H, stream);
// 预处理结果存到CPU
float* recvCPU=(float*)malloc(size_image_dst*sizeof(float));
CUDA_CHECK(cudaMemcpy(recvCPU, buffer_idx,size_image_dst*sizeof(float),cudaMemcpyDeviceToHost));
cv::Mat resize_img(INPUT_H,INPUT_W,CV_8UC3);
for (int i = 0; i < INPUT_H; ++i){
cv::Vec3b *p2 = resize_img.ptr<cv::Vec3b>(i);
for (int j = 0; j < INPUT_W; ++j){
p2[j][2] = round(recvCPU[i*INPUT_W+j]*255);
p2[j][1] = round(recvCPU[INPUT_W*INPUT_H+i*INPUT_W+j]*255);
p2[j][0] = round(recvCPU[2*INPUT_W*INPUT_H+i*INPUT_W+j]*255);
}
}
for (int i = 400; i < 410; i++) {
uchar *data = resize_img.ptr<uchar>(i); //ptr函数访问任意一行像素的首地址,特别方便图像地一行一行的横向访问
for (int j = 400*3; j < 400*3+10*3; j++) { // //在循环体内,应该避免多次运算,应该提前算cols*channels
std::cout<<(int)data[j]<<", ";
}
std::cout<<""<<std::endl;
}对比两者图片预处理后输出结果:
# torch
25, 1, 0; 25, 1, 0; 24, 1, 0; 25, 2, 0; 25, 2, 0; 24, 1, 0; 24, 1, 0; 25, 1, 0; 25, 2, 0; 26, 2, 1;
26, 0, 0; 27, 0, 3; 26, 1, 2; 25, 2, 0; 24, 1, 0; 24, 1, 0; 24, 1, 0; 27, 2, 0; 26, 0, 0; 26, 0, 0;
27, 0, 3; 26, 2, 4; 26, 0, 1; 26, 0, 0; 28, 2, 2; 27, 1, 1; 27, 1, 1; 27, 1, 1; 28, 2, 2; 28, 2, 2;
24, 0, 0; 25, 1, 1; 27, 1, 1; 28, 2, 2; 28, 2, 2; 27, 1, 1; 27, 1, 1; 27, 2, 1; 27, 2, 0; 27, 2, 0;
23, 2, 0; 23, 2, 0; 24, 1, 1; 25, 1, 1; 26, 2, 2; 25, 1, 1; 25, 2, 0; 24, 1, 0; 25, 2, 0; 26, 3, 1;
25, 1, 1; 25, 1, 1; 24, 0, 0; 25, 1, 1; 25, 2, 0; 25, 2, 0; 25, 2, 0; 26, 3, 1; 25, 2, 0; 25, 2, 0;
25, 1, 2; 26, 1, 2; 25, 1, 1; 24, 1, 0; 24, 2, 0; 24, 2, 0; 24, 2, 0; 24, 2, 0; 25, 3, 0; 26, 5, 0;
24, 0, 0; 25, 1, 2; 23, 1, 0; 23, 2, 0; 23, 2, 0; 23, 2, 0; 23, 2, 0; 24, 4, 2; 24, 4, 0; 24, 4, 0;
24, 3, 1; 22, 1, 0; 24, 3, 1; 23, 2, 1; 22, 1, 0; 23, 2, 0; 23, 3, 0; 24, 4, 0; 22, 2, 0; 25, 5, 1;
25, 3, 2; 23, 2, 1; 26, 5, 1; 26, 6, 2; 25, 4, 2; 28, 7, 5; 24, 3, 1; 29, 8, 6; 27, 6, 4; 28, 7, 4;

// c++
26, 1, 0, 26, 1, 0, 25, 1, 0, 25, 2, 0, 24, 1, 0, 24, 1, 0, 24, 1, 0, 25, 1, 0, 26, 2, 1, 27, 2, 1,
26, 0, 0, 27, 0, 3, 26, 2, 2, 25, 1, 0, 25, 1, 0, 24, 1, 0, 25, 1, 0, 27, 2, 0, 26, 0, 0, 26, 0, 0,
27, 0, 3, 26, 2, 4, 26, 0, 0, 26, 0, 0, 28, 2, 2, 27, 1, 1, 28, 2, 2, 27, 1, 1, 28, 2, 2, 28, 2, 2,
24, 0, 0, 25, 1, 1, 27, 1, 1, 29, 3, 3, 28, 2, 2, 27, 1, 1, 27, 1, 1, 27, 2, 0, 28, 3, 1, 28, 3, 1,
23, 2, 0, 23, 2, 0, 25, 1, 1, 26, 2, 2, 26, 2, 2, 25, 1, 1, 25, 2, 0, 25, 2, 0, 25, 2, 0, 26, 3, 1,
25, 1, 1, 25, 1, 1, 24, 0, 0, 25, 2, 1, 25, 2, 0, 25, 2, 0, 25, 2, 0, 26, 3, 1, 25, 2, 0, 25, 3, 0,
25, 1, 2, 26, 0, 2, 25, 1, 1, 24, 2, 0, 24, 2, 0, 24, 2, 0, 24, 2, 0, 24, 2, 0, 25, 4, 0, 26, 5, 0,
24, 1, 0, 24, 1, 2, 23, 2, 0, 23, 2, 0, 23, 2, 0, 23, 2, 0, 23, 2, 0, 24, 4, 1, 24, 4, 0, 24, 4, 0,
24, 3, 1, 22, 1, 0, 25, 4, 2, 23, 2, 0, 22, 1, 0, 23, 2, 0, 23, 3, 0, 24, 4, 0, 22, 2, 0, 26, 6, 1,
24, 3, 2, 23, 2, 1, 26, 6, 1, 26, 5, 2, 25, 4, 2, 29, 8, 6, 24, 3, 1, 30, 9, 7, 28, 7, 5, 29, 8, 6,
结果值仍不相同。
根据:一篇文章为你讲透双线性插值 - 知乎 可知,几何中心点重合对应公式:

因此对c++中双线性插值实现进行修改:
// preprocess.cu
__global__ void warpaffine_kernel(~){
    ...
    // float src_x = m_x1 * dx + m_y1 * dy + m_z1 + 0.5f;
    // float src_y = m_x2 * dx + m_y2 * dy + m_z2 + 0.5f;

    // 目标图像上的点对应于原图上的点的坐标
    float src_x = m_x1 * (dx+0.5f) + m_y1 * (dy+0.5f) + m_z1 - 0.5f;
    float src_y = m_x2 * (dx+0.5f) + m_y2 * (dy+0.5f) + m_z2 - 0.5f;
    ...
}
对比两者图片预处理后输出结果:
# torch
25, 1, 0; 25, 1, 0; 24, 1, 0; 25, 2, 0; 25, 2, 0; 24, 1, 0; 24, 1, 0; 25, 1, 0; 25, 2, 0; 26, 2, 1;
26, 0, 0; 27, 0, 3; 26, 1, 2; 25, 2, 0; 24, 1, 0; 24, 1, 0; 24, 1, 0; 27, 2, 0; 26, 0, 0; 26, 0, 0;
27, 0, 3; 26, 2, 4; 26, 0, 1; 26, 0, 0; 28, 2, 2; 27, 1, 1; 27, 1, 1; 27, 1, 1; 28, 2, 2; 28, 2, 2;
24, 0, 0; 25, 1, 1; 27, 1, 1; 28, 2, 2; 28, 2, 2; 27, 1, 1; 27, 1, 1; 27, 2, 1; 27, 2, 0; 27, 2, 0;
23, 2, 0; 23, 2, 0; 24, 1, 1; 25, 1, 1; 26, 2, 2; 25, 1, 1; 25, 2, 0; 24, 1, 0; 25, 2, 0; 26, 3, 1;
25, 1, 1; 25, 1, 1; 24, 0, 0; 25, 1, 1; 25, 2, 0; 25, 2, 0; 25, 2, 0; 26, 3, 1; 25, 2, 0; 25, 2, 0;
25, 1, 2; 26, 1, 2; 25, 1, 1; 24, 1, 0; 24, 2, 0; 24, 2, 0; 24, 2, 0; 24, 2, 0; 25, 3, 0; 26, 5, 0;
24, 0, 0; 25, 1, 2; 23, 1, 0; 23, 2, 0; 23, 2, 0; 23, 2, 0; 23, 2, 0; 24, 4, 2; 24, 4, 0; 24, 4, 0;
24, 3, 1; 22, 1, 0; 24, 3, 1; 23, 2, 1; 22, 1, 0; 23, 2, 0; 23, 3, 0; 24, 4, 0; 22, 2, 0; 25, 5, 1;
25, 3, 2; 23, 2, 1; 26, 5, 1; 26, 6, 2; 25, 4, 2; 28, 7, 5; 24, 3, 1; 29, 8, 6; 27, 6, 4; 28, 7, 4;

// c++
25, 1, 0, 25, 1, 0, 25, 1, 0, 25, 2, 0, 25, 2, 0, 24, 1, 0, 24, 1, 0, 25, 1, 0, 26, 2, 0, 26, 2, 1,
26, 0, 0, 27, 0, 3, 26, 1, 2, 25, 2, 0, 24, 1, 0, 24, 1, 0, 25, 1, 0, 27, 2, 0, 26, 0, 0, 26, 0, 0,
27, 0, 3, 26, 2, 4, 26, 0, 1, 26, 0, 0, 28, 2, 2, 27, 1, 1, 27, 1, 1, 27, 1, 1, 28, 2, 2, 28, 2, 2,
24, 0, 0, 25, 1, 1, 27, 1, 1, 28, 2, 2, 28, 2, 2, 27, 1, 1, 27, 1, 1, 27, 2, 1, 27, 2, 0, 27, 2, 0,
23, 2, 0, 23, 2, 0, 24, 1, 1, 25, 1, 1, 26, 2, 2, 25, 1, 1, 25, 2, 0, 24, 1, 0, 25, 2, 0, 26, 3, 1,
25, 1, 1, 25, 1, 1, 24, 0, 0, 25, 1, 1, 25, 2, 0, 25, 2, 0, 25, 2, 0, 26, 3, 1, 25, 2, 0, 25, 2, 0,
25, 1, 2, 26, 1, 2, 25, 1, 1, 24, 2, 0, 24, 2, 0, 24, 2, 0, 24, 2, 0, 24, 2, 0, 25, 3, 1, 26, 5, 0,
24, 1, 0, 25, 1, 3, 23, 2, 0, 23, 2, 0, 23, 2, 0, 23, 2, 0, 23, 2, 0, 25, 4, 2, 24, 4, 0, 24, 4, 0,
24, 3, 1, 22, 1, 0, 24, 3, 1, 23, 2, 1, 22, 1, 0, 23, 2, 0, 23, 3, 0, 24, 4, 0, 23, 3, 0, 25, 5, 1,
25, 4, 2, 23, 2, 1, 26, 5, 1, 26, 6, 2, 25, 4, 2, 28, 7, 5, 24, 3, 2, 29, 8, 6, 27, 6, 4, 28, 7, 5,
结果基本相同,仍有些微不同,至此图像预处理结果对齐完成。
2. 网络结构
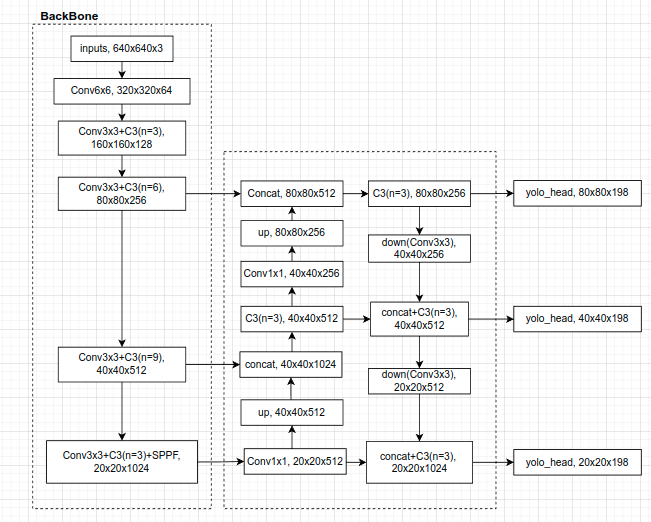
对比torch和c++两者的网络结构实现,无异常。关注BN层的参数,torch中为默认参数:
# models/commom.py
self.bn = nn.BatchNorm2d(c2)
其中eps为1e-5.
c++的BN层eps为1e-3:
// common.hpp
IScaleLayer* bn = addBatchNorm2d(network, weightMap, *cat->getOutput(0), lname + ".bn", 1e-3);
进行相应修改。
3. 网络输出后处理
torch:
# utils/general.py
def non_max_suppression(prediction, conf_thres=0.25, iou_thres=0.45, classes=None, agnostic=False, multi_label=False, labels=(), max_det=300):
    """Runs Non-Maximum Suppression (NMS) on inference results

    Returns:
         list of detections, on (n,6) tensor per image [xyxy, conf, cls]
    """

    nc = prediction.shape[2] - 5  # number of classes
    xc = prediction[..., 4] > conf_thres  #obj_conf>conf_thres
    # Checks
    assert 0 <= conf_thres <= 1, f'Invalid Confidence threshold {conf_thres}, valid values are between 0.0 and 1.0'
    assert 0 <= iou_thres <= 1, f'Invalid IoU {iou_thres}, valid values are between 0.0 and 1.0'

    # Settings
    min_wh, max_wh = 2, 7680  # (pixels) minimum and maximum box width and height
    max_nms = 30000  # maximum number of boxes into torchvision.ops.nms()
    time_limit = 10.0  # seconds to quit after
    redundant = True  # require redundant detections
    multi_label &= nc > 1  # multiple labels per box (adds 0.5ms/img)
    merge = False  # use merge-NMS

    t = time.time()
    output = [torch.zeros((0, 6), device=prediction.device)] * prediction.shape[0]
    for xi, x in enumerate(prediction):  # image index, image inference
        # Apply constraints
        x[((x[..., 2:4] < min_wh) | (x[..., 2:4] > max_wh)).any(1), 4] = 0  # width-height
        x = x[xc[xi]]  # confidence

        # Cat apriori labels if autolabelling
        if labels and len(labels[xi]):
            lb = labels[xi]
            v = torch.zeros((len(lb), nc + 5), device=x.device)
            v[:, :4] = lb[:, 1:5]  # box
            v[:, 4] = 1.0  # conf
            v[range(len(lb)), lb[:, 0].long() + 5] = 1.0  # cls
            x = torch.cat((x, v), 0)

        # If none remain process next image
        if not x.shape[0]:
            continue

        # Compute conf
        x[:, 5:] *= x[:, 4:5]  # conf = obj_conf * cls_conf

        # Box (center x, center y, width, height) to (x1, y1, x2, y2)
        box = xywh2xyxy(x[:, :4])

        # Detections matrix nx6 (xyxy, conf, cls)
        if multi_label:
            i, j = (x[:, 5:] > conf_thres).nonzero(as_tuple=False).T
            x = torch.cat((box[i], x[i, j + 5, None], j[:, None].float()), 1)
        else:  # best class only
            conf, j = x[:, 5:].max(1, keepdim=True)
            x = torch.cat((box, conf, j.float()), 1)[conf.view(-1) > conf_thres] # conf>conf_thres

        # Filter by class
        if classes is not None:
            x = x[(x[:, 5:6] == torch.tensor(classes, device=x.device)).any(1)]

        # Apply finite constraint
        # if not torch.isfinite(x).all():
        #     x = x[torch.isfinite(x).all(1)]

        # Check shape
        n = x.shape[0]  # number of boxes
        if not n:  # no boxes
            continue
        elif n > max_nms:  # excess boxes
            x = x[x[:, 4].argsort(descending=True)[:max_nms]]  # sort by confidence

        ...
网络输出的最大框数量不超过max_nms=30000个,且每个框的obj_conf都要大于conf_thres=0.25,总的conf(=obj_conf*cls_conf)也要大于conf_thres。
c++:
// yololayer.cu
__global__ void CalDetection(~){
    ...
    for (int k = 0; k < CHECK_COUNT; ++k) {
        ...
        if (box_prob < IGNORE_THRESH) continue;
        ...
        int count = (int)atomicAdd(res_count, 1);
        if (count >= maxoutobject) return;
        ...
    }
    ...
}
只有obj_conf,没有对总conf进行校对,添加:
// yololayer.cu
__global__ void CalDetection(~){
    ...
    float max_cls_prob = 0.0;
    for ...
    if (box_prob * max_cls_prob < IGNORE_THRESH) continue; // conf < thres
    ...
}
4. nms后处理
torch:
# utils/general.py
def non_max_suppression(prediction, conf_thres=0.25, iou_thres=0.45, classes=None, agnostic=False, multi_label=False, labels=(), max_det=300):
    ...
    # Batched NMS
    c = x[:, 5:6] * (0 if agnostic else max_wh)  # classes
    boxes, scores = x[:, :4] + c, x[:, 4]  # boxes (offset by class), scores
    i = torchvision.ops.nms(boxes, scores, iou_thres)  # NMS
    if i.shape[0] > max_det:  # limit detections
        i = i[:max_det]
    if merge and (1 < n < 3E3):  # Merge NMS (boxes merged using weighted mean)
        # update boxes as boxes(i,4) = weights(i,n) * boxes(n,4)
        iou = box_iou(boxes[i], boxes) > iou_thres  # iou matrix
        weights = iou * scores[None]  # box weights
        x[i, :4] = torch.mm(weights, x[:, :4]).float() / weights.sum(1, keepdim=True)  # merged boxes
        if redundant:
            i = i[iou.sum(1) > 1]  # require redundancy

    output[xi] = x[i]
    ...
nms后,如果超过max_det=1000个框,则只保存conf从高到低的前1000个框。
c++,增加对输出数量的校对:
// commom.hpp
void nms(~){
    ...
    for (auto it = m.begin(); it != m.end(); it++) {
        ...
        // 只保存conf前1000个结果
        std::sort(res.begin(), res.end(), cmp);
        if(res.size()>Yolo::MAX_OUTPUT_BBOX_COUNT){
            res.erase(res.begin()+Yolo::MAX_OUTPUT_BBOX_COUNT, res.end());
        }
    }
}
5. 坐标转换后处理
torch:
# utils/general.py
def scale_coords(img1_shape, coords, img0_shape, ratio_pad=None):
    # Rescale coords (xyxy) from img1_shape to img0_shape
    if ratio_pad is None:  # calculate from img0_shape
        gain = min(img1_shape[0] / img0_shape[0], img1_shape[1] / img0_shape[1])  # gain  = old / new
        pad = (img1_shape[1] - img0_shape[1] * gain) / 2, (img1_shape[0] - img0_shape[0] * gain) / 2  # wh padding
    else:
        gain = ratio_pad[0][0]
        pad = ratio_pad[1]

    coords[:, [0, 2]] -= pad[0]  # x padding
    coords[:, [1, 3]] -= pad[1]  # y padding
    coords[:, :4] /= gain
    clip_coords(coords, img0_shape)
    return coords

def clip_coords(boxes, shape):
    # Clip bounding xyxy bounding boxes to image shape (height, width)
    if isinstance(boxes, torch.Tensor):  # faster individually
        boxes[:, 0].clamp_(0, shape[1])  # x1
        boxes[:, 1].clamp_(0, shape[0])  # y1
        boxes[:, 2].clamp_(0, shape[1])  # x2
        boxes[:, 3].clamp_(0, shape[0])  # y2
    else:  # np.array (faster grouped)
        boxes[:, [0, 2]] = boxes[:, [0, 2]].clip(0, shape[1])  # x1, x2
        boxes[:, [1, 3]] = boxes[:, [1, 3]].clip(0, shape[0])  # y1, y2
c++:
// common.hpp
cv::Rect get_rect(cv::Mat& img, float bbox[4]) {
    float l, r, t, b;
    float r_w = Yolo::INPUT_W / (img.cols * 1.0);
    float r_h = Yolo::INPUT_H / (img.rows * 1.0);
    if (r_h > r_w) {
        l = bbox[0] - bbox[2] / 2.f;
        r = bbox[0] + bbox[2] / 2.f;
        t = bbox[1] - bbox[3] / 2.f - (Yolo::INPUT_H - r_w * img.rows) / 2;
        b = bbox[1] + bbox[3] / 2.f - (Yolo::INPUT_H - r_w * img.rows) / 2;
        l = l / r_w;
        r = r / r_w;
        t = t / r_w;
        b = b / r_w;
    } else {
        l = bbox[0] - bbox[2] / 2.f - (Yolo::INPUT_W - r_h * img.cols) / 2;
        r = bbox[0] + bbox[2] / 2.f - (Yolo::INPUT_W - r_h * img.cols) / 2;
        t = bbox[1] - bbox[3] / 2.f;
        b = bbox[1] + bbox[3] / 2.f;
        l = l / r_h;
        r = r / r_h;
        t = t / r_h;
        b = b / r_h;
    }
    return cv::Rect(round(l), round(t), round(r - l), round(b - t));
}
转换的方法有些微不同,且没有对坐标的越界进行判断。
修改后:
// common.hpp

float clip_coords(float x, int xmin, int xmax) {
    if (x < xmin) {
        x = xmin;
    }
    if (x > xmax ){
        x = xmax;
    }
    return x;
}

// yolov5/utils/general.py xywh2xyxy(~) and scale_coords(~)
cv::Rect get_rect(cv::Mat& img, float bbox[4]) {
    // xc,yc,w,h --> xmin,ymin,xmax,ymax
    float l, r, t, b;
    l = bbox[0] - bbox[2] / 2.f;
    r = bbox[0] + bbox[2] / 2.f;
    t = bbox[1] - bbox[3] / 2.f;
    b = bbox[1] + bbox[3] / 2.f;

    // Rescale coords (xyxy) from dst shape(640x640) to src shape
    float pad[2];
    float gain = std::min( (float)Yolo::INPUT_W / (float)img.cols, (float)Yolo::INPUT_H / (float)img.rows);
    pad[0] = (Yolo::INPUT_W - img.cols * gain)/2;
    pad[1] = (Yolo::INPUT_H - img.rows * gain)/2;

    l = ( l - pad[0] ) / gain; // x padding
    r = ( r - pad[0] ) / gain;
    t = ( t - pad[1] ) / gain; // y padding
    b = ( b - pad[1] ) / gain;

    // 越界
    l = clip_coords(l, 0, img.cols);
    r = clip_coords(r, 0, img.cols);
    t = clip_coords(t, 0, img.rows);
    b = clip_coords(b, 0, img.rows);

    // xmin,ymin,xmax,ymax --> xmin, ymin, w, h
    return cv::Rect(round(l), round(t), round(r - l), round(b - t));

}
6. 结果比对
c++:
45 0.973848 0 126 810 797
0 0.931803 50 408 215 875
55 0.923260 0 254 33 328
0 0.922524 215 412 323 863
0 0.917015 677 485 810 871
0 0.883489 0 622 64 868
3 0.594060 119 768 156 816
torch: 3 0.253175 120 767 158 815 0 0.859743 677 484 810 872 0 0.863529 1 620 63 868 55 0.906701 0 254 33 328 0 0.907883 214 412 321 861 0 0.922536 52 408 214 876 45 0.962665 0 106 810 813
预测目标个数相同,坐标值基本对应上了,虽然置信度有所不同,但c++普遍比torch高。


 6783
6783


 被折叠的 条评论
为什么被折叠?
被折叠的 条评论
为什么被折叠?
 到【灌水乐园】发言


