


 本文详细介绍Unity ShaderGraph的使用方法,包括创建节点、连接节点、改变输出、创建材质等基础操作,以及如何使用属性编辑图形、创建自定义函数节点、管理精度模式和颜色模式。此外,还提供了ShaderGraph的高级应用技巧,如子图的使用、精度继承和自定义颜色设置。
My first Shader Graph
在开始之前,要确保你的工程设置正确,创建并应用好你自己的渲染管线, See Getting started with Shader Graph for more information.
Create a new node:创建一个节点
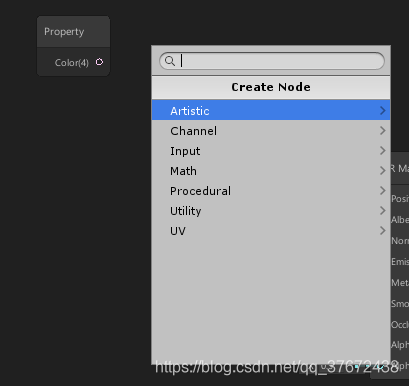
创建节点有两种方式:
- 右键,在弹出菜单中选择Create Node .
- 空格键
Connect nodes
连接节点左边的是输入节点,右边的是输出节点,每个节点都有自己的类型,比如是color类型那么你拖动它的输入端口到空格处,它会自动出现他所能连接得节点
Change node output
改变输出节点,它会更新到MainPreview面板中,然后点击左上角的saveAsset会更新到场景中
Create a Material
创建一个自定义shader的material,有两种方法,一种就是新建material,给它赋值自己定义的shader,第二种就是在shader上右击,选中创建material,然后把这个材质附到游戏物体上
Use properties to edit the graph
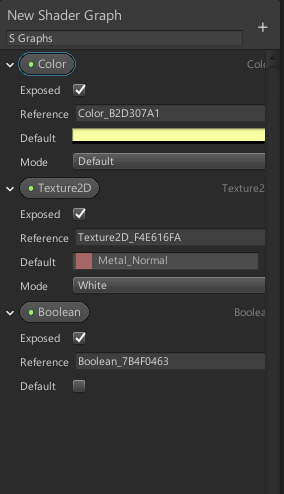
点击blackboard上的+号,可以添加属性,这些属性可以在材质面板上显示出来
| Option | Description |
|---|---|
| Property button | 右键属性,可以重命名,删除等操作 |
| Exposed | 是否在材质面板上显示出来 |
| Reference | C# scripts脚本中引用的名字,就是内部脚本中使用的变量名. To change the Reference name, enter a new string. |
| Default | 默认值 |
| Mode | 属性模式。不同的属性有不同的模式. For Color, you can select either Default or HDR. |
| Precision | 精度 |
有两种方式使用创建的属性:
- 直接拖到空白的graph处
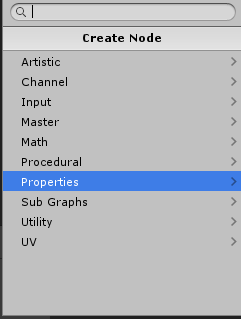
- 右键创建节点,在属性那一列查找
More Tutorials
To keep exploring how to use Shader Graph to author shaders, check out these blog posts:
- Art That Moves: Creating Animated Materials with Shader Graph
- Shader Graph Updates and Sample Project
- Custom Lighting in Shader Graph: Expanding Your Graphs in 2019
- Unity 2018.3 Shader Graph Update: Lit Master Node
- Creating an Interactive Vertex Effect using Shader Graph
- Introduction to Shader Graph: Build your shaders with a visual editor
You can also visit the Unity YouTube Channel and look for video tutorials on Shader Graph, or head to our user forum to find the latest information and conversations about Shader Graph.
Shader Graph Window
Title Bar
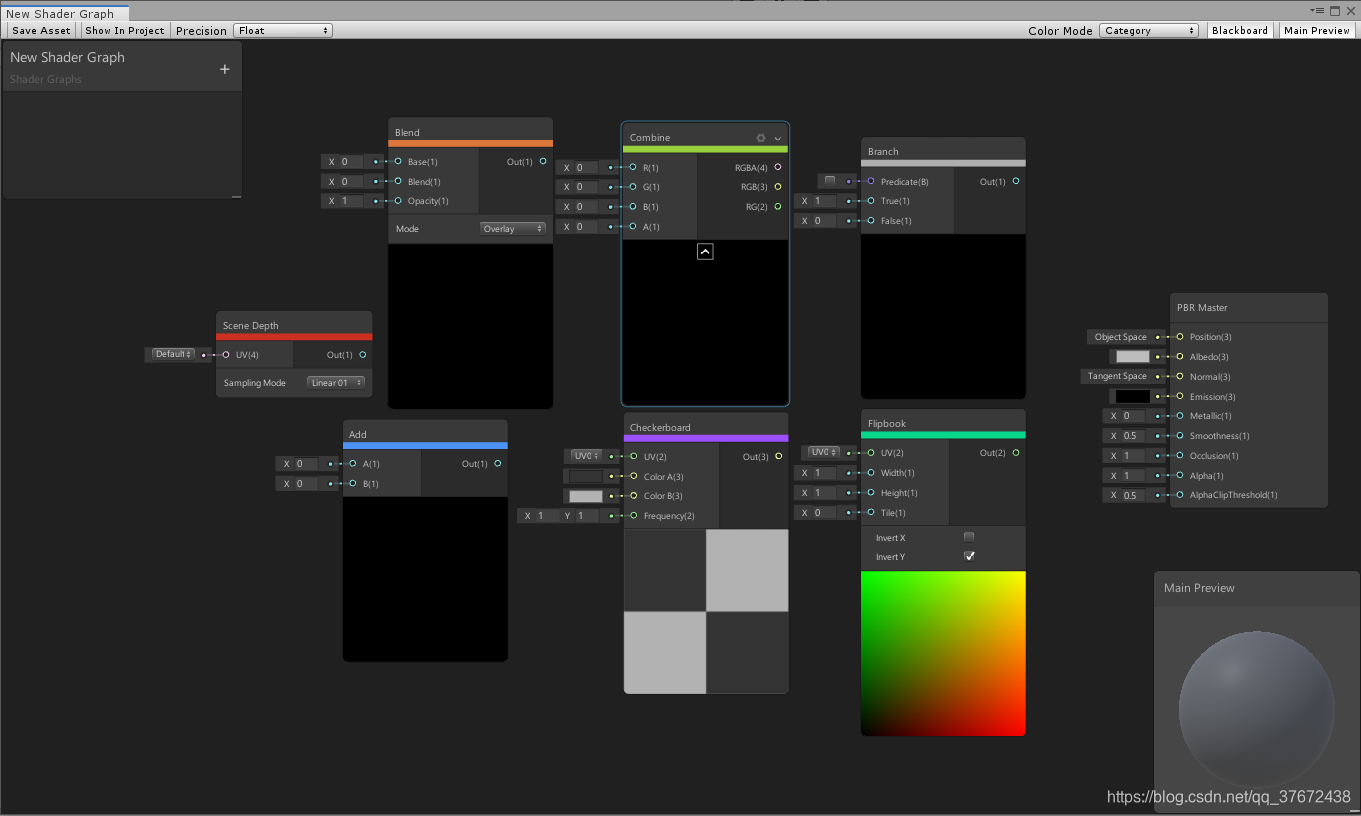
The title bar at the top of the Shader Graph Window contains actions that can be performed on the Graph.
| Item | Description |
|---|---|
| Save Asset | 保存更改 |
| Show In Project | 在资源面板中高亮显示正在编辑的shader |
| Precision Mode | 整个graph的精度,在最新版本的shadergraph才有 |
| Color Mode | 颜色模式,以不同的颜色区分每一类的节点,在最新版本的shadergraph才有 |
| Blackboard | 打开关闭BlackBoard |
| Master Preview | 打开关闭 Master Preview. |
Workspace
在工作区alt+鼠标左键 平移 滚轮缩放,按住鼠标左键框选
| Hotkey | Windows | OSX | Description |
|---|---|---|---|
| Cut | Ctrl + X | Command + X | 剪切 |
| Copy | Ctrl + C | Command + C | 拷贝 |
| Paste | Ctrl + V | Command + V | 粘贴 |
| Focus | F | F | 聚焦,选中单个节点,可以聚焦到视图中央,不选中节点,整个聚焦到试图中央 |
| Create Node | Spacebar | Spacebar | 创建按新节点 |

双击这个地方,可以以/的方式,更改shader的路径,比如默认是在shadergraph下

Master Preview
可以选择应用shader的模型,custom mesh里面就可以选择自己要应用的模型,鼠标左键可以旋转这个预览模型

Sub Graph:子图
Sub Graph是多个节点打包成一个子节点,这个子节点可以在其他graph里面引用,就相当于基础类,如果你有多个shader都有同样的操作,就可以把那些同样的操作,打包成一个子节点,节省时间.sub graph和graph有以下三个方面的不同:
- Sub Graph 在blackboard上的属性定义了 Sub Graph Node 输入端口
- Sub Graph有自己的资源类型 Asset type. see Sub Graph Asset.
- Sub Graph 没有Master Node. Instead,有一个输出节点 Output. For more information, see Output Node.
Sub Graphs and shader stages
If a Node within a Sub Graph specifies a shader stage (for example, like how the Sample Texture 2D Node specifies the fragment shader stage), the Editor locks the entire Sub Graph to that stage. You cannot connect any Nodes that specify a different shader stage to the Sub Graph Output Node, and the Editor locks any Sub Graph Nodes that reference the graph to that shader stage.
Sub Graphs and Keywords
在子图里面定义的属性,会在父图里面作为输入节点存在
Color Modes
根据不同的节点类型,连线颜色和属性面板颜色也会不一样

Modes
| Name | Description |
|---|---|
| None | Does not display colors on the nodes. All nodes use the default gray. |
| Category | 根据节点类型划分颜色 |
| Precision | 根据节点精度类型划分颜色 |
| User Defined | 自定义颜色 |
Category Colors
The table below lists current categories and their corresponding colors.
| Name | Color | Hex Value |
|---|---|---|
| Artistic |  | #DB773B |
| Channel |  | #97D13D |
| Input |  | #CB3022 |
| Math |  | #4B92F3 |
| Procedural |  | #9C4FFF |
| Utility |  | #AEAEAE |
| UV |  | #08D78B |
Note: Sub Graph nodes in a main Shader Graph fall in the Utility category. If you select Category mode, all Sub Graphs use the Utility color.
Precision Colors
根据节点类型划分颜色
The table below lists current precision types and their corresponding colors.
| Name | Color | Hex Value |
|---|---|---|
| Half | | #CB3022,16位整数 |
| Float | | #4B92F3 |
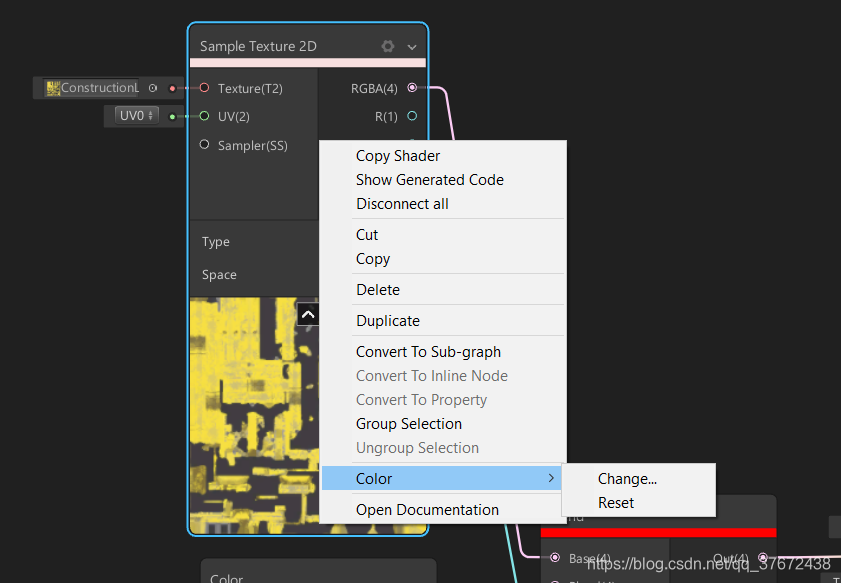
User Defined Colors
自定义颜色,如果没有定义,默认灰色
To set a custom color for a node, right-click on the target node to bring up the the context menu, and select Color.
| Option | Description |
|---|---|
| Change... | Brings up a color picker menu and lets you set your own custom color on the node. |
| Reset | Removes the currently selected color and sets it to the default gray. |
Overriding Default Colors
可以自己更改Category and Precision模式下的颜色 Unity使用一个 .uss 类型的表格和 Hex color设置颜色. 默认表格在你工程目录下 Packages/com.unity.shadergraph/Editor/Resources/Styles/ColorMode.uss.
你可以新创建一个文件夹Editor/Resources/Styles,复制一份ColorMode.uss在里面,然后在这里面更改自己Category and Precision modes.的颜色
Precision Modes
hader Graph允许您设置特定的精度模式,以便跨不同平台进行优化.
Menu Options
| Name | Description |
|---|---|
| Float | float.模式 |
| Half | half.16位整数模式 |
| Inherit | inherit.模式See Precision Inheritance below. Only available on nodes. |
Using Precision Modes
Visualizing Precision
可以在color mode里面选择精度模式,这样节点会根据精度颜色分类
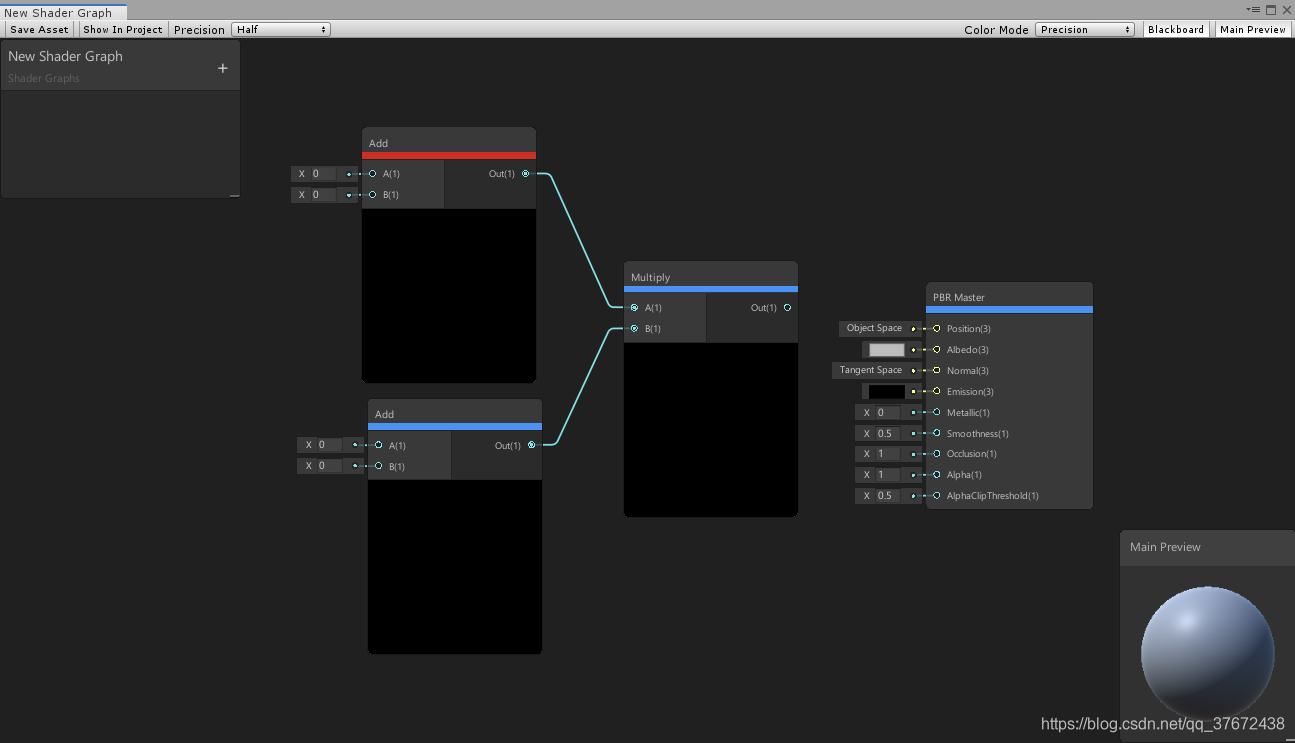
Graph Precision
在左上角设置整个graph的精度模式 float or half
Node Precision
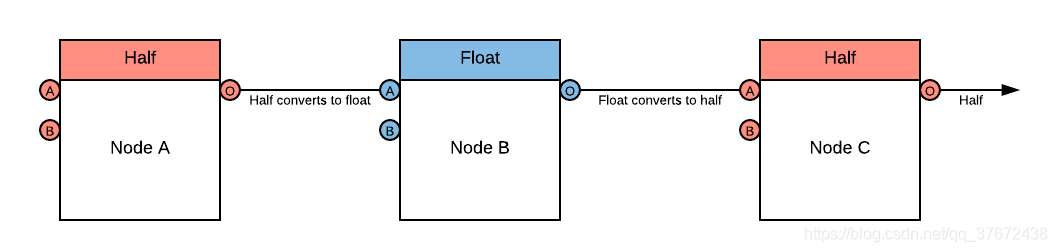
也可以为每一个节点设置一个精度。如果两个节点的精度不一样,他俩连线的时候会自动向上或向下转换
比如:把一个 half节点和 float节点相连,它会向上转换,最后输出是 float. 如果把t float 节点和另一个half 节点相连,它会向下转换成 half.节点
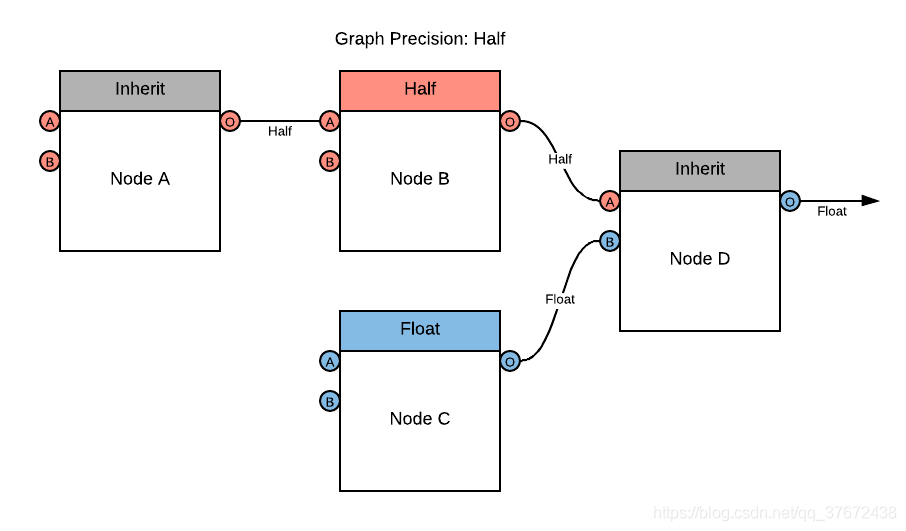
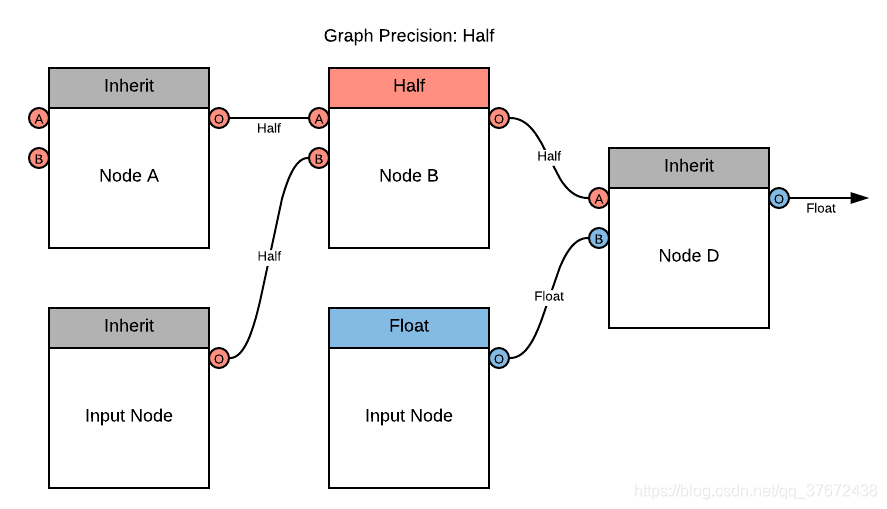
Precision Inheritance
inherit精度会继承任何输入边的精度模式.如果该节点没有任何输入边,那他会继承整个graph的精度设置, Graph Precision setting.
比如:Node A 是 inherit精度,它会使用half精度,因为 Graph Precision 是 half.

节点从每个输入端口读取精度。可以将具有不同精度的节点连接到单个节点的输入端口. 在这种情况下,结果输出是连接节点中可用的最高精度模式。
例如,将节点D设置为inherit。节点B为half精度传递给输入端口A. Node C传递精度 float 给端口 B. Node D 输出 float, float是所有输入节点中最高的的精度
你也可以设置节点没有输入端口(这个是没有输入端口). 它们是典型的 Input Nodes 输入节点,默认使用 inherit 精度并且使用 Graph Precision. 与其他节点类似,使用每个输入节点的齿轮图标菜单手动设置图形输入数据的精度。
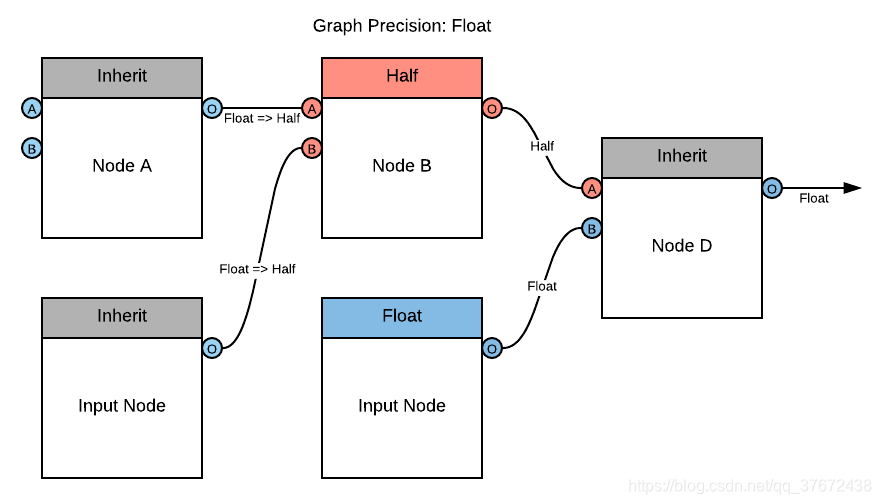
当你给一个输入端口没有连接得节点设置inherit 模式时(这个是有输入节点,但是没有连接),它会使用 Graph Precision 设置.如果你改变Graph Precision mode, 这些节点的模式也会改变. 跟踪设置为继承的节点很重要,因为在更改Graph Precision时,它们可能会导致转换瓶颈。
For example, 如果你改变 Graph Precision 从 half到 float,但手动设置 Node B 为 half, 输入 Node B 的节点从 float 改编成 half,然后在Node D改成 float
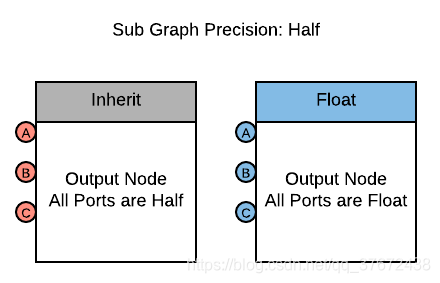
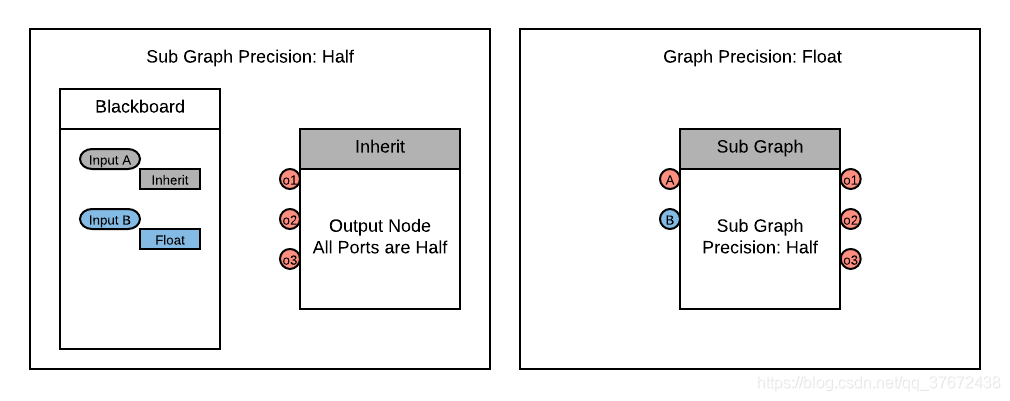
Sub Graph Precision
Sub Graphs,在父图里面双击子图,会重新打开一个子图的编辑器,在这里面可以更改子图的输入输出属性和精度
为 Sub Graph Output 的 Output 节点设置精度. 它会应用到Sub Graph所有的 Output 节点
For Sub Graph Inputs中每一个 Property 都在 Graph'的Blackboard.inherit精度的节点,使用Graph Precision节点的,使用的是子图里面的精度设置
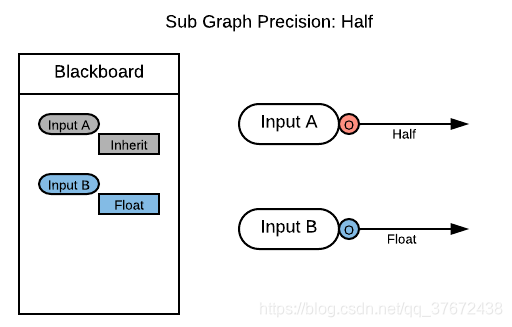
当你在父图里面使用Sub-graph Node 时, Sub Graph 决定它自己的精度.不能在父图里面更改子图的精度
比如设置 Sub Graph Precision to half, Graph Precision to float.设置Input A and the Output为inherit.它们继承子图的精度half,即使你设置Graph Precision to float. 如果你想要他俩一样,你应该也设置子图的精度为half
In This Article
Custom Function Node
Description
Shader Graph 允许你编写自己的节点. 也可以定义自己的输入输出端口
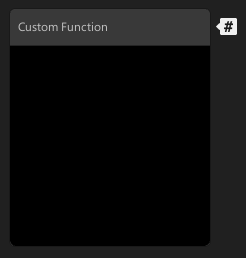
How to Use
通过 Create Node Menu 创建一个Custom Function nodes.默认不含有任何输入输出端口
点击齿轮打开 Custom Port Menu and Custom Function Menu.
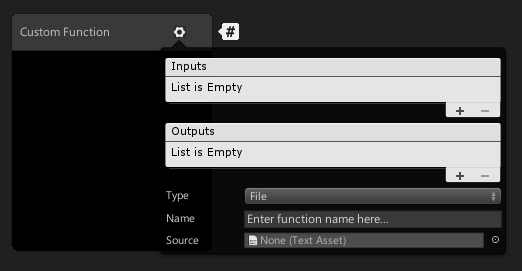
Custom Function Menu
| Menu Item | Description |
|---|---|
| Inputs | A Custom Port Menu that defines the input ports of the node. |
| Outputs | A Custom Port Menu that defines the output ports of the node. |
| Type | 设置函数类型. 选择File以引用外部文件,或选择string以直接向节点输入函数。. |
| Name | 最后生成的代码中的自定义函数的名称 |
| Source | 引用外部HLSL包含文件的资产字段。仅在文件模式下可用。 |
| Body | 输入HLSL代码的文本框。仅在字符串模式下可用 |
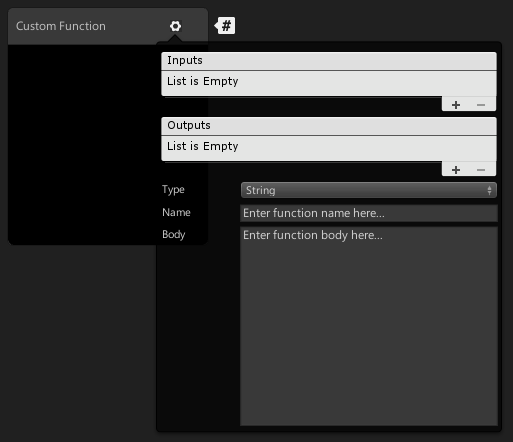
Defining the Function via String
选择 String 模式, the graph 图形生成着色器函数. Name 字段定义生成的函数的名称, Body 字段定义生成的函数的内容. 自动处理参数、大括号和缩进范围.在 String 您可以使用 $precision 而不是 half or float在 Body 中填写字段时. 在处理节点时,根据节点的精度,这将被正确的类型替换。
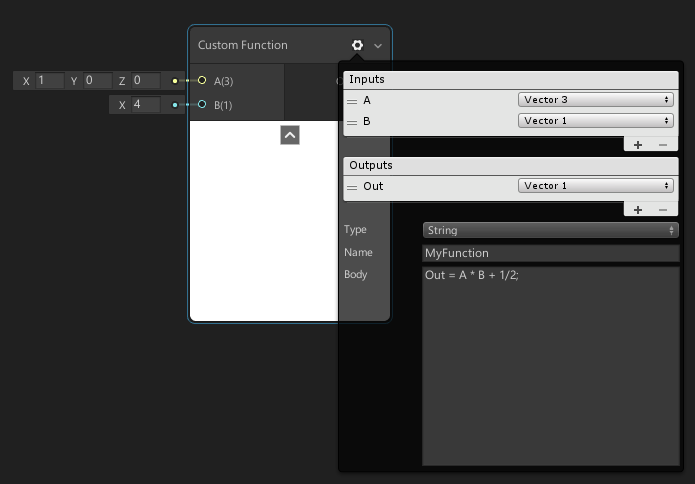
The example above generates the following function:

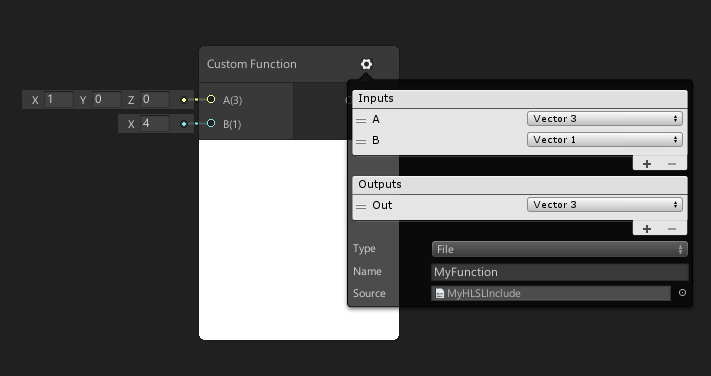
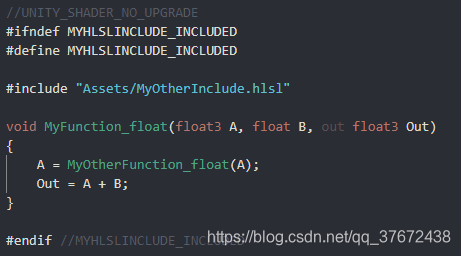
Defining the Function via File
选择File mode, 不会生成shader函数. File 会引用选择文件中的函数. The Name字段是你要引用函数的名字. The Source 是一个包含你引用函数的HLSL文件
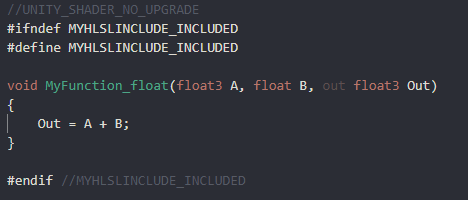
在为自定义函数节点使用文件模式时,必须手动正确格式化函数。在为自定义函数节点使用文件模式时,必须手动正确格式化函数。生成的代码将精度后缀附加到函数名. 文件中的shader函数还必须附加所需的精确后缀 (shown below with _float), or或者含有多个后缀 _float and _half , but your Name但是名字中不能含有后缀.
file 模式可以定义很复杂的函数

您可以在同一个文件中定义多个函数, 并从引用函数中调用它们.或者,您可以引用相同的文件,但是使用来自不同自定义函数节点的不同函数。
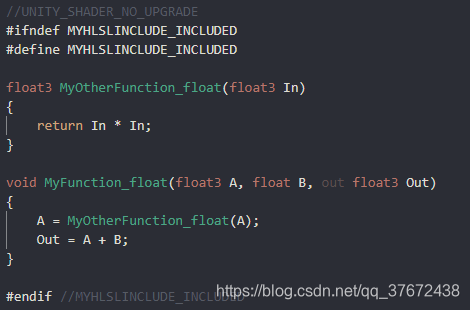
甚至可以使用包含其他函数的文件,相当于添加一个命名空间
Reusing Custom Function Nodes
自定义节点也可以打包成子图,多次使用
Shader Graph samples
shader graph提供了一些样例,在你导入资源包的时候,他会在你的资源面板中创建一个shader graph 文件夹,里面有样例
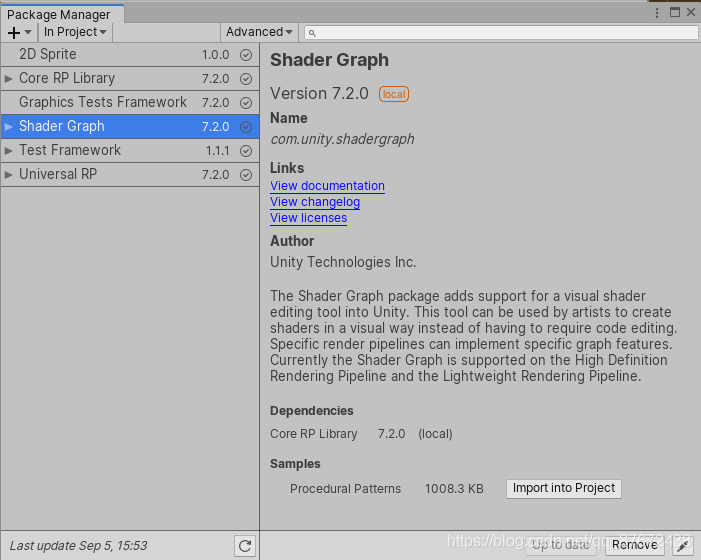
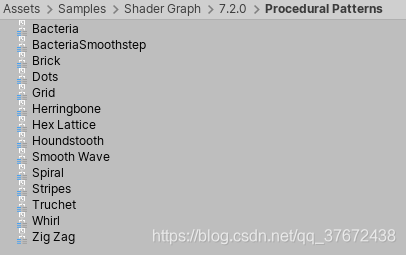
Unity把导入的样本放在 Assets > Samples > Shader Graph > [version number] > [sample name]. 下面的示例显示了 Procedural Patterns.
Available samples
下面的例子是目前可用的着色图形。
| Procedural Patterns |
|---|
 |
| T这个资产集合展示了着色器图形可能的各种procedural techniques。直接在项目中使用它们,或者编辑它们以创建其他procedural模式 这个集合中的模式是: Bacteria, Brick, Dots, Grid, Herringbone, Hex Lattice, Houndstooth, Smooth Wave, Spiral, Stripes, Truchet, Whirl, Zig Zag. |


 2352
2352

 被折叠的 条评论
为什么被折叠?
被折叠的 条评论
为什么被折叠?
 到【灌水乐园】发言


