


使用jupyter (参考视觉SLAM十四讲第二版第七章源码)
# 查看当前kernel下已安装的包
#!pip install opencv-python --user # opencv-python 4.5.1.48
#!pip install -i https://pypi.tuna.tsinghua.edu.cn/simple opencv-python==3.4.8.29
#!pip list --format=columns
1.ORB特征点提取和配准
import cv2 as cv  ## opencv-python==3.4.8.29
import numpy as np
from  matplotlib import pyplot as plt

# 读取图片
im1 = cv.imread('./data/1.png')
im2 = cv.imread('./data/2.png')

# ORB特征提取
orb = cv.ORB_create()
kp1 = orb.detect(im1)
kp2 = orb.detect(im2)
kp1, des1 = orb.compute(im1, kp1) # 求特征
kp2, des2 = orb.compute(im2, kp2) # 求特征
bf = cv.BFMatcher(cv.NORM_HAMMING)# 初始化Matcher
matches = bf.match(des1, des2)    # 配准
# 进行初步筛选
min_distance = 10000
max_distance = 0
for x in matches:
    if x.distance < min_distance: min_distance = x.distance
    if x.distance > max_distance: max_distance = x.distance
print('最小距离:%f' % min_distance)
print('最大距离:%f' % max_distance)
good_match = []
for x in matches:
    if x.distance <= max(2 * min_distance, 30):
        good_match.append(x)
print('匹配数:%d' % len(good_match))
outimage = cv.drawMatches(im1, kp1, im2, kp2, good_match, outImg=None)
plt.imshow(outimage[:,:,::-1])
plt.show()
2.求解位姿 估计相机运动
# 提取配准点
points1 = []
points2 = []
for i in good_match:
    points1.append(list(kp1[i.queryIdx].pt));
    points2.append(list(kp2[i.trainIdx].pt));
points1 = np.array(points1)
points2 = np.array(points2)
#em,mask = cv.findEssentialMat(points1, points2, K, cv.RANSAC, 0.999, 1.0,np.array([])) #opencv4
#em,mask = cv.findEssentialMat(points1, points2, 521, (325.1,249.7), cv.RANSAC, 0.999, 1.0,np.array([])) #opencv3
K = np.array([520.9, 0, 325.1, 0, 521.0, 249.7, 0, 0, 1]).reshape([3,-1]) # 相机参数
em,mask = cv.findEssentialMat(points1, points2, 521, (325.1,249.7))       # 计算本质矩阵  RANSAC
#print(em)
#print(mask)

# 求解位姿
#num,R,t,mask = cv.recoverPose( em, points1, points2, K)
num,R,t,mask = cv.recoverPose( em, points1, points2, np.array([]), np.array([]), 521, (325.1,249.7),mask)
print(R)
print(t) 
3.三角测量 求得配准点的深度(到相机的距离)
projMatr1 = np.array([[1,0,0,0],[0,1,0,0],[0,0,1,0]])    # 第一个相机参数
projMatr2 = np.concatenate((R, t), axis=1)               # 第二个相机参数
projMatr1 = np.matmul(K, projMatr1) # 相机内参 相机外参
projMatr2 = np.matmul(K, projMatr2) #
points4D = cv.triangulatePoints(projMatr1, projMatr2, points1.T, points2.T)
points4D /= points4D[3]       # 归一化
points4D = points4D.T[:,0:3]  # 取坐标点
print(points4D[0:5])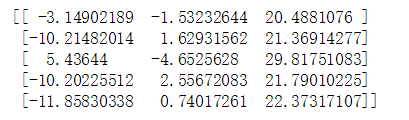
4.三角测量可视化(可视化深度距离)
def get_color(depth):
    up_th = 50
    low_th = 10
    th_range = up_th - low_th;
    if (depth > up_th):
        depth = up_th;
    if (depth < low_th):
        depth = low_th;
    return (255 * depth / th_range, 0, 255 * (1 - depth / th_range));

## 可视化
for i in range(points1.shape[0]):
    # 第一幅图
    im1 = cv.circle(im1, (points1[i][0].astype(int),points1[i][1].astype(int)), 10,get_color(points4D[i,2]), -1)
    # 第二幅图
    tmp_point = np.dot(R,points4D[i,:].reshape(3,1)) + t
    tmp_point = tmp_point.reshape(-1)
    im2 = cv.circle(im2, (points2[i][0].astype(int),points2[i][1].astype(int)), 10,get_color(tmp_point[2]), -1)
plt.subplot(121)
plt.imshow(im1[:,:,::-1])
plt.subplot(122)
plt.imshow(im2[:,:,::-1])
plt.show()


 2025
2025


 被折叠的 条评论
为什么被折叠?
被折叠的 条评论
为什么被折叠?
 到【灌水乐园】发言


