


网格简化-ModelNet10
引言
计算机算力有限,特别是在深度学习领域,撇开网格的输入特征计算,现有条件很难直接训练测试高分辨的网格。故需要对网格进行简化:
一、网格的简化
数据集可参考:三角网格(Triangular Mesh)分类数据集 - ModelNet及其水密版
分别使用open3D、Meshlab和blender对bathtub_0141.obj进行简化,未调参
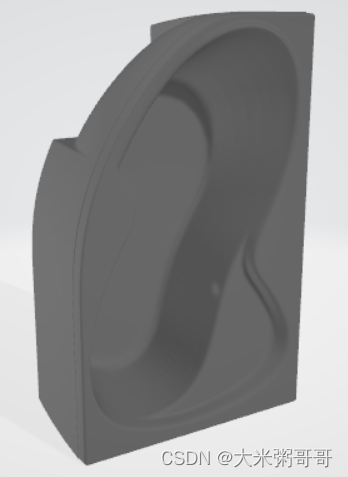
1.1 水密网格的简化可视化
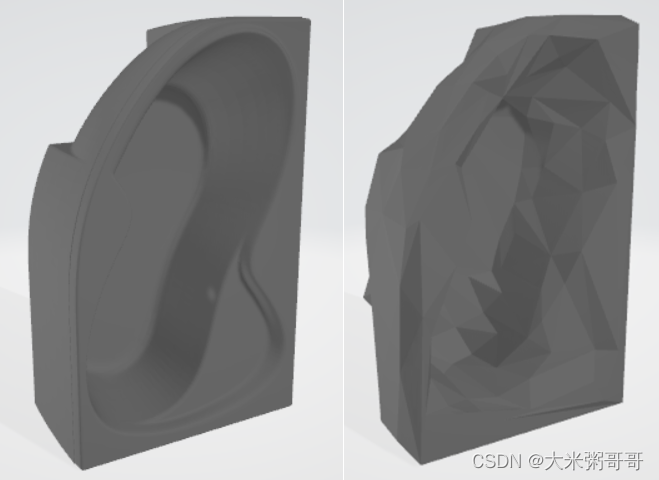
对水密网格进行简化,可以保持其大致形状,但是细节较模糊,也许加入平滑会更好

1.2 非水密网格的简化可视化

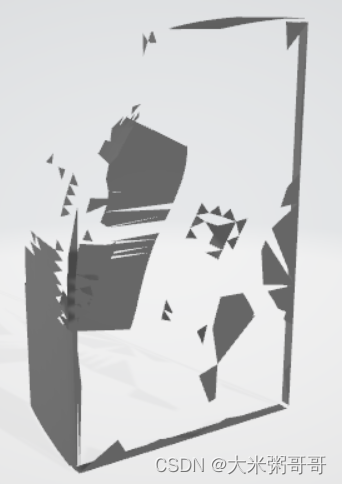
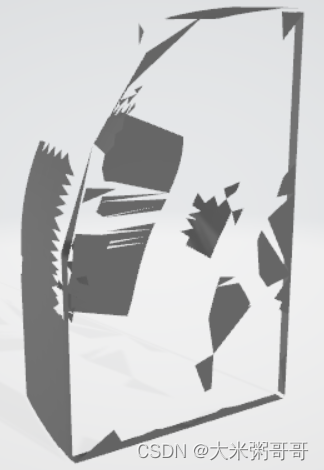
对非水密的离散网格进行简化,可能会使其扭曲,如上图所示
结果文件如下:

1.3 核心代码
import os
import subprocess
import open3d
import time
import numpy as np
from blender_process import Process
# https://github.com/ranahanocka/MeshCNN/blob/master/scripts/dataprep/blender_process.py


def load_obj(file):
    f = open(file)
    vs, faces = [], []
    for line in f:
        line = line.strip()
        splitted_line = line.split()
        if not splitted_line:
            continue
        elif splitted_line[0] == 'v':
            vs.append([float(v) for v in splitted_line[1:4]])
        elif splitted_line[0] == 'f':
            face_vertex_ids = [int(c.split('/')[0]) for c in splitted_line[1:]]
            assert len(face_vertex_ids) == 3
            face_vertex_ids = [(ind - 1) if (ind >= 0) else (len(vs) + ind)
                               for ind in face_vertex_ids]
            faces.append(face_vertex_ids)
    f.close()
    return np.array(vs), np.array(faces, dtype=int)


if __name__=='__main__':
    # 0.简化网格面个数设定
    face_num = 500

    # 1.网格路径 读取网格
    load_dir = './datasets/bathtub_0141.obj'
    save_dir = './datasets/bathtub_0141_' + str(face_num)

    # 2.1 open3D简化并保存
    start_time = time.time()
    vs, faces = load_obj(load_dir)
    m = open3d.geometry.TriangleMesh()
    m.vertices = open3d.utility.Vector3dVector(vs)
    m.triangles = open3d.utility.Vector3iVector(faces)
    m = m.simplify_quadric_decimation(face_num)
    open3d.io.write_triangle_mesh(save_dir + '_open3d.obj', m)
    t = (time.time() - start_time)
    print('open3D简化并保存:', t)

    # 2.2 Meshlab简化并保存
    start_time = time.time()
    temp = subprocess.run(["D:/software/MeshLab/meshlabserver.exe",
                           "-i", os.path.abspath(load_dir),
                           "-o", os.path.abspath(save_dir + '_meshlab.obj'),
                           "-s", "D:/vm/QECD_500.mlx"])
    t = (time.time() - start_time)
    print('Meshlab简化并保存:', t)

    # 2.3 blender简化并保存
    start_time = time.time()
    blender = Process(os.path.abspath(load_dir),
                      face_num,
                      os.path.abspath(save_dir + '_blender.obj'))
    t = (time.time() - start_time)
    print('blender简化并保存:', t)

# bathtub_0141.obj 单位秒
# open3D简化并保存: 0.769096851348877     0.9059770107269287
# Meshlab简化并保存: 0.7407355308532715   1.652160406112671
# blender简化并保存: 0.5777468681335449   0.7607262134552002
QECD_500.mlx:
<!DOCTYPE FilterScript>
<FilterScript>
<filter name="Simplification: Quadric Edge Collapse Decimation">
<Param name="TargetFaceNum" type="RichInt" tooltip="The desired final number of faces." description="Target number of faces" value="500"/>
<Param name="TargetPerc" type="RichFloat" tooltip="If non zero, this parameter specifies the desired final size of the mesh as a percentage of the initial size." description="Percentage reduction (0..1)" value="0"/>
<Param name="QualityThr" type="RichFloat" tooltip="Quality threshold for penalizing bad shaped faces.<br>The value is in the range [0..1]
 0 accept any kind of face (no penalties),
 0.5 penalize faces with quality < 0.5, proportionally to their shape
" description="Quality threshold" value="0.3"/>
<Param name="PreserveBoundary" type="RichBool" tooltip="The simplification process tries to do not affect mesh boundaries during simplification" description="Preserve Boundary of the mesh" value="false"/>
<Param name="BoundaryWeight" type="RichFloat" tooltip="The importance of the boundary during simplification. Default (1.0) means that the boundary has the same importance of the rest. Values greater than 1.0 raise boundary importance and has the effect of removing less vertices on the border. Admitted range of values (0,+inf). " description="Boundary Preserving Weight" value="1"/>
<Param name="PreserveNormal" type="RichBool" tooltip="Try to avoid face flipping effects and try to preserve the original orientation of the surface" description="Preserve Normal" value="false"/>
<Param name="PreserveTopology" type="RichBool" tooltip="Avoid all the collapses that should cause a topology change in the mesh (like closing holes, squeezing handles, etc). If checked the genus of the mesh should stay unchanged." description="Preserve Topology" value="false"/>
<Param name="OptimalPlacement" type="RichBool" tooltip="Each collapsed vertex is placed in the position minimizing the quadric error.
 It can fail (creating bad spikes) in case of very flat areas. 
If disabled edges are collapsed onto one of the two original vertices and the final mesh is composed by a subset of the original vertices. " description="Optimal position of simplified vertices" value="false"/>
<Param name="PlanarQuadric" type="RichBool" tooltip="Add additional simplification constraints that improves the quality of the simplification of the planar portion of the mesh." description="Planar Simplification" value="false"/>
<Param name="QualityWeight" type="RichBool" tooltip="Use the Per-Vertex quality as a weighting factor for the simplification. The weight is used as a error amplification value, so a vertex with a high quality value will not be simplified and a portion of the mesh with low quality values will be aggressively simplified." description="Weighted Simplification" value="false"/>
<Param name="AutoClean" type="RichBool" tooltip="After the simplification an additional set of steps is performed to clean the mesh (unreferenced vertices, bad faces, etc)" description="Post-simplification cleaning" value="true"/>
<Param name="Selected" type="RichBool" tooltip="The simplification is applied only to the selected set of faces.
 Take care of the target number of faces!" description="Simplify only selected faces" value="false"/>
</filter>
</FilterScript>
参考:
Meshlab:用PyMeshLab执行从MeshLab中导出的过滤器脚本(.mlx)功能
Open3D:Open3D Mesh 网格
blender:blender_process.py
二、ModelNet10数据集简化
生成简化版本的数据集:
import glob, os, shutil, sys, json
from pathlib import Path
import pylab as plt
import trimesh
import open3d
import time
import numpy as np
from tqdm import tqdm


def load_off(file):
    file = open(file, 'r')
    if 'OFF' != file.readline().strip():
        raise ('Not a valid OFF header')

    n_verts, n_faces, n_dontknow = tuple([int(s) for s in file.readline().strip().split(' ')])
    verts = [[float(s) for s in file.readline().strip().split(' ')] for i_vert in range(n_verts)]
    faces = [[int(s) for s in file.readline().strip().split(' ')][1:] for i_face in range(n_faces)]
    file.close()
    return np.array(verts), np.array(faces, dtype=int)


MESH_EXTENSIONS = [
    '.off',
]
def is_mesh_file(filename):
    return any(filename.endswith(extension) for extension in MESH_EXTENSIONS)
def make_dataset_by_class(dir, class_to_idx, phase):
    meshes = [[] for _ in class_to_idx]
    dir = os.path.expanduser(dir)
    id = -1
    for target in sorted(os.listdir(dir)):
        d = os.path.join(dir, target)  # 获取每一类的 路径
        if not os.path.isdir(d):
            continue  # 不是文件夹就跳过了
        d = os.path.join(d, phase)
        id = id + 1
        #print(os.listdir(d))
        for root, _, fnames in sorted(os.walk(d)):
            for fname in sorted(fnames):
                if is_mesh_file(fname):  # 是mesh文件 并且 是相关类型 train or test
                    path = os.path.join(root, fname)
                    item = (path, class_to_idx[target],fname,root)  # 路径 , 类别
                    meshes[id].append(item)
    return meshes


if __name__=='__main__':
    # 0.简化网格面个数设定
    face_num = 500
    # 1.得到所有文件的路径
    dir_ = '../../../datasets/ModelNet10'
    classes = [d for d in os.listdir(dir_) if os.path.isdir(os.path.join(dir_, d))]  # 只返回文件夹
    class_to_idx = {classes[i]: i for i in range(len(classes))}                      # 类别
    train = make_dataset_by_class(os.path.join(dir_), class_to_idx,'train')
    test = make_dataset_by_class(os.path.join(dir_), class_to_idx,'test')

    # 2.遍历 test
    cnt = 0
    for test_ in test:  # 所有类
        start_time = time.time()
        cnt = cnt + 1
        print(cnt)
        for mesh in test_:  # 每一类的所有obj
            # 2.1 读取
            vs, faces = load_off(mesh[0])
            m = open3d.geometry.TriangleMesh()
            m.vertices = open3d.utility.Vector3dVector(vs)
            m.triangles = open3d.utility.Vector3iVector(faces)
            # 2.2 路径
            # save_dir = '../../../datasets/ModelNet10_' + str(face_num) + '/' + mesh[3]
            save_dir = mesh[3].replace('ModelNet10', 'ModelNet10_' + str(face_num))
            if not os.path.isdir(save_dir):
                os.makedirs(save_dir, exist_ok=True)
            # 2.3 简化并保存
            while len(m.triangles) < face_num:   # 面的个数
                m = m.subdivide_midpoint(number_of_iterations=1)
            m = m.simplify_quadric_decimation(face_num)
            file_name = os.path.splitext(mesh[2])
            open3d.io.write_triangle_mesh(save_dir + '/' + file_name[0] + '.obj', m)
        t = (time.time() - start_time)
        print('t:', t)

    # 2.遍历 train
    cnt = 0
    for train_ in train:   # 所有类
        start_time = time.time()
        cnt = cnt + 1
        print(cnt)
        for mesh in train_:   # 每一类的所有obj
            # 2.1 读取
            vs, faces = load_off(mesh[0])
            m = open3d.geometry.TriangleMesh()
            m.vertices = open3d.utility.Vector3dVector(vs)
            m.triangles = open3d.utility.Vector3iVector(faces)
            # 2.2 路径
            save_dir = mesh[3].replace('ModelNet10', 'ModelNet10_' + str(face_num))
            if not os.path.isdir(save_dir):
                os.makedirs(save_dir, exist_ok=True)
            # 2.3 简化并保存
            while len(m.triangles) < face_num:
                m = m.subdivide_midpoint(number_of_iterations=1)
            m = m.simplify_quadric_decimation(face_num)
            file_name = os.path.splitext(mesh[2])
            open3d.io.write_triangle_mesh(save_dir + '/' + file_name[0] + '.obj', m)
        t = (time.time() - start_time)
        print('t:', t)
三、展望
- 保护边缘的网格简化
- 先计算完网格元素特征,再进行降采样
- 先水密化后简化,最好加入平滑等预处理


 73
73


 被折叠的 条评论
为什么被折叠?
被折叠的 条评论
为什么被折叠?
 到【灌水乐园】发言


