


《博主简介》
小伙伴们好,我是阿旭。专注于人工智能、AIGC、python、计算机视觉相关分享研究。
✌更多学习资源,可关注公-仲-hao:【阿旭算法与机器学习】,共同学习交流~
👍感谢小伙伴们点赞、关注!
《------往期经典推荐------》
二、机器学习实战专栏【链接】,已更新31期,欢迎关注,持续更新中~~
三、深度学习【Pytorch】专栏【链接】
四、【Stable Diffusion绘画系列】专栏【链接】
五、YOLOv8改进专栏【链接】,持续更新中~~
六、YOLO性能对比专栏【链接】,持续更新中~
《------正文------》
目录
引言
在开创性的论文“attention is all you need”中,Transformers架构被引入NLP中的序列到序列任务。像Bert,GPT这样的模型是建立在Transformers架构之上的,该架构成为各种NLP任务中的SOTA。2020年在题为“An Image is Worth 16×16 Words”的论文中引入的视觉转换器在图像识别任务中使用了Transformer架构,这显示了将Transformer架构用于计算机视觉任务的有效性。不久之后,DETR(Detection Transformer) 在Facebook AI的论文“使用Transformer的端到端对象检测”中引入,该论文使用变压器架构进行对象检测任务。
DETR与以前目标检测不同之处
- 像
YOLO(You Only Look Once)、Faster R-CNN、SSD这样的模型的架构通常使用多个卷积层,然后是用于对象检测的专用层。DETR还在主干中使用CNN进行特征提取,但这些特征随后被传递到Transformer编码器和解码器层。 - 以前的模型需要一些手工设计的先验知识,比如YOLO中的锚框,R-CNN中的区域建议。DETR消除了对任何此类手工设计先验的需要。
- DETR模型不需要NMS(非最大抑制)作为后处理技术来删除不相关的边界框,这在基于CNN的模型中是需要的。
DETR的基本结构如下:

DETR架构
DETR体系结构有4个主要组成部分:
- backbone主干
- Transformer编码器
- Transformer解码器
- 前馈网络(Feed Forward Networks)
在下面的小节中,我们将详细介绍每个组件。
backbone
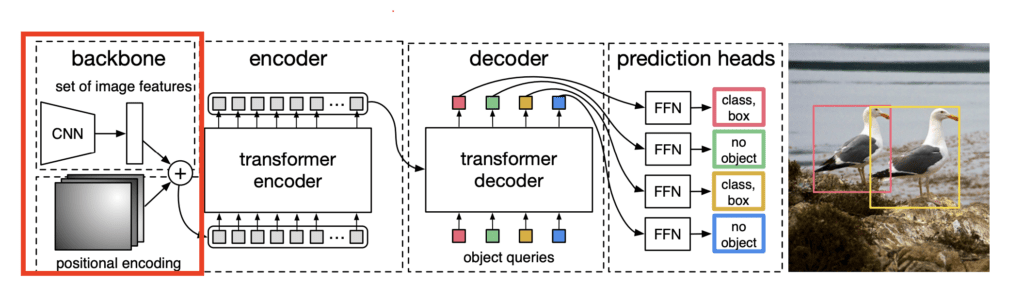
DETR模型从卷积神经网络(CNN)主干开始,通常是ResNet架构。这个主干充当特征提取器,处理原始输入图像以产生丰富的视觉特征集。DETR通常使用ResNet-50或ResNet-101作为其主干。
位置编码:
在学习Transformer Encoder之前,我们需要解释一下位置编码。沿着骨干网络的输出,即从原始图像中提取的特征,我们还将位置编码传递给Transformer Encoder。这些编码注入了关于像素空间位置的信息,以帮助模型保持对2D图像中位置的感知。
Transformer编码器
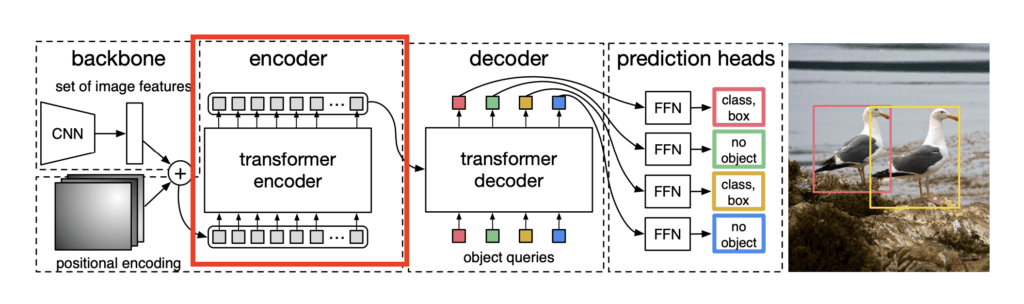 图3:Transformer编码器
骨干网络的输出,沿着位置编码,然后通过一系列的Transformer编码器。Transformer编码器的每一层都包含-
- 多头自注意力:有助于同时注意图像的各个部分,捕捉长距离的依赖关系。
- 前馈网络:帮助提取主要特征。
这有助于学习图像的不同区域中的对象之间的上下文关系。
Transformer解码器
 图4:Transformer解码器
Transformer解码器是DETR中的一项关键创新,这在Vision Transformers中并不存在。Transformer解码器接受两个输入,即来自编码器的编码特征和一组学习对象查询。
就像编码器层一样,解码器层也有多头自注意和FFN(前馈网络)。它还具有多头交叉注意力,也称为编码器-解码器注意力。多头交叉注意允许对象查询与来自编码器的编码特征“交互”。
Transformer解码器的输出是一组学习对象查询,其以嵌入的形式表示图像中的潜在对象。
预测头
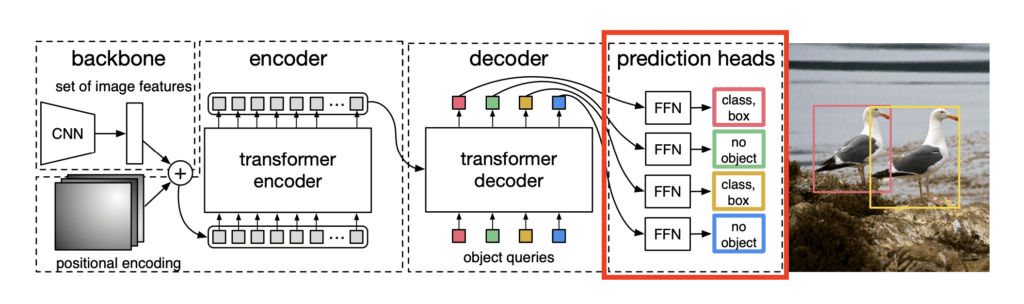
预测头是DETR架构的最后一个组件。解码器层的输出作为预测头的输入给出。预测头将学习到的对象查询作为输入,并且对于每个对象查询,预测头沿着预测对象的边界框来预测是否存在对象。
正是在架构的这个组件中,我们计算了用于训练整个网络的损失。总体损失是分类损失和边界框损失的组合。
基准测试结果
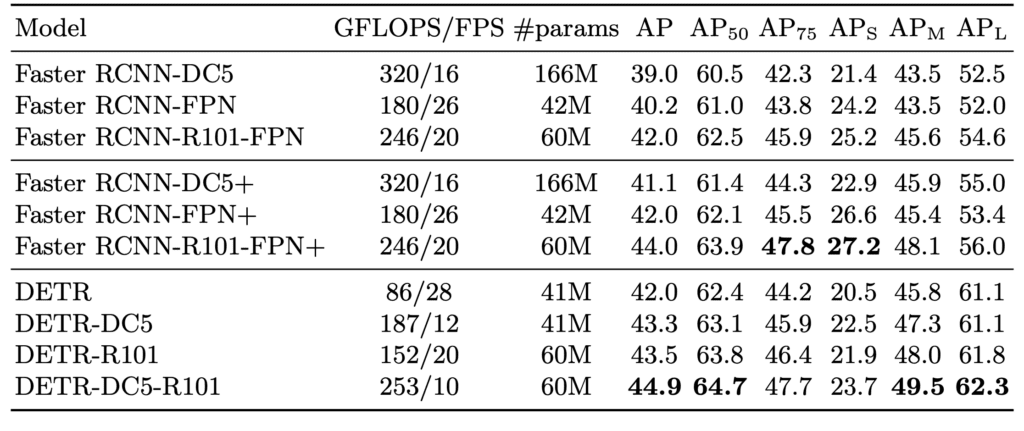
上表比较了DETR、Faster RCNN及其变体在COCO 2017数据集上的性能。R101代表使用ResNet-101作为主干。DC 5指的是扩张卷积的用法。DETR-DC 5-R101模型使用ResNet-101主干沿着扩展卷积,步长为5。
使用预训练的DETR模型进行图像推理
由于我们已经介绍了DETR的架构和理论细节,让我们开始动手并进行一些实现。我们将使用Hugging Face Transformers库来加载DETR模型对象检测。
我们将对从COCO数据集中选择的一些随机图像进行推断。演示中使用的示例图像可以使用命令下载。
!wget "https://www.dropbox.com/scl/fi/ekllt8pwum1cu41ohsddh/inference_data.zip ?rlkey=b1iih9q1mct5vcnwiyw98ouup&st=uncr8qho&dl=1" -O inference_data.zi
这将下载zip文件并将其保存为inference_data. zip。要解压缩下载的文件,请运行以下命令-
!unzip inference_data.zip
这将为我们提供5个图像,我们将使用它们来测试DETR模型。以下是5张图片-
[


让我们从transformers库导入DETR类开始-
from transformers import DetrForObjectDetection, DetrImageProcessor
我们还需要一些其他的库-
import torch
import cv2
import matplotlib.pyplot as plt
import numpy as np
from glob import glob
import os
在下一个单元格中,我们将初始化模型和图像处理器。处理器将输入图像的大小调整为(800,1333)。
model = DetrForObjectDetection.from_pretrained("facebook/detr-resnet-50")
processor = DetrImageProcessor.from_pretrained("facebook/detr-resnet-50")
为了加载和预处理图像,我们将使用以下代码块-
image = cv2.imread(image_path)
image_rgb = cv2.cvtColor(image, cv2.COLOR_BGR2RGB)
inputs = processor(images=image_rgb, return_tensors="pt")
这里,image_path是我们要运行推理的图像的路径。我们使用函数cv2.cvtColor将BGR图像转换为RGB图像,该图像是cv 2默认加载的。函数处理器用于对输入图像进行预处理。
在随后的代码中,我们将把这些输入传递给模型。torch.no_grad()确保我们不为这一步执行反向传播,因为它只是用于评估。
with torch.no_grad():
    outputs = model(**inputs)
输出包含模型的预测。对于每个预测,它给出预测的分数,连同其边界框一起沿着。边界框的格式为center_x,center_y,width,height,我们需要将其转换为标准的coco格式。为此,我们使用以下代码块-
target_sizes = torch.tensor([image_rgb.shape[:2]])  # Image size (height, width)
results = processor.post_process_object_detection(outputs, target_sizes=target_sizes)[0]
变量“results”是一个字典列表,每个字典包含模型预测的批次中图像的置信度、标签和框。
该模型将为每个图像提供n=100个预测框。默认情况下,n被设置为100,它表示预测头中存在的对象查询的数量。并非所有预测都是需要的,我们需要删除冗余的预测。
# Filter boxes based on confidence score (threshold can be adjusted)
threshold = 0.9
scores = results["scores"].numpy()
keep = scores > threshold
boxes = results["boxes"].numpy()[keep]
labels = results["labels"].numpy()[keep]
scores = scores[keep]
在上面的代码块中,我们过滤掉得分大于阈值的预测,阈值设置为0.9。行keep = scores > threshold将创建一个二进制数组,其中1表示得分大于threshold的预测,0表示其余预测。
一旦我们有了过滤后的预测,我们就可以通过在图像上绘制边界框来可视化它们。
for box, label, score in zip(boxes, labels, scores):
    xmin, ymin, xmax, ymax = box
    box_width = xmax - xmin
    box_height = ymax - ymin
    img_width, img_height = image_rgb.shape[:2]
    font_scale = calculate_label_size(box_width, box_height, img_width, img_height, max_scale=1)

    label_text = f"{model.config.id2label[label]}: {score:.2f}"
    (text_width, text_height), baseline = cv2.getTextSize(
        label_text,
        cv2.FONT_HERSHEY_SIMPLEX,
        font_scale,
        1
    )

    # Get the color for this label
    color = get_label_color(label)

    # Draw rectangle and label with the same color for the same class
    cv2.rectangle(image_rgb, (int(xmin), int(ymin)), (int(xmax), int(ymax)), color, max(2, int(font_scale * 3)))
    cv2.rectangle(image_rgb, (int(xmin), int(ymin) - text_height - baseline - 5),
                  (int(xmin) + text_width, int(ymin)), color, -1)
    cv2.putText(image_rgb, label_text, (int(xmin), int(ymin) - baseline - 2),
                cv2.FONT_HERSHEY_SIMPLEX, font_scale, (0, 0, 0), max(1, int(font_scale * 1.5)), cv2.LINE_AA)

plt.figure(figsize=(10, 10))
plt.imshow(image_rgb)
plt.axis("off")  # Hide axes
plt.show()
在上面的代码块中,我们将迭代过滤后的预测,并将其与边界框的标签一起沿着绘制在图像上。函数 get_label_color and calculate_label_size 是辅助函数,用于帮助选择边界框的颜色和标签文本的相对大小。
我们把上面所有的代码块放在一个函数中。这需要输入图像路径,并执行我们上面讨论的所有过程。
# Function to predict and plot bounding boxes
def predict_and_plot_boxes(image_path, threshold=0.9):
    # Step 1: Load and preprocess the image
    image = cv2.imread(image_path)
    image_rgb = cv2.cvtColor(image, cv2.COLOR_BGR2RGB)
    inputs = processor(images=image_rgb, return_tensors="pt")

    # Step 2: Run inference
    with torch.no_grad():
        outputs = model(**inputs)

    # Step 3: Post-process the results
    # Convert the outputs (logits) into bounding boxes and labels
    target_sizes = torch.tensor([image_rgb.shape[:2]])  # Image size (height, width)
    results = processor.post_process_object_detection(outputs, target_sizes=target_sizes)[0]

    # Filter boxes based on confidence score (threshold can be adjusted)
    scores = results["scores"].numpy()
    keep = scores > threshold

    boxes = results["boxes"].numpy()[keep]
    labels = results["labels"].numpy()[keep]
    scores = scores[keep]

    for box, label, score in zip(boxes, labels, scores):
        xmin, ymin, xmax, ymax = box
        box_width = xmax - xmin
        box_height = ymax - ymin
        img_width, img_height = image_rgb.shape[:2]
        font_scale = calculate_label_size(box_width, box_height, img_width, img_height, max_scale=1)

        label_text = f"{model.config.id2label[label]}: {score:.2f}"
        (text_width, text_height), baseline = cv2.getTextSize(
            label_text,
            cv2.FONT_HERSHEY_SIMPLEX,
            font_scale,
            1
        )

        # Get the color for this label
        color = get_label_color(label)

        # Draw rectangle and label with the same color for the same class
        cv2.rectangle(image_rgb, (int(xmin), int(ymin)), (int(xmax), int(ymax)), color, max(2, int(font_scale * 3)))
        cv2.rectangle(image_rgb, (int(xmin), int(ymin) - text_height - baseline - 5),
                      (int(xmin) + text_width, int(ymin)), color, -1)
        cv2.putText(image_rgb, label_text, (int(xmin), int(ymin) - baseline - 2),
                    cv2.FONT_HERSHEY_SIMPLEX, font_scale, (0, 0, 0), max(1, int(font_scale * 1.5)), cv2.LINE_AA)

    # Step 5: Plot the image with bounding boxes
    plt.figure(figsize=(10, 10))
    plt.imshow(image_rgb)
    plt.axis("off")  # Hide axes
    plt.show()
上述函数可以被称为predict_and_plot_boxes('image.jpeg')。
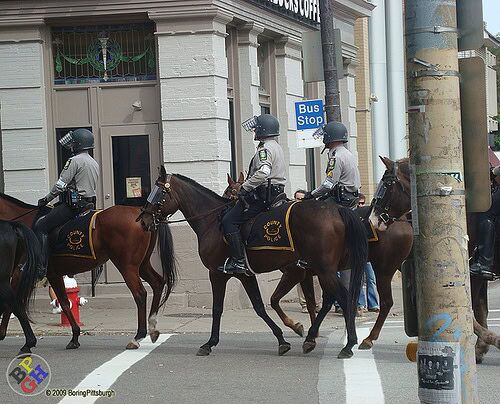
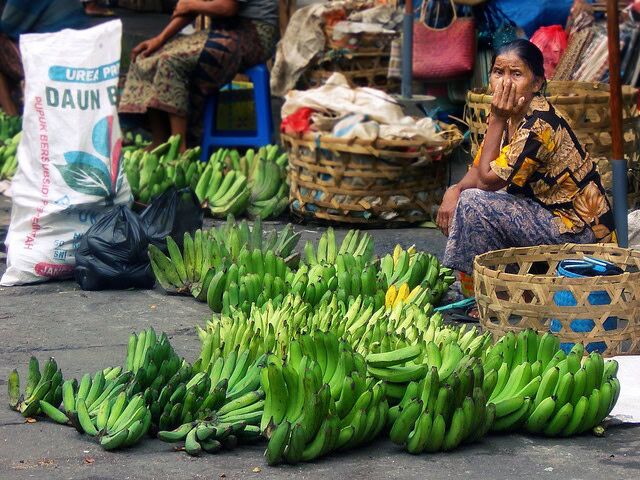
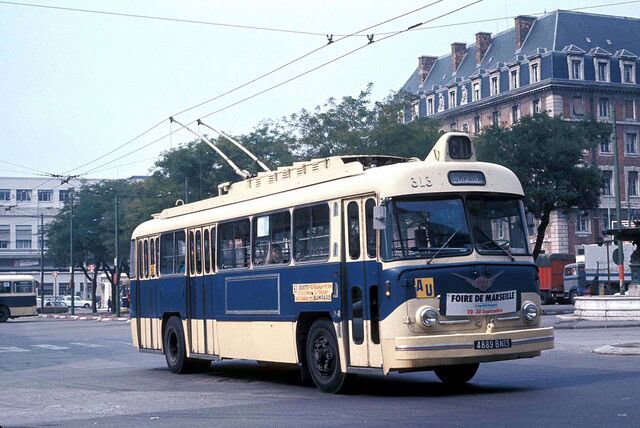
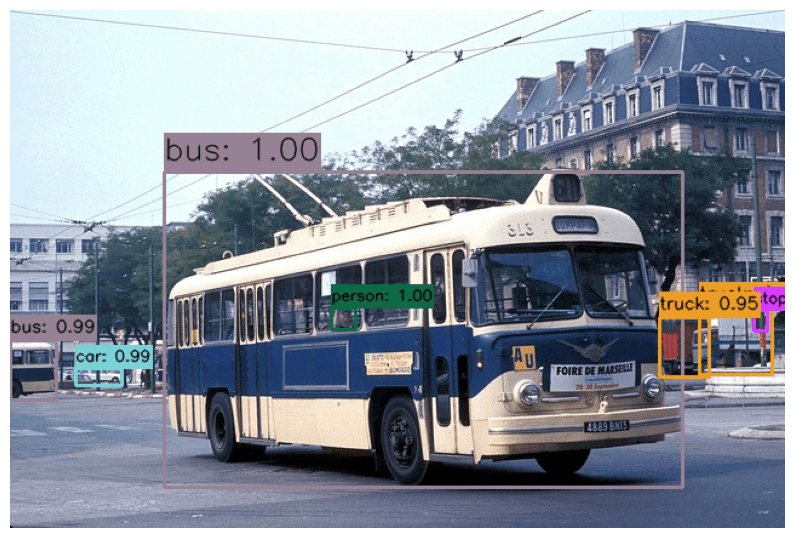
我们在一些图像上测试了DETR模型,这是我们得到的结果-
[


推理结果分析
虽然我们在前4张图像中得到了几乎完美的结果,但我们可以看到,在最后一张图像中,一些香蕉没有被检测到。这可以通过降低置信度阈值的值来改善。下图显示了同一图像的输出,但使用了较低的阈值0.85。
predict_and_plot_boxes('/inference_data/images/000000052123.jpg', threshold=0.85)

视频推理
我们修改了上面的代码来处理视频。这是一个功能,需要输入一个视频,并预测的对象,并保存在给定的目录视频-
def process_video(video_path, output_path):
    """
    Process a video file using GPU acceleration (if available) for object detection.
    """
    device = torch.device("cuda" if torch.cuda.is_available() else "cpu")
    print(f"Using device: {device}")
    model.to(device)
    cap = cv2.VideoCapture(video_path)
    if not cap.isOpened():
        raise ValueError("Error opening video file")
    frame_width = int(cap.get(cv2.CAP_PROP_FRAME_WIDTH))
    frame_height = int(cap.get(cv2.CAP_PROP_FRAME_HEIGHT))
    fps = int(cap.get(cv2.CAP_PROP_FPS))
    total_frames = int(cap.get(cv2.CAP_PROP_FRAME_COUNT))
    fourcc = cv2.VideoWriter_fourcc(*'mp4v')
    out = cv2.VideoWriter(output_path, fourcc, fps, (frame_width, frame_height))
    pbar = tqdm(total=total_frames, desc="Processing frames",
                unit="frames", dynamic_ncols=True)
    frame_count = 0 # To count total frames.
    total_fps = 0 # To get the final frames per second.
    try:
        while cap.isOpened():
            ret, frame = cap.read()
            if not ret:
                break
            # Start timing for this frame
            start_time = time.time()
            frame_rgb = cv2.cvtColor(frame, cv2.COLOR_BGR2RGB)
            inputs = processor(images=frame_rgb, return_tensors="pt")
            inputs = {k: v.to(device) for k, v in inputs.items()}
            with torch.no_grad():
                outputs = model(**inputs)
            target_sizes = torch.tensor([frame_rgb.shape[:2]]).to(device)
            results = processor.post_process_object_detection(outputs, target_sizes=target_sizes)[0]
            scores = results["scores"].cpu().numpy()
            threshold = 0.9
            keep = scores > threshold
            boxes = results["boxes"].cpu().numpy()[keep]
            labels = results["labels"].cpu().numpy()[keep]
            scores = scores[keep]
            # Draw bounding boxes
            for box, label, score in zip(boxes, labels, scores):
                xmin, ymin, xmax, ymax = box
                box_width = xmax - xmin
                box_height = ymax - ymin
                font_scale = calculate_label_size(box_width, box_height, frame_width, frame_height)
                label_text = f"{model.config.id2label[label]}: {score:.2f}"
                (text_width, text_height), baseline = cv2.getTextSize(
                    label_text,
                    cv2.FONT_HERSHEY_SIMPLEX,
                    font_scale,
                    1
                )
                cv2.rectangle(frame,
                            (int(xmin), int(ymin)),
                            (int(xmax), int(ymax)),
                            (0, 255, 0),
                            max(1, int(font_scale * 2)))
                cv2.rectangle(frame,
                            (int(xmin), int(ymin) - text_height - baseline - 5),
                            (int(xmin) + text_width, int(ymin)),
                            (0, 255, 0),
                            -1)
                cv2.putText(frame,
                           label_text,
                           (int(xmin), int(ymin) - baseline - 2),
                           cv2.FONT_HERSHEY_SIMPLEX,
                           font_scale,
                           (0, 0, 0),
                           max(1, int(font_scale * 1.5)),
                           cv2.LINE_AA)
            end_time = time.time()
            # Get the current fps.
            fps = 1 / (end_time - start_time)
            # Add `fps` to `total_fps`.
            total_fps += fps
            # Increment frame count.
            frame_count += 1
            # Add FPS counter to frame
            add_fps_counter(frame, fps, frame_width)
            out.write(frame)
            pbar.update(1)
            if pbar.n % 100 == 0:
                torch.cuda.empty_cache()
                gc.collect()
    except Exception as e:
        print(f"An error occurred: {e}")
        raise
    finally:
        pbar.close()
        cap.release()
        out.release()
        cv2.destroyAllWindows()
        torch.cuda.empty_cache()
        gc.collect()
        model.to('cpu')
    print("nVideo processing completed!")
我们将在下载的数据集中的视频上调用此函数。推理结果如下:
推理1

推理2

推理3

结论
在本文中,我们介绍了DETR的架构,并介绍了DETR与基于CNN的计算机视觉模型的不同之处。我们还对图像和视频进行了推断,并查看了模型给出的结果。

好了,这篇文章就介绍到这里,喜欢的小伙伴感谢给点个赞和关注,更多精彩内容持续更新~~
关于本篇文章大家有任何建议或意见,欢迎在评论区留言交流!


 2839
2839

 被折叠的 条评论
为什么被折叠?
被折叠的 条评论
为什么被折叠?
 到【灌水乐园】发言


