


0 介绍
-
在图像分割中,常常有过分割与欠分割问题,为了显示它们,可以在预测的基础上,使用不同的颜色标记
-
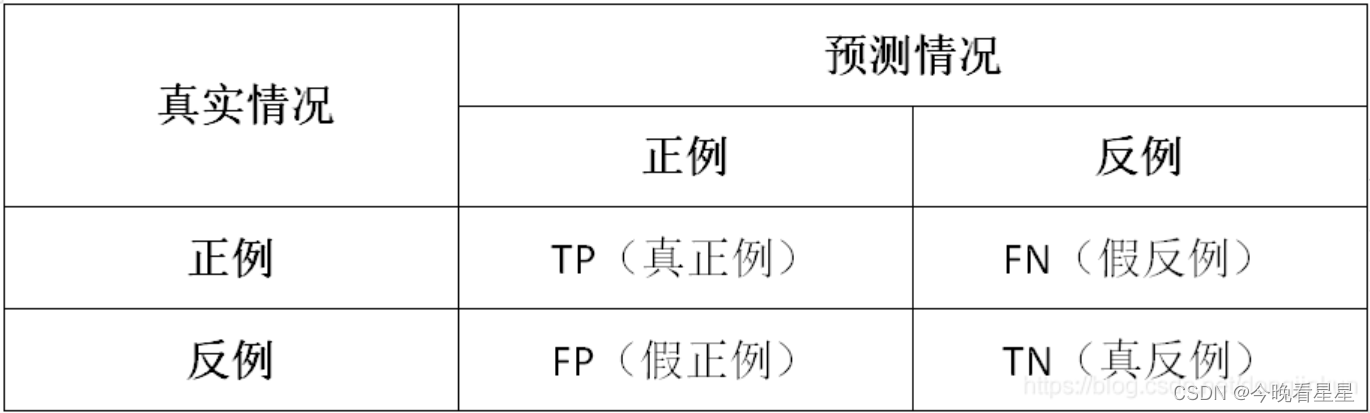
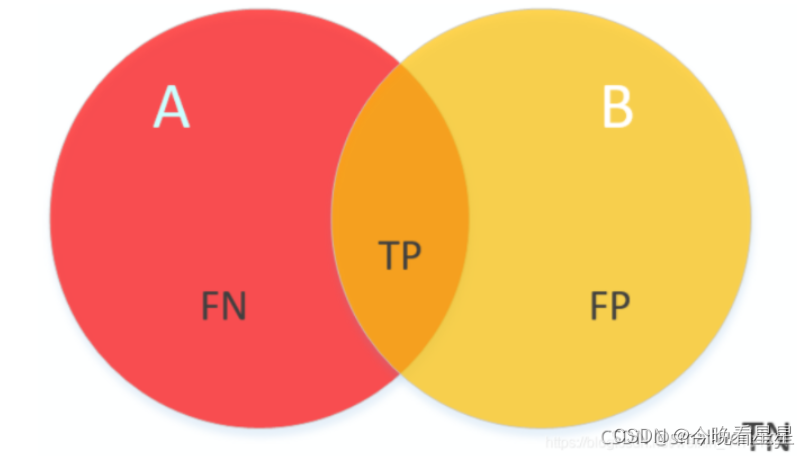
过分割:在混淆矩阵中即假正类(False positive, FP),模型将不属于该类的像素预测成了该类,即预测错误。设预测的图像为prd_img, GT为mask_image, 在二分类中,FP的计算方式为 fp = (1 - mask_iamge) × prd_image
-
欠分割:在混淆矩阵中即假负类(False negative, FN), 模型将属于某个类的像素预测为了别的类,即没预测出来。接上面的假设,二分类中FN的计算方式为: fn = (1 - prd_image) × mask_image
-
预测正确: 在混淆矩阵中为真正类(True positive, TP), 模型对于某个类的像素预测正确。接上面的假设,二分类中,TP的计算为 tp = prd_image × mask_image
1.1 背景
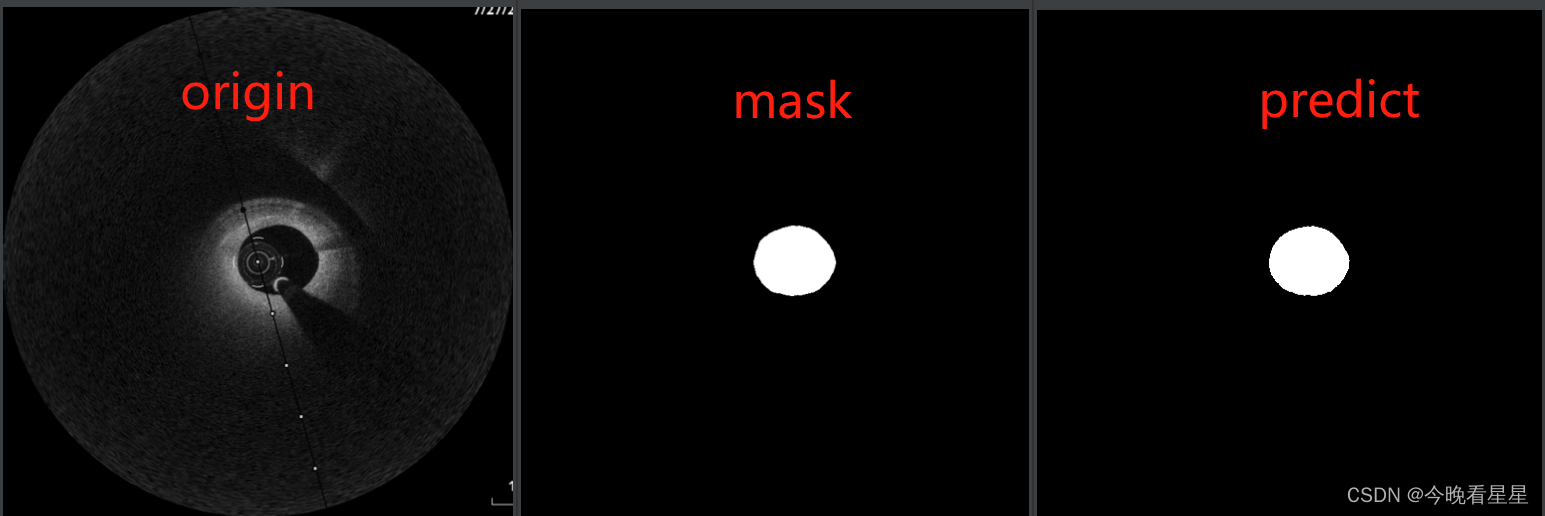
要处理的图片:
-
本次使用的图像为灰度图像,颜色的深度为8bit,为了显示不同的颜色,需要将其扩充为24bit图像
-
对于不同的颜色,表示的为TP, FP, FN。将其表示为彩色,同样需要进行颜色深度上的扩充
本次使用的颜色扩充方式为:
- 先初始化一个和图像长款一致的全零数组
- 对于不同的维度,进行数组上的赋值
在pytorch中,数组为tensor
代码:
def image_gray2RGB(image):
    image_RGB = torch.zeros(size=(image.shape[0] + 2, image.shape[1], image.shape[2]))
    # 维度上复制三次
    image_RGB[0, :, :] = image
    image_RGB[1, :, :] = image
    image_RGB[2, :, :] = image
    return image_RGB
    pass
1.2 流程
- 获取tp, fp, fn: 先在tensor数据下,计算tp, fp, fn
- 获取除了tp, fp, fn之外的背景: 计算完tp, fp, fn后,由于tp, fp, fn 相互没有相交,将tp, fp, fn相加得到一块区域,除去此区域外的区域即为背景
- 将图片转化为RGB格式:为了显示不同颜色的区域,需要将GRAY格式的图片转化为RGB,需要转化的有tp, fp, fn与背景
- 根据获取的tp, fp, fn和背景,最终相加(此时是RGB格式)得到最终的图片
2 获取TP,FP,FN
前提:
- 操作的对象都为tensor数组
- 去掉了批次,格式为 [C, H , W], 因此在使用的时候,可以遍历批次 [N, C, H, W]
- TP计算
def get_tp(mask, prd):
    # 都是基于tensor计算
    # tp 取共同的像素,矩阵相乘
    tp = mask * prd
    return tp
- 获取FP
def get_fp(mask, prd):
    # fp prd中去除mask的部分
    fp = prd * (1 - mask)
    return fp
- 获取FN
def get_fn(mask, prd):
    # FN 取mask去掉prd的部分
    fn = mask * (1 - prd)
    return fn
3 获取背景
- 除去tp, fp, fn外的区域为背景
def get_background(image, tp, fp, fn):
    tp_fp_fn = tp + fp + fn
    background = image * (1 - tp_fp_fn)
    return background
    pass
4. GRAY图片转化为RGB
- 使用全零tensor生成图片的内存
- 根据不同通道的数值进行赋值,达到获取不同颜色的结果
def image_gray2RGB(image):
    image_RGB = torch.zeros(size=(image.shape[0] + 2, image.shape[1], image.shape[2]))
    # 维度上复制三次
    image_RGB[0, :, :] = image
    image_RGB[1, :, :] = image
    image_RGB[2, :, :] = image
    return image_RGB
    pass


def image_gray2RGBRed(image):
    image_RGB_RED = torch.zeros(size=(image.shape[0] + 2, image.shape[1], image.shape[2]))
    # 维度上复制三次
    image_RGB_RED[0, :, :] = image
    return image_RGB_RED
    pass


def image_gray2RGBGreen(image):
    image_RGB_GREEN = torch.zeros(size=(image.shape[0] + 2, image.shape[1], image.shape[2]))
    # 维度上复制三次
    image_RGB_GREEN[1, :, :] = image
    return image_RGB_GREEN
    pass


def image_gray2RGBlue(image):
    image_RGB_BLUE = torch.zeros(size=(image.shape[0] + 2, image.shape[1], image.shape[2]))
    # 维度上复制三次
    image_RGB_BLUE[2, :, :] = image
    return image_RGB_BLUE


def image_gray2RGBYellow(image):
    image_RGB_BLUE = torch.zeros(size=(image.shape[0] + 2, image.shape[1], image.shape[2]))
    # 维度上复制三次
    image_RGB_BLUE[0, :, :] = image
    image_RGB_BLUE[1, :, :] = image
    return image_RGB_BLUE

    pass
5 图片融合 保持图片 算法流程
- 使用加法进行融合
def converge_image(image_RGB, tp_RGB, fp_RGB, fn_RGB):
    image = image_RGB + tp_RGB + fp_RGB + fn_RGB
    return image
    pass
- 图片保存
- tensor中图片的格式为 [C, H, W]
- 本文使用
PIL.Image操作图片,其操作图片格式为 [H, W, C], 因此需要对图片进行变换,核心代码为image_array = tensor.permute(1, 2, 0)
def save_image(image, dst):
    # image的格式为[H,W,C]
    image = torch.clamp(image * 255, 0, 255).permute(1, 2, 0).byte().cpu().numpy()
    image = Image.fromarray(image)  # PIL.Image接受[H,W,C]这样格式图
    image.save(dst)
- 基本流程:
- 获取图片并转化为tensor
def get_tensor_image(image_path):
    # 转换格式
    transform2tensor = torchvision.transforms.ToTensor()
    image = Image.open(image_path)
    image = image.convert("L")
    image_tensor = transform2tensor(image)
    return image_tensor
- 操作
def test1():
    origin_image_path = r'resourse/test1/patient1_IMG001_frame026_resize_512.png'
    mask_image_path = r'resourse/test1/patient1_IMG001_frame026_mask_resize_512.png'
    prd_image_path = r'resourse/test1/patient1_IMG001_frame026_prd.png'
    save_dst_path = r'./result/test1/test_image_tp_fp_fn.png'

    origin_image = get_tensor_image(image_path=origin_image_path)
    mask_image = get_tensor_image(image_path=mask_image_path)
    prd_image = get_tensor_image(image_path=prd_image_path)

    # 取TP, FP, FN
    tp = get_tp(mask=mask_image, prd=prd_image)
    fn = get_fn(mask=mask_image, prd=prd_image)
    fp = get_fp(mask=mask_image, prd=prd_image)

    # 获取背景
    background_image = get_background(image=origin_image, tp=tp, fp=fp, fn=fn)

    # 转化为RGB,并取一定的颜色
    background_image_RGB = image_gray2RGB(background_image)
    tp_image_GREEN = image_gray2RGBGreen(tp)
    fp_image_RED = image_gray2RGBRed(fp)
    fn_image_Yellow = image_gray2RGBYellow(fn)

    # 图片融合
    image = converge_image(image_RGB=background_image_RGB, tp_RGB=tp_image_GREEN
                           , fp_RGB=fp_image_RED, fn_RGB=fn_image_Yellow)

    # 保存结果
    save_image(image=image, dst=save_dst_path)
    pass
6 结果
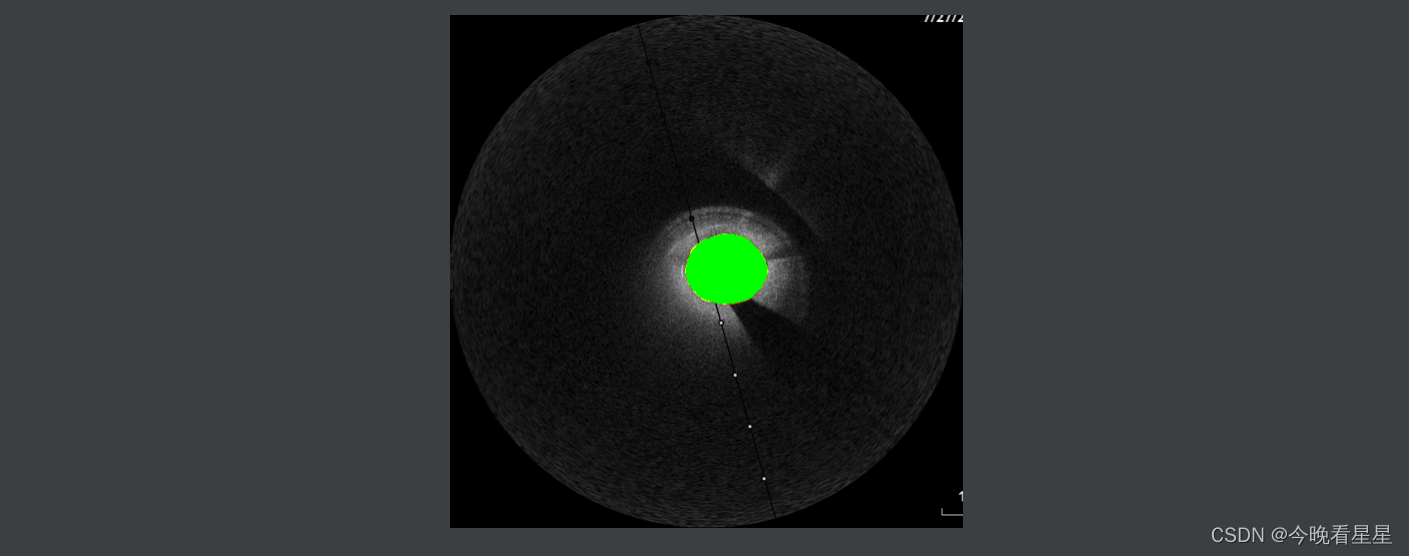
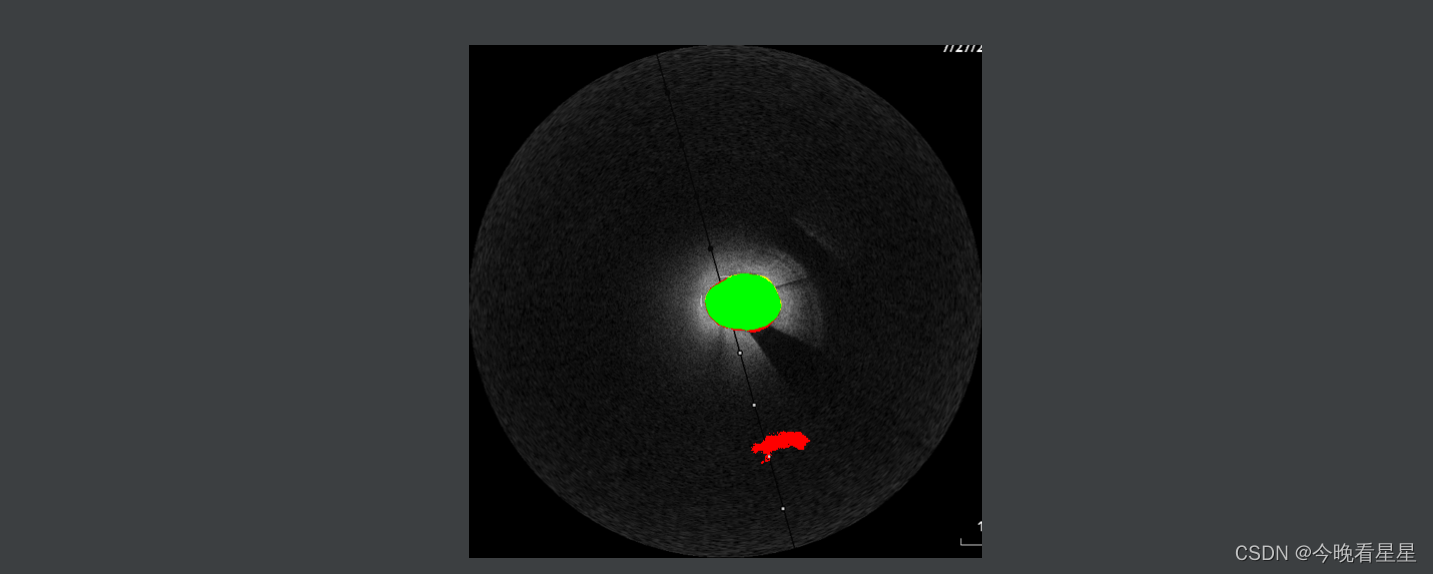
- 本文使用绿色为TP, 红色为FP, 黄色为FP
背景中展示图片的结果
- Test2
- image - mask - prd
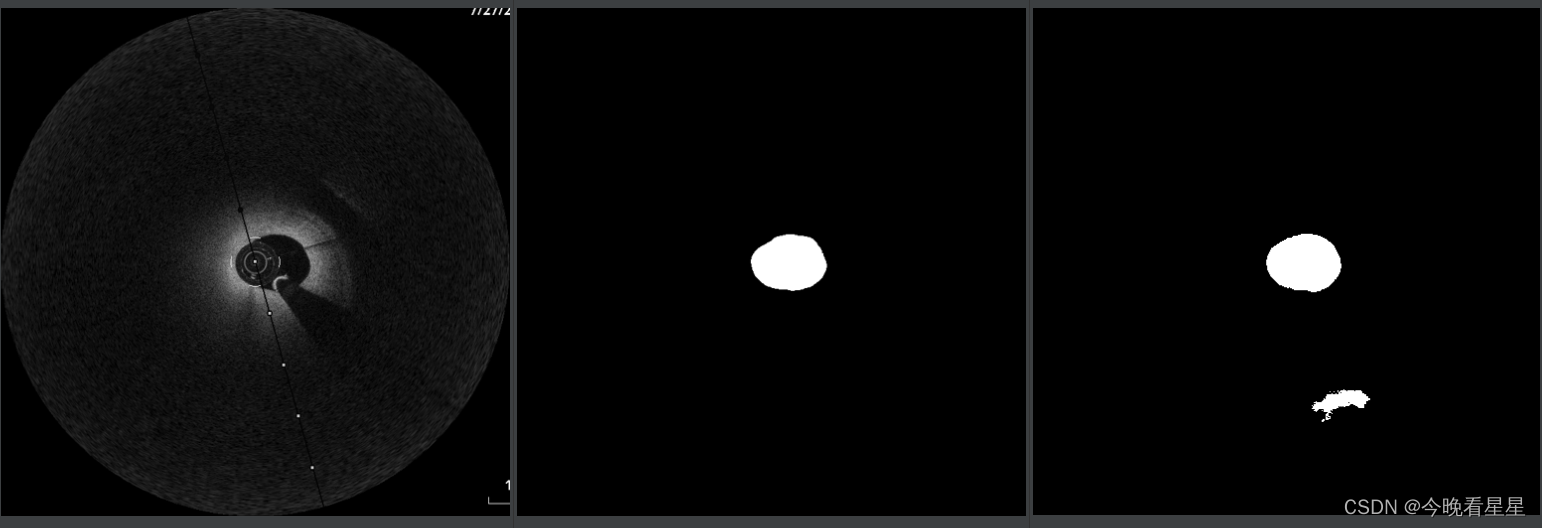
- result
- Test3
- image - mask - prd
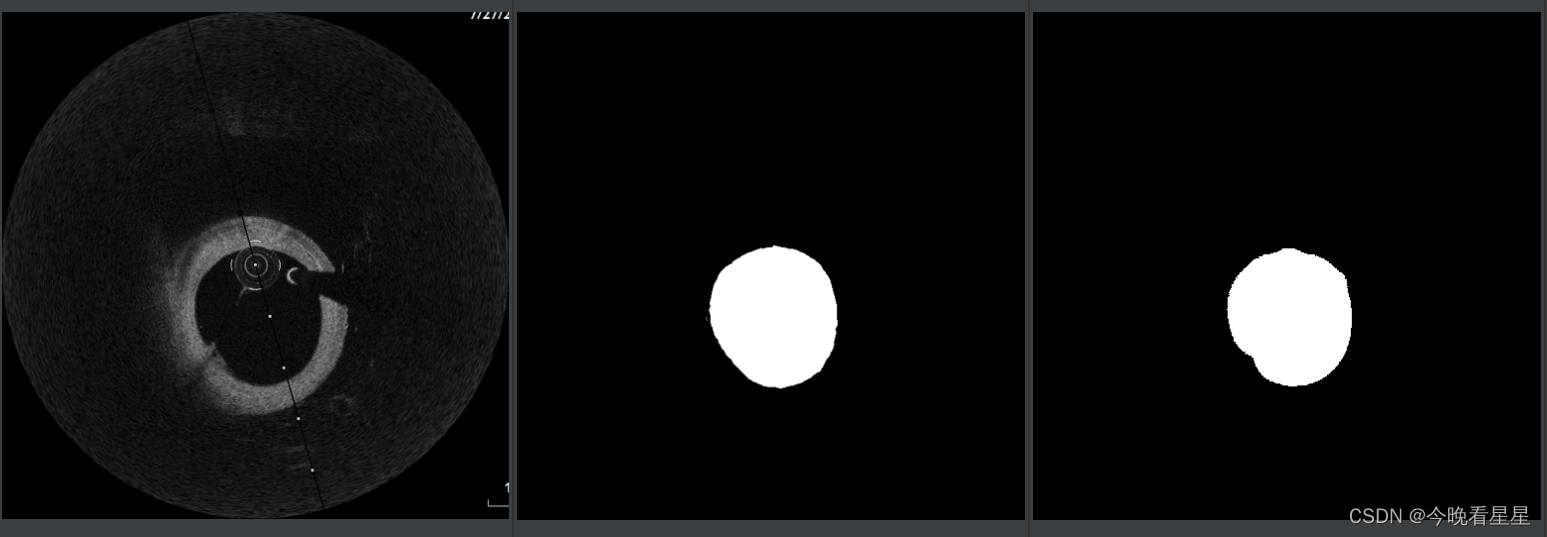
-result

参考文章
- TP、TN、FP、FN超级详细解析https://blog.csdn.net/dongjinkun/article/details/109899733
- 语义分割指标—MIoU详细介绍(原理及代码)https://blog.csdn.net/smallworldxyl/article/details/121401875


 219
219


 被折叠的 条评论
为什么被折叠?
被折叠的 条评论
为什么被折叠?
 到【灌水乐园】发言


