


4.ROS2话题通信
话题是ROS2中常用的通信方式之一,话题通信采取的是订阅发布模型,一个节点的数据会发布到某个话题之上,然后另一个节点可以订阅这个话题,这个节点就可以通过这个话题来拿到发布节点发布的数据了。
4.1订阅发布模型
订阅发布模型可以是:
- 一对一的
- 一对多的
- 多对一的
- 多对多的
- 节点可以订阅本身发布的话题内容
4.2ROS2话题工具
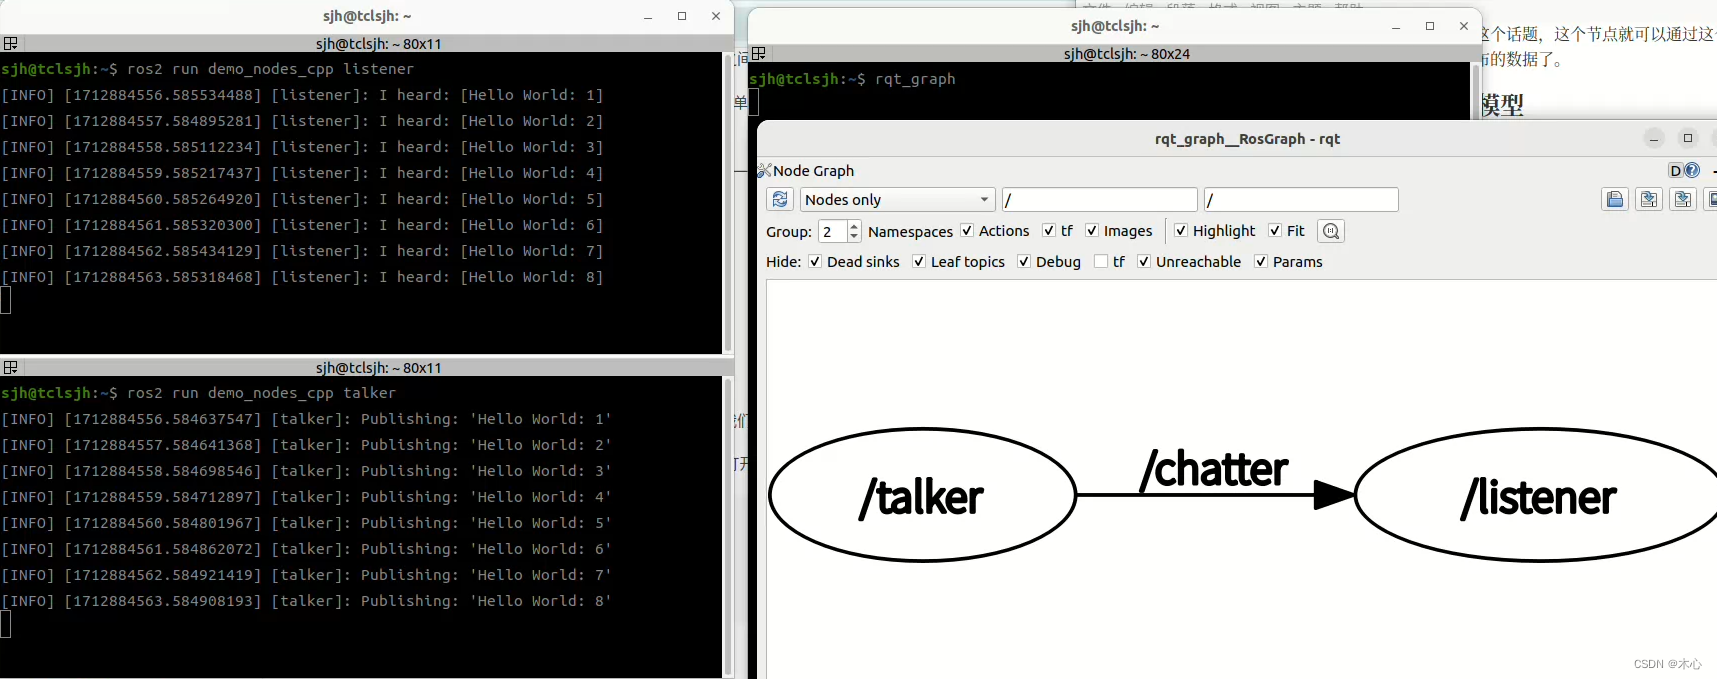
运行ROS2自带的demo我们可以简单地使用rqt_graph来查看topic的传递路径
ros2 run demo_nodes_cpp listener
ros2 run demo_nodes_cpp talker
rqt_graph
就可以看到下面的结果
除了rqt_graph之外,ROS2还有一些CLI(Command Line Interface)命令行工具可以使用:
ros2 topic -h
可以查看所有有关topic的CLI的使用方法,这里不再赘述。
4.3rclcpp实现话题
4.3.1编写发布者
(1)创建新的节点
首先,创建一个新的工作空间colcon_test03_ws和新的功能包example_topic_rclcpp(这里旨在回顾工作空间和功能包的创建方法,你也可以在现有的功能包中直接创建脚本文件),然后新建脚本文件topic_publisher_01.cpp
mkdir -p ./colcon_test03_ws/src
cd ./colcon_test03_ws/src
ros2 pkg create example_topic_rclcpp --build-type ament_cmake --license Apache-2.0 --dependencies rclcpp
touch ./example_topic_rclcpp/src/topic_publisher_01.cpp
使用tree命令来查看目录结构(如果没有该命令则需提前安装sudo apt install tree),如下:
.
└── example_topic_rclcpp
    ├── CMakeLists.txt
    ├── include
    │   └── example_topic_rclcpp
    ├── LICENSE
    ├── package.xml
    └── src
        └── topic_publisher_01.cpp

4 directories, 4 files
现在我们需要在这个脚本文件中写入内容了,推荐使用vscode作为编辑器。我们使用面向对象的方式来编写一个最简单的节点,
#include "rclcpp/rclcpp.hpp"
#include <string>

class TopicPublisher01: public rclcpp::Node{
public:
    // 构造函数
    TopicPublisher01(std::string name) : Node(name){
        RCLCPP_INFO(this->get_logger(), "%s node has been launched", name.c_str());
    }
private:

};

int main(int argc, char **argv){
    rclcpp::init(argc, argv);
    auto node = std::make_shared<TopicPublisher01>("topic_publisher_01");
    rclcpp::spin(node);
    rclcpp::shutdown();
    return 0;
}
然后修改CMakeListst.txt,添加依赖
add_executable(topic_publisher_01 src/topic_publisher_01.cpp)
ament_target_dependencies(topic_publisher_01 rclcpp)
install(TARGETS
  topic_publisher_01
  DESTINATION lib/${PROJECT_NAME}
)
(2)导入消息接口
消息接口是ROS2通信时必须的一部分,通过消息接口ROS2才能够完成消息的序列化和反序列化。ROS2为我们定义好了常用的消息接口,并生成了C++和Python的依赖文件,我们可以直接在程序中进行导入。
ament_cmake类型功能包导入消息接口分为三部分:
- 在
CMakeLists.txt中导入,具体是先find_packages再ament_target_dependencies - 在
packages.xml中导入,具体是添加depend标签并将消息接口写入 - 在代码中导入,C++中是
#inlcude "消息功能包/xxx/xxx.hpp"
这三步修改的文件内容如下:
CMakeLists.txt
find_package(ament_cmake REQUIRED)
find_package(rclcpp REQUIRED)
find_package(std_msgs REQUIRED)

add_executable(topic_publisher_01 src/topic_publisher_01.cpp)
ament_target_dependencies(topic_publisher_01 rclcpp std_msgs)
install(TARGETS
  topic_publisher_01
  DESTINATION lib/${PROJECT_NAME}
)
packages.xml
<buildtool_depend>ament_cmake</buildtool_depend>

<depend>rclcpp</depend>
<depend>std_msgs</depend>

<test_depend>ament_lint_auto</test_depend>
<test_depend>ament_lint_common</test_depend>
如果不想手动在CMakeLists.txt和packages.xml中添加包的依赖,我们可以在创建功能包的时候就添加上--dependencies std_msgs的依赖,这样就会为我们自动添加了。如下:
ros2 pkg create example_topic_rclcpp01 --build-type ament_cmake --license Apache-2.0 --dependencies rclcpp std_msgs
代码文件topic_publisher_01.cpp,包含消息头文件
#include "rclcpp/rclcpp.hpp"
#include "std_msgs/msg/string.hpp"

class TopicPublisher01 : public rclcpp::Node
(3)创建发布者Publisher
相关API文档可以参考:https://docs.ros2.org/latest/api/rclcpp/
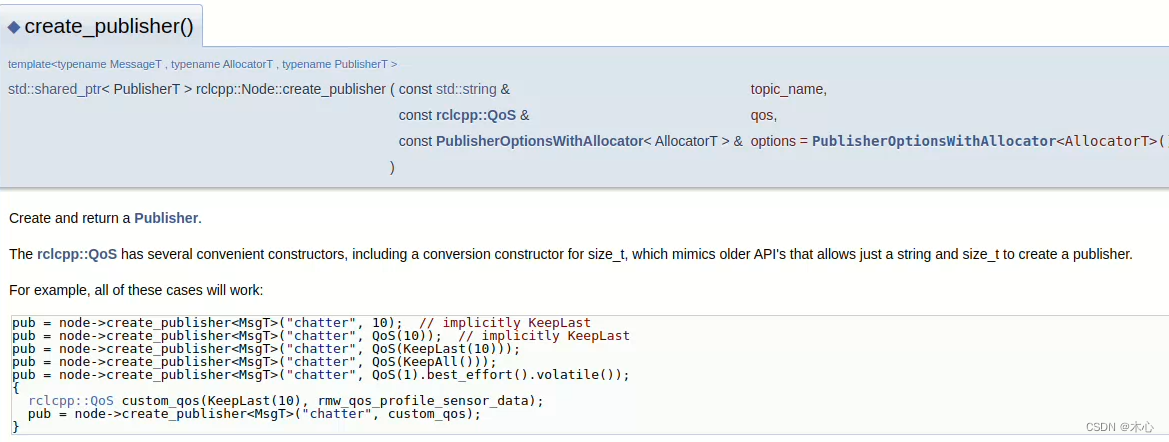
我们需要指定的参数有:
- 话题名称(
topic_name),我们设置为control_command即可 Qos,Qos指定一个数字,这个数字对应的是KeepLast消息队列的长度。- 还需要指定函数原型
template中MessageT的消息类型(即示例中的MsgT),我们直接设置成std_msgs::msg::String即可。
编写如下的发布者代码
#include "rclcpp/rclcpp.hpp"
#include "std_msgs/msg/string.hpp"

class TopicPublisher01: public rclcpp::Node{
public:
    // 构造函数
    TopicPublisher01(std::string name) : Node(name){
        RCLCPP_INFO(this->get_logger(), "%s node has been launched", name.c_str());
        // 创建发布者
        command_publisher_ = this->create_publisher<std_msgs::msg::String>('control_command', 10);
    }
private:
    // 声明话题发布者,在类的私有成员中再次声明发布者对象是为了在整个类中都能够访问和使用该对象。
    rclcpp::Publisher<std_msgs::msg::String>::SharedPtr command_publisher_;
};

int main(int argc, char **argv){
    rclcpp::init(argc, argv);
    auto node = std::make_shared<TopicPublisher01>("topic_publisher_01");
    rclcpp::spin(node);
    rclcpp::shutdown();
    return 0;
}
(4)创建定时器Timer
相关API文档可以参考:https://docs.ros2.org/latest/api/rclcpp/
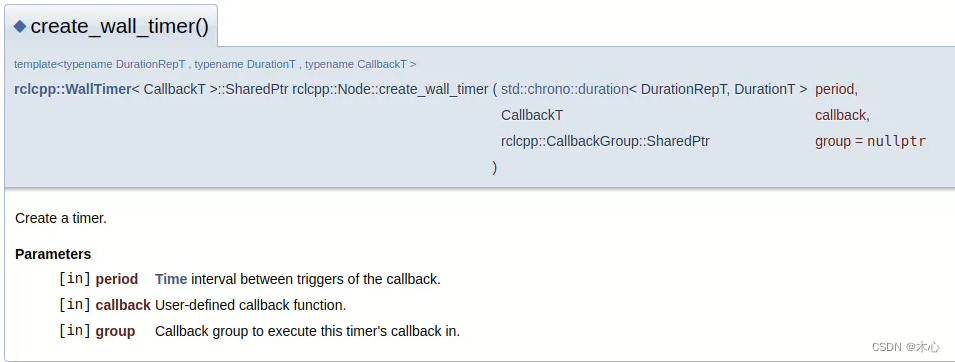
- period,回调函数调用的周期
- callback,回调函数
- group,调用回调函数所在的回调组,默认为
nullptr
编写如下的Timer代码
#include "rclcpp/rclcpp.hpp"
#include "std_msgs/msg/string.hpp"

class TopicPublisher01: public rclcpp::Node{
public:
    // 构造函数
    TopicPublisher01(std::string name) : Node(name){
        RCLCPP_INFO(this->get_logger(), "%s node has been launched", name.c_str());
        // 创建发布者
        command_publisher_ = this->create_publisher<std_msgs::msg::String>('control_command', 10);
        // 创建定时器,500ms周期
        timer_ = this->create_wall_timer(std::chrono::milliseconds(500), std::bind(&TopicPublisher01::timer_callback, this));
    }
private:
    // 声明话题发布者,在类的私有成员中再次声明发布者对象是为了在整个类中都能够访问和使用该对象。
    rclcpp::Publisher<std_msgs::msg::String>::SharedPtr command_publisher_;
    // 声明定时器
    rclcpp::TimerBase::SharedPtr timer_;

    void timer_callback(){
        // 创建消息
        std_msgs::msg::String message;
        message.data = "forward";
        // 打印日志
        RCLCPP_INFO(this->get_logger(), "Publishing: '%s'", message.data.c_str());
        // 发布消息
        this->command_publisher_->publish(message);
    }
};

int main(int argc, char **argv){
    rclcpp::init(argc, argv);
    auto node = std::make_shared<TopicPublisher01>("topic_publisher_01");
    rclcpp::spin(node);
    rclcpp::shutdown();
    return 0;
}
测试一下是否正确
colcon build --packages-select example_topic_rclcpp
source ./intsall/setup.bash
ros2 run example_topic_rclcpp topic_publisher_01
使用CLI查看消息内容
ros2 topic list
ros2 topic echo /control_command
4.4编写订阅者
(1)创建订阅节点
cd ./colcon_test03_ws/src
touch ./example_topic_rclcpp/src/topic_subscriber_01.cpp
编写以下内容:
#include "rclcpp/rclcpp.hpp"

class TopicSubscriber01: public rclcpp::Node{
public:
    TopicSubscriber01(std::string name): Node(name){
        RCLCPP_INFO(this->get_logger(), "%s has been launched", name.c_str());
    }

private:
};

int main(int argc, char **argv){
    rclcpp::init(argc, argv);
    auto node = std::make_shared<TopicSubscriber01>("topic_subscriber_01");
    rclcpp::spin(node);
    rclcpp::shutdown();
    return 0;
}
修改CMakeLists.txt文件
add_executable(topic_subscriber_01 src/topic_subscriber_01.cpp)
ament_target_dependencies(topic_subscriber_01 rclcpp std_msgs)

install(TARGETS
  topic_publisher_01
  topic_subscriber_01
  DESTINATION lib/${PROJECT_NAME}
)
然后可以测试运行一下
colcon build --packages-select example_topic_rclcpp
source install/setup.bash
ros2 run example_topic_rclcpp topic_subscriber_01
(2)创建订阅者Subscriber
相关API文档可以参考:https://docs.ros2.org/latest/api/rclcpp/
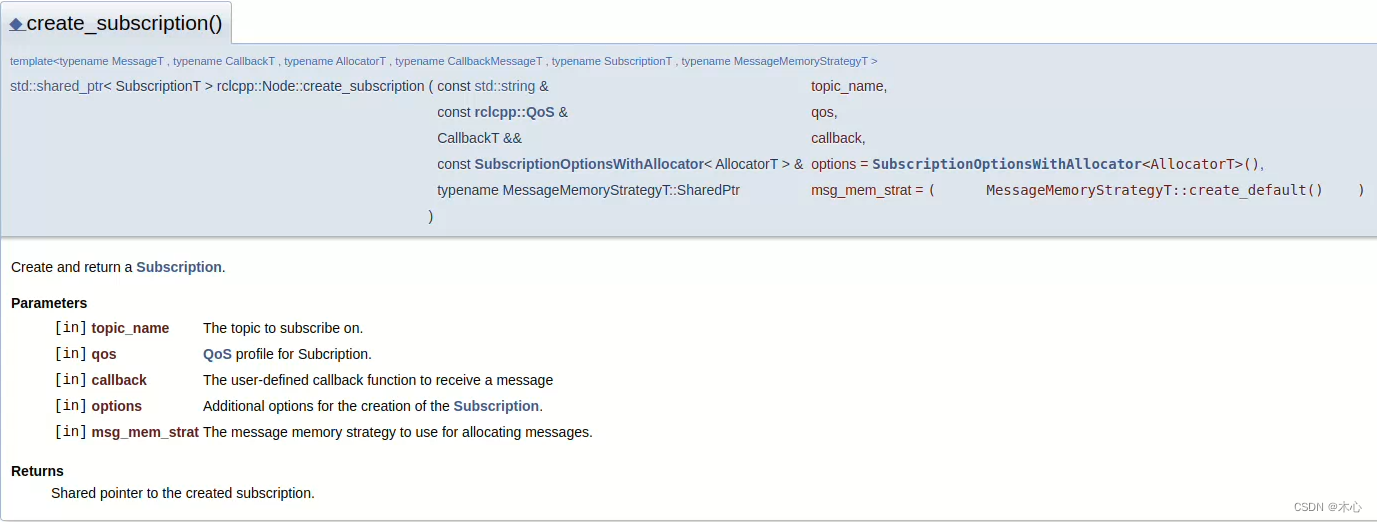
我们只关心前面三个参数,后面两个参数可以选择默认的参数
topic_name,指定订阅的话题名称qos,指定消息队列长度callback,指定订阅后消息处理的回调函数
编写以下代码:
#include "rclcpp/rclcpp.hpp"
#include "std_msgs/msg/string.hpp"

class TopicSubscriber01: public rclcpp::Node{
public:
    TopicSubscriber01(std::string name): Node(name){
        RCLCPP_INFO(this->get_logger(), "%s has been launched", name.c_str());
        // 创建一个订阅者
        command_subscriber_ = this->create_subscription<std_msgs::msg::String>("control_command", 10, std::bind(&TopicSubscriber01::command_callback, this, std::placeholders::_1));
    }

private:
    // 声明一个订阅者
    rclcpp::Subscription<std_msgs::msg::String>::SharedPtr command_subscriber_;
    // 消息处理的回调函数
    void command_callback(const std_msgs::msg::String::SharedPtr msg){
        double speed = 0.0f;
        if (msg->data == "forward"){
            speed = 0.2f;
        }
        RCLCPP_INFO(this->get_logger(), "Receive instruction [%s], send speed [%f]", msg->data.c_str(), speed);
    }

};

int main(int argc, char **argv){
    rclcpp::init(argc, argv);
    auto node = std::make_shared<TopicSubscriber01>("topic_subscriber_01");
    rclcpp::spin(node);
    rclcpp::shutdown();
    return 0;
}
构建然后运行
colcon build --packages-select example_topic_rclcpp
source install/setup.bash
ros2 run example_topic_rclcpp topic_publisher_01
ros2 run example_topic_rclcpp topic_subscriber_01
运行后的输出效果类似如下:
[INFO] [1712900021.099703358] [topic_publisher_01]: Publishing: 'forward'
[INFO] [1712900021.599713885] [topic_publisher_01]: Publishing: 'forward'
[INFO] [1712900022.099719858] [topic_publisher_01]: Publishing: 'forward'
[INFO] [1712900022.599664745] [topic_publisher_01]: Publishing: 'forward'


[INFO] [1712900027.600149013] [topic_subscriber_01]: Receive instruction [forward], send speed [0.200000]
[INFO] [1712900028.100186298] [topic_subscriber_01]: Receive instruction [forward], send speed [0.200000]
[INFO] [1712900028.600202891] [topic_subscriber_01]: Receive instruction [forward], send speed [0.200000]


 1487
1487


 被折叠的 条评论
为什么被折叠?
被折叠的 条评论
为什么被折叠?
 到【灌水乐园】发言


