


文章目录
提示:以下是本篇文章正文内容,下面案例可供参考
一、robot_localization
1.介绍
Robot_localization是一个基于卡尔曼滤波 ROS的包,可以对里程计 imu gps多种传感器进行数据融合,进而完成机器人的定位的算法。对于不懂卡尔曼滤波的小伙伴,通过修改配置文件就能顺利的使用大佬们造好的轮子,极大的降低了使用多传感器定位的难度。
2.使用环境
ubuntu 18.04 ros2 eloquent
3.安装教程
ros2的eloquent不能直接使用install安装robot_localization,需要去github进行clone,在终端中输入以下命令
git clone https://github.com/cra-ros-pkg/robot_localization/tree/eloquent-devel
clone不下来可以直接从我上传的文件里下载
robot_localization功能包
从github克隆的包不能直接使用,还需要安装下面两个依赖
sudo apt-get install ros-eloquent-geographic-msgs
sudo apt-get install ros-eloquent-launch-testing-ament-cmake
安装完成之后进入robot_localization进行编译,编译完成之后就可以使用了
4.使用教程
robot_localization包集成度已经很高了,我们需要做的就行改改参数就好了,下面是需要修改的内容,我已经把每行代码都打上了中文注释,可以按需修改
1.ekf.launch.py包
# 导入所需的库和模块

from launch import LaunchDescription              # 导入 LaunchDescription 类
from ament_index_python.packages import get_package_share_directory   # 导入 ament_index_python 库的 get_package_share_directory 函数
import launch_ros.actions                        # 导入 launch_ros 库的 actions 模块
import os                                        # 导入 os 库
import yaml                                      # 导入 yaml 库
from launch.substitutions import EnvironmentVariable  # 导入 launch.substitutions 的 EnvironmentVariable 子模块
import pathlib                                   # 导入 pathlib 库
import launch.actions                            # 导入 launch 库的 actions 模块
from launch.actions import DeclareLaunchArgument  # 导入 launch.actions 的 DeclareLaunchArgument 类

def generate_launch_description():
    # 创建 LaunchDescription 对象,用于描述整个启动文件
    return LaunchDescription([
        # 启动 robot_localization 包中的 ekf_node 可执行文件作为节点
        launch_ros.actions.Node(
            package='robot_localization',                      # 节点所在的 ROS2 包名
            node_executable='ekf_node',                         # 节点的可执行文件名
            node_name='ekf_filter_node',                        # 节点名称
            output='screen',                                    # 节点输出到屏幕
            parameters=[os.path.join(get_package_share_directory("robot_localization"), 'params', 'ekf.yaml')],  # 从 ekf.yaml 文件中读取节点参数
           ),
    ])
2.ekf.yaml包
ekf.yaml保存的是要进行数据融合的传感器的参数,这里我只用到了里程计和imu的融合,我的里程计的话题和imu的话题分别为
| 里程计(odom) | /odom |
|---|---|
| imu | /mobile_base/sensors/imu_data |
下面是我自己修改的配置文件,供大家参考
### ekf config file ###
ekf_filter_node:
    ros__parameters:
# The frequency, in Hz, at which the filter will output a position estimate. Note that the filter will not begin
# computation until it receives at least one message from one of the inputs. It will then run continuously at the
# frequency specified here, regardless of whether it receives more measurements. Defaults to 30 if unspecified.
        frequency: 20.0

# ekf_localization_node and ukf_localization_node both use a 3D omnidirectional motion model. If this parameter is
# set to true, no 3D information will be used in your state estimate. Use this if you are operating in a planar
# environment and want to ignore the effect of small variations in the ground plane that might otherwise be detected
# by, for example, an IMU. Defaults to false if unspecified.
        two_d_mode: true

# Whether to publish the acceleration state. Defaults to false if unspecified.
        publish_acceleration: false

# Whether to broadcast the transformation over the /tf topic. Defaults to true if unspecified.
        publish_tf: true

# 1. Set the map_frame, odom_frame, and base_link frames to the appropriate frame names for your system.
#     1a. If your system does not have a map_frame, just remove it, and make sure "world_frame" is set to the value of odom_frame.
# 2. If you are fusing continuous position data such as wheel encoder odometry, visual odometry, or IMU data, set "world_frame"
#    to your odom_frame value. This is the default behavior for robot_localization's state estimation nodes.
# 3. If you are fusing global absolute position data that is subject to discrete jumps (e.g., GPS or position updates from landmark
#    observations) then:
#     3a. Set your "world_frame" to your map_frame value
#     3b. MAKE SURE something else is generating the odom->base_link transform. Note that this can even be another state estimation node
#         from robot_localization! However, that instance should *not* fuse the global data.
        map_frame: map              # Defaults to "map" if unspecified
        odom_frame: odom          # Defaults to "odom" if unspecified
        base_link_frame: base_footprint  # Defaults to "base_link" if unspecified
        world_frame: odom           # Defaults to the value of odom_frame if unspecified

        # odom0: /odom_diff
        # odom0_config: [true,  true,  true,
        #                false, false, false,
        #                false, false, true,
        #                false, false, false,
        #                false, false, false]
        odom0: /odom
        odom0_config: [false,  false,  false,
                       false, false, false,
                       true, true, false,
                       false, false, true,
                       false, false, false]

        imu0: /mobile_base/sensors/imu_data
        imu0_config: [false, false, false,
                       false,  false,  true,
                      false, false, false,
                      false, false, true,
                      true, false, false]
修改完上述文件后重现编译然后执行下面这条指令
ros2 launch robot_localization ekf.launch.py
二、cartographer
1.介绍
Cartographer是Google开源的一个可跨多个平台和传感器配置以2D和3D形式提供实时同时定位和建图(SLAM)的系统。为了达到一个更好的建图效果,我们使用了robot_localization包,对IMU和里程计的数据进行融合,并将其发布,使得cartographer的建图效果更上一层楼。且基本上不会出现漂移等问题
2.使用环境
ubuntu 18.04 ros2 eloquent
3.安装教程
ros2的eloquent版本可以直接安装Cartographer
sudo apt install ros-eloquent-cartographer
sudo apt install ros-eloquent-cartographer-ros
安装完成之后可以测试是否安装成功
ros2 pkg list | grep cartographer
能看到下面的结果即可
cartographer_ros
cartographer_ros_msgs
4.使用教程
作为一个优秀的开源库,Cartographer提供了很多可以配置的参数,虽然灵活性提高了,但同时也提高了使用难度(需要对参数进行调节配置),
因为我主要使用其进行2D的建图定位,所以我只需要关注2D相关的参数。
Cartographer参数是使用lua文件来描述的,不会lua也没关系,我们只是改改参数而已。
ros2 eloquent cartographer会下载到电脑的路径为/opt/ros/eloquent/share/cartographer_ros/configuration_files/
1.backpack2d.lua文件
下面是我自己修改的配置文件,供大家参考
include "map_builder.lua"
include "trajectory_builder.lua"

options = {
  map_builder = MAP_BUILDER,
  trajectory_builder = TRAJECTORY_BUILDER,
  map_frame = "map",
  tracking_frame = "base_footprint",
  published_frame = "odom",
  odom_frame = "odom",
  provide_odom_frame = false,
  publish_frame_projected_to_2d = true,  -- 启用生成最新帧 ID 的功能
  use_odometry = true,
  use_nav_sat = false,
  use_landmarks = false,
  num_laser_scans = 1,
  num_multi_echo_laser_scans = 0,
  num_subdivisions_per_laser_scan = 1,
  num_point_clouds = 0,
  lookup_transform_timeout_sec = 0.2,
  submap_publish_period_sec = 0.3,
  pose_publish_period_sec = 5e-3,
  trajectory_publish_period_sec = 30e-3,
  rangefinder_sampling_ratio = 1.,
  odometry_sampling_ratio = 1.,
  fixed_frame_pose_sampling_ratio = 1.,
  imu_sampling_ratio = 1.,
  landmarks_sampling_ratio = 1.,
}

MAP_BUILDER.use_trajectory_builder_2d = true
TRAJECTORY_BUILDER_2D.num_accumulated_range_data = 1  -- 设置子地图中保存的激光数据数量

return options
2.map_builder.lua
下面是我自己修改的配置文件,供大家参考
include "pose_graph.lua"

  MAP_BUILDER = {
   use_trajectory_builder_2d = true, //是否使用2d建图
   use_trajectory_builder_3d = false, //是否使用3d建图
   num_background_threads = 1,			//我使用的是单线程激光雷达
   pose_graph = POSE_GRAPH,
   collate_by_trajectory = false,
   //用于控制是否将数据按照轨迹进行分组。

	//如果将 collate_by_trajectory 设置为 true,则 Cartographer 将会按照每个轨迹的 ID 将数据进行分组。在建图过程中,Cartographer 将每个轨迹的数据单独处理,然后将它们合并到最终地图中。这对于多个轨迹的数据进行建图时非常有用。

	//如果将 collate_by_trajectory 设置为 false,则 Cartographer 将忽略轨迹信息,并将所有数据都视为同一个轨迹进行处理。在这种情况下,Cartographer 会将所有数据合并到一起进行建图,生成一个单一的地图。
  }
3.trajectory_builder_2d.lua
下面是我自己修改的配置文件,供大家参考
-- Copyright 2016 The Cartographer Authors
--
-- Licensed under the Apache License, Version 2.0 (the "License");
-- you may not use this file except in compliance with the License.
-- You may obtain a copy of the License at
--
--      http://www.apache.org/licenses/LICENSE-2.0
--
-- Unless required by applicable law or agreed to in writing, software
-- distributed under the License is distributed on an "AS IS" BASIS,
-- WITHOUT WARRANTIES OR CONDITIONS OF ANY KIND, either express or implied.
-- See the License for the specific language governing permissions and
-- limitations under the License.

TRAJECTORY_BUILDER_2D = {
  use_imu_data = true,
  min_range = 0.,
  max_range = 30.,
  min_z = -0.8,
  max_z = 2.,
  missing_data_ray_length = 5.,
  num_accumulated_range_data = 1,
  voxel_filter_size = 0.025,

  adaptive_voxel_filter = {
    max_length = 0.5,
    min_num_points = 200,
    max_range = 50.,
  },

  loop_closure_adaptive_voxel_filter = {
    max_length = 0.9,
    min_num_points = 100,
    max_range = 50.,
  },

  use_online_correlative_scan_matching = false,
  real_time_correlative_scan_matcher = {
    linear_search_window = 0.1,
    angular_search_window = math.rad(20.),
    translation_delta_cost_weight = 1e-1,
    rotation_delta_cost_weight = 1e-1,
  },

  ceres_scan_matcher = {
    occupied_space_weight = 1.,
    translation_weight = 10.,
    rotation_weight = 40.,
    ceres_solver_options = {
      use_nonmonotonic_steps = false,
      max_num_iterations = 20,
      num_threads = 1,
    },
  },

  motion_filter = {
    max_time_seconds = 5.,
    max_distance_meters = 0.2,
    max_angle_radians = math.rad(1.),
  },

  imu_gravity_time_constant = 10.,

  submaps = {
    num_range_data = 90,
    grid_options_2d = {
      grid_type = "PROBABILITY_GRID",
      resolution = 0.05,
    },
    range_data_inserter = {
      range_data_inserter_type = "PROBABILITY_GRID_INSERTER_2D",
      probability_grid_range_data_inserter = {
        insert_free_space = true,
        hit_probability = 0.55,
        miss_probability = 0.49,
      },
    },
  },
}
4.自己的.launch文件
下面是我自己修改的配置文件,供大家参考
from launch import LaunchDescription
from launch.actions import DeclareLaunchArgument, IncludeLaunchDescription
from launch.conditions import IfCondition, UnlessCondition
from launch.substitutions import LaunchConfiguration
from launch_ros.actions import Node
from launch_ros.substitutions import FindPackageShare
from launch.launch_description_sources import PythonLaunchDescriptionSource
import os

def generate_launch_description():

    ## ***** Launch arguments *****
    # 是否使用仿真时间,真实的机器人我们不需要,设置为False
    use_sim_time_arg = DeclareLaunchArgument('use_sim_time', default_value = 'False')

    ## ***** File paths ******
    # 找到cartographer功能包的地址
    pkg_share = FindPackageShare('cartographer_ros').find('cartographer_ros')
    ## ***** Nodes *****
    #=====================声明三个节点,cartographer/occupancy_grid_node/rviz_node=================================
    cartographer_node = Node(
        package = 'cartographer_ros',
        node_executable = 'cartographer_node',
        arguments = [
            '-configuration_directory', FindPackageShare('cartographer_ros').find('cartographer_ros') + '/configuration_files',
            '-configuration_basename', 'backpack_2d.lua'],
        remappings = [
            ('odom', '/odometry/filtered')
            ],

        output = 'screen'
        )


	# 可视化节点
    # rviz_node = Node(
    #       package='rviz2',

    #       node_executable='rviz2',
    #       name='rviz2',
    #       output='screen')

    cartographer_occupancy_grid_node = Node(
        package = 'cartographer_ros',
        node_executable = 'occupancy_grid_node',
        parameters = [
            {'use_sim_time': False},
            {'resolution': 0.05}],
        )

    return LaunchDescription([
        use_sim_time_arg,
        # Nodes
      #  rviz_node ,
        cartographer_node,
        cartographer_occupancy_grid_node,
    ])
remap标签将节点的输入话题/odom重映射到/odometry/filtered,以便Cartographer节点可以正确接收odom数据。
激光雷达+融合后的odom进行的2D建图需要修改的内容应该就这么多了
总结
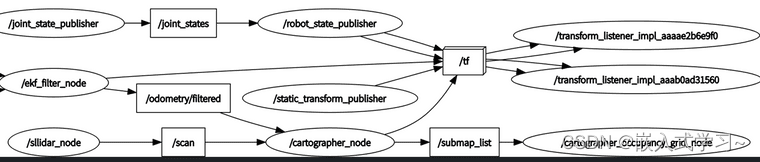
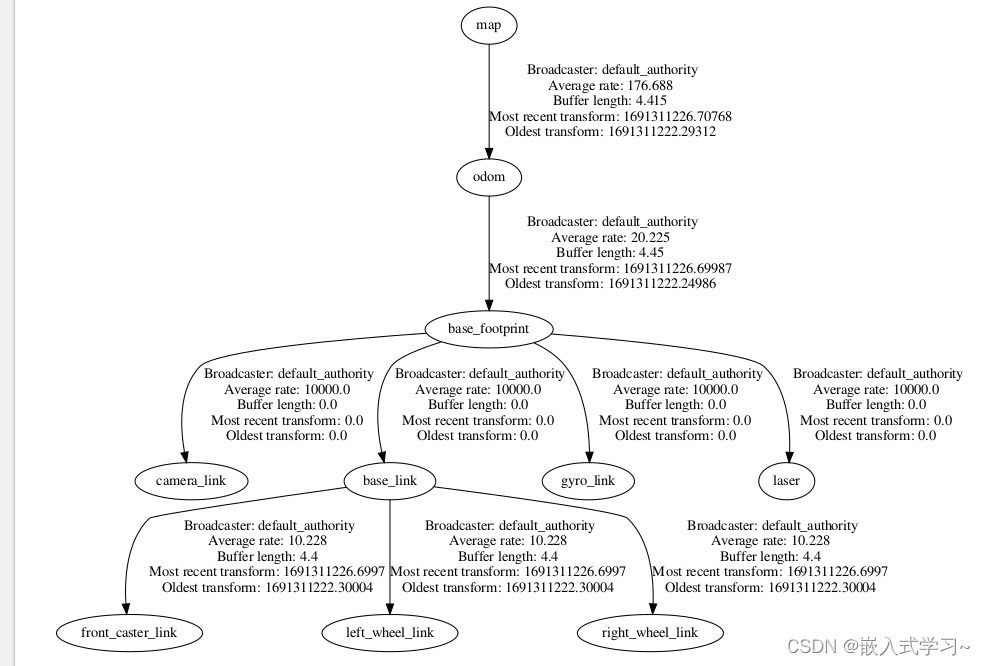
最后给大家看一下我的rqt_tree和tf树
rqt_tree
tf树


 1164
1164

 被折叠的 条评论
为什么被折叠?
被折叠的 条评论
为什么被折叠?
 到【灌水乐园】发言


